Search the Community
Showing results for tags 'vehicle'.
-
Hello and welcome to my tutorial. It covers full workflow of vehicle creation for PZ. If you are a complete beginner in 3D modelling, you'll have to watch/read additional tutorials, I won't cover every aspect of model creation and 'where this button is located'. I divide vehicle creation in these stages: 1) Modelling 2) Wheels texture and modelling 3) Texturing 4) Packing files in folders 5) Editing scripts and .lua 6) In-game editing and tests 7) Workshop publish STAGE 1 - MODELLING Today I am creating a 1960 Ford Falcon I prefer using blender as it is my everyday 3d modelling software. Now, find references for your vehicle and ideally it will be a blueprint/outline scheme, like this one: There are some tips in modelling for PZ: 1) Do not care too much about topology and good shading. There is no actual shading in game, only windows have reflections. 2) Avoid n-gons or triangulate them before export 3) DO NOT make edges to outline body panels/parts. All dividing of parts will be done with texture mask. You can do it in UVs if there will be a point for that. 4) Place spindiel imitations in wheel wells to hide rear part of wheel models 5) In the UVs parts of body have to be straight-oriented without any non-90 degrees rotation, so pixels in texture will lay parallel with polygon flow. 6) To avoid physics artifacts in game import model of one of vanilla game cars models to your scene and model in consistent scale. Or import mine, that is available in the end of topic. This is what I consider a well done model There is nothing special in UV unwrapping process, just remember to place the least amount of seams possible and keep island aligned. Here are the UVs of my model: I've unwrapped the model without applied mirror modifier, so now we will have to texture just one half of the car. I'll fix mirroring later. STAGE 2 - WHEELS There are many ways to make a wheel and texture it, but I'll show the most efficient one. Make the wheel's face with simple materials, but unwrap the 'road touching part' to flat surface, like this: Then place an orthographic camera facing the wheel, scale it to fit the whole wheel-dish. Place a ring with emission material to light the wheel. Switch your renderer to Cycles and go to camera view, now use a rendered shading mode to adjust materials and lights to your taste. Set rendering resolution to something like 120x120-175-175 for best results Check the 'transparent' box in film settings to have alpha backround in texture: Now increase the sample count to something like 512-1024 and hit render. You will end up with a result of a ready-to-go wheel texture: The example file with scene for rendering and the model of this wheel you can download here: *google drive .blend file* Now make a lowpoly model of the wheel to use this texture on. I prefer using 18-24 edge circles for wheels. The unwrapping will be later, but eventually you'll end up with this: This method takes 10-15 minutes when you get used to it and gives a stunning and clear result. STAGE 3 - TEXTURING NOTE: I use a pretty complicated way of texturing and adding light to model. All rules of using textures the default way are covered in "HOW TO CREATE NEW VEHICLE MODS" topic by RingoD123, one of PZ devs. You can access it here: *boop* I'll show you my way, using Substance Painter to apply lighting and fake chrome parts to model. But first comes the base color and details of the car, so let's dive into it. Create a texture with 0 alpha and resolution 256x256. You can go for 512x512, but personally I like pixelated look of lo-res texture. Here are the settings for initial image: To preview the texture you are painting with different car colors, use this node setup. But switch filtering mode from "Linear" to "Closest", I forgot to do it on screenshot. There are two types of texture details: somewhat transparent and absolutely opaque. Half-transparent parts will be affected by car color, so they are mostly shadow/highlight details. Headlights, fixtures and things like that have to be opaque and painted with 100% brush hardness. It is easier to keep 3d view just to see what are you doing and paint texture in image editing mode, right there: First, paint the outlines of doors and other opening parts. Here are some brush hardness values: 0.2 - Outline shadow 0.5 - Outline 1.0 - Fake chrome and rubber window sealing Some work in progress screenshots Now when you have windows frames, save the image you just painted and go to photoshop and mask out glass sections like that Well, time for Substance Painter. You can use photoshop gradients for windows and blender lighting for lighting of the body, but I'll use SP "Baked lighting" filter for that, and for chrome especially. I will briefly describe what I've done in SP: 1) Mask out windows, give them mirror metal material and add a filter to them 2) Mask out chrome parts, made them mirror metal and added the same filter with slightly different settings. 3) Apply the same filter to all body parts left. 4) Add a position gradient to the windows Now I have this result, it is not shaded model, just basecolor: Also export the AO map you baked in SP. You can download file with this scene to look through and get ideas using this link: *boop* Now paint additional details you want on the car and open Photoshop. This is your layers layout: Now save it as .psd for future color editing and as .png to see what the you've done. Plug .png direcly as BaseColor in shader settings. Set your shading setting like this: And check if everything looks ok. This is my result: And this is the vehicle's look with wheels that we made before Sweet, isn't it? Now, it is time to get rid of mirroring. You can make new UV, bake it and... get A LOT of offset artifacts resulting in jagged pixel edges. There is a lazy but effective method: 1) In the UV editor place cursor in the 0,0 coordinates. 2) Set Pivot to 2D cursor: 3) Scale all UV islands to 0.5 EXACTLY 4) Apply mirror modifier to your model. Now select FACES of any half of the model and move it in UVs on Y by value 0.5 EXACTLY or you'll eventually mess everything up. 5) In Photoshop expand canvas of your PSD file we made before 6) Duplicate everything and move to the upper left corner, like in UVs. You can merge color layer(s) to operate color on export more easily. Now you have half of the texture empty... You do not want to waste it, right? Then drop in the wheel texture here without scaling, and you won't need additional texture file for it! 7) Create a layer beneath all others and paint it black or grey to cover alpha-holes in the textures. 8 ) Now unwrap the wheel to this new texture and let it shine! We painted the car and fixed mirroring. DOWNLOAD THE .PSD FILE: *bloop* There are 3 more types of textures to make: 1) Rust 2) Damage (1 or 2 levels, I'm lazy, I prefer using single one) 3) ID Color Mask or just Mask It wasn't possible to make them right with mirroring. Everything about these textures are explained clearly in Ringo's guide, again: *boop* I'll just show results I ended up with. Now you have to use 512x512 clear images for these textures, do not forget it. RUST Painted it with jitter brush and 0.2 hardness. To see what I am doing used the same node setup, as for base texture. DAMAGE Painted gradients with black and white with 0.1 hardess with repetitive strokes. MASK Mask texture tells game where are separate parts of car: doors, windows, lights and others. Every part has it's own color in palette, you can find color table in Ringo's guide. Copy and paste color HEX to use it in blender brush or fill tools. I've missed some of the parts because they do not really matter. AEUGH Texturing is finished. Go to photoshop and make all color variations you want and save them as .png, name them Vehicles_[vehicle name]_ Vehicle name mustn't containt spaces These are color palettes of my car: Now you have to export your vehicle body and wheel models. Copy them to an empty scene and save as separate file. If you used blender default orientations (front, back, right, left, top), then rotate the car on Z axis by 180 degrees. Game rotates it for some reason, so you'll have to do it. Now position everything in scene like this and continue to export settings. Export body and wheel separately with these settings: STAGE 5 - Packing files in folders The folder hierarchy and naming the files you can find in Ringo's guide. The mod file and all of my project files you will be able to download in the end of this topic. make up an Id name for your car. It has to be short, but unique and do not contain spaces. For this car I use '60falcon'. _____________________________________________ workshop.txt properties of the mod for Steam Workshop _____________________________________________ mod.info properties of the mod for in-game mod menu _____________________________________________ models_X folder -> vehicles this folder contains 3d meshes of the vehicle - body and wheel _____________________________________________ textures -> vehicles easy to guess, all vehicle textures are placed here null.png - completely transparent image, used as placeholder later on _____________________________________________ scripts -> vehicles there shoud be a .txt file named with you vehicle's ID name. Open it up and follow these instructions: change invertX to 'TRUE' if vehicle appears to be mirrored by left and right in game. Do not care about scale, offset and other geometric parameters. Insert all your color variation textures as shown below: All vehicle driving parameters are self-explanatory. Remember to set seats count, I'm creating a car with 4 seats. If you want to make less seats or add new, delete passenger[Seat code] records or add new. Also remember Seat[position] records down below. Add or delete the templates, loaded from Game default files: _____________________________________________ LUA SCRIPTS lua -> server -> vehicles -> [car id name]dis.lua Vehicle trunk type distribution file. There is a file with all vehicle distribution types in game files, I'll put it in project folder in the end if the article. This is game files distibution types, select one of them in respect to the vehicle type you are creating. I'll use CarNormal type for Ford Falcon. This is what distribution lua file has to be: _____________________________________________ lua -> shared -> [car id name]SpawnList.lua This file describes spawn zones of your car in game world with certain chance. I've typed in all default zones of spawn, you just have to change the chance and set [Base.60falcon] to [Base.(your car id name)] _____________________________________________ lua -> shared -> Translate -> EN -> IG_UI_EN.txt This is the name of the car in UI - keys name, mechanics window name and such. STAGE 6 - In-game editing and tests Launch PZ and disable all mod exept the one you will be debugging. Now close the game and go to Steam. In application setting set startup parameter to -debug It enables many debug options in-game. Now launch the Game again and, if menu doesn't appear, you've done something wrong in lua scripts. Check them for probles, and I hope, you'll figure out what is wrong. Now start a new game in world with no zombies and big amount of cars. Leave the house and find any car vibing in the street. Right click, -> Vehicle -> Set Script -> [your car ID name]. Car will switch to yours. This is what I've got on first time in-game spawning: YEET, it is all coming along. But wheel positions are a bit off, and we have to place the entering areas of doors. Go to Right click on car -> [DEBUG] Vehicle -> Vehicle Editor. Chassis Place extents and physics shape to outline the car Areas These are access areas to different parts of the car. There is nothing to describe, really, just place them where you can explain it and continue to next section Right click in mechanics tab to enable cheat options for the car. Now right click in mechanics panel. Here you can get key for that car or repair it. Final result in different variations Make a suitable preview image for your mod and crop it in Photoshop to 256x256. Place it in mod folder as preview.png In game menu go WORKSHOP -> create or update mod -> Go to your profile workshop items and find the new mod. Add the description, more screenshots and set visibility to 'Public' ALL PROJECT FILES: *YEET* ZE END Congratulations if you followed my guide to this point. Comment any issues or mistakes I've made.
-
I'd like to create a mod to repair vehicle parts. I know that there is already a mod there. https://steamcommunity.com/sharedfiles/filedetails/?id=1558779191 But I would like to make it as realistic as possible. Therefore, I wonder what is the real difficulty of repairing auto parts? And how can this be done most nice and neat in terms of game design?
-
My suggestion is that the vehicle access "area" in build 41+ is made easier to engage with. Either by allowing access when not completely facing the vehicle or by making it slightly bigger, especially on 2 door vehicles. With the new animations and sluggish turning when your going anything faster than a slow amble it's awkward to make sure you hit the right spot. Might just be me and if so 😔 I'll assume it'll remain the same and I'll make sure I'm never in a hurry to enter my vehicle. But wanted to post as this has happened to me a few times and when you have start again because you couldn't open a door when moving what I consider slow, can be a bit of a pain. Here is the scenario: You picked up a bit more heat than you expected on a loot run and are now high tailing it back to your pimped out ride. Should be a simple crouched jog back over the road and jump into your sweet ride and off into the sunset you got. However you've a bit of momentum and overshoot it!! 😱 Now you cannot enter the door, no drama I'll step back and then..... Run past it again!?! At this point I'm questioning my characters mental aptitude, and 💩ing my pants as it only takes a Zed to stroke your back in Apocalypse and you're all but dead. So with lighting wit Run around the vehicle to the other side only to have to same thing happen again 🤬 Now obviously the best fix is to not run towards your vehicle. However when you have a 7+ Zeds on your tail in a tight group with more following behind, walking isn't always possible. Interested to hear others experiences with this.
-
 I'm not sure if this is a bug with LuaManager or if I'm doing something wrong, but calling addVehicle spits out an invocation error on 41.21. The vehicle seems to be spawned correctly, but it disappears when the player leaves the cell. On Build 40 neither the error nor the despawning occurs. Code to replicate the error: addVehicle("Base.SmallCar") -- spawns a Chevalier Dart The error:
 -
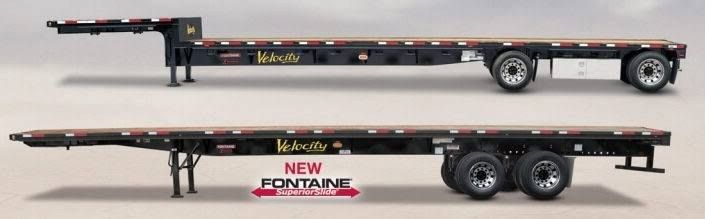
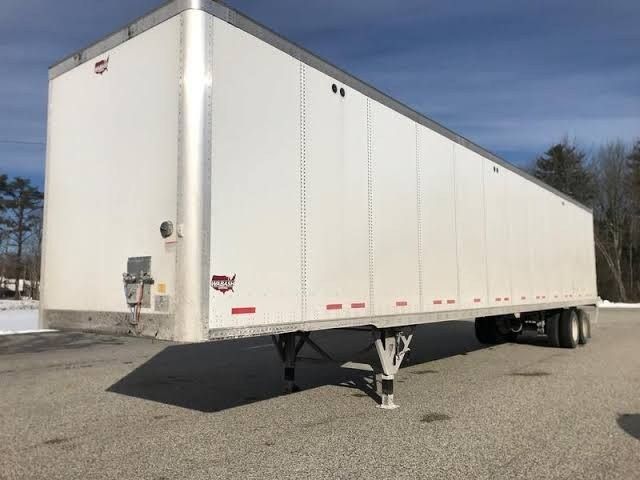
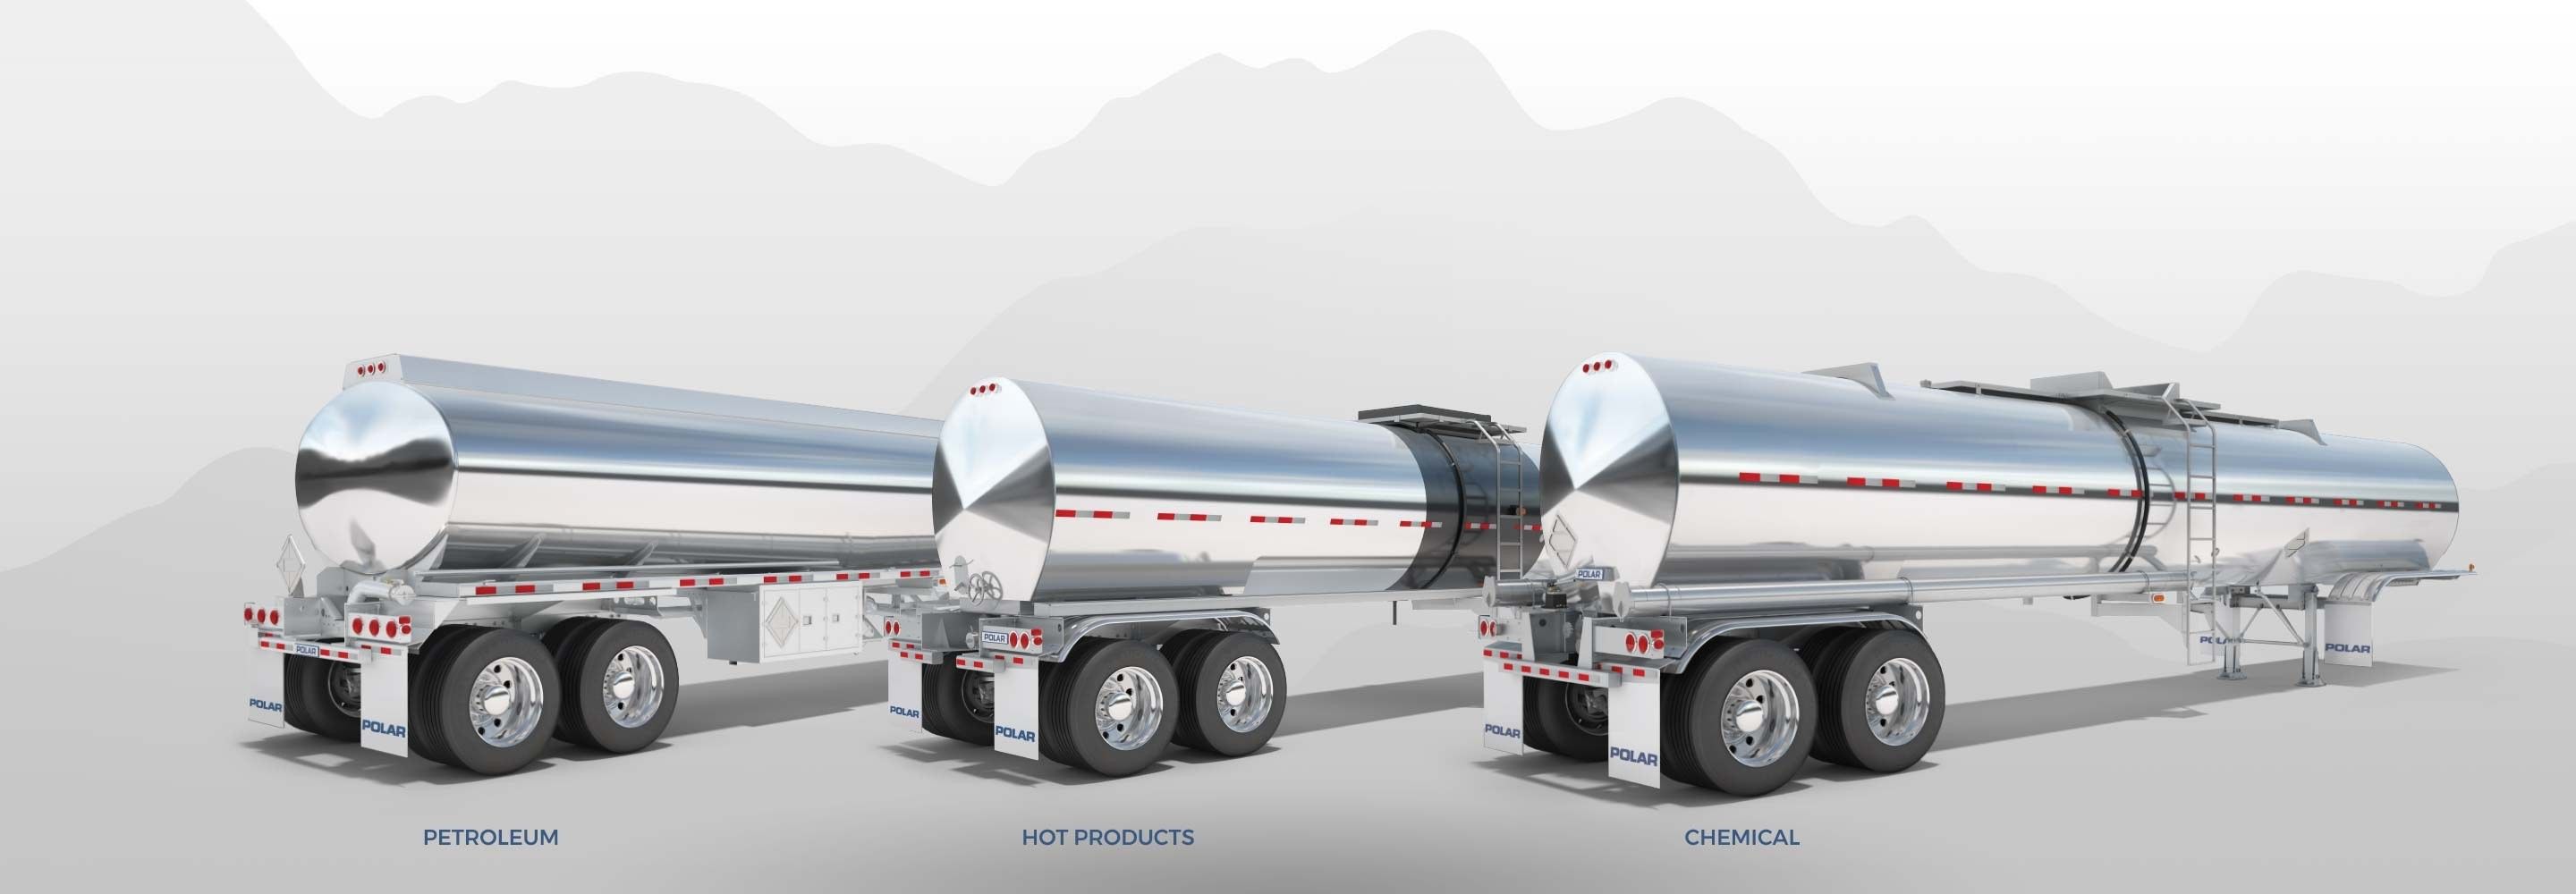
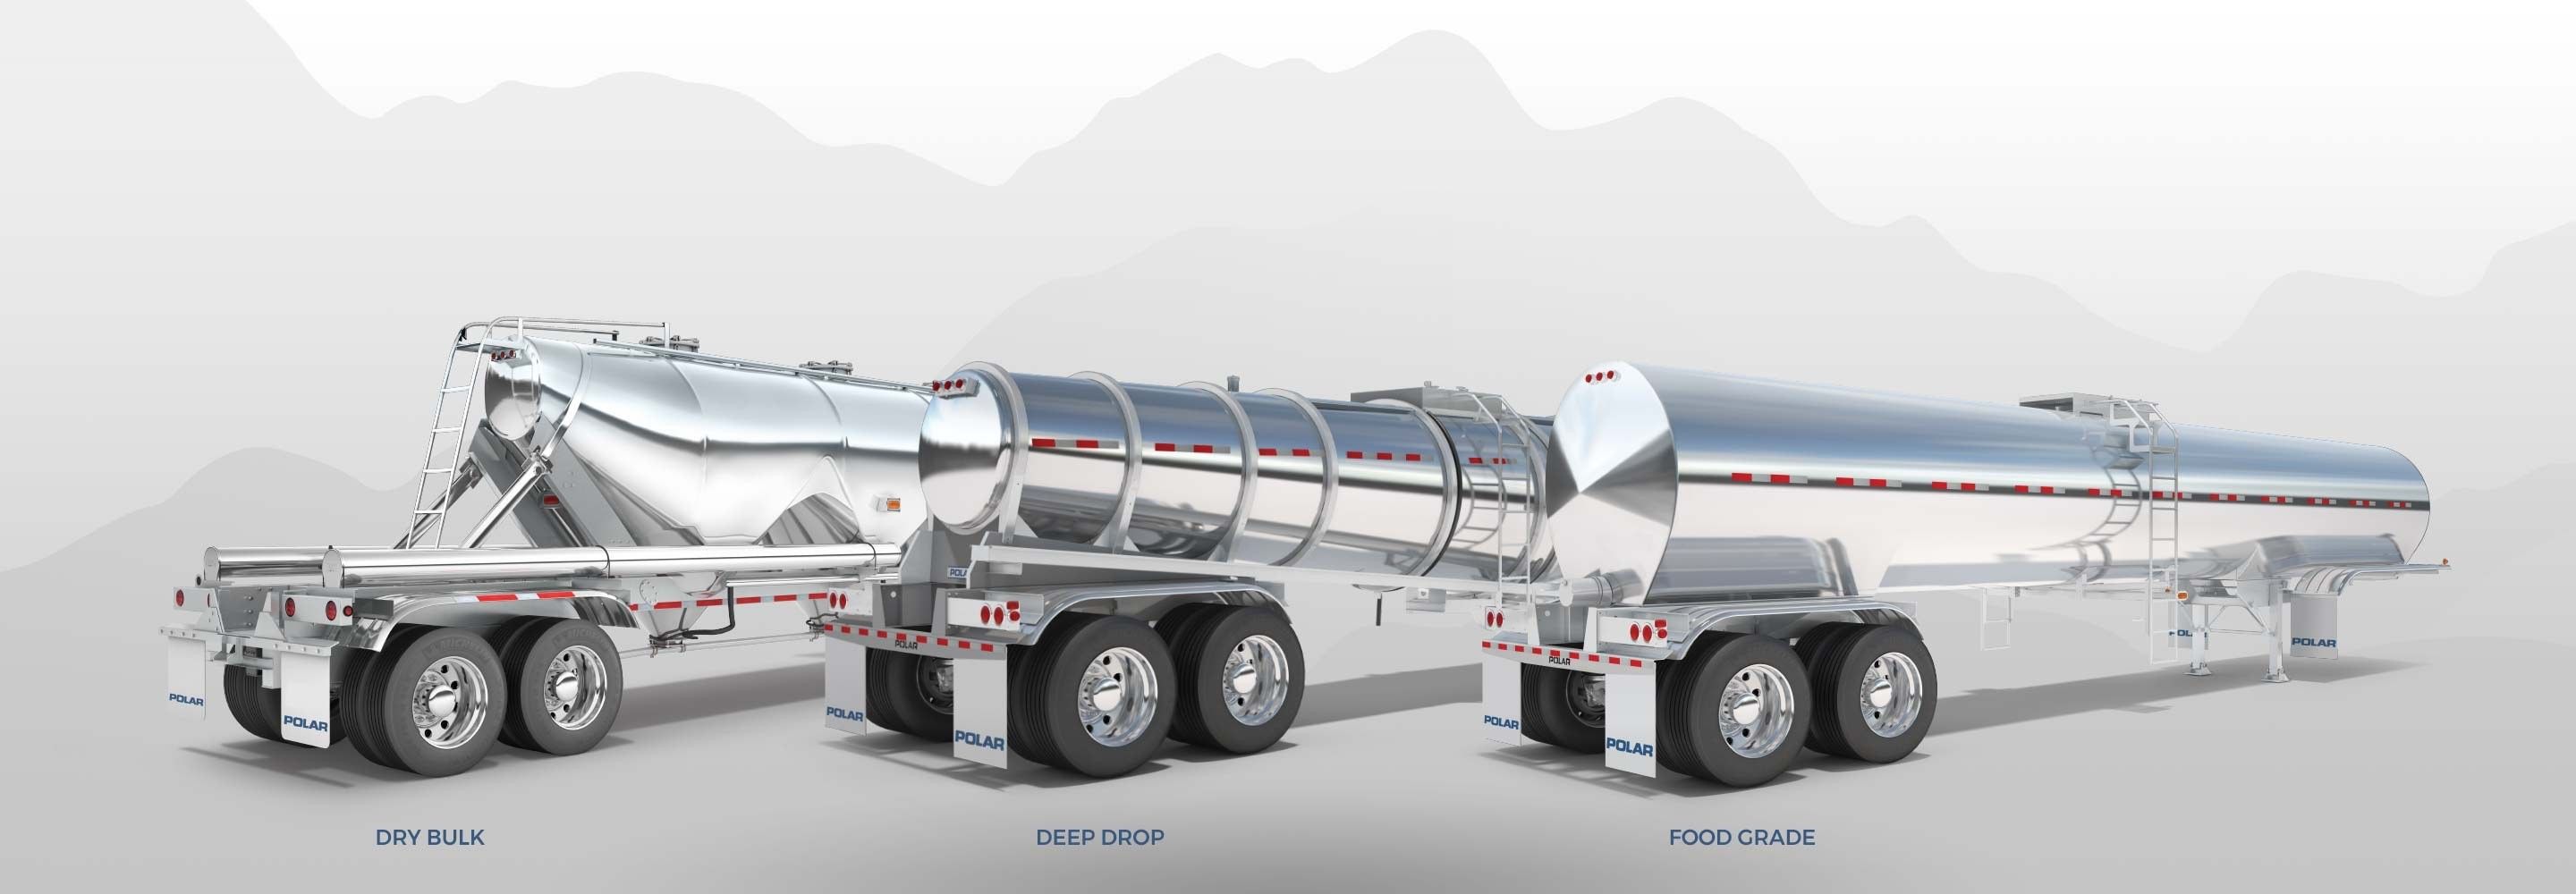
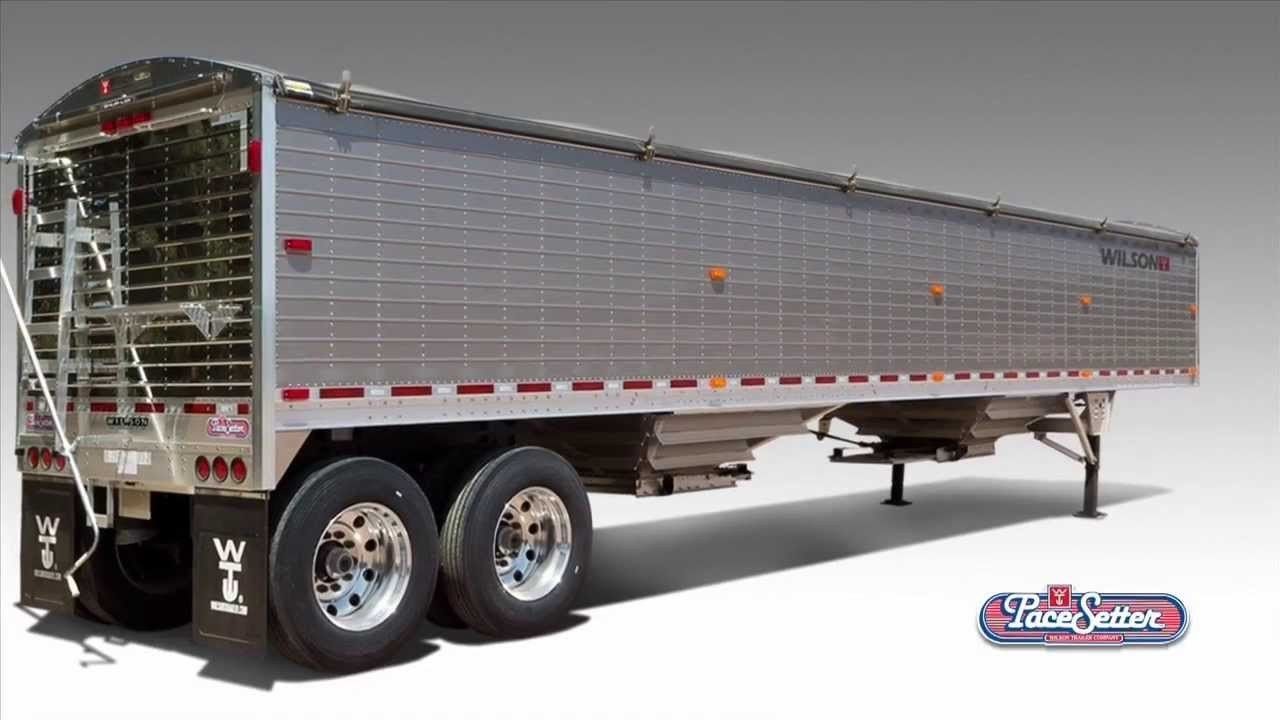
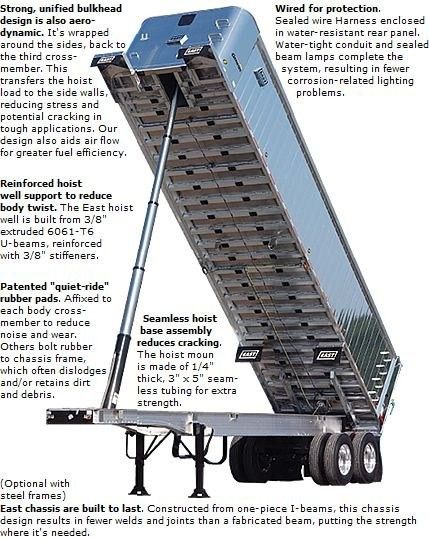
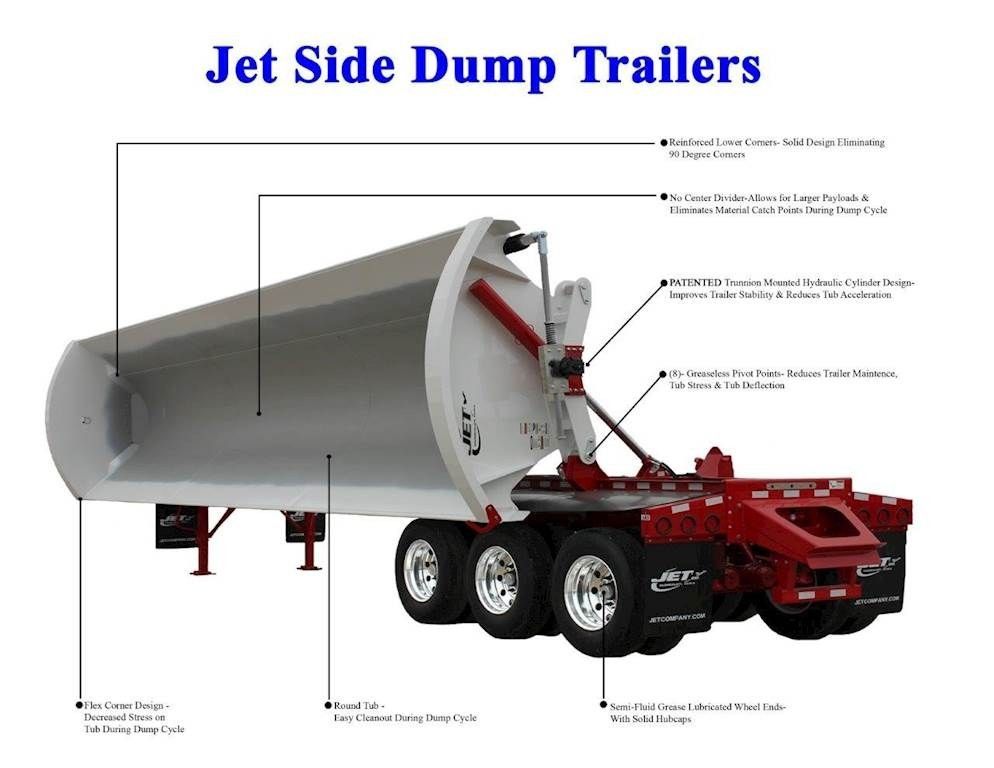
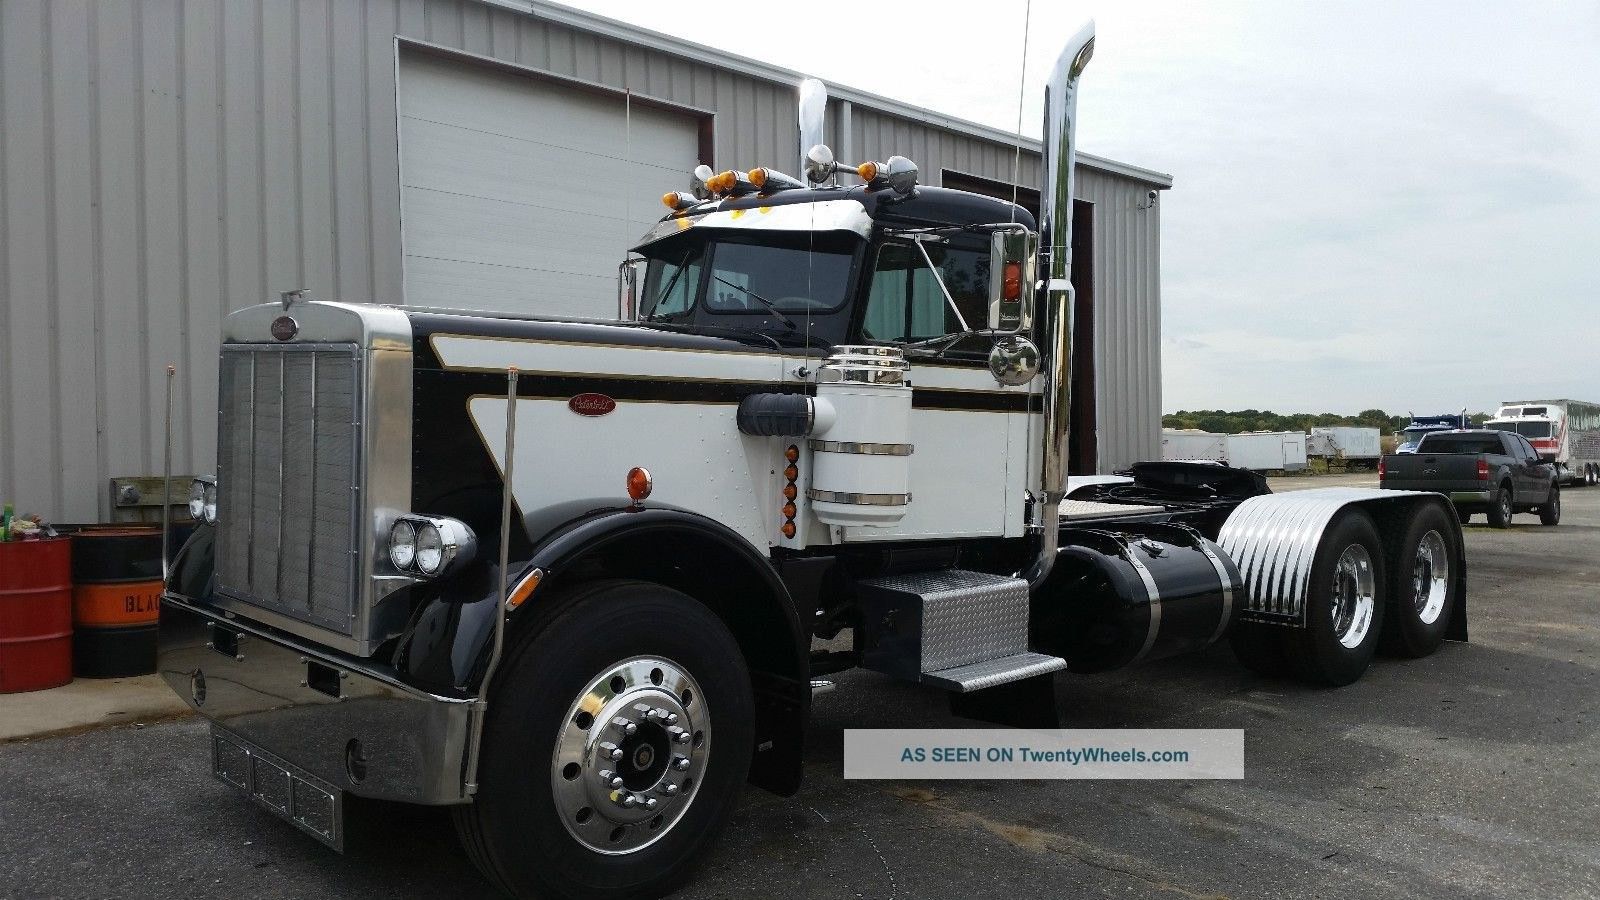
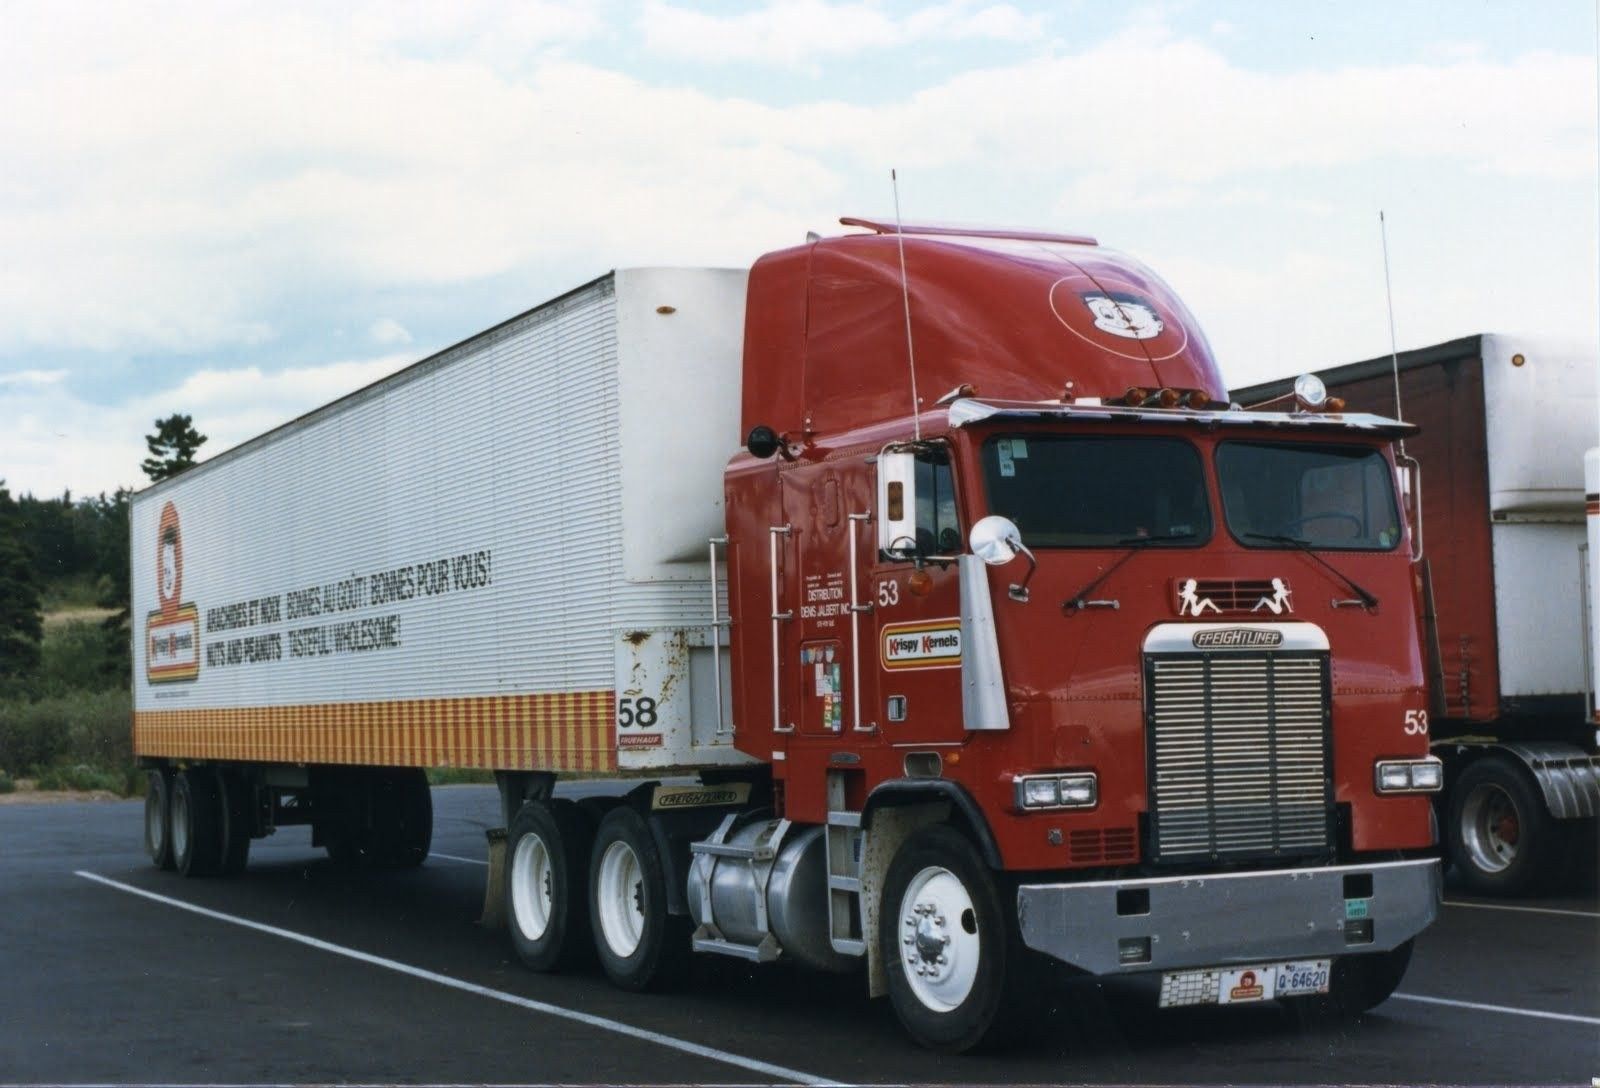
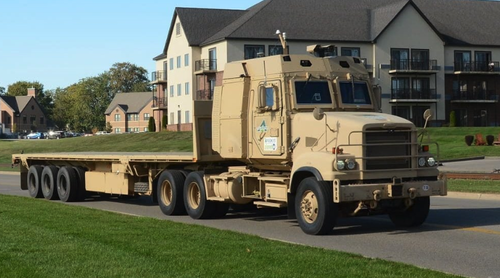
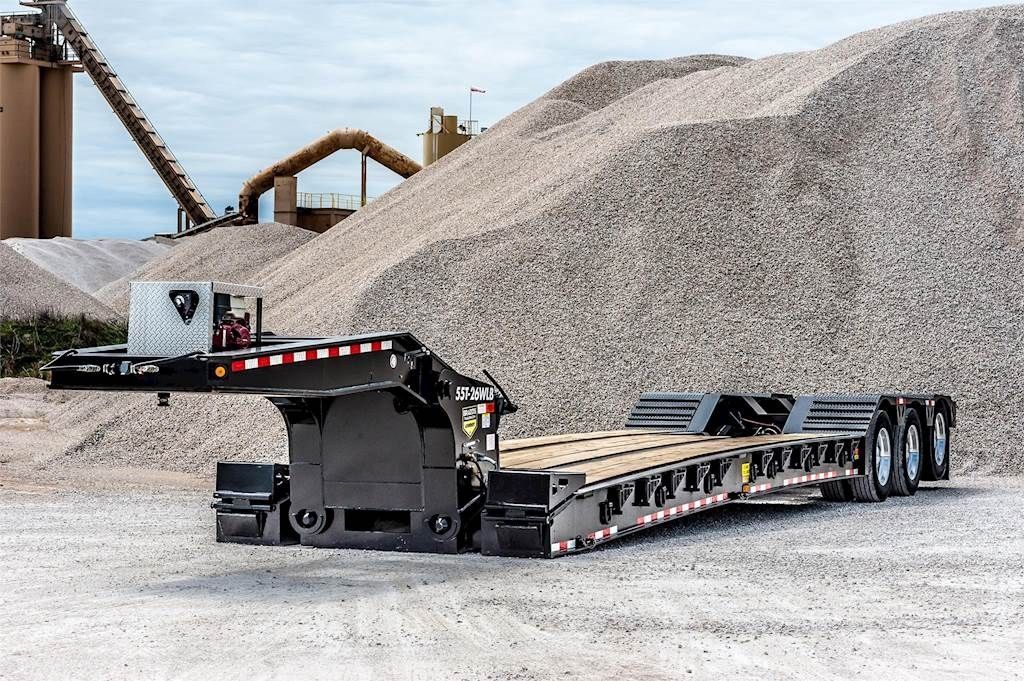
TRUCKS Since this is set in America, this should have one of the most iconic things America has, and it is its long nosed Diesel semi trucks. These trucks would have a lot of use for players that wants to live the travelling nomad life, they would be safe in a large truck with a Sleeper behind.(A Sleeper is a the part of the truck where Truckers sleep, eat and entertain themselves). It would also give a lot of utility to communities if the time ever comes to Multiplayer where large groups of players have banded together with NPCs. These trucks could be their lifeline in supplies themselves or blockading a street. The challenge in having a truck in the Apocalypse would be: Repairing it and up keeping it. Trucks have larger tires than normal cars, so after a while, finding replacement wheels would be extremely hard(Trucks usually have 22.5 tires). Refueling a truck could take a lot of effort. For example, a 1980s Peterbilt 359 with a Sleeper and 6X4 Chassis would need at least 300 Gallons per Football Field to be fully refueled. Maintenance would be a nightmare as trucks do not have usual parts that you could use on cars and you would need to find a Truck shop to get the proper parts for it. Space, trucks need a ton of space to be stored, so unless you have a warehouse as a Safehouse, you would have to park it in the open, for everyone to see. Lights, trucks have a TON of lights, from the roof of the cab to the sides of the Cab and Sleeper, some would even have Spotlights, old time trucks in the 1980s would have Spotlights and Long Reverse lights attached to the top of their chrome driver and passenger side windows. These bad boys uses 4 car batteries, good luck with that. Majority of trucks use 12 Speed or 18 Speed Eaton Fullers, so the player has a lot of shifts to do to get it up to speed. Some like logging trucks has High and Low gears for Hills and Mountain roads. There are different types of trucks too, Day Cab, Flat top, Cabovers, Logging, Military and Sleepers. Day Cab: A truck that only consists of the Cab, it is shorter and used for local trucking industries as it could fit in almost anywhere and has a smaller turn circle Flat top: One of the most famous types of trucks in the 1980s and early 90's. These trucks has sleepers that has flat roofs. Cabovers: A very old design of trucks used way back then in the 80s and 90s when road regulations on truck length wasn't harsh one many states. Logging: These are the types that could plow through large hordes with ease, they are city trucks equipped for the harsh muddy roads of the Mountains. Large bullbars and headache racks. Mostly seen in Day cab with the headache rack behind the cab to protect the driver from the Logs his hauling. Military: The military uses many types of Civilian trucks converted for military use like the M915A5. A Freightliner converted for Military transport. Day Cab 1978 Peterbilt 359 Flat Top 1984 Peterbilt 359 Cabover 1994 Freightliner FLA Kenworth T800 Logging truck, the thing you see behind the cab is what truckers call "Headache" rack. United States Military M915A5 with a M1015 Flatbed Trailer (If this is too modern, there is always the M35 Semi used way back in the 70s) The benefits would be great for anyone. A truck could travel a thousand kilometers in a single tank, large hordes would be nothing as you just plow through them with a trailer, and it would be good as an intimidation to players on the road or walking along it. But one should always remember that trucks have air brakes, so you cannot just be constantly be tapping the brakes since it would lock and would take a lot seconds of revving up the engine(It is to pump air into the brakes) to unlock. They would also be noisy, and more noisy with the trailer jumping on and on in tight turns or just from speed. TRAILERS In terms of trailers, the usual 48ft Fontaine Flatbed and 53ft Wabash Dry Vans and 48ft Refrigerated Reefers you see everyday should be scattered on Industrial areas, these are their Pros and Cons: They would have large utility, but are hard to use since if you do not have a Semi truck, they cannot be moved. Replacing their tires would also be hard after a Month into the survival since they also use the same size as the Semi trucks. Hooking up a trailer would also be a hard thing if you do not know which airline to attach and how to hitch the 5th wheel. Though the creativity that could spark if you have a 48ft Flatbed, you could turn it into a house, towed battlewagon, and car/parts/object carrier while the Dry Van would serve the same purpose just excluding the battlewagon but instead as troop carrier or a more enclosed house or moving storage facility. The Dry Van could be used as a temporary or permanent blockade since 53ft is a very long length and could block off Highways and entire entrances to towns. The Reefers(Basically large fridges) could be used to freeze captured players to death or store large amount of foods. But it has a Generator and would need to be attached to a Truck to work properly. These trailers has the ability to "slide" their axles to balance out the weight, but since this is the Apocalypse, they'd be just there as an option if you want to slide the Axles backward. Examples: Wabash 53ft Dry Van trailer Velocity Fontaine 48ft Flatbed. The one on top is a Dropdeck with Spread Axles Here is a link to how Axles slide on Dry Vans: Now for the more complex trailers like Bulk tankers and specialized trailers, these should only appear in specified areas like construction sites and Gas stations. There are multiple types of Bulk Trailers and you'd see. I'll just post a picture since it would be complex to explain it all. The examples I'll use are from a Tanker Company named Polar Tanks. I don't know all the liquids they carry but the examples I could give is: Petroleum: Used to store Diesel and other types of Gasses. Up to 80,000lbs. Dry Bulk: Used for Cement and other types of Construction materials that are in liquid form. Chemicals: Used to haul dangerous chemicals from factories and is often called as the most dangerous type of trailer as if one could leak, an entire town could die. I cannot explain the others as my American Truck Simulator knowledge on tankers ends there, you guys might have to ask actual truckers on what they do. Here are more types of trailers: Wilson 42ft Grain Trailer, these should be found in large farms. There is two types of Dump trailers, one that is called "Side" Dump trailer and "Full" Dump Trailer, here are examples: EAST Full Frame Dump Trailer JET Side Dump Trailer And here is an example of a "Lowboy" trailer: JET Tri Axle Lowboy trailer, these are used to haul Construction equipment or just heavy vehicles in general. Thanks for looking into my suggestions! Keep doing great Devs!

-
I've just about clocked my 24th hour on the current IWBUMS build, with 100+ prior plus a handful more from the Kate + Baldspot versions. I'm really enjoying the new mechanics and features so far; the following is a bunch of things I hope to see changed/added. Beyond the list of commonly suggested suggestions (Some of which I will be reiterating), I'm somewhat ignorant of currently planned features and content, so I apologise if any of this already is. Likewise I'm going to ignore developmental constraints and engine limitations for the time being and present everything as I'd like to see it. Where stats and numbers are concerned, in most cases I'm pulling them out my arse for examples' sake. Anything marked with *, even I think might be too complex to be worthwhile Sandbox - Weighted "Random" Zombie attributes, and/or zombie type definitions & Loot Rarity options This is probably the most simple suggestion here, and the one I feel most strongly about so I'll start with it - the customisation options regarding zombies are quite limited. In short, I'd wish for the player to be able to weight each attribute to their pleasing. For example, I could choose for 5% of zombies to have the ability to navigate + use doors, while 10% are sprinters, 20% are blind, etc - making them unpredictable, without having an overwhelming number of zombies with or without X and Y properties. As for zombie type definitions, you create several rulesets and again, weight them for incidence. For example, my Type 1 Zombie constitues 80% of the population, and I go with the standard lore for them. For the remaining 20%, my Type 2 Zombies are weak, blind sprinters with a hightened sense of smell, but they are unable to pass on the infection. This could go so far as to be targeted to existing zombie types, eg. the player could choose for firemen zombies to always be strong, police zombies will always have better eyesight, military zombies will always be sprinters etc but I digress. The same could apply somewhat to vehicles. For example I'd like to be able to set parked cars to either have 0 fuel or 10-100%, and in generally fine condition, but are almost certainly locked and alarmed - While survivor vehicles will be beat up, either out of fuel and/or too damaged to start, and never alarmed Also, being able to allow zombies to use (melee) weapons would certainly be interesting. As for loot rarity settings, I'd like to see them further divided; "Weapons" into Melee, Firearm, Ranged, Ammunition ; "Other" into Medical, Crafting, Books, Electronics etc. Food is fine as it is I suppose. Sound This was pointed out in another thread, but there's quite a disconnect between the sounds the player hears, and those heard by the zombies. Doors opening and closing are, as far as I can tell, completely silent as far as the zombies are concerned, but early on I remember being very hesitant to touch them because I hear them. For this case, the player could have a toggle to open/close doors quietly, taking longer to do so in the latter case. More importantly, I find that it's practically impossible to tell how far north/south a sound is coming from, while East/West seems easy enough. The sound of gunshots seems to travel much further than the player hears. Sounds produced inside or from behind buildings & obstacles are muffled for the player, but I can't tell if this is the case for zombies. If it isn't, I'd hope that changes. Firearms - Dirt vs Condition The most common cause of a firearm malfunctioning beyond mishandling is dirt and debris entering the action, rather than outright damage. Simply enough, firearm condition would take a loooong time to degrade unless they're directly damaged (And the more degraded its moving parts, the quicker it will damage its self) - but firing them, crawling through woodland with them on your person, dropping them and splattering zombie guts all over them would all contribute to increased dirt. At low levels, just water can be used to clean it. But for a seriously gunked-up firearm, it'd necessitate disassembly, cleaning with water and tools, and re-oiling. If we want to go really into depth with it, as if we weren't already, you wouldn't just be able to duct-tape the working parts back into functionality. Rather, you'd be able to strip the components from compatible weapons in the same fashion as the vehicle mechanics currently work; My M16's bolt is damaged - I need to find (or manufacture, good luck?) another. My shotgun's stock is cracked - That I can fix with wood-glue or duct-tape. Where applicable, mechanics, metalwork and carpentry skill would factor in. Suppressors Yes, it's been suggested many times (even by myself) and somewhat definitively shot down, but while I'm here I'd like to reiterate why I think they'd be a positive addition, while addressing some of the misconceptions around them as applied to Zomboid. To get that bit out the way first: A suppressor does not make a firearm truly silent - far from it. All the mods that include them, to my memory, had them completely nullify the volume of a shot. This is uninteresting from a gameplay standpoint in addition to being almost entirely unrealistic. So with that said, what is the need for suppressors in the game? Currently, firearms are in a weird place. In reality, they'd probably be one of the most valuable tools attainable, or at least would appear to be as evidenced by how high novice players especially tend to place them on the priority list. Throughout most of the game however, they're practically irrelevant especially as weapons. If you're in a situation bad enough to warrant their use, firing a few shots is almost always going to make it even worse - the only real exceptions being very remote areas. Ultimately, firearms' utility boils down to them being an on-demand loud noise that can be used to kite zombies away from your intended destination. That is until you've stockpiled enough guns, ammo and if MP/NPCs, people, to use them to clear out the entire cell's worth of zombies that will be attracted to the noise. How would I have them work? -* The noise of a shot is divided into two components - The report (The gunshot its self, the radius surrounding the shooter in which the shot is heard) and the bullet (Noise in direction of fire, extends beyond distance of report radius) - To (poorly) illustrate: - The best suppressor reduces the volume of the report by up to 70%, the distance it travels by up to 60% - dependent on calibre. In other words, the already-quieter and weaker guns would get the most volume reduction; the louder and more powerful a firearm the less benefit a suppressor would convey. - *Subsonic ammunition (where the "standard" round is otherwise supersonic) can be used to decrease the volume of the noise generated by the bullet, whether or not it's suppressed - *at the cost of range and/or damage. - Military/commercial-grade suppressors can be found. Extremely rare, most likely found in military storage/NPCs/zombies - Absolutely minuscule chance of spawning in homes or already attached to firearms - Several levels of improvised suppressors can be crafted, contingent on Metalwork and Mechanics skills - possibly necessitating a skill magazine too - *Military/commercial suppressors are caliber-specific. Crafted suppressors are generic until attached to a firearm. - Suppressors have durability; The more they degrade, the less effective they are (But they will always keep a firearm quieter than otherwise). *The higher the calibre, the more quickly they degrade. A commercial-grade suppressor will last roughly 500 shots before its effectivness bottoms out, while a top-tier crafted suppressor will last roughly 300. - Using a suppressor increases the chance of a firearm malfunctioning and/or increases rate of firearm degradation/dirt gain through firing. *The more crude the suppressor, the greater its influence on degradation/malfunction/dirt. Even with the quietest possible firearm, you wouldn't be able to use it with impunity just because it's suppressed - it'd still be heard for a block or two, but toward the edges of that radius it might not be so loud as to overpower everything else a given zombie is hearing. So for more sparsely populated areas as well as the interior of large buildings, using a firearm becomes much more viable beyond kiting - using a suppressed gun in an emergency would stand a much greater chance of getting you out of it without attracting too much more attention. Bows In the same vein as suppressors, bows and crossbows would make for an interesting addition; Again there would be craftable and non-craftable variants. Compared to (even suppressed) firearms they'd be relatively quiet and more sustainable in terms of ammo consumption. However, they'd be much more difficult to use than firearms, with generally shorter range - though their relative quietness would allow you to gain more experience in practice. I feel like they could use their own set of skills, but that might be going overboard. - Short Bows: Short range, low damage, quietest, decent refire rate, low exertion. Crafting requires beginner carpentry. - Long Bows: Longest range, middling damage, middling volume, slower refire rate, highest exertion. Crafting requires intermediate carpentry. - Crossbows: Middling range, highest damage, loudest, slowest refire rate, middling exertion. Crafting requires intermediate mechanics, beginner metalwork and beginner carpentry. Again, the ability to craft them could be contingent on skill magazines. There could be several varieties of each type, particularly amongst "found" ones, each modifying some of those stats. For example a modern composite bow might be a lot quieter, a modern crossbow pistol might be much faster yet do less damage. I don't know much about archery, but I imagine it's even more bottomless pit of possibilities than I'm presenting here. Vehicle modification & repairs I won't go too into depth with this one, but it essentially boils down to weaponising and up-armouring vehicles. Create a plow and strap it to the front to reduce slowdown and damage caused by mowing down zombies (And humans!), bullbars to reduce collision damage, weld bars across windows and windshields to protect them (reduced visibility?), metal plating on bodywork to protect components and occupants from firearms. Would require metalworking and mechanics skills where applicable. I would like to see the ability to repair bodywork- minor dents would only require a hammer, while more serious damage could be patched over with metal sheets and such. Of course, all that added weight will reduce acceleration, max speed and increase fuel consumption. To go even further with it, you could frankensetein cars together, eg shove a V8 into a hatchback and become an accident waiting to happen. Medical & Physiological I feel like wounds are too easy to disinfect, and antibiotics are a get-out-of-jail-free card should you be unable to disinfect them. I think that for the more persistent injuries you should have to disinfect them multiple times - and regardless, that there should still be a chance of infection dependent on First Aid skill and the quality of dressings, especially if you're still fighting zombies or pissing about in the mud. As for the zombie infection, again I'm aware it's a definitive "no" for a cure, but I feel like giving the player a death sentence with no way to come back from it kinda sucks. Eating plenty could help delay it, amputation could prevent it spreading (but that's a pretty tall order considering the development implications). Beyond that, I think the best compromise would be a drug that can delay it perpetually so long as you have a supply, necessitating a sorta gun-to-your-head approach in getting your next dose. It'd have to be very rare, but maybe there could be a chemistry skill allowing synthesis of this drug at the highest level, with some difficult to acquire/sustain ingredients - in addition to allowing synthesis of disinfectants, medicinal drugs and alcohol. I've also found it a lot more difficult to lose weight in PZ than in reality - I've lost 7kg over the past two months, and as soon as I started maintaining a calorie deficit it started dropping - This doesn't seem to be how it works in-game, with some weird long lag period between not eating and losing the weight. There's no real reason a full day of not eating should not result in weight loss. For relatively minor arm and hand injuries (scratches particularly), I find attack speed is diminished way too much - Adrenaline and the instinct for self-preservation are going to take precedence over keeping such injuries safe in the face of a handful of zombies. I'd rather they diminished accuracy, with only lacerations or anything more serious affecting attack speed. Also rather than the speed of the entire process being reduced, I think it should just be recovery - so the length of time between swings/stabs stays the same, but there's no delay between starting and connecting the attack. Having wounds re-open as a consequence of fighting while injured would give this more depth too, though it could possibly be too frustrating. Improvised Armour & Tailoring As I understand it the protection system is still in its infancy, but again the depth it could go to is endless. Improvised armour could be modifications to existing clothing items, or stand-alone clothing items in themselves. Why not both, beyond the countless hours to code it all and create art? Facetiousness aside, improvised armour would be applicable to each body part that can be damaged. It could be made from all sorts - the heavier the material/larger the piece, the larger the debuffs to movement speed, exertion and/or attack speed dependent on which body part they're worn on, but the greater the protection. So you could be a walking tank but the moment you have to run you're buggered, or you could travel very light and get bitten by the next zombie you encounter, or anything in between. Ballistic protection With armoured vests already in the game and NPCs on the way (or already here with Super(b) survivors, not to mention PvP functionality in MP), ballistic protection has a role to play. Most items that can protect against scratches and bites would likely be useless in the face of a bullet - however some types of improvised (if implemented) or found armour might be better than nothing. Eg. a shot to a flak jacket might cause what would otherwise be a bullet wound to be a bruise. Having both entry and exit wounds possible would also be interesting. Traits Some traits I think should be able to be acquired through gameplay, especially across in-game years, eg. near/far-sightedness, deafness (esp. if you've been in proximity to firearms being shot). As another example, if you smoke too many cigarettes too quickly, you gain the smoker trait; If you abstain, you lose it (after a long time). I feel like athletic, strong, stout and fit shouldn't be traits at all beyond defining your character's starting attributes, and from there would be defined by diet and exercise as with over/underweightedness. Desensitisation could occur after X time in a panic state, with that time lengthened by the Coward trait and shortened by the Brave trait. Professions I feel like some of them are quite lacking - they give you a leg up compared to a traitless, professionless character for sure, but I don't feel like they anywhere near fully reflect the experience someone in that given line of work would really have. For example, I'd imagine a combat veteran to be much more than 20% better than the uninitiated when it comes to all things firearm, and to have some experience with construction, greater aptitude for figuring out improvised explosives. A carpenter by trade would be able to make something much more refined than a bunch of wooden planks assembled into the form of a chair Quality of life/"minor" feature/content wishlist - (Toggle to?) Automatically drop vehicle components when removed - Wheels, brakes, suspension, seats, gas tanks, doors, windows etc. - Allow queueing of constructions eg. walls - Allow all interactions with wounds at all times (assuming I have the requisite supplies) so I don't have to wait for eg. a disinfect operation to complete before I can queue up the bandage. - Almost all clothing items should, imo, provide some scratch and/or bite defence even if it's 1-5% - Leaving car key in ignition drains battery - Skill books renamed to <Skill> for Beginners, <Skill> for Intermediates for better sorting - Maps renamed to Map of <Location> - Annotated maps suffixed with (Annotated). Eg. "Map of West Point (Annotated)" - Welding mask functions as apparrel face item - More options regarding meta events, ie. Frequency, cut-off dates etc. - Generally increase range of firearms - With the Aiming skill given by the Police profession, you can't even attempt a target across a road which I find to be silly. - Different types of belt with greater capacity - Ejecting a magazine from a firearm should not immediately replace it if another is available - Eg. I'll pick up a pistol that I intend to throw away to nick its mag, only to load one I was carrying with me into it - Fix for eating, smoking or otherwise performing animated actions that still allow you to move, the player-character stops every time they change direction. - Aiming/looking/sneaking should be able to be performed while crouched, instead of standing up to do so. - Switching equipped items via the belt possible while sprinting, with a chance of dropping it dependent on All Thumbs/Dextrous trait, and Sprinting skill - Reloading firearms possible while jogging, with a chance of dropping the mag to load dependent on All Thumbs/Dextrous trait and Reloading skill - Bandaging/disinfecting arms, torso and head possible while jogging, with a chance of failure and/or dropping/wasting the bandage/wipe/disinfectant dependent on All Thumbs/Dextrous trait and First Aid skill - A proper equipment/clothing UI, similar to the Medical menu instead of sectioning off part of the existing inventory list - More in-depth categorisation of items, eg. medical supplies, construction/crafting items etc. - The ability to "Loot/Transfer All in Category" when mousing over a given item in container/inventory - Ability to change sandbox settings in SP - Button to leave the current car's key in its glovebox - Keys spawn for ALL vehicles - but they might be on a zombie on the other side of town - or a different town - Vehicle cruise control - Wire Cutters to cut holes in wire fences - Jimmy vehicle door locks with screwdriver, pry locked doors open with crowbar - high chance of destroying the lock, room for a skill/trait to factor in - Reading in darkness takes longer, increases boredom gain - at some point it becomes impossible to read - Reduce exertion of Wood Axe, currently feels more efficient to use regular Axe to chop trees NPC/Meta/Story events - Special Forces/Hazmat teams investigating certain sites, analysing zombie corpses, downloading computer data, extracting VIPs and such - If suppressors ever get in, they'd have them, and they'd shoot survivors on-sight. Good loot on them but practically impossible to kill without an army of your own and/or severe manipulation of the zombie hordes - And that's if you even cross paths with them in the first place. - Helicopter crashlanding - would havefer a decent stock of relatively obscure supplies, at great risk. Could have some more worldbuilding/story items on board. After a given length of time, the wreck could be destroyed and its important contents recovered by aforementioned SF teams - especially if there are survivors of the crash. There could also be civilian variations, a news chopper for example. - Injured/imperiled survivor(s) on ham radio asking for assistance - Survivors intending to rob you, using above as a lure as one option So, that's a big old text dump. There's probably a lot more I could add to this list that currently escapes me. And of what's already here, there will be a lot that each of you will disagree with, but please do mention anything you would really like before you shoot the rest of it down. But beyond that go crazy, it's a lot more effort for the devs to implement any of this rambling than it is for me to think and type it up.
- 2 replies
-
- 3
-

-
- everything
- meta
- (and 13 more)
-
on one of my better runs and found a floating car on the bridge out of west point Also found an acoustic guitar, when equipped two handed it showed as a ghostly outline with no fill. didn't manage to get a picture as i was shortly attacked and it broke after the first 3
-
When I drop items (either by Drop button or by mouse dragging) while sitting in a vehicle the items float above the ground once I drive away.
-
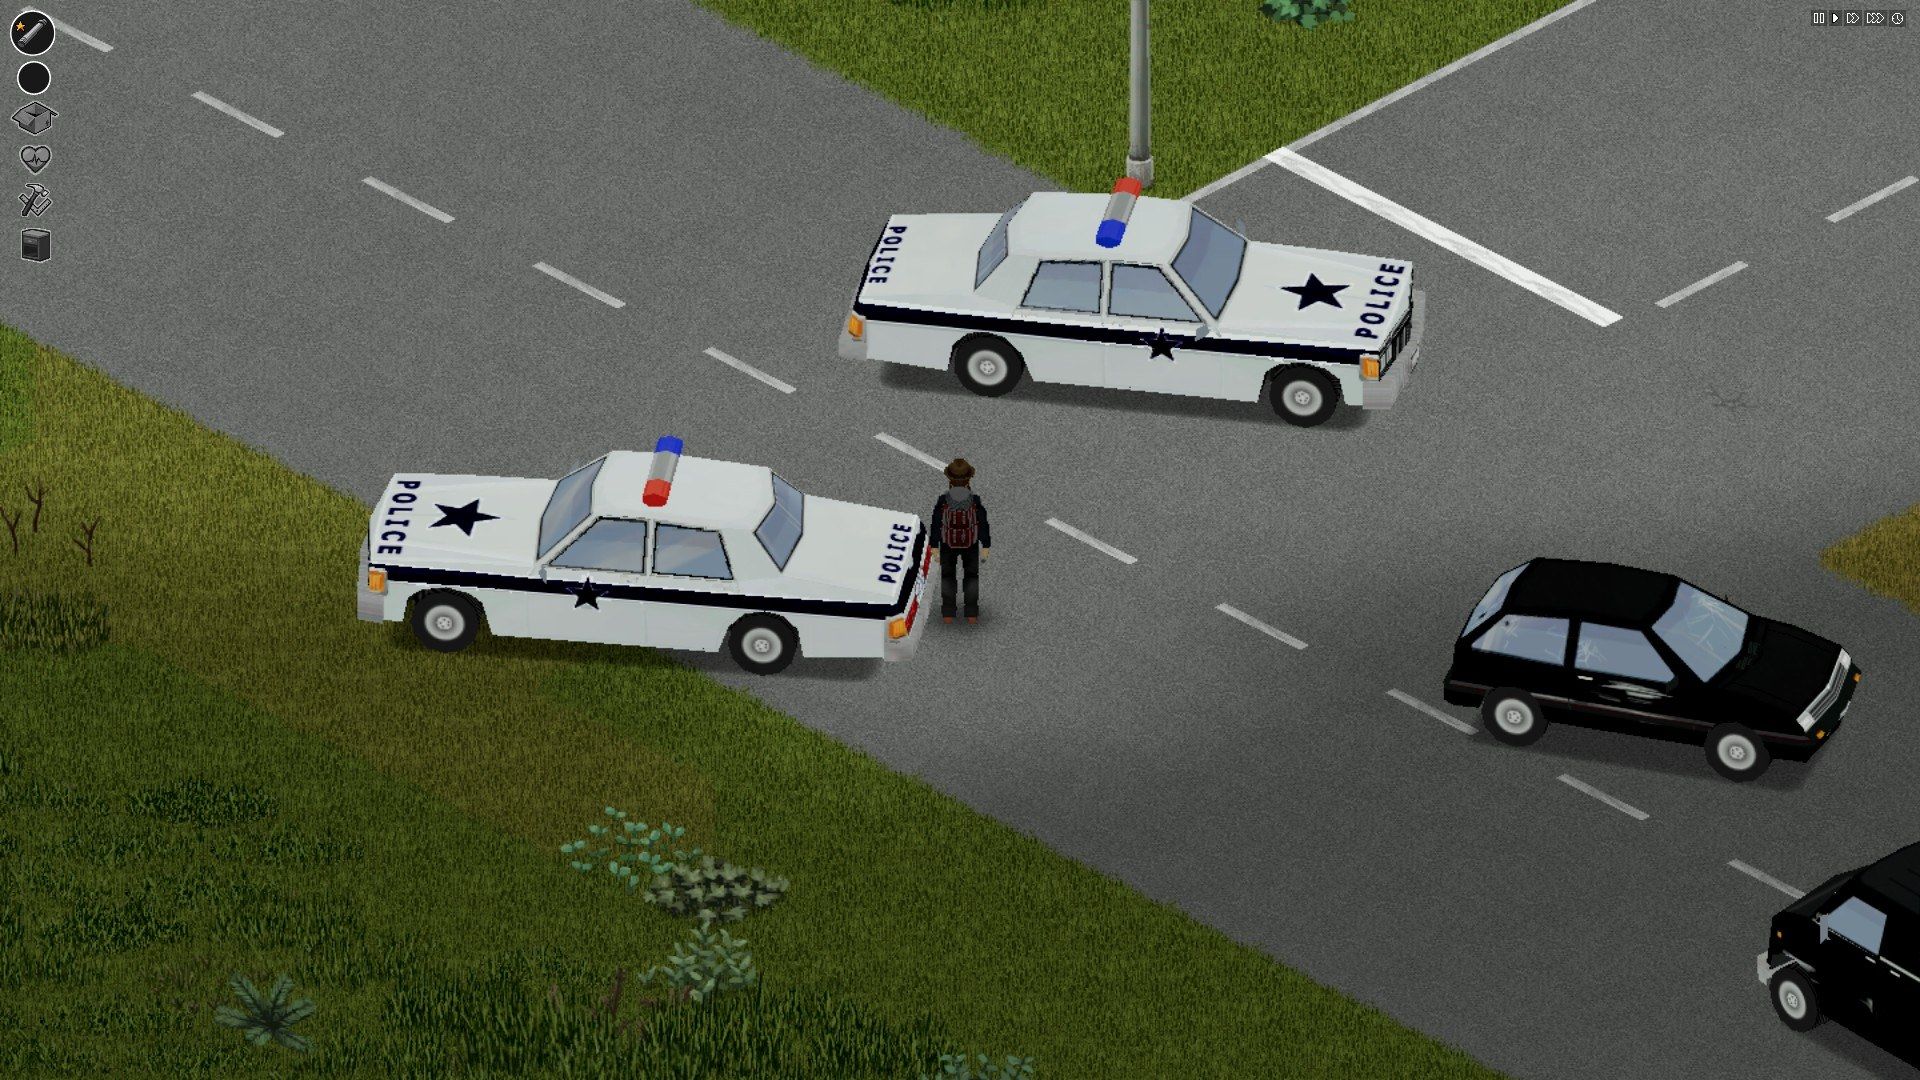
 I've been playing the new build 41 (the latest update to be more accurate) and I've had a few bugs with cars: 1) Duped cars (look at the screenshot ). So I drove the police car by this spot, did some stuff then later drove back by this same spot and magic - the same car appeared like it was always there. It was the same car because it's condition was the same as mine's and it had the same loot inside (although the duped car had only things that I found at first in my original car, not the stuff that I loaded after). 2) Getting stuck in a car - I don't know how but when I got in my car, my vehicle UI disappeared (although if I pressed V, the circle vehicle UI could appear) and then if I tried to get out of the car - I couln't. Also wasn't being able to change sits, but was able to drive for some reason. Then when I quited the game, opened it again and loaded my save file - my character was at his first original spawn point without any loot that I got whatsoever. This character was the second in this game world, the first one died, but the keys to the car belonged to the 1st character and so as the loot. 3) Car vanishing. I parked my car just outside my house, went outside away from the house, quited the game, then loaded it again and got back to the house - my car vanished. After some time I found it on the road not so far away from my house. It's like it teleported away from the place where I left it. I believe that those are all the same issues with vehicles, but I am not so sure.
-
1) Healing. It should be possible to open health panel of another person. 2) PvP. It should be possible to kill each other, e.g. to kill driver or try to throw him out
-
brakingForce is not defined for Chevalier Cossette (SportsCar). stoppingMovementForce is not defined for Chevalier D6 (PickUpTruck) and Chevalier D6 (PickUpTruckMccoy).
-
well, the image speaks
-
 Good evening. This is something I can't explain in pictures, because it's in motion. I can, however, describe it. I am also experiencing lag like I've never imagined, although I attribute that to the "Super Survivors" and my entry into a place I have not been before, which requires new Survivors to be generated. (Trying it without the "Super Survivors" enabled only caused monster lag when there were large numbers of zombies.) When I summon a horde of zombies to follow me in my car (so that I may either ignite them or run them over), the occasional event in which the horde gets so big that the zombies literally stop my car happens. This is normal, and usually, my car can't move more than a few pixels for some time until I break out. That is where the problem arises. Zombie hordes keep concentrating on one side of my car, and the game clips as my car is forced in the direction the zombies are pushing. I have no control over my car until it crashes into something. It's as if my car is on black glass! When I plough into a horde of zombies and they stop me, the usual pixel-by-pixel shoving begins, but once I break out of the horde, my car suddenly lunges at full speed, as if the horde was a chain that had been broken, in the direction it was going. I cannot control, break, or reverse course into the car unless and until it crashes in some way. It's as if my car is on black glass! I should mention, BTW, that it is in November, the temperature is approximately thirty two degrees Farenheit, and it is raining. This, coupled with lag, means my car crashes into everything and the game keeps lagging, so even when I am in control, I still crash into things. Even with all the Mods and the special Advanced Map, I never experienced any lag like this, and I've noticed a lot of change in vehicle mechanics and behavior since the IWBUMS V40.14 version. (Namely, the positive benefits are that I can run over zombies more efficiently and vehicles cause more damage to zombies.) Is this Working As Designed, or have I encountered a bug? Thank you for any assistance you may render. -TURTLESHROOM
 -
Hey all. Long story short, I want to try modelling interiors for some of PZs native cars. Partially for fun and practise, with view to release as a mod later, if I do a decent job. My issue is that I need the base 3d models of the vehicles ingame to do so. I've found all the .txt files, but have no idea how to convert them into an actual 3d file of some kind (OBJ, STL, FBX, etc). Does anyone know how to achieve this? Thanks.
-
Hello, I'm need some help In this site resources, I found events (seems decompile..), and one was: Events.OnPlayerMove.Add(functionName); But, it does not work, when you are in car( It's bug, or what? ), and I did not find anything like: OnVehicleMove The question is: How to get coords, [without OnPostUIDraw or other not connectable events,] when you are in car? But, however, I can use crutch: OnPlayerMove and if plr:isDriver check coords by OnPostUIDraw..
-
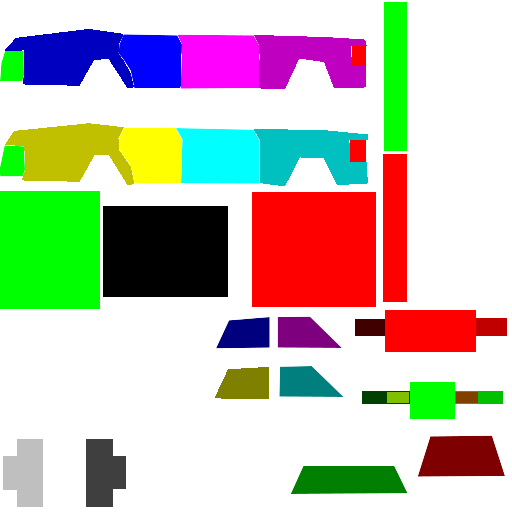
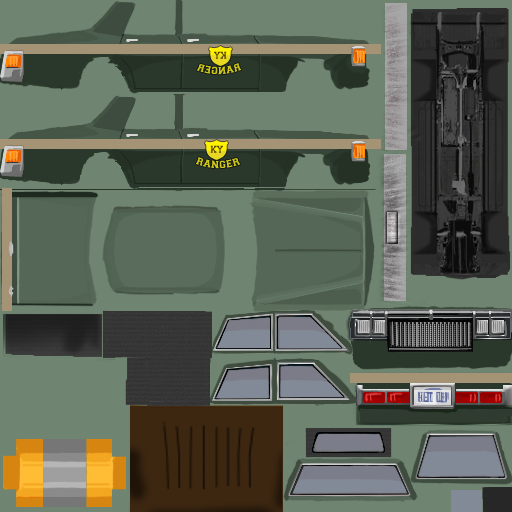
1) The first thing you want to do, as with most mods is to create your mods folder structure, use the image below as a reference, replacing MOD_NAME with the name of your mod: Don't worry about the files shown above, you will be creating them as you follow this guide, just make sure to remember, anytime you see "MOD_NAME" in this guide, replace that with the name you chose for your mod. 2) In your "..mods/MOD_NAME" folder, create your "mod.info" text file which contains the following code: Remember to replace all "MOD_NAME"'s with the actual name of your mod. 3) In the same folder, create/place your MOD_NAME.png , this will be the thumbnail used in game as the poster/picture for your mod. 4) Next up, in your "mods/MOD_NAME/media/lua/client" folder, create your MOD_NAME.lua file with the following code inside: This is the script that will load your model and scripts into the game, it also controls the spawn rate for the car in each type of zone as well as providing the vehicle mechanic overlay. Remember to replace all instances of "MOD_NAME" with the actual name you chose for your mod. 5) Next, in your "mods/MOD_NAME/media/scripts/vehicles" folder, create your MOD_NAME.txt file containing the following code: This script example contains all of the parameters to control the simulation of the vehicle, such as engine power, gear ratios, collision cube and much more. You will (hopefully) find it well commented to give you an idea of what each parameter does. You can look in the games "media\scripts\vehicles" folder for a vanilla vehicle script that more closely reflects the vehicle you are adding rather than starting with the example above, have a good look through them all to get a sense of the different templates you can use and the various changes that can be made to different components. 6) Now you need to (if you have not already) make the 3d model for your vehicle. We suggest using Blender, but as long as you're experienced in 3d modelling, any program that can export .ply files should work, just make sure your faces are triangulated, in Blender you can do this by selecting your model in Edit mode then pressing Ctrl + T. Then drag and drop the exported ply file onto the converter supplied below (unzip the below file, drag your .ply directly onto the .exe, do not double click the exe), it will output a new txt file with the same name as the .ply in the same directory. Copy the new .txt file into your "mods/MOD_NAME/media/models" folder as "Vehicles_MOD_NAME.txt This is the .ply to PZ convertor: PZ_PLYtoPZconverter.zip 7) Now it's time to create your vehicles texture files, these should all go into the "mods/MOD_NAME/media/textures/Vehicles" folder. First up is your "Vehicles_MOD_NAME_Shell.png" , this is the main texture image for your vehicle and needs to be 512x512 pixels, as do all of your textures, below is an example: Next there are 6 different overlay/detail png's to create, the first is for the vehicle lights ("Vehicles_MOD_NAME_Lights.png"): Then the vehicle rust ("Vehicles_MOD_NAME_Rust.png"): The next 2 image examples ("Vehicles_MOD_NAME_Shell_Damaged01.png" and "Vehicles_MOD_NAME_Shell_Damaged02.png") are to show light and heavy damage, respectively, on the vehicle's shell. They are used to represent dents in the bodywork: The next 2 image examples ("Vehicles_MOD_NAME_Overlays_Damaged01.png" and "Vehicles_MOD_NAME_Overlays_Damaged02.png") are very similar to the previous 2 except they are for showing damage on windows and lights as well as scratched on the body work: The last file we need is the vehicle colour mask ("Vehicles_MOD_NAME_Mask.png"), which should also be placed in your "mods/MOD_NAME/media/textures/Vehicles" folder. This tells the game which parts of your vehicle texture correspond to which part of your vehicle model and is needed to display damage, lowered windows and removed elements etc: Here the colour values to be used: Copy your complete mod folder structure into your C:\Users\YourUsernameHere\Zomboid\Mods folder, load the game, turn the mod on in the mod menu and start a new game, your new vehicle is now ready to be found and taken for a spin. Finally, here: ZAZ968M.zip - you can find an example vehicle mod using the above instructions. Notice the included example mod uses a slightly different process with its textures/overlays. The main texture is transparent while the detail has been shifted onto the vehicle_lights .png. This allows the game to automatically and procedurally generate different colours of your car when they are spawned in. Happy Modding!
-
playing MP on a private server running vehicle stable build 39 (steam version). we have all noticed that when you load in the vehicles seem to load off of the ground and then drop to the ground level. Today noticed another problem in that both vehicles i had outside my safe house had all 4 wheels fall off as i drove away. they were showing on the vehicles when i got in but after moving a tile they all fell off simultaneously
-
-
Car acceleration is very low, turns on coutryside road are very aggressive at high speed. all roads are mountain roads ? 45° road could smooth curves and prevent from slow down. they are only around the train station. They would be very appreciable here, here, etc.. and pretty here (rail do, why road not), here, here, here, etc.... before vehicle was visual, but now it is handy and visual. it's seems to be only a map modifcation (exept 45° sidewalk and signaling lines on high way).
-
Hi everyone, During my last session I realized for the first time that garage doors were not big enough to let cars go in. Is there a plan to get the door bigger?
-
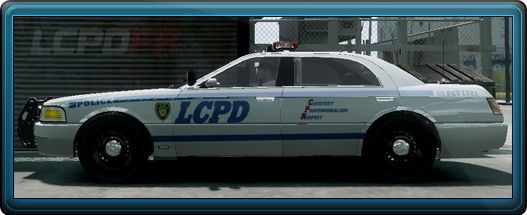
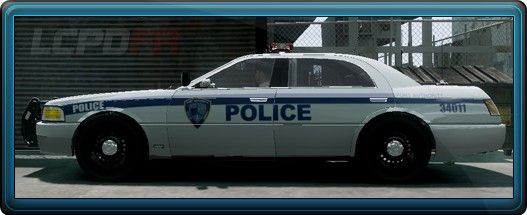
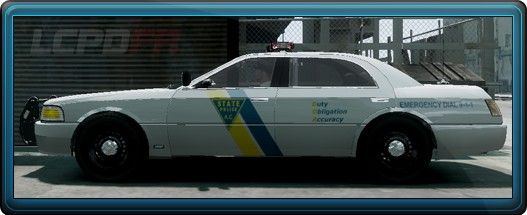
At this moment I do not know how work the principle of using service paintjob at services vehicles, but I want to suggest using a variable number to assign a pattern at the vehicles. For example, I'll take a sample of vehicle liverys from GTA IV and GTA V. This will be useful for optimizing the game. Now for more details: In GTA V, we can find vehicles with a variation of numbers on the roofs of patrol cars / taxi / firetruck's. Is that how different textures are applied on one model. Long time ago I did the LCPD Cruisers for GTA IV and use diffirent livery to make use a one car for ownership to different regions of the city with different textures. Example: 1. Libery City Polcie Department livery Port Tudor Polcie Department livery Alderney City State Police livery In exactly the same way, we can use one model for different cities in Project Zomboid by setting the livery binding parameter to the spawn region. if Muldraugh = "1" then copcar1_livery = "1" - copcar1 at spawn position around Muldraugh spawned with livery 1 (Muldraugh Police Dept.) West Point = "2" then copcar1_livery = "2" - copcar1 at spawn position around West Point spawned with livery 2 (West Point Police Dept.) Valley Station = "3" then copcar1_livery = "3" - copcar1 at spawn position around Valley Station spawned with livery 3 (Valley Station Sheriff Dept.) Louisville = "4" then copcar1_livery = "4" - copcar1 at spawn position around Louisville spawned with livery 4 (Louisville Sheriff Dept.) Brandenburg = "5" then copcar1_livery = "5" - copcar1 at spawn position around Brandenburg spawned with livery 5 (Brandenburg Police Dept.) Fort Knox = "6" then copcar1_livery = "6" - copcar1 at spawn position around Fort Knox spawned with livery 6 (Fort Knox Sheriff Dept.) ... = "7" then copcar1_livery = "7" - copcar1 at spawn position around %new city% spawned with livery 7 (%new city%) ... = "8" then copcar1_livery = "8" - copcar1 at spawn position around %new city% spawned with livery 8 (%new city%) ... etc. I think this approach will help to bring variety and realism into the game. Thank you!
-
A the title says, here's my suggestion towards the Dev's for another type of large vehicle that I for one would love to see in the game. I saw in some threads the mention and occasionally pictures of buses and other transport vehicles. Since there's already kindergartens and schools in Mouldraugh and WestPoint (probably someplace else also I don't quite remember) and on custom maps I would love to first of all, see School Buses like this one, which let's say, can hold up to 12 people or such in total. Now, the vehicle won't be op. It drives slower but has a large fuel capacity, it's harder to steer it at higher speeds and turning in general is a challenge just like in real life, also it's more durable but replacements parts and such are harder to come by (ex: only found on trucks and mechanic shops). Same things apply to the Prison Bus. As for the Prison Bus, being reinforced to stand up to more damage will mean that the consumption of fuel might be a bit higher but overall it will offer more protection for the player/s. Also, inmate zombies with a matching Bus ? WOOP WOOP! Now, moving on to the Trucks section. We already have the UPS type trucks and the mail delivery trucks in the game, but they are just for small deliveries. While I know large vehicles might be a problem in PZ, I think that they should be added since cars are becoming more and more diverse. Cars like security trucks, dump trucks, garbage collecting trucks and transport should be something worth of finding. Large fuel capacity, large consumption, hard to turn but with good speed and durability. Not to mention that they are loud and they'll attract zeds worse, if not the same as a bus would. I'm not sure if adding trailers to it would be a thing but I would surely love to see that. A box truck (furniture moving, delivery truck etc. Knox Telecommunication Utility Vehicle.
-
Hey guys, Is it just me or there's no longer cars in the vehicle beta server? I updated and it no longer works. Literally no cars showing up after the update. Anyone know what's going on and how to fix it? Thanks so much!
-
Official Web Page: http://undeniable.info/pz/DrivingCarsMod.php List of all the Vehicles with their information here: http://undeniable.info/pz/DrivingCarsMod.php#list Please Help Contribute if you can! TO DO LIST: Fix Problems on Multiplayer: GridSqaure:transmitRemoveItemFromSquare(item) seems to occasionally fail or time out when used multiple times per second. This problem is causing cars to duplicate themselves from time to time as you drive along. I have yet to find a solution to this Maybe we can kindly ask the devs if they can provide a method for the IsoWorldInventoryObject class such as setPosition(newX, newY) though I understand this could be more difficult then it sounds as these world inventoy objects are relative to what square they exists on. So if thats too much to ask, I can live with just a setTextureOffset(newX, newY) method so I can just change the offset of the car Until it moves onto a different square. This would reduce my item drop and pickup command spamming by like 80% which should fix the problems experienced in MP. What do you say devs? Make isometric car images for other kinds of cars with all 8 angles We should really make our own art as I just found most of these cars on google images, though I made slight adjustments to them, we really need you artists to whip us up some isometric vehicles from the 8 angles you see. Including one image of the car being broken. Off Topic: Feeling Bored? Try these games The game of Stones The game of Lights
- 123 replies
-
- 12
-
-
When come a vehicle update or a Mod ? I wait for a long time for this but nobody makes a mod like this ? Is Anybody working on this please inform me !!