Search the Community
Showing results for tags 'map'.
-
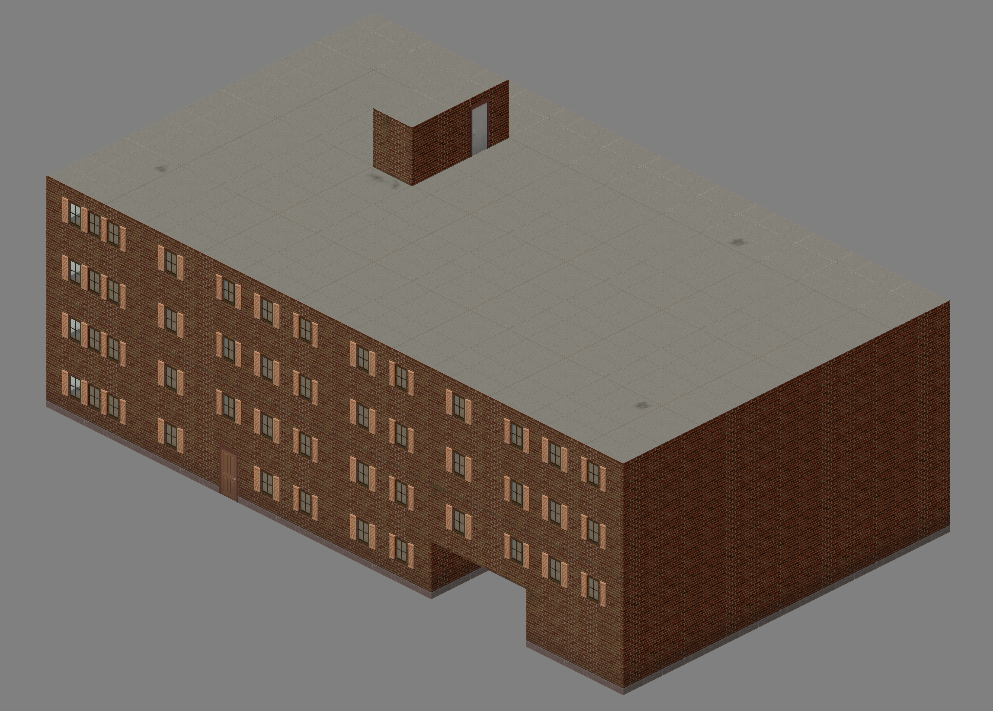
 Any full tile roof peice that is currently not over a room definition in your building needs a room definition. For any bits that are above an internal room, simply make sure that room has a room definition (all room in buildings should, even hallways etc). If the roof bit is over an outside area (such as a porch) then instead of giving it an internal room definition, which could possibly mess with loot tables etc, use the new room definition made for this situation - emptyoutside. In the example below you can see that this building has a porch roof outside the front door, all other bits of roof are already over a pre-existing room definition and so we don't need to worry about them. We do need to add an emptyoutside room definition on/under the porch roof however as there currently is no room definition outside the building. In this example, the porch roof is on the roof layer of floor 2. If we check Ortho view you can see that a room definition of emptyoutside yellow) has been applied to the corrosponding tiles on floor 2. Once applied, simply save the building and move on to the next. Once all buildings are done, close buildingEd and open your map in WorldEd, generate lots and you're done, your map should now support the new roof occlusion system! If you're having problems getting it to work properly, remember: every "full tile" roof peice (the little overhang peices you see in the example above do not need to adhere to this rule, just leave them as is if you have any) must be "over/on" a room definition, so make sure every room in your buildings has a room definition (including hallways etc). Add a room definition of "emptyoutside" (without " ") to any full tile roof peices that do not sit "over/on" an internal room definition. Make sure to generate lots in WorldEd once all of your relevant buildings have been updated.
 -
Greetings all, completely new to the whole map-stuff, but how would I add little things to the main map like small huts, camping sites, ...? A whole new map is to much for me right now, but some adjustments to the current one would be neat. Any help and tips would be nice
-
Hello everyone! In short, two friends and I are playing in the coop mode, I wanted to know if for example the one who created the map or the world can pass it to another so they can continue playing when he is not there. Thanks
-
I am redirecting my post from modding to map as i did not realize there was a category for map only. Here is the original post for details: https://theindiestone.com/forums/index.php?/topic/23230-map-of-normandy-france/ I have attached a section of the map, where most of the towns will be (where there is sand essentially) I have reposted the larger map also I had a few questions for you map modders: - Is it possible to apply a vegetation biome using WorldEd? For now I have only pine trees, which are not really adequate for my environment. I would like to have fruit trees and such. Is it something I have to do manually? - I had seen a while ago a video where you could see a developer scatter vegetation on the fly, is it something that exists within tilezed or it's a future feature of the creative mod? - Is there a centralized DB with all .tmx building created by the comumnity? I wish to consult and contribute! - Is there any "populate" tool in Tilezed that I should know about before getting started? Like for roads for instance? - Do you have any piece of advice for me? Remarks, suggestions...?

-
 I would love this map being on the official game map website, I play it all the time, and it would be so nice if I can just entering the official game map, put this map and search coordinates, find where I am, I would love it http://steamcommunity.com/sharedfiles/filedetails/?id=1158053757
- 1 reply
-
- 4
-

-
- official game map
- map
- (and 1 more)
-
Hello, I am speaking for both the community and the Dev's, could you please add an Official Test Map for your latest updates ? For example a large parking lot with all vehicles having a place to spawn and such, different types of roads, terrain, etc. Zombies to roam a side of it, and a bunch more. Would love to see that kind of a test map. You could get a lot of information out of it and we could test all kinds of bugs and, fps decrease and other issues that pz needs fixed and as such I think it would be a good idea to be able to test the new features on a such said map. We could have trees to crash in or to chop, a mechanic shop filled with the parts you need to test out anything else and so on. That way it would be easier to test and see where problems arise. Below is a really poor example (really poor) but I think that everyone gets the idea. We can test houses, how the rendering will affect buildings and such and vehicles. We can have a dense area with a bunch of houses, a bunch of two story buildings and then just normal country road. Tight curves, intersections, etc. We could basically do a lot of stuff on it and it would be a fun way for everyone to test out new features before playing or if they are willing to make the game better and report anything unusual. This is just a suggestion but I hope it will come true. A cell or four at max would probably be enough for the car to accelerate, do leaps and anything like that. Please think it through and share your opinions with me and anyone else.
-
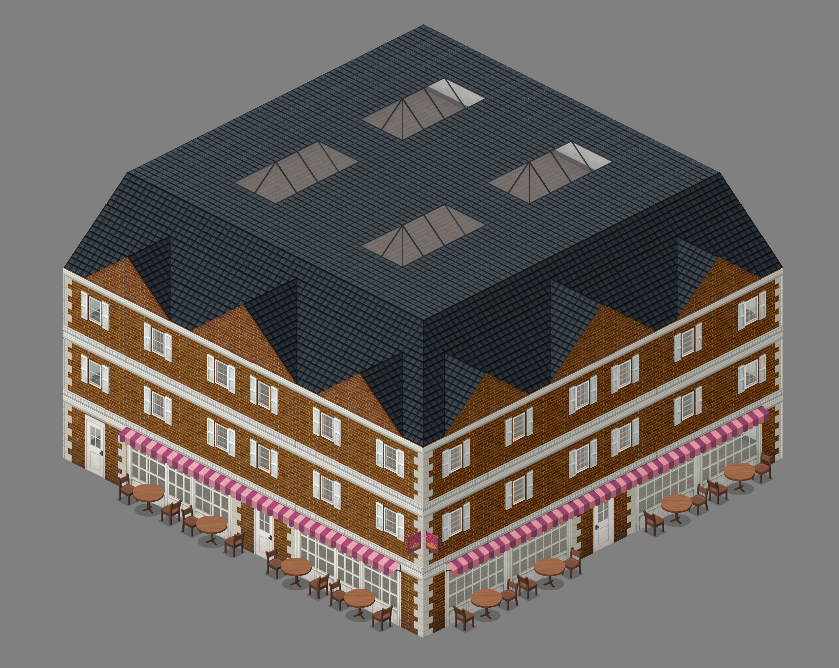
Hello everyone. I'll make an official thread for posting my custom buildings so that I won't fill the forums every time I do something that I consider worthy or in the mood of sharing. Hope you'll like this Questions, comments and criticism is welcomed ! <3
- 16 replies
-
- 5
-
-
- building
- legoland99
- (and 7 more)
-
Buildings face different sides.
-
Spawn Map-Objects Utility - Enhance your maps ! Workshop link What is this mod ? While I was working with the map editor, I got frustrated some items could not be placed using it. For instance, barricades and campfires. So we decided with a friend to solve this problem... Once done we decided to make this mod and make it as generic as possible ! This should allow any mapper to use our object-spawning system to make better maps and any modder to upgrade it with ease. I'm a player, what do I need to know or do ? Nothing. This mod should be a dependency mod for any map that uses the Spawn Map-Objects Utility. One you have this mod installed, it should work without needing you to do anything. I'm a mapper, what is this mod doing precisely and how does it works ? Tell me more about it ! This mod will allow you to place items & events within the map editor like campfire, tents, wall frames, zombies... Those placeholders will be converted into their working version inside the map once loaded. This means you will be able to place pick-up-able tents, light-able campfires, thumpables wooden and metal structures, break windows, spawn zombies at precise places and even more ! Interesting... So how do I use it ? The installation is very simple, once you have subscribed and download this mod, locate it's installation folder : \Steam_Installation_Folder\steamapps\workshop\content\108600\974718243\mods\SpawnMapObjectsUtil Once inside the mod folder, you should see a Tiles folder. Open it, and then open the 2x folder. You should see all the placeholders images you will need. Copy all these .png files to the 2x folder of your Tilezed. Now, you should be able to use the placeholders via the tilset list. I usually place those on the Furniture layer but it should work on other layers too. If you want to test the features, check out the building we are using for internal testing : https://rbfi.io/dl.php?key=/0Sol/testmap.tbx Once your map is finished and you are ready to publish it to the workshop make sure to add this mod to the dependencies of your map. So that it will be prompted to the players to install it with your map. Great, but before I install it, can you showcase some features ? Of course, here is the list of what you can do with the current version of Spawn Map-Objects Utility. Place thumpable walls of all possible quality with adjusted durability (Logs, wood, metal). Place fences adjusted durability too (Sandbags, wood, metal plates or bars). Place thumpables and working-properly barricades on windows (1,2,3 or four planks, metal sheet, metal bars) Place upgradable by player walls frames. Place weapons, literature, trash and food items on the floor. Place properly-interactable camping materials (tents, campfires and compost) Zombies-spawner at specific places (Horde inside a tower away from the city or a lone zombie in a specific room...) Add water collecting barrels already full of water Place fishing-nets on your lake or generators in a specific room Break specific windows on the map (with them still barricadable and full of dangerous shards). Break and remove glass from windows and keep it barricadeable Place sheetropes on windows. We also plan to add more to this list with upcoming updates, things like traps, sound events and such. What are those red tiles on your placeholders images ? As said earlier, we are planning to add more tiles to the placeholders. You can use the blue ones, but if you try to place a red one, it won't work. The red tiles are the not-implemented-yet features. But we kept it so that it will be easier to update once done. Please do not use the red placeholder tiles. I'm a modder, you said I could expand your utility ? Even more ! We made functions for you to easily add your own placeholders or remove the "default placeholders" shipped with the mod. Let me explain. Create your custom placeholder Once you have created the png of your custom new placeholder, you will need to code the replacement function in lua. To do it, you can write your lua file using this template : require "WorldManager/SpawnFromPlaceholder"; MyPlaceholder = {}; MyPlaceholder.replace = function(square, tileObject) -- Your code goes here -- indicate that the method has worked properly -- and the placeholder tile can be removed return true; end -- register and identify the placeholder in the system SpawnFromPlaceholder.Add({ name = "MyPlaceholder" }); Here are the explanations : First, you need to implement the method MyPlaceholder.replace(square, tileObject) which will be called for each object found in each square loaded. This method need to return a Boolean (true or false) to indicate if the method has worked. If the method return true the program will automatically delete the tile placeholder else it does nothing. The second step is to register your placeholder in the system with the method SpawnFromPlaceholder.Add(placeholderInfoObj). The parameter expect two important properties : name : the name of your object which contains at least the method replace() Remove default placeholders This mod allow you to remove unused shipped placeholders to save resources and gain performance. To remove the placeholders, you can use this snippet : require "WorldManager/SpawnFromPlaceholder"; SpawnFromPlaceholder.Remove({ "WallsPlaceholder", "ZombiePlaceholder", "..." }); The method will remove the placeholders listed in the array when the event OnGameStart is fired. Shipped placeholders list BarricadePlaceholder CampingCompostPlaceholder (campfire, tent and compost) CarpentryAndConstructedPlaceholder (sandbag, barrel, rain collector, lamp) DroppedFoodItemsPlaceholder DroppedTrashItemsPlaceholder DroppedWeaponsItemsPlaceholder GeneratorPlaceholder TrapsPlaceholder WallsPlaceholder WindowStuffPlaceholder (smash & clean window, sheet rope) ZombiePlaceholder
-
Project South Zagoria - Chernarus Hello everyone and welcome to my first mapping project on Project Zomboid. I will be attempting to replicate the current Chernarus+ map into Project Zomboid for you to enjoy. Now, I am currently working with the basic tiles and items without anything custom added, and it may be a while this way since I don't have much knowledge into creating custom tiles, furniture, etc. So, I will try to get as close as I can to the actual DayZ/ArmA map. Keep in mind that there will be differences and issues and bugs and so forth, but that is why I hope I can make a releasable edition soon for all of you to at least test if you are willing to. Features: A 1 : 1,6 Scale of the map - Due to allowing easier replicating of the map (Or you can see it as 1 Chernarus meter = 1,6 Project Zomboid meters) New Custom Replicas of Chernarus Buildings A 9000x9000px Map A 30x30 cell map (Possible enlargement might be done) This is the PRE-Apocalypse version/Day 1 Version (So no crashed plane in the hotel in Chernogorsk and broken buildings) Current Status: Currently Completed Map Pictures of Areas in the Map (More to Come Later as most of it is Forests): Further Comments: I am basing the map on 500mx500m cubes taken out of the dayzdb map online and slowly re-doing them in photoshop to use them in WorldEd. Here is the link to anyone wishing to scale the map or compare it to my creation: http://dayzdb.com/map/chernarusplus#4.020.014 Contact and Contribute: If you wish to contribute or help out, whether that is improving or making tiles, making custom buildings based on the Chernarus/DayZ ones, even custom textures if you can, as well as any suggestions, tips or anything I am willing to accept it. You can help out either by posting in the comments or contacting me via PM and I can get you involved in this current one-man team job and of course you will get credit for your work (No money, is Eastern European, never people was rich here, very sorry, I run this on stolen Soviet PC). Either way I will accept comments of any kind, hope you guys like it! Updates: 07/07/2017: 08/07/2017: 13/07/2017:
-
Just your thoughts.
-
Hello to anyone who's reading this. I'm working with Neutz on the Union City map. We'll release a part of it once the Suburban Area is done. What I need from each one of you is an idea for buildings, it can be a shop, a gas station, (no more house ideas, please, unless you made some and want to share them, my brain is mush as this moment from making 200+ houses already) warehouses, small clinics, pet shops, you name it. I just need building ideas. If you want to give some buildings for the upcoming map you're more than welcome to do so. If you want to give ideas, give a small description or a list of the buildings, if you can, provide a picture if you want something custom which I could try and make. Thanks to anyone who'll be writing below, be sure to check the Union City thread, we'll keep you posted weekly (if we don't forget from time to time ._.) on the upcoming map progress.
-
Like the title says, I want to start creating my own map and buildings. I've never done it before, but I've got the time and I've got a decent enough computer, as well as some ideas for a town or two that I've been wanting to bring to life. Unfortunately, I have no idea where to begin. Thuztor's supposedly tell-all mapping guide is no longer accessible for some reason, so I'm not quite sure how to go about doing ANYTHING in relation to mapping. Does anyone have another guide available, or perhaps a link to Thuztor's guide that actually works? Is mapping easy or hard? I'm an utter noob when it comes to mapping, so forgive me for being so confused.
-
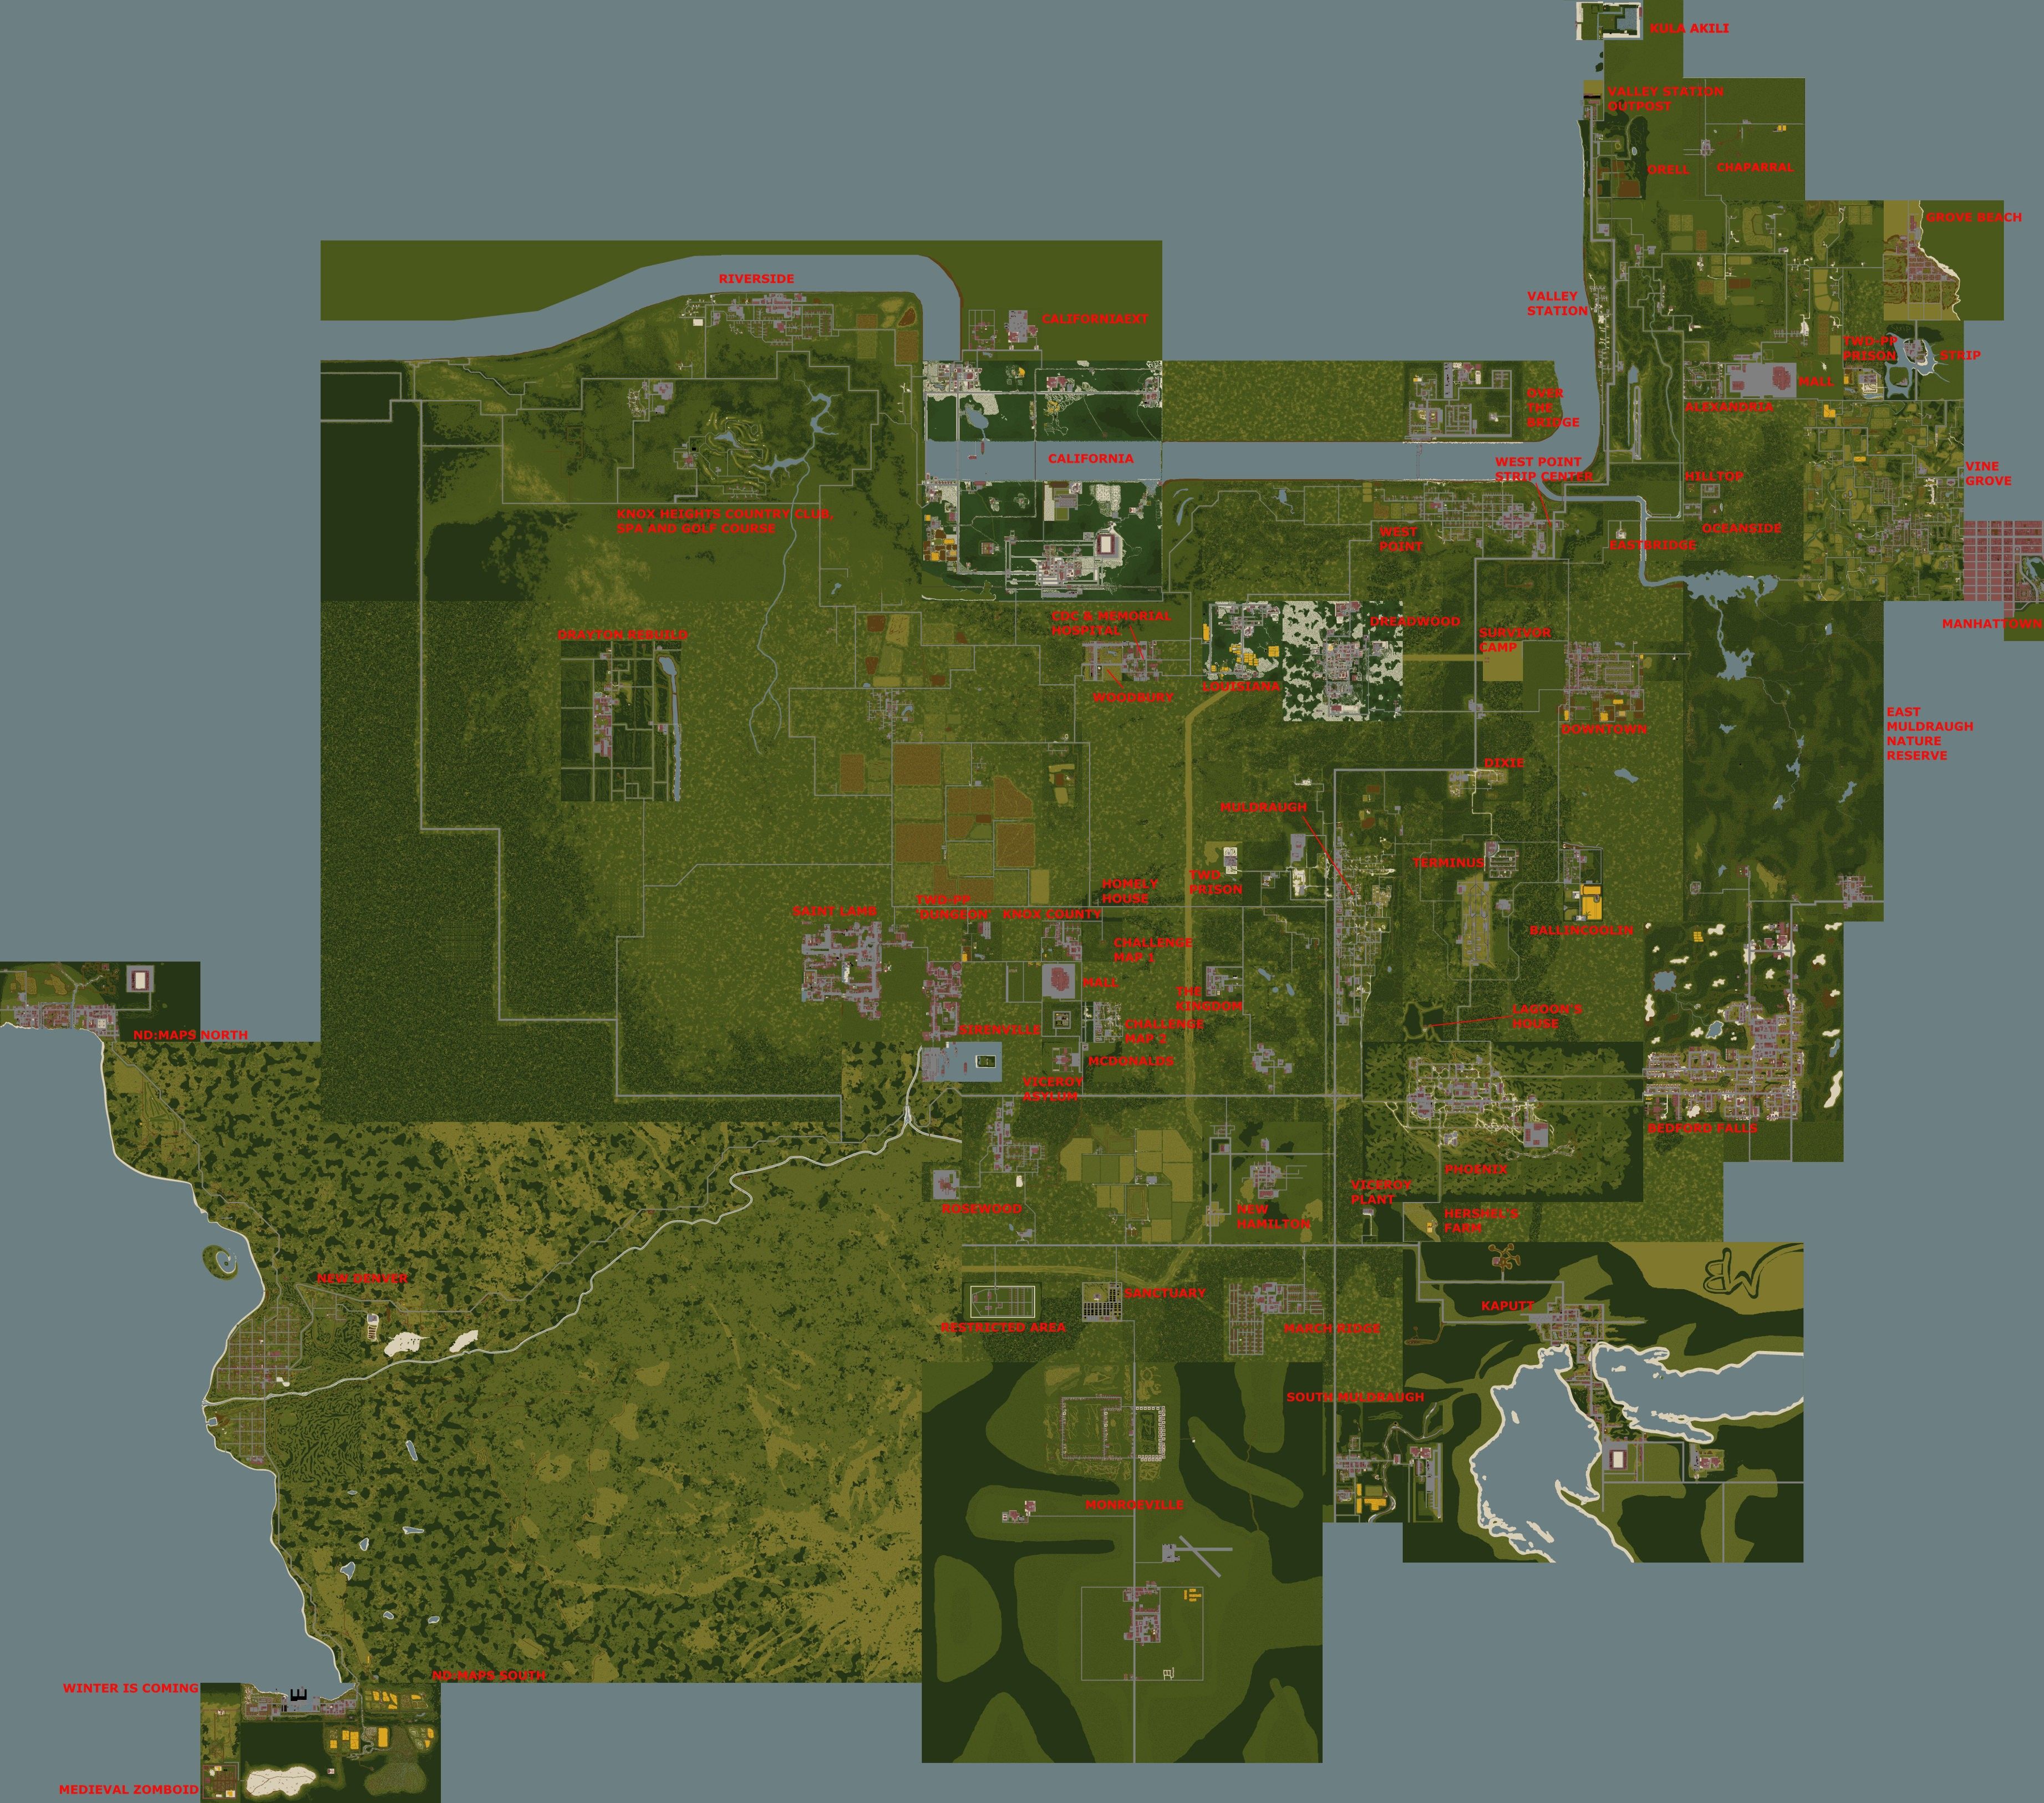
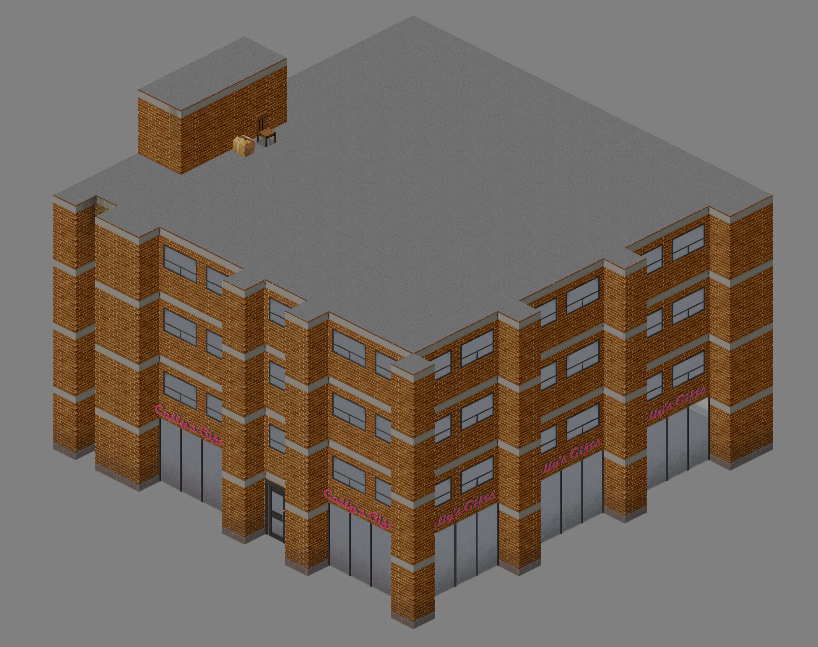
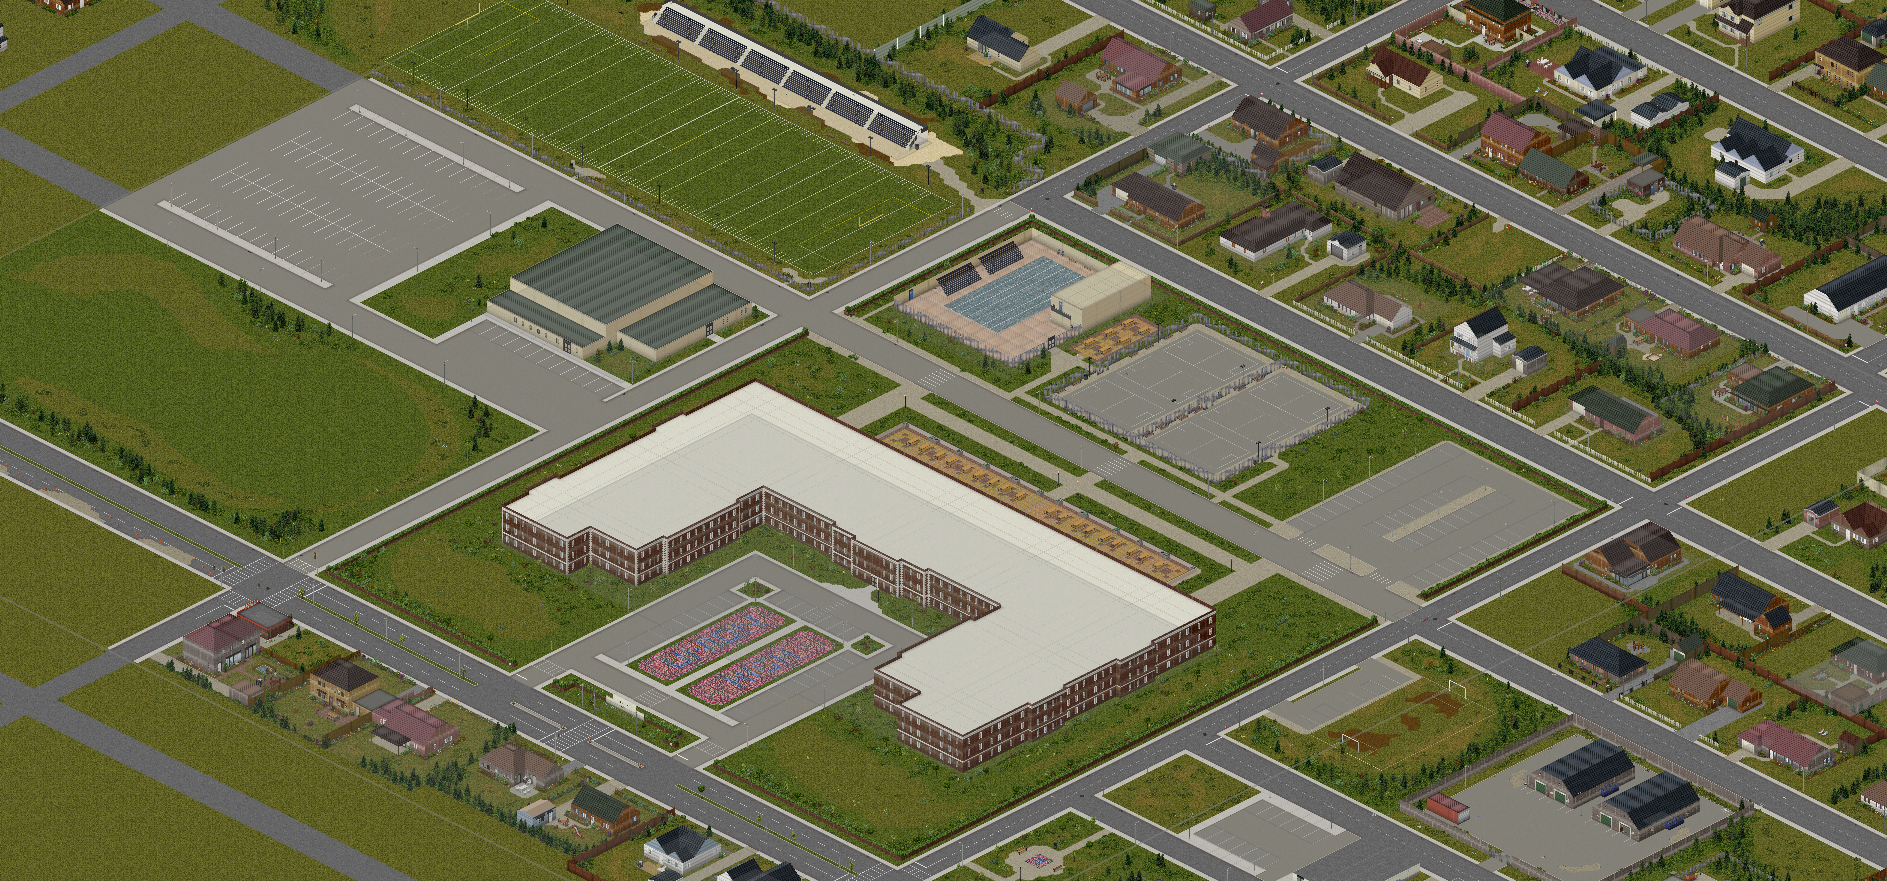
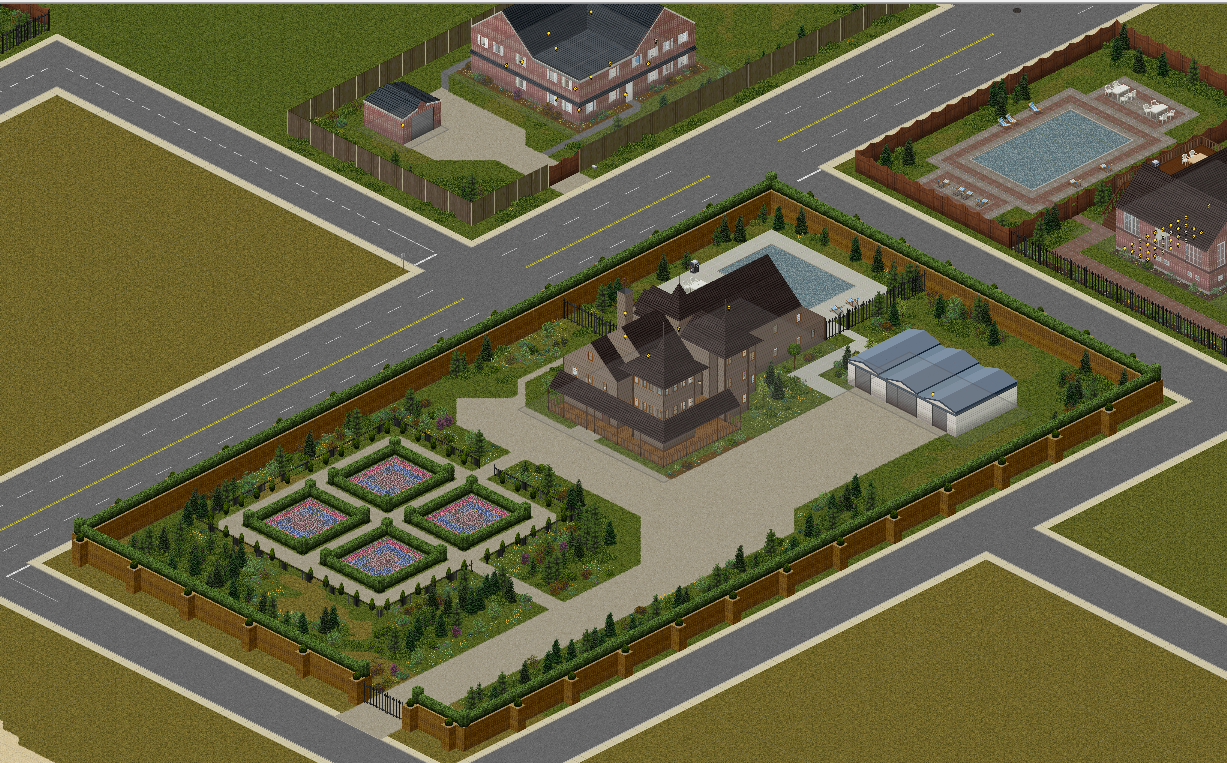
UNION CITY With Louisville a still a while off I decided to take up the task of getting a good sized city into the game. Also, Yes the map does borrow the name from the last stand web browser games but otherwise has no relation If anyone would like to help out with buildings, comment here or PM me. I don't have alot of time to work on the map these days, every now and then i will post updates though It has many buildings made by myself and other contributors, i have also made alot of custom tiles for the map. Most recent progress Residential Housing High School A Victorian mansion. Just one of Legoland99's many creations, Custom Sprites This map includes new sprites and variations made by myself I have made a bunch of clutter objects to make the world feel more lived in and immersive Thanks to the following This map will also contain buildings from the community. Thanks to the following forum members for your creations Legoland99 Atoxwarrior 956Texas BeastlyBean Blackbeard06 cmseter dko112 DoctahWong Doublebrain EUDOXIO fluffe9911 GothicGhost grivcin Jela331 kaizokuroof Leolvanov mads232 Mainulainen Project Zomboid (for 2 example buildings) rsdworker Sieben The googlator Traya Aclus Valindil Veged VikiDikRUS Way2sp00ky Z3759xy IndigoRebel zoeyflower
- 110 replies
-
- 23
-
-
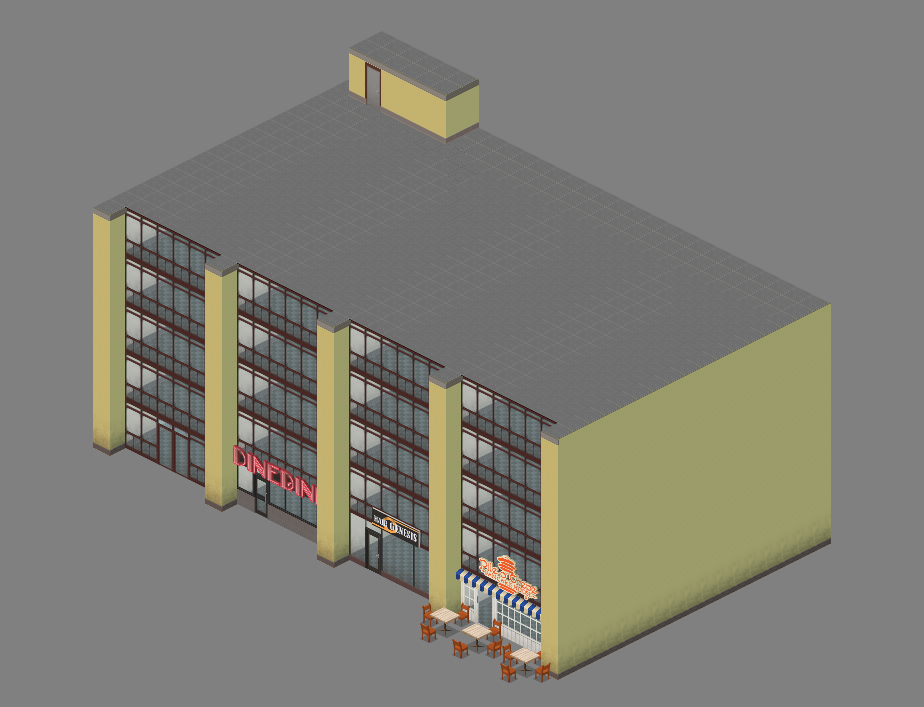
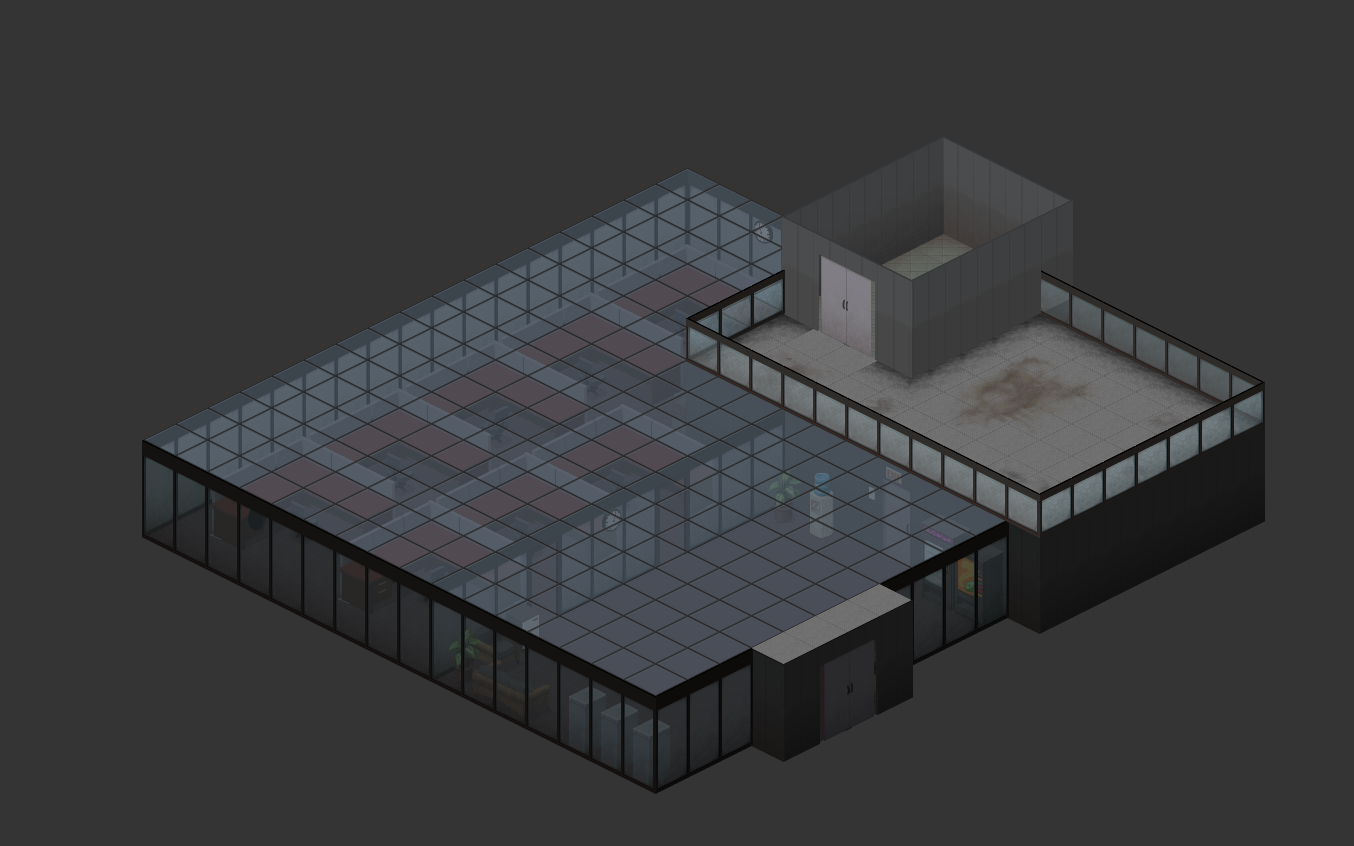
Hello fellow players and map editors. I'll be posting my custom buildings here as I make them. I'd like to hear what you guys think so that I could get a good feeling what this community wants. So far, I built a simple, one story office building that could be a car dealership. A parking lot will soon come separately. I might be able to expand the building... Loot will contain tools (Such as wrenches, hammers, etc.) and electronic parts.
- 10 replies
-
- 3
-
-
- custom building
- buildings
- (and 3 more)
-
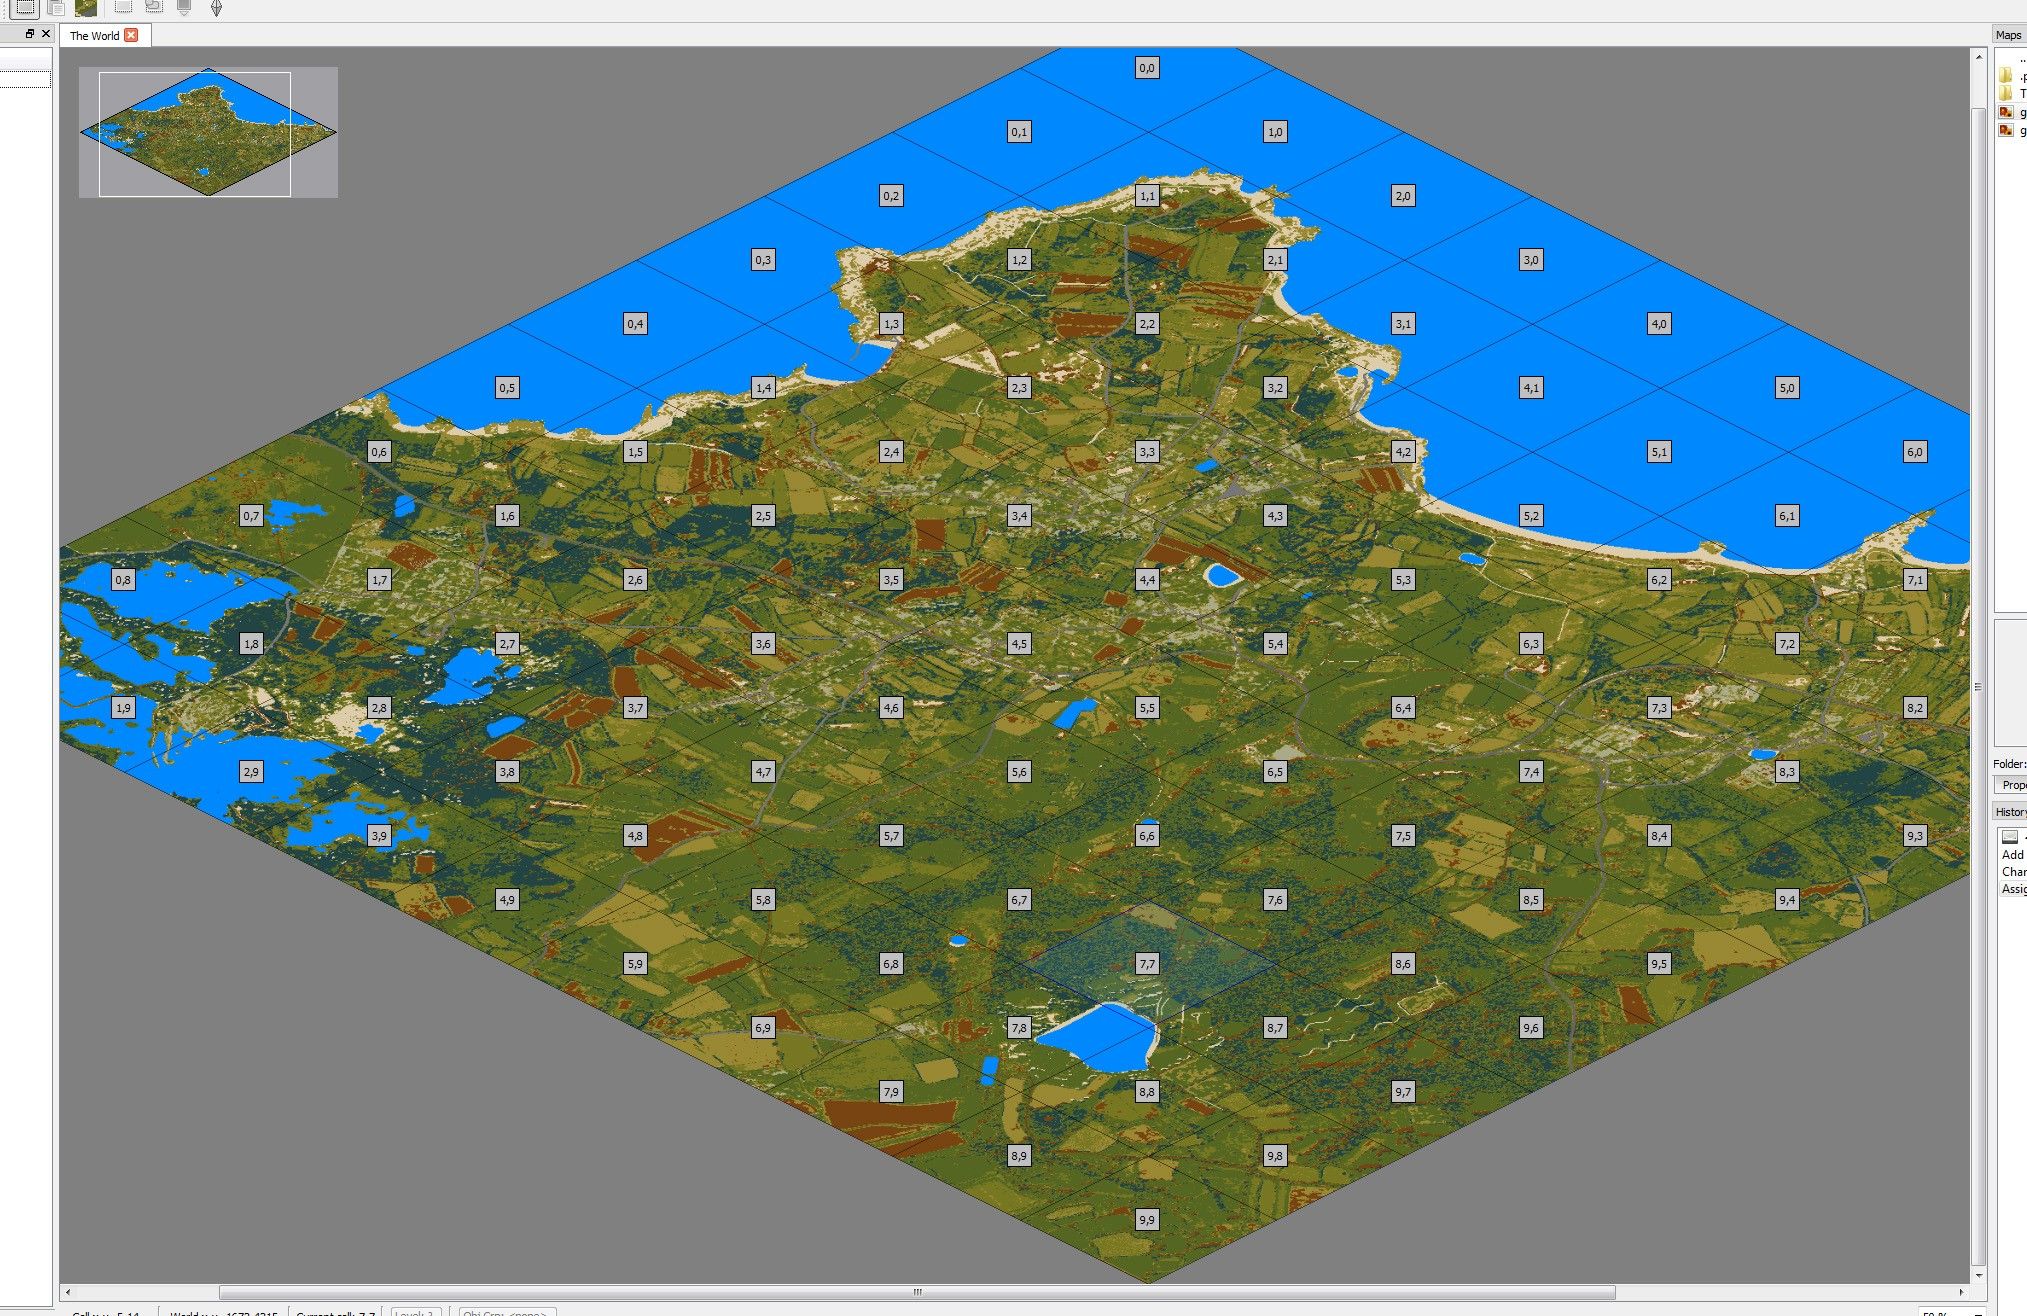
First, create the following file structure (if you are adding the lootable map to your own map mod then create all folders within the media folder below in your map mods media folder instead): Spoiler MyLootableMapsMod >media >>lua >>>server >>>>Items >>>client >>>>ISUI >>>>>Maps >scripts >textures >>worldMap Next up create a .txt file in the scripts folder called something like "mylootablemap" (except make it more unique to avoid any possible compatability issues with other mods that might use the same names), it should include this code: Spoiler module Base { item MyLootableMap { DisplayCategory = Cartography, Type = Map, DisplayName = Your map name here, Icon = Map, Weight = 0.1, Map = MyLootableMap, WorldStaticModel = Map, } } The above code is adding a new item with the internal name "MyLootableMap" (so again make sure yours is something unique) into the vanilla pool of items, the above settings work for maps. The next file you need you will want to create in the "media\lua\server\Items" folder, call it something like MyLootableMapDistribution.lua but again make it's a unique name to avoid any possible mod imcompatability with other mods. It should contain the following code: Spoiler local function preDistributionMerge() table.insert(ProceduralDistributions.list.MagazineRackMaps.items, "MyLootableMap"); table.insert(ProceduralDistributions.list.MagazineRackMaps.items, 50); end Events.OnPreDistributionMerge.Add(preDistributionMerge); In the above code you can see that we are adding our new Item "MyLootableMap" into the "MagazineRackMaps" loot table inside of ProceduralDistributions.lua, this will affect any roomDef of any building that pulls from the MagazineRackMaps loot table. We are doing it this way as the definition we want to add to has the "procedural" tag in Distributions.lua and is therefore using the procedural loot tables. The number 50 is the "weight" of the item you are adding, higher number = more chance. To find the current room and container definitions, navigate to your "steamapps\common\ProjectZomboid\media\lua\server\Items" folder and open the Distributions.lua file. If the definition you want to add your item to is not procedural (does not have the "procedural = true" line) then you want to add this code instead of the above code: Spoiler local myMapdistributionTable = { all = { shelves = { rolls = 5, items = { "Magazine", 20, "Newspaper", 20, "Book", 20, "SheetPaper2", 20, "Notebook", 20, "BookTailoring1", 2, "BookTailoring2", 1, "BookTailoring3", 0.7, "BookTailoring4", 0.5, "BookTailoring5", 0.3, "BookCarpentry1", 2, "BookCarpentry2", 1, "BookCarpentry3", 0.7, "BookCarpentry4", 0.5, "BookCarpentry5", 0.3, "BookCooking1", 2, "BookCooking2", 1, "BookCooking3", 0.5, "BookCooking4", 0.3, "BookForaging1", 2, "BookForaging2", 1, "BookForaging3", 0.7, "BookForaging4", 0.5, "BookForaging5", 0.3, "BookFarming1", 2, "BookFarming2", 1, "BookFarming3", 0.7, "BookFarming4", 0.5, "BookFarming5", 0.3, "BookFishing1", 2, "BookFishing2", 1, "BookFishing3", 0.7, "BookFishing4", 0.5, "BookFishing5", 0.3, "BookTrapping1", 2, "BookTrapping2", 1, "BookTrapping3", 0.7, "BookTrapping4", 0.5, "BookTrapping5", 0.3, "BookFirstAid1", 2, "BookFirstAid2", 1, "BookFirstAid3", 0.7, "BookFirstAid4", 0.5, "BookFirstAid5", 0.3, "BookMetalWelding1", 2, "BookMetalWelding2", 1, "BookMetalWelding3", 0.7, "BookMetalWelding4", 0.5, "BookMetalWelding5", 0.3, "BookElectrician1", 2, "BookElectrician2", 1, "BookElectrician3", 0.7, "BookElectrician4", 0.5, "BookElectrician5", 0.3, "BookMechanic1", 2, "BookMechanic2", 1, "BookMechanic3", 0.7, "BookMechanic4", 0.5, "BookMechanic5", 0.3, "FishingMag1", 1, "FishingMag2", 1, "HuntingMag1", 1, "HuntingMag2", 1, "HuntingMag3", 1, "HerbalistMag", 1, "FarmingMag1", 1, "CookingMag1", 1, "CookingMag2", 1, "ElectronicsMag1", 1, "ElectronicsMag2", 1, "ElectronicsMag3", 1, "ElectronicsMag4", 1, "ElectronicsMag5", 1, "MechanicMag1", 1, "MechanicMag2", 1, "MechanicMag3", 1, "EngineerMagazine1", 1, "EngineerMagazine2", 1, "MetalworkMag1", 1, "MetalworkMag2", 1, "MetalworkMag3", 1, "MetalworkMag4", 1, "Journal", 2, "Radio.RadioBlack",2, "Radio.RadioRed",1, "MyLootableMap", 50, } }, } } table.insert(Distributions, 2, myMapdistributionTable); This would add your map to the existing "all>shelves" definitions, which would be every shelves container in the game world not inside a roomdef defined inside Distributions.lua, so for example your map would not spawn on shelves that are placed inside a "bookstore" room def as that room def already exists in Distributions.lua with a rule for shelves. You can also check this thread: for a more in-depth guide to working with the loot tables. Lastly, inside of your "media\lua\client\ISUI\Maps" folder create a new file called something like MyLootableMapDefinition.lua (make it unique to your mod instead of a generic name) and include the following code: Spoiler require "ISMapDefinitions" MapUtils = {} function MapUtils.initDirectoryMapData(mapUI, directory) local mapAPI = mapUI.javaObject:getAPIv1() local file = directory..'/worldmap-forest.xml' if fileExists(file) then mapAPI:addData(file) end file = directory..'/worldmap.xml' if fileExists(file) then mapAPI:addData(file) end -- This call indicates the end of XML data files for the directory. -- If map features exist for a particular cell in this directory, -- then no data added afterwards will be used for that same cell. mapAPI:endDirectoryData() mapAPI:addImages(directory) end function MapUtils.initDefaultMapData(mapUI) local mapAPI = mapUI.javaObject:getAPIv1() mapAPI:clearData() -- Add data from highest priority (mods) to lowest priority (vanilla) local dirs = getLotDirectories() for i=1,dirs:size() do MapUtils.initDirectoryMapData(mapUI, 'media/maps/'..dirs:get(i-1)) end end local MINZ = 0 local MAXZ = 24 local WATER_TEXTURE = false function MapUtils.initDefaultStyleV1(mapUI) local mapAPI = mapUI.javaObject:getAPIv1() local styleAPI = mapAPI:getStyleAPI() local r,g,b = 219/255, 215/255, 192/255 mapAPI:setBackgroundRGBA(r, g, b, 1.0) mapAPI:setUnvisitedRGBA(r * 0.915, g * 0.915, b * 0.915, 1.0) mapAPI:setUnvisitedGridRGBA(r * 0.777, g * 0.777, b * 0.777, 1.0) styleAPI:clear() local layer = styleAPI:newPolygonLayer("forest") layer:setMinZoom(13.5) layer:setFilter("natural", "forest") if true then layer:addFill(MINZ, 189, 197, 163, 0) layer:addFill(13.5, 189, 197, 163, 0) layer:addFill(14, 189, 197, 163, 255) layer:addFill(MAXZ, 189, 197, 163, 255) else layer:addFill(MINZ, 255, 255, 255, 255) layer:addFill(MAXZ, 255, 255, 255, 255) layer:addTexture(MINZ, "media/textures/worldMap/Grass.png") layer:addTexture(MAXZ, "media/textures/worldMap/Grass.png") layer:addScale(13.5, 4.0) layer:addScale(MAXZ, 4.0) end layer = styleAPI:newPolygonLayer("water") layer:setMinZoom(MINZ) layer:setFilter("water", "river") if not WATER_TEXTURE then layer:addFill(MINZ, 59, 141, 149, 255) layer:addFill(MAXZ, 59, 141, 149, 255) else layer:addFill(MINZ, 59, 141, 149, 255) layer:addFill(14.5, 59, 141, 149, 255) layer:addFill(14.5, 255, 255, 255, 255) layer:addTexture(MINZ, nil) layer:addTexture(14.5, nil) layer:addTexture(14.5, "media/textures/worldMap/Water.png") layer:addTexture(MAXZ, "media/textures/worldMap/Water.png") -- layer:addScale(MINZ, 4.0) -- layer:addScale(MAX, 4.0) end layer = styleAPI:newPolygonLayer("road-trail") layer:setMinZoom(12.0) layer:setFilter("highway", "trail") layer:addFill(12.25, 185, 122, 87, 0) layer:addFill(13, 185, 122, 87, 255) layer:addFill(MAXZ, 185, 122, 87, 255) layer = styleAPI:newPolygonLayer("road-tertiary") layer:setMinZoom(11.0) layer:setFilter("highway", "tertiary") layer:addFill(11.5, 171, 158, 143, 0) layer:addFill(13, 171, 158, 143, 255) layer:addFill(MAXZ, 171, 158, 143, 255) layer = styleAPI:newPolygonLayer("road-secondary") layer:setMinZoom(11.0) layer:setFilter("highway", "secondary") layer:addFill(MINZ, 134, 125, 113, 255) layer:addFill(MAXZ, 134, 125, 113, 255) layer = styleAPI:newPolygonLayer("road-primary") layer:setMinZoom(11.0) layer:setFilter("highway", "primary") layer:addFill(MINZ, 134, 125, 113, 255) layer:addFill(MAXZ, 134, 125, 113, 255) layer = styleAPI:newPolygonLayer("railway") layer:setMinZoom(14.0) layer:setFilter("railway", "*") layer:addFill(MINZ, 200, 191, 231, 255) layer:addFill(MAXZ, 200, 191, 231, 255) -- Default, same as building-Residential layer = styleAPI:newPolygonLayer("building") layer:setMinZoom(13.0) layer:setFilter("building", "yes") layer:addFill(13.0f, 210, 158, 105, 0) layer:addFill(13.5f, 210, 158, 105, 255) layer:addFill(MAXZ, 210, 158, 105, 255) layer = styleAPI:newPolygonLayer("building-Residential") layer:setMinZoom(13.0) layer:setFilter("building", "Residential") layer:addFill(13.0f, 210, 158, 105, 0) layer:addFill(13.5f, 210, 158, 105, 255) layer:addFill(MAXZ, 210, 158, 105, 255) layer = styleAPI:newPolygonLayer("building-CommunityServices") layer:setMinZoom(13.0) layer:setFilter("building", "CommunityServices") layer:addFill(13.0f, 139, 117, 235, 0) layer:addFill(13.5f, 139, 117, 235, 255) layer:addFill(MAXZ, 139, 117, 235, 255) layer = styleAPI:newPolygonLayer("building-Hospitality") layer:setMinZoom(13.0) layer:setFilter("building", "Hospitality") layer:addFill(13.0f, 127, 206, 225, 0) layer:addFill(13.5f, 127, 206, 225, 255) layer:addFill(MAXZ, 127, 206, 225, 255) layer = styleAPI:newPolygonLayer("building-Industrial") layer:setMinZoom(13.0) layer:setFilter("building", "Industrial") layer:addFill(13.0f, 56, 54, 53, 0) layer:addFill(13.5f, 56, 54, 53, 255) layer:addFill(MAXZ, 56, 54, 53, 255) layer = styleAPI:newPolygonLayer("building-Medical") layer:setMinZoom(13.0) layer:setFilter("building", "Medical") layer:addFill(13.0f, 229, 128, 151, 0) layer:addFill(13.5f, 229, 128, 151, 255) layer:addFill(MAXZ, 229, 128, 151, 255) layer = styleAPI:newPolygonLayer("building-RestaurantsAndEntertainment") layer:setMinZoom(13.0) layer:setFilter("building", "RestaurantsAndEntertainment") layer:addFill(13.0f, 245, 225, 60, 0) layer:addFill(13.5f, 245, 225, 60, 255) layer:addFill(MAXZ, 245, 225, 60, 255) layer = styleAPI:newPolygonLayer("building-RetailAndCommercial") layer:setMinZoom(13.0) layer:setFilter("building", "RetailAndCommercial") layer:addFill(13.0f, 184, 205, 84, 0) layer:addFill(13.5f, 184, 205, 84, 255) layer:addFill(MAXZ, 184, 205, 84, 255) end function MapUtils.overlayPaper(mapUI) local mapAPI = mapUI.javaObject:getAPIv1() local styleAPI = mapAPI:getStyleAPI() local layer = styleAPI:newTextureLayer("paper") layer:setMinZoom(0.00) local x1 = mapAPI:getMinXInSquares() local y1 = mapAPI:getMinYInSquares() local x2 = mapAPI:getMaxXInSquares() + 1 local y2 = mapAPI:getMaxYInSquares() + 1 layer:setBoundsInSquares(x1, y1, x2, y2) layer:setTile(true) layer:setUseWorldBounds(true) layer:addFill(14.00, 128, 128, 128, 0) layer:addFill(15.00, 128, 128, 128, 32) layer:addFill(15.00, 255, 255, 255, 32) layer:addTexture(0.00, "media/white.png") layer:addTexture(15.00, "media/white.png") layer:addTexture(15.00, "media/textures/worldMap/Paper.png") end function MapUtils.revealKnownArea(mapUI) local mapAPI = mapUI.javaObject:getAPIv1() local x1 = mapAPI:getMinXInSquares() local y1 = mapAPI:getMinYInSquares() local x2 = mapAPI:getMaxXInSquares() local y2 = mapAPI:getMaxYInSquares() WorldMapVisited.getInstance():setKnownInSquares(x1, y1, x2, y2) end ----- local function replaceWaterStyle(mapUI) if not WATER_TEXTURE then return end local mapAPI = mapUI.javaObject:getAPIv1() local styleAPI = mapAPI:getStyleAPI() local layer = styleAPI:getLayerByName("water") if not layer then return end layer:setMinZoom(MINZ) layer:setFilter("water", "river") layer:removeAllFill() layer:removeAllTexture() layer:addFill(MINZ, 59, 141, 149, 255) layer:addFill(MAXZ, 59, 141, 149, 255) end local function overlayPNG(mapUI, x, y, scale, layerName, tex, alpha) local texture = getTexture(tex) if not texture then return end local mapAPI = mapUI.javaObject:getAPIv1() local styleAPI = mapAPI:getStyleAPI() local layer = styleAPI:newTextureLayer(layerName) layer:setMinZoom(MINZ) layer:addFill(MINZ, 255, 255, 255, (alpha or 1.0) * 255) layer:addTexture(MINZ, tex) layer:setBoundsInSquares(x, y, x + texture:getWidth() * scale, y + texture:getHeight() * scale) end local function overlayPNG2(mapUI, x, y, scaleX, scaleY, tex) local mapAPI = mapUI.javaObject:getAPIv1() local styleAPI = mapAPI:getStyleAPI() local layer = styleAPI:newTextureLayer("lootMapPNG") layer:setMinZoom(MINZ) local texture = getTexture(tex) layer:addFill(MINZ, 255, 255, 255, 128) layer:addTexture(MINZ, tex) layer:setBoundsInSquares(x, y, x + texture:getWidth() * scaleX, y + texture:getHeight() * scaleY) end -- -- -- -- -- Now, after the last set of dashed lines you can add your lootable map definitions with the following code: Spoiler LootMaps.Init.MyLootableMap = function(mapUI) local mapAPI = mapUI.javaObject:getAPIv1() MapUtils.initDirectoryMapData(mapUI, 'media/maps/MyMapMod') -- 'media/maps/MyMapMod' - this should be where your maps worldmap.xml file is MapUtils.initDefaultStyleV1(mapUI) -- Specify the appearance of the map. replaceWaterStyle(mapUI) -- Use solid color for water instead of a texture. mapAPI:setBoundsInSquares(12900, 9900, 14399, 11399) -- (starting x, starting y, ending x, ending y) of the area you want to display and uncover, in World Co-ordinates. overlayPNG(mapUI, 14299, 9900, 0.666, "badge", "media/textures/worldMap/MyLootableMapBadge.png") -- Add your lootable maps banner PNG. overlayPNG(mapUI, 13000, 10000, 0.666, "legend", "media/textures/worldMap/Legend.png") -- Add the legend PNG. MapUtils.overlayPaper(mapUI) -- Draw a paper-like texture overtop the map. end Make sure that your "LootMaps.Init.MyLootableMap" on line 1 matches the name you specified on the "Maps = " line in your map item script you made earlier in this tutorial. The rest of the code is commented to describe what they do. The "textures\worldMap" folder that you created at the start should be used to store your maps name banner png if you have one and is referenced in the above code to make your lootable map look more official. As you can see, no external PNG's need to be created as the map is drawn from the data stored in the maps worldmap.xml file, which is what the "mapAPI:setBoundsInSquares" is using to draw a certain section of the overall world map. And that's it, copy your entire folder structure into your "C:\Users\YourUserNameHere\Zomboid\Mods" folder, load up the game, enable the mod (Your map mod if you made your lootable maps as part of a map mod) and start a new game, you now have your lootable map in game and waiting for you to find, and when you do it will uncover that area automatically on the main in game map. If you need a working example you can always subscribe to Bedford Falls on Steam and check it's workshop folder "steamapps\workshop\content\108600\522891356" . It's handy to verify your folder/file structure etc if you're having problems.
-
Hello. Im new to this community, and I hope I'll make a good addition to it. Im creating a massive map ( 5 by 5 regions ) that has an island which will contain several cities and towns. I started some planning, but I dont know precisely where to go layout-wise. I was thinking I could get some help from some talented editors in this community - specifically people who can work well with the building editor. The map will contain: - 3 large cities - 7 smaller towns - A large portion of the map will be covered in dense forest dotted with "abandoned" industrial buildings. - And an Airport Hoping someone responds soon so that we could kick off this project! (I got some editor skills myself, so that you guys dont think im a random guy that wants some free labor...)
- 1 reply
-
- 1
-
-
- custom map
- island
- (and 2 more)
-
Hello, my first post here to let you know about my little project, the East Muldraugh Nature Reserve. http://steamcommunity.com/sharedfiles/filedetails/?id=942309234 I built it in the first place to fill the void between Westpoint and New Bedford. In the North it connects to the end of the River south of Westpoint, forming a lake. From there it is mainly forest, crisscrossed by some hiking paths for nature tourists. A few huts here and there for those who would like to try in the wild. On the south border towards Bedford Falls there is the small village (Fetzington) east and an Eco-Hotel and a prison on the west. I dont really plan on making many buildings or large towns. I hope others do that. My plan for the future is only to add a few more customized locations in forest. If feedback is good ill look into working over few other parts of the main map with a little more interesting forest and a few small villages. Big thanks to the Authors of the buildings in Building Pool V2 and for the effort of putting all these buildings into a budle. More of that please! i hope you enjoy, let me know what you think. Fetzen
-
Does anyone know the maximum number of floors the game can hold ? I think it was 7 or 9. Any help would be great !
-
Hello again folks. Dipping my toes into the mapping pool, but after so much time away, I've forgotten how to fix the issues that I managed to navigate last time. At present, I've been following Ringo's new mapping guide as close to the letter as I can, but I've run into issues with the spawn points. Similar to the problem Xeonyx had back in 2015 the spawn point tool does not seem to work as intended. I am able to place the diamonds onto the map, but upon selecting them, there is no menu of professions to choose from. Instead, I have to type a custom profession (unemployed and all have run into the same issues). Either way, if I type unemployed and set the spawn points, the coordinates update on my spawnpoint.lua with the following: Once everything is saved and packaged again, I load up the mod as per instructions, find the map, create a new character (I've tried several careers including unemployed) and receive the following error message in the console. Can anyone see why the map would be failing to load? Am I wrong in thinking that it's the spawnpoint causing the issue (considering that the coordinates on the map and in the console are completely different)? Any help would be greatly appreciated, and I would love to put an answer up here permanently, as I remember the same thing happening 2 years ago! Mono
- 11 replies
-
- 1
-
-
- spawn point
- custom
- (and 1 more)
-
Hello guys! I have another super question about the PZ Map tool. I saw this video, but I don't understand how put the right path in the .txt file because i have a OVH linux server and i can not choose the path of it because is not on my pc obviusly... so, how can i do? thanks for helping!
-
Hi, as you know forage areas are very limited. once I started a very long and tough journey to a lake far west of muldraugh and OMG there was nowhere to forage no matter where i went, so i decided to make a map of foraging zones and share it with others so no one lost in the woods with nowhere to forage. Foraging Map Red Highlighted areas are Forage zones. I used "PZCarto_v1" that i found in this forum for drawing map. Map is 1:1 scale, means the coordinates on the map is the same of the real world in the game (you can use Photoshop or Paint to find the coordinates) and the empty space in the top left corner is because of correcting the coordinates. please tell me if there was any mistake. Enjoy Edit: Unfortunately "imgur" changes the scale of the map, so i uploaded it somewhere else. now scale is correct.
- 4 replies
-
- 2
-
-
- forest
- project zomboid
- (and 2 more)
-
Aight. Ever since the conception of games in this style such as Class3Outbreak, the idea of making my home area has been a thought. There are so many amazing options, Monroeville and the mall, Evans City, Any of the boroughs and townships in Butler and Allegheny Counties. And hell, to top it all off there is Pittsburgh. Now, I have absolutely no mapping experience and may just be using this as a good excuse to forget about my fiancee leaving me. However, I really want some input here. Here are some Google Maps images of local areas including the aforementioned. Monroeville: https://gyazo.com/e38857243ecbd99ea1fbc0119ff13970 The Mall: (featured in Dawn of The Dead) https://gyazo.com/bbaea16c9aa723ac43a5e8fa6e9249cc Evans City: (Home of Night of the Living Dead) https://gyazo.com/2e55455f11d06c4271e6c0a1ea75e000 Butler: https://gyazo.com/9cedc6993d74d642f11b04d0cb152846 Cranberry Township: https://gyazo.com/2d03b8777935912067c88b71e9310353 Connecting roads: https://gyazo.com/b06bb52ddc7906bfdbce70d6470b6a2b Zelienople: https://gyazo.com/e8602d983501e6a6e12e54fb439ba8ad Callery: https://gyazo.com/03ea7cc1265bb8efaa4ef835d5d1af0f Connoquenessing: https://gyazo.com/ca54b35b14bd084c4c8ea9867e082bf9 Meridian: https://gyazo.com/01e056def79de3da5867853cef1e1167 All of there are Southwestern PA, north of Pittsburgh. I know scale seems to be a thing we all have a hard-on for and we definitely need some sort of MP or fleshed out SP to make these maps worth it. The resources contained alone would make it boring to play on your own. Just wondering, is any of this something someone could take on? Can the game handle this sort of scale? Could it handle individual towns but not all of them interconnected? Hit me up share your thoughts.
-
Monroeville has now been released! An area south of Rosewood. This map contains a suburbia, Airport, Military base, Research Lab, City, Farms, and various outside settlements. The map is in a usable state. I plan to add more detail and buildings in the future. If you discover any bugs please report them here or in the Steam work shop page. You may download the map from the Steam workshop here. http://steamcommunity.com/sharedfiles/filedetails/?id=915801691 I've used many community made buildings from the Building Pool V2 which was made from 30 different Artists. I'd love to thank you all for your hard work in making this map possible! Atoxwarrior BeastlyBean Blackbeard06 cmseter dko112 DoctahWong Doublebrain EUDOXIO fluffe9911 GothicGhost grivcin Jela331 kaizokuroof Leolvanov mads232 Mainulainen Neutralnz1 rsdworker Sieben srandiny The googlator Traya Aclus Valindil Veged VikiDikRUS Way2sp00ky Z3759xy IndigoRebel zoeyflower Below is the initial WIP post, you may also reply your bugs here. ~Initial post~ My second map, and currently 10x10 cells. Features a suburb spanning 2 cells, a city, Airport, and various others. Lots of scattered settlements here and there as well. I'm trying to make every single building for the map, so it would be a new experience for everyone and to get some new buildings out there for everyone to use. I am making this with quality in mind and want to make this map very detailed like others. The area I plan to place this would be south of Rosewood, and should roughly be the size of West Point as far as content.. Not sure on the release date, regardless after this map I plan to make a huge map. Like 45x45 cells or more if possible. (inspired by Cardenaglo's bunjil map.) More info on that when this one is finished..
- 15 replies
-
- 4
-
-
- monroeville
- wip
- (and 1 more)
-
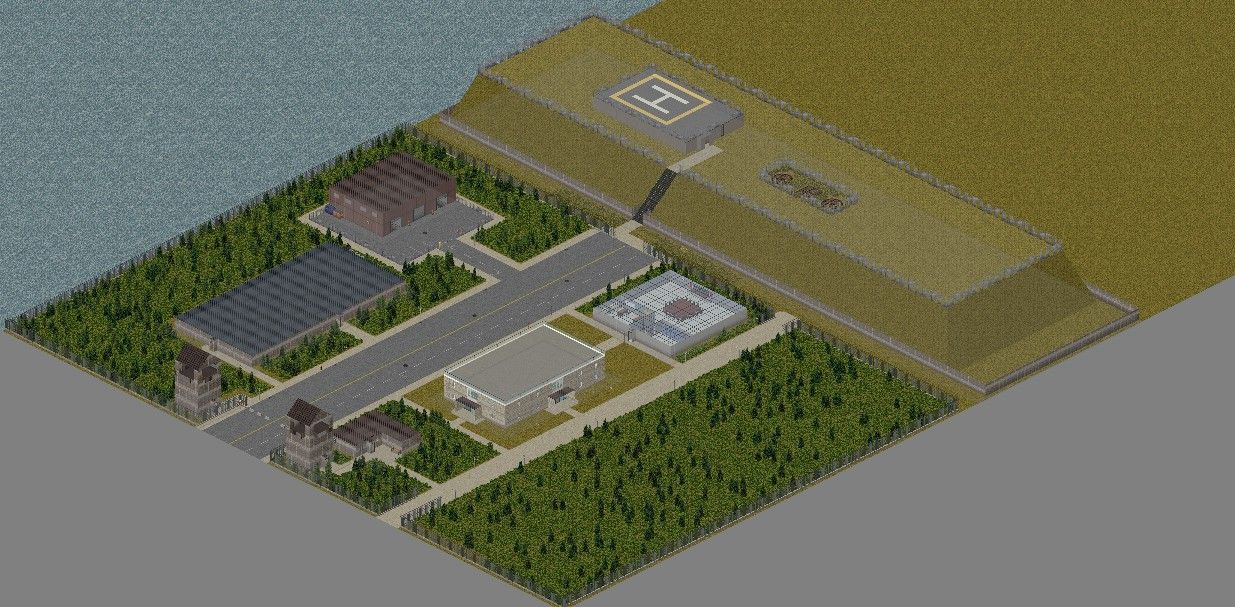
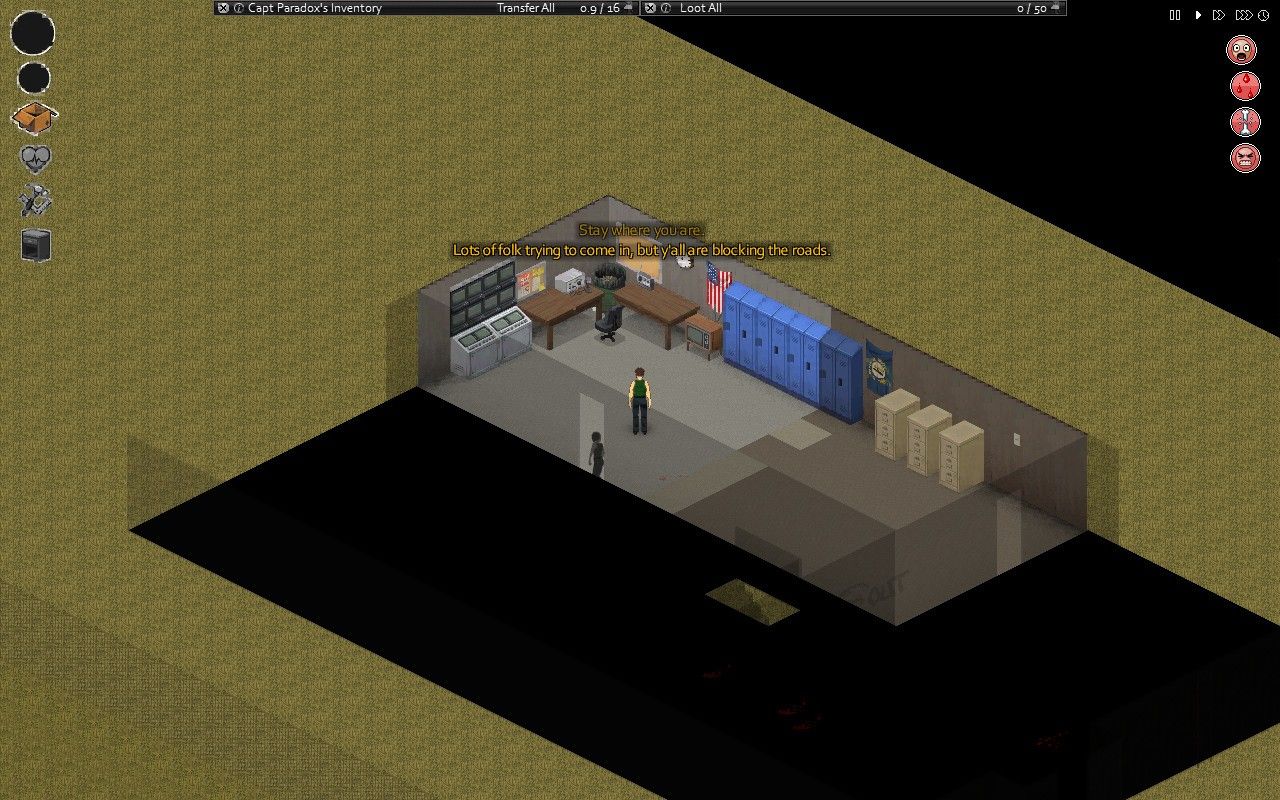
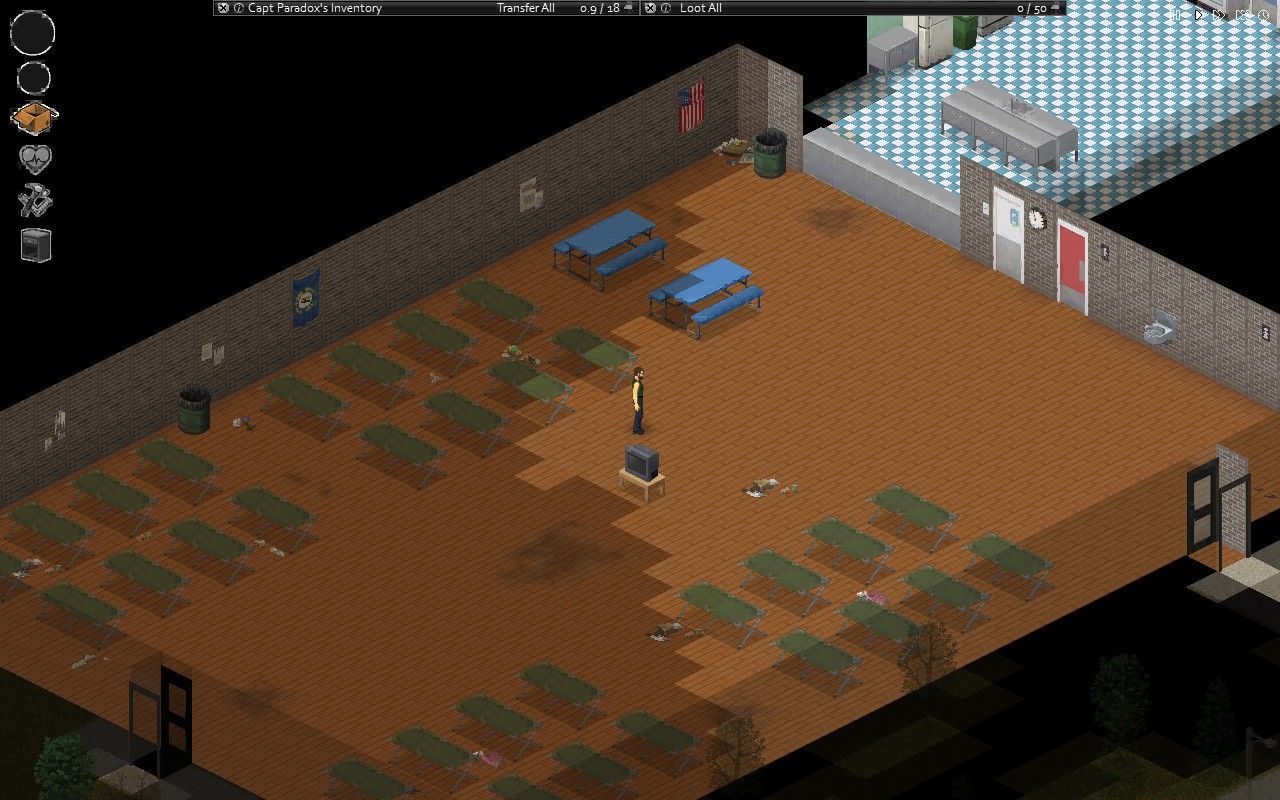
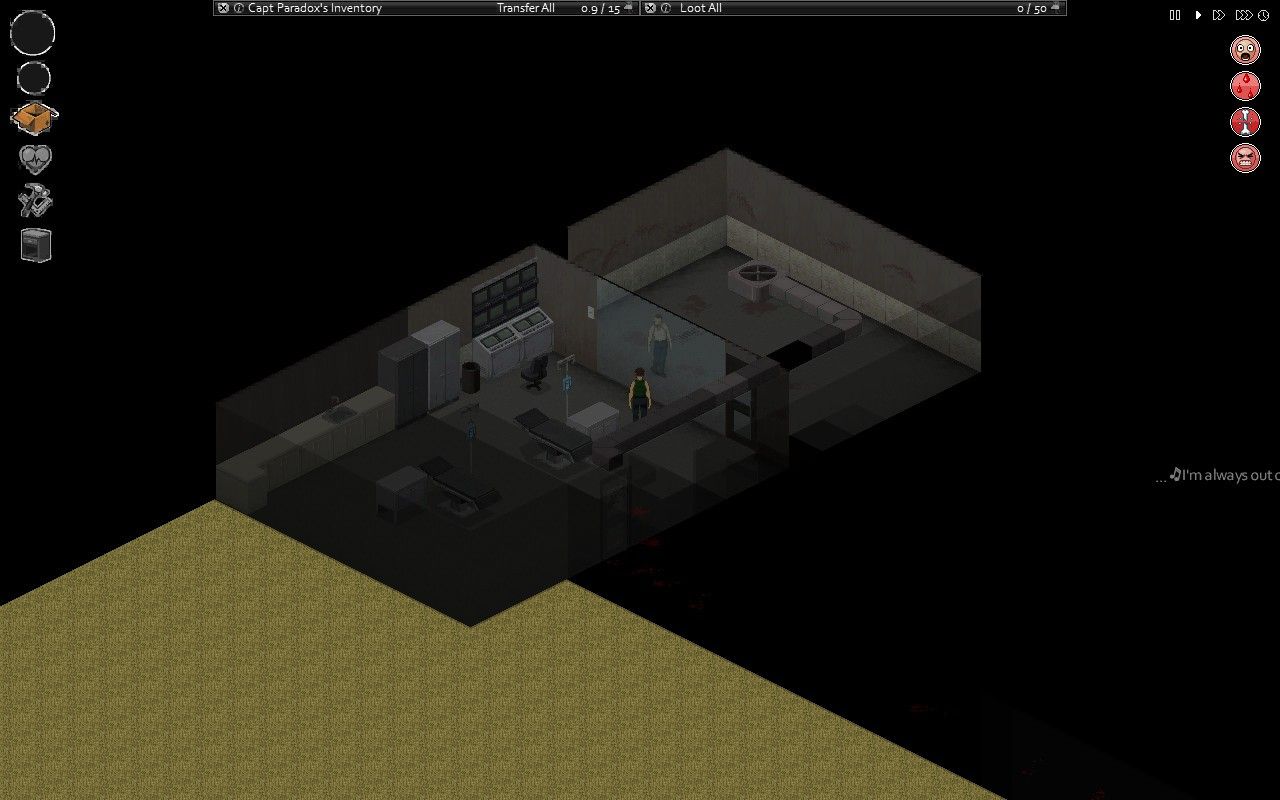
Workshop Page:http://steamcommunity.com/sharedfiles/filedetails/?id=860479137 This is a map I've been working on. It is a continuation of a map I started for Nolan's Survivor Mod. Please note you cannot use Nolan's Survivor Mod at the same time you use this map. Title:Valley Station Military Outpost Version:1.1 Size: 1 Cell Cell Location: 41,14 http://map.projectzomboid.com/?desc=Survival_1xL0#0.8336425885023149,0.11389437032158789,237.37631379976963 Description:The military has created an outpost on the highway leaving Valley Station. All knowledge of this outpost is classified, who knows what you'll discover!
- 29 replies
-
- 6
-
-

-
- valley station military outpost
- valley station
- (and 7 more)