

Capt_Paradox
-
Posts
113 -
Joined
-
Last visited
Reputation Activity
-

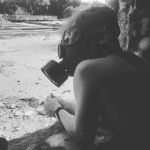 Capt_Paradox got a reaction from Legoland99 in Valley Station Military Outpost
Workshop Page:http://steamcommunity.com/sharedfiles/filedetails/?id=860479137
This is a map I've been working on. It is a continuation of a map I started for Nolan's Survivor Mod. Please note you cannot use Nolan's Survivor Mod at the same time you use this map.
Title:Valley Station Military Outpost
Version:1.1
Size: 1 Cell
Cell Location: 41,14 http://map.projectzomboid.com/?desc=Survival_1xL0#0.8336425885023149,0.11389437032158789,237.37631379976963
Description:The military has created an outpost on the highway leaving Valley Station. All knowledge of this outpost is classified, who knows what you'll discover!
-

 Capt_Paradox reacted to Woldren in How to add a house? - Map Editor
problem solved. I was trying to add the house from Tilezed instead of WorldEd
-
Capt_Paradox reacted to RingoD123 in The One Stop TileZed Mapping Shop
Here you will find a (hopefully) comprehensive guide to map modding using TileZed, from scratch, to uploading to Steam Workshop.
Step 1) Installation and setup
Step 2) Creating a new map
- Creating A Master Image
- Creating The Base Map Image
- Creating The vegetation Map Image
- Creating The Zombie Spawn Map Image
- Importing into WorldEd
Step 3) Creating/Adding custom buildings
Navigate to your TileZed folder and create a new folder inside named Buildings, this is where you are going to save any buildings you make or download.
- How to create custom buildings
- How to add buildings to your map
Step 4) Exporting and testing the map
- Exporting
- Getting it in game
Step 5) Adding world detail
Step 6) Zoning Your Map
Step 7) Uploading to steam workshop
Tips
FAQ's
Other Helpful Guides
Big thanks to Capt_Paradox, Blackbeard06, Suomiboi, Thuztor and the whole modding community ❤️
-
 Capt_Paradox got a reaction from trombonaught in Project Zomboid Mapping Instructions - VegMap to Testing Custom Map
UPDATE:Tiles for 2015 didn't work for me or BlackBeard so I linked to 2014 tiles which still work. I have modified the tutorial to reflect this! If someone knows of a fix for 2015 tiles please let me know. https://dl.dropboxusercontent.com/u/237104401/Project Zomboid Mapping Instructions.txt (New Download link for Txt file Tutorial)^^^^^ This is a basic guide to get people from Veg Map to testing their Custom Map in PZ. I'm one of those people, who before I commit to something I want to understand the process to see limitations. I spent 3 days scouring the web for videos and tutorials to learn as much as I could. At which point I think I finally have a good grasp of everything up to the point of testing. I've included some links to tools and tutorials that helped me better understand this as well. Maybe later I'll pretty this up, but for now enjoy! I apologize for any typos!
-------------------------------------------------------------------------------- Mapping for Project Zomboid Required: TileZed-May-25-2015-32bit.zip https://dl.dropboxusercontent.com/u/13095836/TileZed-May-25-2015-32bit.zip Tiles-May-25-2015.zip https://dl.dropboxusercontent.com/u/13095836/Tiles-May-25-2015.zip (2015 tiles that didn't work) ZomboidMapTools1_1.zip http://www.moddb.com/games/project-zomboid/downloads/zomboid-map-tools-64bit (2014 tiles that work) mapzoidv060exe.zip (Optional if you do not want to make your own maps for layout/vegetation). Paint Program First: Create a few folders for easy access: Main Folder= Zomboid Mapping SubFolders found in Zomboid Mapping Folder: -Buildings (this is where you will store building files for the Building Editor). -Output (This is where you will find your lot files(map you made) after clicking generate lots in WorldEd). -TmxWorld (This is where your saved map from the PNG/BMP Basemap/Vegetation Map will save too). -Tiles -Tools (This is where you have your Tile Definitions from the Tiles-May-25-2015.zip ZomboidMapTools1_1.zip that will be props/textures).(Extract the zip file into the Zomboid Mapping Folder,there will be a folder named Tools created, inside that folder will be another called Tiles. This Tiles folder is the one you will use for generating lot's when asked.) These instructions are going to assume you are creating a 1x1 Cell map. Step 1: Create your BaseMap(Roads,Basic Terrain). Step 2: Create your Vegetation Map (The types of Plants/Tree's and Ground Coverage your map will have) Step 3: Create your ZombieSpawnMap Your BaseMap and Veg map should be saved in PNG format. Size for a one cell map= 300x300 for both. Your ZombieSpawnMap should be saved in BMP format. Size for a one cell map= 30x30 Example File names: NewbCity.png(baselayout 300x300),NewbCity_veg.png(Vegetation map 300x300), NewbCity_ZombieSpawnMap.Bmp(Duh,Zombie Spawn map 30x30) I just used NewbCity as the example for my map project. These links will help explain the color codes to use in the paint editor to draw Base Layout map/Vegetation Map. https://theindiestone.com/forums/index.php?/topic/4823-how-to-draw-maps-for-the-pz-mapping-tools/ Thuztor's Pdf file for mapping contains good color code info as well pages 5 and 6. https://dl.dropboxusercontent.com/u/69737873/PZ/Sonstiges/mapping/Mapping%20Guide_v0.2.pdf If you want to try your hand using Mapzoid to get an idea of what it's like here's the link: https://theindiestone.com/forums/index.php?/topic/4684-random-mapzoid-random-bitmap-terrain-generator-python-win-exe/ Base layout colors Veg Map Colors(I would copy and paste these color palettes to your paint program and use them with the color picker tool to adjust your mapzoid file to your liking since it doesn't always work perfectly.:Thanks to Suomiboi again for his tutorial found here) Also make sure to disable anti-aliasing if you have any issues with incorrect colors (I didn't have too but some programs react differently). Wouldn't let me display the image here so if you want to copy them click on the links or scroll to the bottom of this page. Step 3:Now that you are done using mapzoid or a paint program to create those 3 files(which I would store in the main directory of ZomboidMapping folder) Load up TileZed. Go to the toolbar at the top and look for the tab TOOLS Then go down and select WorldEd. Now a new window popped open with WorldEd. Go to File in the Toolbar and select New and popup window asking the size of the map you want to create. Change it to 1 Cell Width, 1 Cell Height. Great now you have this empty grey square saying 0,0 You might notice in the upper right side of the screen it says Maps with a little window of folders. Navigate to your ZomboidMapping Folder you created earlier. If you saved your files to the ZomboidMapping folder earlier you will now see NewbCity.png. Drag this file from the window into the grey square that says 0,0. You should now see a basic view of the file you created in paint or mapzoid earlier. Great! Go to File tab in the toolbar at the top, Save as> Newbcity.pzw (or whatever your map name is you chose). Step 4: Go to the File Tab again in the toobar at the top, BMP>TMX then select All Cells. You should now have a new popup window asking you all kinds of fun stuff. The only one you should have to change is the top one for Export directory Select that and navigate to your Tmx_World folder you created in Zomboid Mapping earlier and select that. (if you click apply afterwards the window will exit saving your directory but will not complete the BMP>TMX so go through the file tab again doing the same process this time click OK). Next a window should popup saying Bmp to Tmx Sanity Check, click Ok. After a few seconds it should say Finished, Click OK. Step 5: go into TileZed and go to the File Toolbar tab in the upper left corner. Click Open, navigate to Tmx_World folder in the Zomboid Mapping folder you created earlier. Select NewbCity_0_0.tmx or whatever you saved your map as (make sure to keep the name the same across all files). Now you should be able to view your map in TileZed. Some notes: If you plan on changing your vegetation map I highly suggest you do it at this stage before you add props or details in TileZed Because when I tried editing mine afterwards I had to go back and do the BMP>TMX (close out of TileZed Reload the program and load up the file again) only to realize all of my street lines, fences and props were now gone. So make sure you are happy with your layout of roads/forests/vegetation before continuing to detail your map. This should roughly get your started mapping, maybe when I master HouseBuilding/Spawning ETC I will add that later. Step 6: Playing your map! So after all of this you have some really basic map you want to try out right? Ok, so go back to WorldED, Go to the File Tab on the toolbar in the top left. Select Generate Lots, then Select All Cells. Now a new pop window has started. Lots Directory: This is where your map files will save, select the folder we created earlier in Zomboid Mapping called Output. Zombie Spawn Map Image: This is the 30x30 NewbCity_ZombieSpawnMap.bmp you created earlier (or whatever your map is named) it should be in the Main Zomboid Mapping Folder. Tile Definitions: This is all those wonderful images/props for your map which should be located in the Tiles (tools/tiles is where they are now located)folder you extracted Tiles-May-25-2015.zip ZomboidMapTools1_1.zip to earlier in Zomboid Mapping earlier. (note:Depending upon how you extracted it there might be a Tools\Tiles folder inside of the tiles folder you created earlier).<<<<<< This might explain why even I was confused about the 2015 tiles and the 2014 tiles. So make sure you use the 2014 from http://www.moddb.com/games/project-zomboid/downloads/zomboid-map-tools-64bit World Origin: This tells the game what area of the Zomboid Map you are claiming for your cell. Note( Go to http://map.projectzomboid.com/ and on the left side click Map Coordinates. Now you will see it say Example: Cell 35x32 which is main st Muldraugh you obviously don't want to cover over a part of the map that has a town in it, so scroll around and find a nice spot where there isn't a a lot of stuff (clear land or forest)). Write down the cells you want and input them into the World Origin and click OK Now all the map files are compiled to the output folder in Zomboid Mapping. Step 7:Now you have to make it a mod. Go to the C:\Users\(your user name\Zomboid\Mods folder. In this folder you will notice another folder called examplemod, you can use this as a template to create your new map mod. So under the Mods folder create a new folder for your map named after your map. New Folder in Mods= NewbCity Inside the NewbCity Folder you will need to create another folder called media. Inside the Media Folder you will have to create another folder called maps. Inside the Maps folder you will have to create another folder called NewbCity (yes again!) Inside the 2nd Newbcity folder there should be the following: 0_0.Lotheader (0_0 is the World Origin you picked earlier so if you choose cell 35x32 it would say 35_32.Lotheader) Chunkdata_0_0.bin (again 0_0 is just an example for your world origin) World_0_0.lotpack (again again 0_0 is just an example) These 3 files are the files that were created in your output folder after you went through generating lots in WorldEd, you should copy them here. the other required files are: Description.Txt = NewbCity - Population ~750 <LINE> <LINE> (V1.1). U=BTL <Note>>:I figured this out but looking at New Denvers Files so I modified them to test my map, just change it to your map name.> Map.info file looks like this: title=Newb City lots=Muldraugh, KY description=Newb City - Add a short description of your map here Spawnpoints.lua : This file will designate where your player spawns in the game based on character occupation Updated because I was missing a closed bracket - Ty Blackbeard
function SpawnPoints()
return {
constructionworker = {
{ worldX = 38, worldY = 26, posX = 180, posY = 180, posZ = 0 }
},
fireofficer = {
{ worldX = 38, worldY = 26, posX = 180, posY = 180, posZ = 0 }
},
parkranger = {
{ worldX = 38, worldY = 26, posX = 180, posY = 180, posZ = 0 }
},
policeofficer = {
{ worldX = 38, worldY = 26, posX = 180, posY = 180, posZ = 0 }
},
securityguard = {
{ worldX = 38, worldY = 26, posX = 180, posY = 180, posZ = 0 }
},
unemployed = {
{ worldX = 38, worldY = 26, posX = 180, posY = 180, posZ = 0 }
}
}
end
You will notice that WorldX and World Y refers to which cell. You will also notice posx and posy refers to the tile in your cell/map. If you look at your map in TileZed you will see in the bottem left corner numbers like Example:180,172 These are your tile coordinates. So find a tile you want to spawn and write down the numbers. Now modify that file for which cell you picked earlier on the PZ map under worldx and worldy Now modify that file for which tile you picked on your map in TileZed under posx and posy Save the file and now you character will spawn in the spot you chose. The next file in the folder will be: Thumb.png This is just a screenshot for your map, you can steal the one out of New Denvers to use as a placeholder for now if you want till you have your own. So let's recap: Inside of the last NewbCity folder you need: 0_0.lotheader Chunkdata_0_0.bin World_0_0.lotpack Map.info Description.txt Spawnpoints.lua Thumb.png Make sure you have all 7 files. Ok now go back to the Mods\Newbcity folder (the first newbcity or your mapname folder with the media folder in it). There should be 2 files in here: Mod.info (this is another file to describe your map) Poster.png (Another screenshot photo) Mod.info contains this: name=NewbCity id=NewbCity description= This is NewbCity for newbs trying to map. poster=poster.png If you want to get rolling you can modify the files in the examplemod folder to make it easier. If you want a better understanding of these files I suggest you download NewDenvers map to take a look at this link: https://theindiestone.com/forums/index.php?/topic/12110-new-denver-bc-v21/ Step 8: Load up Project Zomboid Go to mods in the bottom left corner and go to NewbCity(or your map name and activate it) Create a single player game and you will see your Newbcity(or your map name) as a spawn location. Join the game and you will notice that you spawned at the location you designated earlier in the spawnpoints.lua file. Play your barren wasteland of a map and enjoy! Big thanks to EasyPickins, Blindcoder, Thuztor, Suomiboi, Mendonca for their tools and tutorials which helped me make it to testing my own custom map.
Courtesy of BlackBeard! Great comprehensive tutorial!
-
 Capt_Paradox got a reaction from Ice Sex in How to make a map Start to Finish Full Video Tutorial
Blackbeard put some serious work into this. I can't say I've seen a tutorial this in depth before.
Blackbeard - "Making PZ Mapping Great Again!"
-
 Capt_Paradox got a reaction from Blackbeard06 in How to make a map Start to Finish Full Video Tutorial
Blackbeard put some serious work into this. I can't say I've seen a tutorial this in depth before.
Blackbeard - "Making PZ Mapping Great Again!"
-
-
 Capt_Paradox got a reaction from xXxFANCYCAPYBARA36xXx in How to make a map Start to Finish Full Video Tutorial
Blackbeard put some serious work into this. I can't say I've seen a tutorial this in depth before.
Blackbeard - "Making PZ Mapping Great Again!"
-
Capt_Paradox reacted to Blackbeard06 in How to make a map Start to Finish Full Video Tutorial
After a very long time of waiting I have decided to bite the bullet and do my own research and find out how to make a custom map for Project Zomboid. After a Red Bull fueled, grueling 3 days of research I have finally found out how to get started with making a map. I have decided that I would do the community a service and create a tutorial video on how to make a map. A complete all in 1 guide that covers all aspects of the tools and steps needed to get your creativity in gear. The video is long, but worth the watch as you will be on your way to making maps in just a little over 1 hour. I've also added skippable chapters in the video description so you can skip ahead or easily find what your looking for.
~update~ I've added another video explaining the spawnregions.lua file. It is annotated in the video with a link.
This wouldn't be possible without some help from others and would like to thank Capt_Paradox, Will, RingoD123, and EasyPickens for your support!
If you have any questions please feel free to reply to this topic, the youtube video channel, and or The Indie Stone Community Discord and I will try my best to help you in anyway I can.
-
 Capt_Paradox got a reaction from nolanri in Map Tools & Tiles for Build 36
Awesome! Thank you so much. Any chance on getting the updated Raw TMX files? or at least a way to revert the lot files to modify them?
-
Capt_Paradox reacted to EasyPickins in Map Tools & Tiles for Build 36
Latest Version Here: https://theindiestone.com/forums/index.php?/topic/23803-latest-tilezed-worlded-and-tilesets-may-14-2018/
If you have a 32-bit version of Windows, download "TileZed + WorldEd 32-bit".
If you have a 64-bit version of Windows, download "TileZed + WorldEd 64-bit".
Download your TileZed version of choice AND the Tilesets listed above.
You should create a folder and unzip both the "TileZed + WorldEd" archive and the "Tileset images" archive into that folder.
This should give you 3 folders like this:
PZMapTools/ <--- you create this folder somewhere
Tiles/
TileZed/
WorldEd/
If you get an error about a missing DLL, run the TileZed/vcredist_xNN.exe installer.
-
 Capt_Paradox got a reaction from Ciber Ninja in Project Zomboid Mapping Instructions - VegMap to Testing Custom Map
UPDATE:Tiles for 2015 didn't work for me or BlackBeard so I linked to 2014 tiles which still work. I have modified the tutorial to reflect this! If someone knows of a fix for 2015 tiles please let me know. https://dl.dropboxusercontent.com/u/237104401/Project Zomboid Mapping Instructions.txt (New Download link for Txt file Tutorial)^^^^^ This is a basic guide to get people from Veg Map to testing their Custom Map in PZ. I'm one of those people, who before I commit to something I want to understand the process to see limitations. I spent 3 days scouring the web for videos and tutorials to learn as much as I could. At which point I think I finally have a good grasp of everything up to the point of testing. I've included some links to tools and tutorials that helped me better understand this as well. Maybe later I'll pretty this up, but for now enjoy! I apologize for any typos!
-------------------------------------------------------------------------------- Mapping for Project Zomboid Required: TileZed-May-25-2015-32bit.zip https://dl.dropboxusercontent.com/u/13095836/TileZed-May-25-2015-32bit.zip Tiles-May-25-2015.zip https://dl.dropboxusercontent.com/u/13095836/Tiles-May-25-2015.zip (2015 tiles that didn't work) ZomboidMapTools1_1.zip http://www.moddb.com/games/project-zomboid/downloads/zomboid-map-tools-64bit (2014 tiles that work) mapzoidv060exe.zip (Optional if you do not want to make your own maps for layout/vegetation). Paint Program First: Create a few folders for easy access: Main Folder= Zomboid Mapping SubFolders found in Zomboid Mapping Folder: -Buildings (this is where you will store building files for the Building Editor). -Output (This is where you will find your lot files(map you made) after clicking generate lots in WorldEd). -TmxWorld (This is where your saved map from the PNG/BMP Basemap/Vegetation Map will save too). -Tiles -Tools (This is where you have your Tile Definitions from the Tiles-May-25-2015.zip ZomboidMapTools1_1.zip that will be props/textures).(Extract the zip file into the Zomboid Mapping Folder,there will be a folder named Tools created, inside that folder will be another called Tiles. This Tiles folder is the one you will use for generating lot's when asked.) These instructions are going to assume you are creating a 1x1 Cell map. Step 1: Create your BaseMap(Roads,Basic Terrain). Step 2: Create your Vegetation Map (The types of Plants/Tree's and Ground Coverage your map will have) Step 3: Create your ZombieSpawnMap Your BaseMap and Veg map should be saved in PNG format. Size for a one cell map= 300x300 for both. Your ZombieSpawnMap should be saved in BMP format. Size for a one cell map= 30x30 Example File names: NewbCity.png(baselayout 300x300),NewbCity_veg.png(Vegetation map 300x300), NewbCity_ZombieSpawnMap.Bmp(Duh,Zombie Spawn map 30x30) I just used NewbCity as the example for my map project. These links will help explain the color codes to use in the paint editor to draw Base Layout map/Vegetation Map. https://theindiestone.com/forums/index.php?/topic/4823-how-to-draw-maps-for-the-pz-mapping-tools/ Thuztor's Pdf file for mapping contains good color code info as well pages 5 and 6. https://dl.dropboxusercontent.com/u/69737873/PZ/Sonstiges/mapping/Mapping%20Guide_v0.2.pdf If you want to try your hand using Mapzoid to get an idea of what it's like here's the link: https://theindiestone.com/forums/index.php?/topic/4684-random-mapzoid-random-bitmap-terrain-generator-python-win-exe/ Base layout colors Veg Map Colors(I would copy and paste these color palettes to your paint program and use them with the color picker tool to adjust your mapzoid file to your liking since it doesn't always work perfectly.:Thanks to Suomiboi again for his tutorial found here) Also make sure to disable anti-aliasing if you have any issues with incorrect colors (I didn't have too but some programs react differently). Wouldn't let me display the image here so if you want to copy them click on the links or scroll to the bottom of this page. Step 3:Now that you are done using mapzoid or a paint program to create those 3 files(which I would store in the main directory of ZomboidMapping folder) Load up TileZed. Go to the toolbar at the top and look for the tab TOOLS Then go down and select WorldEd. Now a new window popped open with WorldEd. Go to File in the Toolbar and select New and popup window asking the size of the map you want to create. Change it to 1 Cell Width, 1 Cell Height. Great now you have this empty grey square saying 0,0 You might notice in the upper right side of the screen it says Maps with a little window of folders. Navigate to your ZomboidMapping Folder you created earlier. If you saved your files to the ZomboidMapping folder earlier you will now see NewbCity.png. Drag this file from the window into the grey square that says 0,0. You should now see a basic view of the file you created in paint or mapzoid earlier. Great! Go to File tab in the toolbar at the top, Save as> Newbcity.pzw (or whatever your map name is you chose). Step 4: Go to the File Tab again in the toobar at the top, BMP>TMX then select All Cells. You should now have a new popup window asking you all kinds of fun stuff. The only one you should have to change is the top one for Export directory Select that and navigate to your Tmx_World folder you created in Zomboid Mapping earlier and select that. (if you click apply afterwards the window will exit saving your directory but will not complete the BMP>TMX so go through the file tab again doing the same process this time click OK). Next a window should popup saying Bmp to Tmx Sanity Check, click Ok. After a few seconds it should say Finished, Click OK. Step 5: go into TileZed and go to the File Toolbar tab in the upper left corner. Click Open, navigate to Tmx_World folder in the Zomboid Mapping folder you created earlier. Select NewbCity_0_0.tmx or whatever you saved your map as (make sure to keep the name the same across all files). Now you should be able to view your map in TileZed. Some notes: If you plan on changing your vegetation map I highly suggest you do it at this stage before you add props or details in TileZed Because when I tried editing mine afterwards I had to go back and do the BMP>TMX (close out of TileZed Reload the program and load up the file again) only to realize all of my street lines, fences and props were now gone. So make sure you are happy with your layout of roads/forests/vegetation before continuing to detail your map. This should roughly get your started mapping, maybe when I master HouseBuilding/Spawning ETC I will add that later. Step 6: Playing your map! So after all of this you have some really basic map you want to try out right? Ok, so go back to WorldED, Go to the File Tab on the toolbar in the top left. Select Generate Lots, then Select All Cells. Now a new pop window has started. Lots Directory: This is where your map files will save, select the folder we created earlier in Zomboid Mapping called Output. Zombie Spawn Map Image: This is the 30x30 NewbCity_ZombieSpawnMap.bmp you created earlier (or whatever your map is named) it should be in the Main Zomboid Mapping Folder. Tile Definitions: This is all those wonderful images/props for your map which should be located in the Tiles (tools/tiles is where they are now located)folder you extracted Tiles-May-25-2015.zip ZomboidMapTools1_1.zip to earlier in Zomboid Mapping earlier. (note:Depending upon how you extracted it there might be a Tools\Tiles folder inside of the tiles folder you created earlier).<<<<<< This might explain why even I was confused about the 2015 tiles and the 2014 tiles. So make sure you use the 2014 from http://www.moddb.com/games/project-zomboid/downloads/zomboid-map-tools-64bit World Origin: This tells the game what area of the Zomboid Map you are claiming for your cell. Note( Go to http://map.projectzomboid.com/ and on the left side click Map Coordinates. Now you will see it say Example: Cell 35x32 which is main st Muldraugh you obviously don't want to cover over a part of the map that has a town in it, so scroll around and find a nice spot where there isn't a a lot of stuff (clear land or forest)). Write down the cells you want and input them into the World Origin and click OK Now all the map files are compiled to the output folder in Zomboid Mapping. Step 7:Now you have to make it a mod. Go to the C:\Users\(your user name\Zomboid\Mods folder. In this folder you will notice another folder called examplemod, you can use this as a template to create your new map mod. So under the Mods folder create a new folder for your map named after your map. New Folder in Mods= NewbCity Inside the NewbCity Folder you will need to create another folder called media. Inside the Media Folder you will have to create another folder called maps. Inside the Maps folder you will have to create another folder called NewbCity (yes again!) Inside the 2nd Newbcity folder there should be the following: 0_0.Lotheader (0_0 is the World Origin you picked earlier so if you choose cell 35x32 it would say 35_32.Lotheader) Chunkdata_0_0.bin (again 0_0 is just an example for your world origin) World_0_0.lotpack (again again 0_0 is just an example) These 3 files are the files that were created in your output folder after you went through generating lots in WorldEd, you should copy them here. the other required files are: Description.Txt = NewbCity - Population ~750 <LINE> <LINE> (V1.1). U=BTL <Note>>:I figured this out but looking at New Denvers Files so I modified them to test my map, just change it to your map name.> Map.info file looks like this: title=Newb City lots=Muldraugh, KY description=Newb City - Add a short description of your map here Spawnpoints.lua : This file will designate where your player spawns in the game based on character occupation Updated because I was missing a closed bracket - Ty Blackbeard
function SpawnPoints()
return {
constructionworker = {
{ worldX = 38, worldY = 26, posX = 180, posY = 180, posZ = 0 }
},
fireofficer = {
{ worldX = 38, worldY = 26, posX = 180, posY = 180, posZ = 0 }
},
parkranger = {
{ worldX = 38, worldY = 26, posX = 180, posY = 180, posZ = 0 }
},
policeofficer = {
{ worldX = 38, worldY = 26, posX = 180, posY = 180, posZ = 0 }
},
securityguard = {
{ worldX = 38, worldY = 26, posX = 180, posY = 180, posZ = 0 }
},
unemployed = {
{ worldX = 38, worldY = 26, posX = 180, posY = 180, posZ = 0 }
}
}
end
You will notice that WorldX and World Y refers to which cell. You will also notice posx and posy refers to the tile in your cell/map. If you look at your map in TileZed you will see in the bottem left corner numbers like Example:180,172 These are your tile coordinates. So find a tile you want to spawn and write down the numbers. Now modify that file for which cell you picked earlier on the PZ map under worldx and worldy Now modify that file for which tile you picked on your map in TileZed under posx and posy Save the file and now you character will spawn in the spot you chose. The next file in the folder will be: Thumb.png This is just a screenshot for your map, you can steal the one out of New Denvers to use as a placeholder for now if you want till you have your own. So let's recap: Inside of the last NewbCity folder you need: 0_0.lotheader Chunkdata_0_0.bin World_0_0.lotpack Map.info Description.txt Spawnpoints.lua Thumb.png Make sure you have all 7 files. Ok now go back to the Mods\Newbcity folder (the first newbcity or your mapname folder with the media folder in it). There should be 2 files in here: Mod.info (this is another file to describe your map) Poster.png (Another screenshot photo) Mod.info contains this: name=NewbCity id=NewbCity description= This is NewbCity for newbs trying to map. poster=poster.png If you want to get rolling you can modify the files in the examplemod folder to make it easier. If you want a better understanding of these files I suggest you download NewDenvers map to take a look at this link: https://theindiestone.com/forums/index.php?/topic/12110-new-denver-bc-v21/ Step 8: Load up Project Zomboid Go to mods in the bottom left corner and go to NewbCity(or your map name and activate it) Create a single player game and you will see your Newbcity(or your map name) as a spawn location. Join the game and you will notice that you spawned at the location you designated earlier in the spawnpoints.lua file. Play your barren wasteland of a map and enjoy! Big thanks to EasyPickins, Blindcoder, Thuztor, Suomiboi, Mendonca for their tools and tutorials which helped me make it to testing my own custom map.
Courtesy of BlackBeard! Great comprehensive tutorial!