Search the Community
Showing results for tags 'car'.
-
The vehicles in the game all have the some looking dashboard HUD so I was thinking different vehicles should have different dashboard HUDs. You know with differently arranged and shaped odometers, fuel gauges, rev counter etc. Makes the game more realistic and authentic.
-
Hello and welcome to my tutorial. It covers full workflow of vehicle creation for PZ. If you are a complete beginner in 3D modelling, you'll have to watch/read additional tutorials, I won't cover every aspect of model creation and 'where this button is located'. I divide vehicle creation in these stages: 1) Modelling 2) Wheels texture and modelling 3) Texturing 4) Packing files in folders 5) Editing scripts and .lua 6) In-game editing and tests 7) Workshop publish STAGE 1 - MODELLING Today I am creating a 1960 Ford Falcon I prefer using blender as it is my everyday 3d modelling software. Now, find references for your vehicle and ideally it will be a blueprint/outline scheme, like this one: There are some tips in modelling for PZ: 1) Do not care too much about topology and good shading. There is no actual shading in game, only windows have reflections. 2) Avoid n-gons or triangulate them before export 3) DO NOT make edges to outline body panels/parts. All dividing of parts will be done with texture mask. You can do it in UVs if there will be a point for that. 4) Place spindiel imitations in wheel wells to hide rear part of wheel models 5) In the UVs parts of body have to be straight-oriented without any non-90 degrees rotation, so pixels in texture will lay parallel with polygon flow. 6) To avoid physics artifacts in game import model of one of vanilla game cars models to your scene and model in consistent scale. Or import mine, that is available in the end of topic. This is what I consider a well done model There is nothing special in UV unwrapping process, just remember to place the least amount of seams possible and keep island aligned. Here are the UVs of my model: I've unwrapped the model without applied mirror modifier, so now we will have to texture just one half of the car. I'll fix mirroring later. STAGE 2 - WHEELS There are many ways to make a wheel and texture it, but I'll show the most efficient one. Make the wheel's face with simple materials, but unwrap the 'road touching part' to flat surface, like this: Then place an orthographic camera facing the wheel, scale it to fit the whole wheel-dish. Place a ring with emission material to light the wheel. Switch your renderer to Cycles and go to camera view, now use a rendered shading mode to adjust materials and lights to your taste. Set rendering resolution to something like 120x120-175-175 for best results Check the 'transparent' box in film settings to have alpha backround in texture: Now increase the sample count to something like 512-1024 and hit render. You will end up with a result of a ready-to-go wheel texture: The example file with scene for rendering and the model of this wheel you can download here: *google drive .blend file* Now make a lowpoly model of the wheel to use this texture on. I prefer using 18-24 edge circles for wheels. The unwrapping will be later, but eventually you'll end up with this: This method takes 10-15 minutes when you get used to it and gives a stunning and clear result. STAGE 3 - TEXTURING NOTE: I use a pretty complicated way of texturing and adding light to model. All rules of using textures the default way are covered in "HOW TO CREATE NEW VEHICLE MODS" topic by RingoD123, one of PZ devs. You can access it here: *boop* I'll show you my way, using Substance Painter to apply lighting and fake chrome parts to model. But first comes the base color and details of the car, so let's dive into it. Create a texture with 0 alpha and resolution 256x256. You can go for 512x512, but personally I like pixelated look of lo-res texture. Here are the settings for initial image: To preview the texture you are painting with different car colors, use this node setup. But switch filtering mode from "Linear" to "Closest", I forgot to do it on screenshot. There are two types of texture details: somewhat transparent and absolutely opaque. Half-transparent parts will be affected by car color, so they are mostly shadow/highlight details. Headlights, fixtures and things like that have to be opaque and painted with 100% brush hardness. It is easier to keep 3d view just to see what are you doing and paint texture in image editing mode, right there: First, paint the outlines of doors and other opening parts. Here are some brush hardness values: 0.2 - Outline shadow 0.5 - Outline 1.0 - Fake chrome and rubber window sealing Some work in progress screenshots Now when you have windows frames, save the image you just painted and go to photoshop and mask out glass sections like that Well, time for Substance Painter. You can use photoshop gradients for windows and blender lighting for lighting of the body, but I'll use SP "Baked lighting" filter for that, and for chrome especially. I will briefly describe what I've done in SP: 1) Mask out windows, give them mirror metal material and add a filter to them 2) Mask out chrome parts, made them mirror metal and added the same filter with slightly different settings. 3) Apply the same filter to all body parts left. 4) Add a position gradient to the windows Now I have this result, it is not shaded model, just basecolor: Also export the AO map you baked in SP. You can download file with this scene to look through and get ideas using this link: *boop* Now paint additional details you want on the car and open Photoshop. This is your layers layout: Now save it as .psd for future color editing and as .png to see what the you've done. Plug .png direcly as BaseColor in shader settings. Set your shading setting like this: And check if everything looks ok. This is my result: And this is the vehicle's look with wheels that we made before Sweet, isn't it? Now, it is time to get rid of mirroring. You can make new UV, bake it and... get A LOT of offset artifacts resulting in jagged pixel edges. There is a lazy but effective method: 1) In the UV editor place cursor in the 0,0 coordinates. 2) Set Pivot to 2D cursor: 3) Scale all UV islands to 0.5 EXACTLY 4) Apply mirror modifier to your model. Now select FACES of any half of the model and move it in UVs on Y by value 0.5 EXACTLY or you'll eventually mess everything up. 5) In Photoshop expand canvas of your PSD file we made before 6) Duplicate everything and move to the upper left corner, like in UVs. You can merge color layer(s) to operate color on export more easily. Now you have half of the texture empty... You do not want to waste it, right? Then drop in the wheel texture here without scaling, and you won't need additional texture file for it! 7) Create a layer beneath all others and paint it black or grey to cover alpha-holes in the textures. 8 ) Now unwrap the wheel to this new texture and let it shine! We painted the car and fixed mirroring. DOWNLOAD THE .PSD FILE: *bloop* There are 3 more types of textures to make: 1) Rust 2) Damage (1 or 2 levels, I'm lazy, I prefer using single one) 3) ID Color Mask or just Mask It wasn't possible to make them right with mirroring. Everything about these textures are explained clearly in Ringo's guide, again: *boop* I'll just show results I ended up with. Now you have to use 512x512 clear images for these textures, do not forget it. RUST Painted it with jitter brush and 0.2 hardness. To see what I am doing used the same node setup, as for base texture. DAMAGE Painted gradients with black and white with 0.1 hardess with repetitive strokes. MASK Mask texture tells game where are separate parts of car: doors, windows, lights and others. Every part has it's own color in palette, you can find color table in Ringo's guide. Copy and paste color HEX to use it in blender brush or fill tools. I've missed some of the parts because they do not really matter. AEUGH Texturing is finished. Go to photoshop and make all color variations you want and save them as .png, name them Vehicles_[vehicle name]_ Vehicle name mustn't containt spaces These are color palettes of my car: Now you have to export your vehicle body and wheel models. Copy them to an empty scene and save as separate file. If you used blender default orientations (front, back, right, left, top), then rotate the car on Z axis by 180 degrees. Game rotates it for some reason, so you'll have to do it. Now position everything in scene like this and continue to export settings. Export body and wheel separately with these settings: STAGE 5 - Packing files in folders The folder hierarchy and naming the files you can find in Ringo's guide. The mod file and all of my project files you will be able to download in the end of this topic. make up an Id name for your car. It has to be short, but unique and do not contain spaces. For this car I use '60falcon'. _____________________________________________ workshop.txt properties of the mod for Steam Workshop _____________________________________________ mod.info properties of the mod for in-game mod menu _____________________________________________ models_X folder -> vehicles this folder contains 3d meshes of the vehicle - body and wheel _____________________________________________ textures -> vehicles easy to guess, all vehicle textures are placed here null.png - completely transparent image, used as placeholder later on _____________________________________________ scripts -> vehicles there shoud be a .txt file named with you vehicle's ID name. Open it up and follow these instructions: change invertX to 'TRUE' if vehicle appears to be mirrored by left and right in game. Do not care about scale, offset and other geometric parameters. Insert all your color variation textures as shown below: All vehicle driving parameters are self-explanatory. Remember to set seats count, I'm creating a car with 4 seats. If you want to make less seats or add new, delete passenger[Seat code] records or add new. Also remember Seat[position] records down below. Add or delete the templates, loaded from Game default files: _____________________________________________ LUA SCRIPTS lua -> server -> vehicles -> [car id name]dis.lua Vehicle trunk type distribution file. There is a file with all vehicle distribution types in game files, I'll put it in project folder in the end if the article. This is game files distibution types, select one of them in respect to the vehicle type you are creating. I'll use CarNormal type for Ford Falcon. This is what distribution lua file has to be: _____________________________________________ lua -> shared -> [car id name]SpawnList.lua This file describes spawn zones of your car in game world with certain chance. I've typed in all default zones of spawn, you just have to change the chance and set [Base.60falcon] to [Base.(your car id name)] _____________________________________________ lua -> shared -> Translate -> EN -> IG_UI_EN.txt This is the name of the car in UI - keys name, mechanics window name and such. STAGE 6 - In-game editing and tests Launch PZ and disable all mod exept the one you will be debugging. Now close the game and go to Steam. In application setting set startup parameter to -debug It enables many debug options in-game. Now launch the Game again and, if menu doesn't appear, you've done something wrong in lua scripts. Check them for probles, and I hope, you'll figure out what is wrong. Now start a new game in world with no zombies and big amount of cars. Leave the house and find any car vibing in the street. Right click, -> Vehicle -> Set Script -> [your car ID name]. Car will switch to yours. This is what I've got on first time in-game spawning: YEET, it is all coming along. But wheel positions are a bit off, and we have to place the entering areas of doors. Go to Right click on car -> [DEBUG] Vehicle -> Vehicle Editor. Chassis Place extents and physics shape to outline the car Areas These are access areas to different parts of the car. There is nothing to describe, really, just place them where you can explain it and continue to next section Right click in mechanics tab to enable cheat options for the car. Now right click in mechanics panel. Here you can get key for that car or repair it. Final result in different variations Make a suitable preview image for your mod and crop it in Photoshop to 256x256. Place it in mod folder as preview.png In game menu go WORKSHOP -> create or update mod -> Go to your profile workshop items and find the new mod. Add the description, more screenshots and set visibility to 'Public' ALL PROJECT FILES: *YEET* ZE END Congratulations if you followed my guide to this point. Comment any issues or mistakes I've made.
-
I think it'd be nice if tow trucks were added to the game for the following reasons. 1. You could tow a car with the crane in the rear of the truck without having to get out of your car to hook it up. 2. Tow trucks would have high horse power by default so they'd be especially good for towing vehicles. 3. The crane in the back could lift the car upwards creating less drag since only 2 tires would be making contact with the road. 4. They'd be a great way of sorting vehicles out rather than have to drive each one individually to put into place or have each be towed manually by another car. 5. You could clear the road of any accident obstructions of too wrecked to even get into cars or just regular cars. I was thinking the tow crane could be controlled like raised or lowed by the v menu from flat to a predetermined height/angle. Also you could set from the menu whether to hook up to a car or release it from the tow hook. I was thinking they could be found around at tow garages or along the road at accident events.
-
Think of a tow cable, but a truck designed to tow both crates or a car. But it you want to tow a car, you need more than one tow cable and at least level four or five in mechanics.
-
There should be an option to plant pipe bombs inside of a car in order to make a car bomb. Imagine if you are bitten and desire to take out as many zombies as you can so you drive to a horde at maximum speed and blow them up. Detonator could be set with a clock, remote or on impact
-
Hello, I posted some time ago about me not being able to get any part of my mod to work in game. A removable Back Up Beeper will be added to the game's Step Van, which will make noise when the player puts the van in reverse. You would need a little electrical skill to remove it. I was also planning on giving it a little extra storage, to balance. It is a very big vehicle, after all. I managed now to get the Back-Up Beeper part to function as a part in the world. It is not in the van yet. I now need to have it be a part that's in the Step Van, which I could not seem to work properly. Back up beepers on real vehicles seem to be mounted on the underside, out of sight, so I'm not concerned about having a model that appears on the Step Van. What I'm asking is this: How can I modify the base game's Step Van so that it will include this part, a Back Up Beeper? I have looked at similar mods which have added new cars with new parts, but I wasn't able to figure out the specifics. If it would help, I have attached below the files in which the Back Up Beeper is defined. If it is necessary, I could send more of what I have currently written. Simply adding "template BackUpBeeper," to the Step Van's script did not seem to work. I will greatly appreciate any insight that you may be able to offer. Have a good evening. Thank you for reading, Blockbot20 BackUpBeeper.txt BackUpBeeper_models.txt template_BackUpBeeper.txt
-
Hi, I'm making a mod that adds a removable (with some electrical skill) back-up beeper to spawn with the game's step vans, while adding a little extra trunk room (the downside being putting the vehicle in reverse will make a looping loud beep from the vehicle, which will attract zombies until the part can be uninstalled). This will not be visible from looking at the step van, but checking at the mechanics tab will reveal whether it's installed or not. It will always be installed when the vehicle spawns into the world. I know of older versions of the game where something very similar was on all commercial vehicles, but I couldn't find the code for that in those versions files, and the seemed to have a problem where the sound would play as soon as the reverse button was pressed, and rapidly tapping would quickly, repeatedly play the sound. My goal was to avoid that and place a minimum time limit between each beep. Hopefully, this is understandable and enough information. This is my first mod, I have a little familiarity with coding, but not much with lua, so I'd like to apologize, I had to take inspiration from similar vehicle mods already on the workshop. Unfortunately, I'm not quite sure what exactly is causing this issue. Booting up the game with only this mob enabled shows no change from the base game. The step vans in the world will not have the part on them and will not beep in reverse. The console give the following: ERROR: template "BackUpBeeper" not found. (The name I have used throughout the code to specify this back-up beeper.) I have below attached files I suspect to be causing the problem. "beeper_vehiclesitems" gives the qualities of the back-up beeper itself, while "template_beeper" explains the qualities of the item in the vehicle, if that's the correct information. I also have attached the revised step van code for the game. The changes I have made it to where the back-up beeper ("template = BackUpBeeper") and an increase of 10 to the step van's trunk size, increasing it to 170. These were taken after the example of the base game's code for adding vehicle items, so I'm not quite sure what bits are necessary for this item. For example, some of the code that specified an item of a vehicle had a "lua" segment at the end, which I believe gave the variables such as "create" and "update" and I believe all of them had "test" under the specifications for uninstalling the part. This can be seen as the last written code in my "template_beeper". Is this necessary? What, exactly, does it do? I have additionally attached below the code which specifies what functions of the back-up beeper (I have my intended functions for the beeper at the top of this message) The code runs through the game as the mod is but it may cause errors in the future once the mod's functionality changes. I apologize if this was too much to read, I just wasn't sure how to get the mod functioning properly. Thank you. beeper_vehiclesitems.txt template_beeper.txt vehicle_stepvan.txt ReverseBeeper.lua
-
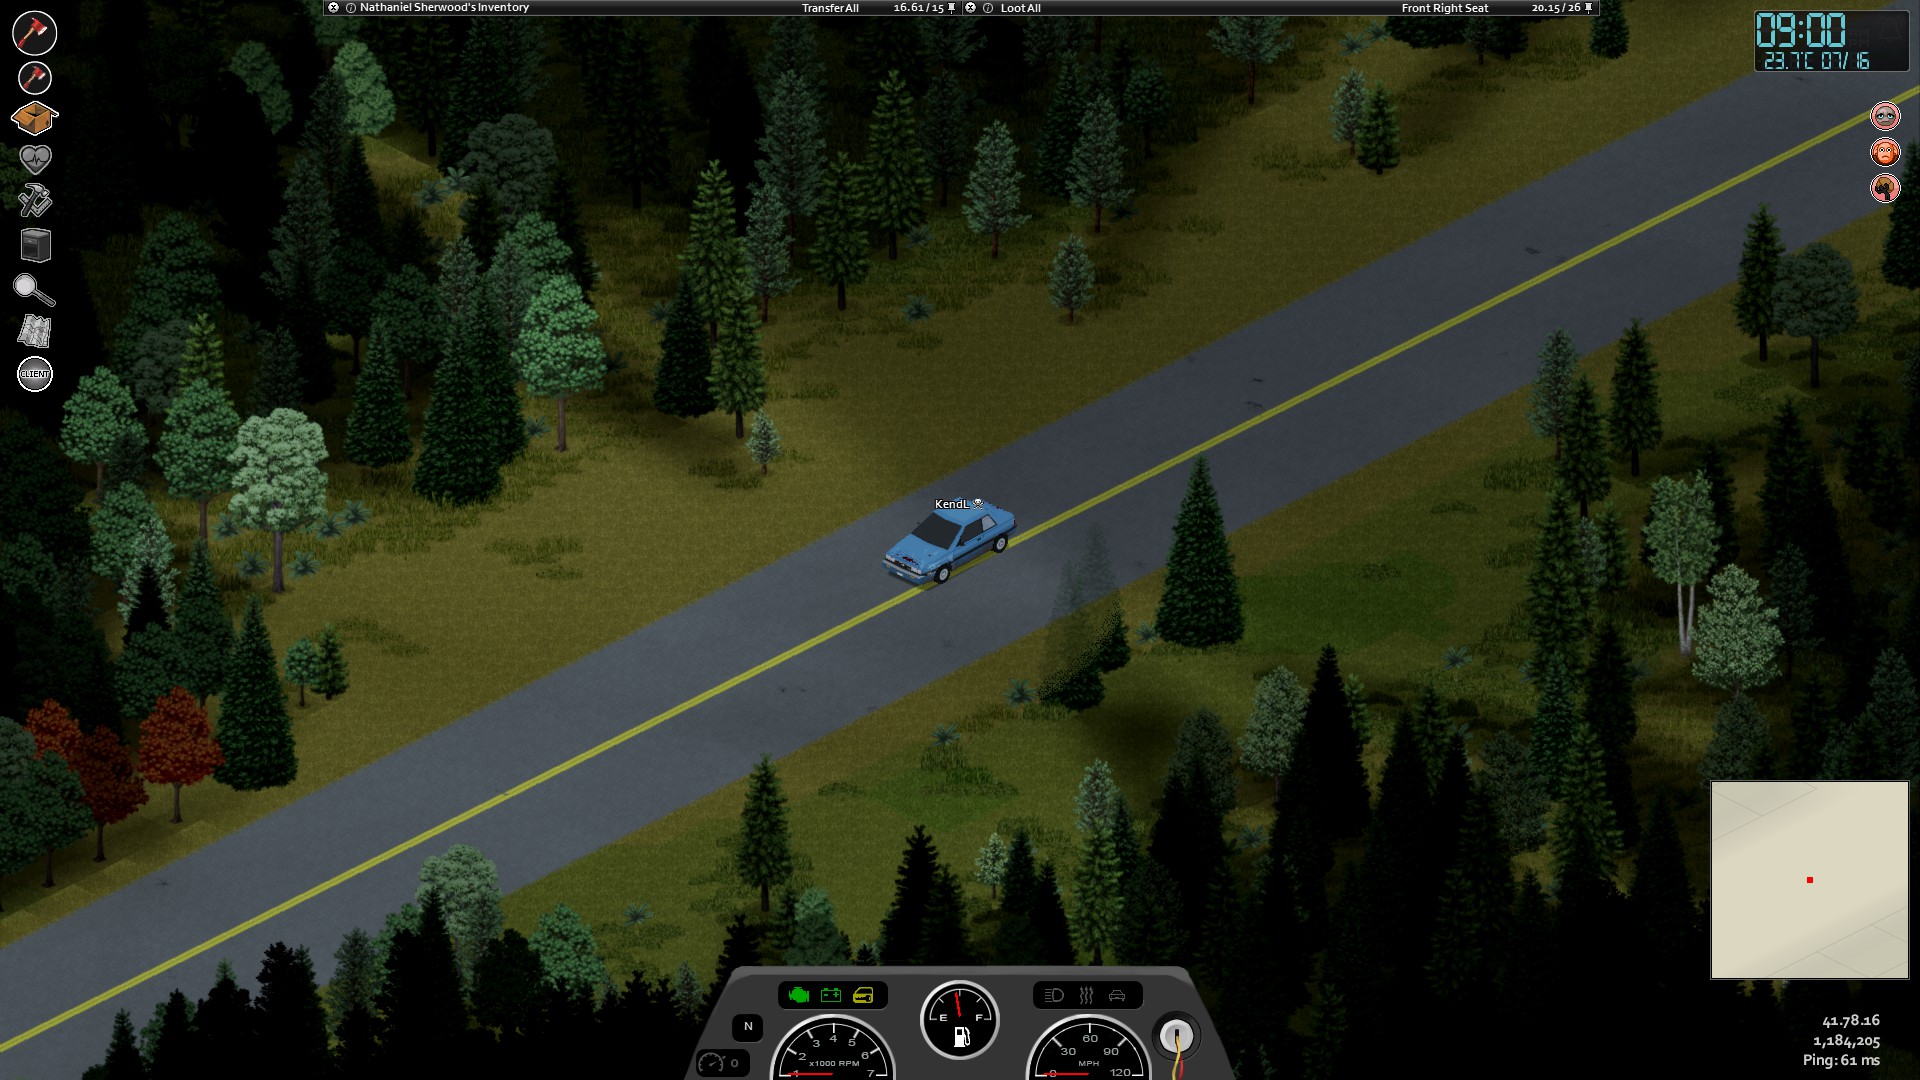
Suggestions 1. Change Vehicle camera positioning. The center of the screen should be shifted forward in the direction of the vehicle. 2. Allow camera movement with RMB like in a normal person view. Currently it is only possible to "aim" the camera when the front window is open... which is illogical. 3. It would be better to introduce "Vehicle camera offset" option to let players configure how far the camera is moved when they enter a vehicle. Rationale 1. In most cases a player does not really need to observe half of the screen behind the car. At the other hand the player needs to look forward and the further he can see the road - the better. It is not possible to "aim" the camera with RMB in a car when the front window is closed but it is possible to do so when you open that window. As the result I found myself in an illogical situation where I open a window to look further by aiming the camera and positioning it so that the car would be at the border of my screen. Because I don't need to know what is BEHIND my car when I move at 100mph speed. The only exception is a situation where I intentionally aim my camera backwards. 2. It is useful to be able to use "aim" camera. I don't really get why we can't use it with closed windows. It would be better to allow players to use this camera and look through the windows of the car exactly the same as they can do with open windows now. 3. In case someone does not like the offset - they can tune it.

-
Hello, let us place colored light bulbs as headlights A possibility to paint light bulbs somehow would be cool too. thanks in advance
-
Hi , i and a lot of my friends like cars in project zomboid but they are missing a lot of things ... some of those things being better control of the car like changing gears and holding the key until the car starts , having realistic force and grip and a lot more ... my idea is that project zomboid needs a overall update for the cars like adding custom parts for them like push bars that you can find them in garages and warehouses and putting them on your car let you kill zombies with it or some engine upgrade parts that i really want to see in the game because i died a lot only for being in a slow van or old car ... some stuff that can make cars feel so much better are for example needing to change the oil (it's a nightmare) or not letting the car be outside in cold weather because they're are old cars and they're carburetor works better in warm weather and not in cold weather ( a old car with carburetor will struggle to start in cold weather ) they are a lot more things that i don't remember rn thank you
-
I was playing Project Zomboid the other day when I realized something, whenever I hit a zombie I would lose way more speed than I should. Then I started testing. Going 90km/h in an unloaded, 100% condition van hitting a single zombie would cause the van to lose 22% of it's speed, ending up with around 70km/h. I then did the math: If the average van weighs 1984kg and we suppose that the average zombie is 56kg (14% loss of 65, average human weight, due to decay), the van should have a final velocity of about 88km/h. So, car collisions should be tweaked so cars lose a more proportional amount of speed.
-
 I mean that's it, why have 26 storage per seat when you can take them out and have a "merged" trunk which would be a lot more space efficent than having stuff on the seats and you can put so much more, trust me or atleast trust my neighbour, he did it so he could put 30 heavy crates of raspberries, before that he could barely put 10 crates in the car. Also a buff to the trunks would be cool too.
 -
I noticed when you hook up cars to cars the towing chain is invisible. So I think the chain should be visible as in actually modeled and textured. If you have an invisible chain then it looks like the cars are just floating together which doesn't look right.
-
[41.73] Singleplayer and Multiplayer Hosted Server and Dedicated No Mods Occurs on New Save Reproduction Steps: 1. Start the game in any mode. 2. Get a readable skill book. 3. Start reading the skill book inside a car. 4. Character get stuck, can't stop reading, can't exit, can't eat until finish reading the book. Extra Information The first way is to turn on the vehicle and drive it. If the car has no key, no gas or no battery. The second way to stop is wait a zombie break the window, then push the zombie. Many times leads to fatal injuries and character losses. About Duplicants: Couldn't find any similar bug report. Words used during the research car, car reading, car bug, car reading bug. book reading, book bug, book reading bug. car book reading, car book reading bug.
-
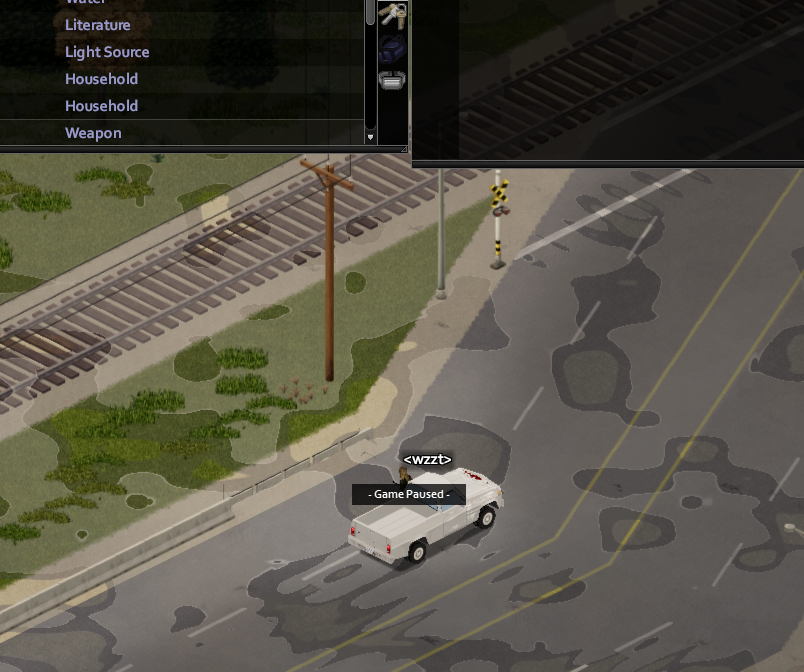
Hello, I may missed the words to describe it, but one image (or two in this case)... Anyway, I've noticed that the car has some sort of 'bubble' going on where it glitches those little barricades on the side of the road at Valley Station. I'm at 40mph on the first picture, it glitches 9 or so tiles. If I stop, the number of tiles bugged goes down to 2 or 3. After going out of the car (second image), if I'm looking it glitches as well. If I'm not looking, it renders as usual.
- 3 replies
-
- 3
-

-

-
- car
- visual glitch
- (and 1 more)
-
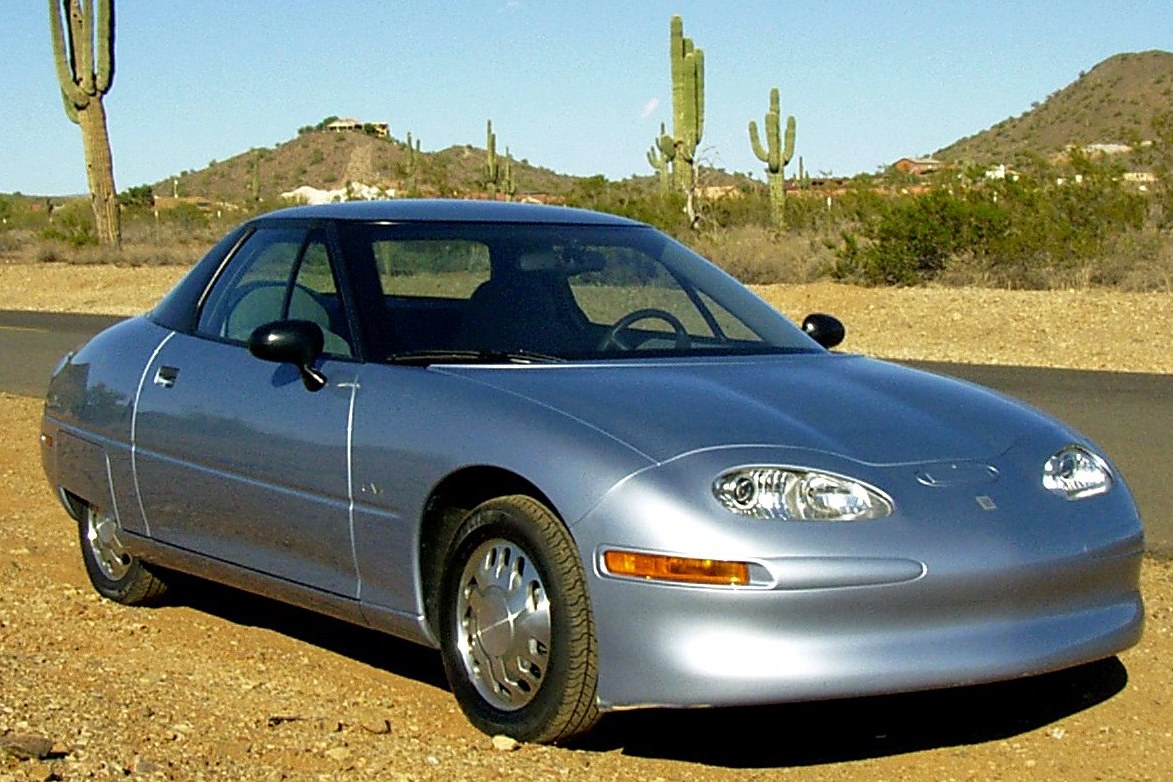
Internal combustion vehicles available in the game are making excessive noise. As much as it is fun to drive, it attracts the attention of zombies. I think the game takes place in the 90s and there were electric vehicles on the market at that time. If these vehicles are added to the game, traveling between provinces or districts with less sound would be a little better. I did some research and in the 90s there were EV1 cars made by General Motors. Generators or solar cells can be used to charge them. Electric vehicles weren't very common back then, and if you add them to the game, you'll still do the same. This will not make the game any easier.
-
It would be great for 6 month later to have to convert a car for use whit wood-gas if fuel is scarce. Don't know what I mean here is google translation link to an explanation. I would love too have the option in-game whit pros and cons.
-
 41.64 Multiplayer Host No. Reproduction steps: Just driving a car, I don't really exactly know, but while driving the character will sometimes just remove the key and refuse to start the car (I think it happens most often after motor dies) I've seen this happen a couple of times in my multiplayer server with my friends where the car will not start moving. Sometimes it's just due to engine failure, but I've noticed that when you try to start the car again, they key disappears from the keyhole and even when you put it in, the character doesn't rotate it and the car just can't start until you step out and in or after a couple tries of rotating the key.
 -
Hi IndieStone, Not completely sure if this is intended behavior or not, but reporting it anyway since this was possible (and really useful) in build 40. Passengers used to be able to sleep in the car while someone else was driving. We used this functionality a lot previously, as switching driver positions allowed us to roam the map overnight, just as we can in real-life. In B41 though, whenever the car is moving, we get a message saying that sleeping is prohibited unless the car is standing still. Obviously zombies aren't that real, but it really gave a nice touch to exploring. We would love to have this option come back!
-
[EN] Hello! I decided to make more realistic retextures for vanilla machines. I decided to create a mods theme on the forum, maybe someone is more comfortable. Work is still ongoing!) [RU] Всем привет! Я решил сделать более реалистичные ретекстуры для ванильных машин. Решил создать тему мода на форуме, возможно кому то так удобнее. Работа все еще продолжается!) Мод тут | Mod Here
-
As the title says, I can't leave the car anymore. I just drove on the street and did hit the fence, it catapulted me into the air, landing on a burned car. Now Im on top of it and can't do anything about it. See the Video Link for details.
-
This car that I stripped for parts was in the parking spot when I was working on it, as you can see by all the broken parts I've left behind. One time I came back and noticed it was halfway up the sidewalk area, and now it's over a full car length west. I've not pushed it or towed it, and it's done all this without tires. It's been maybe 24 hours since I took it apart, so it's drifted that far in quit a short amount of time.
-
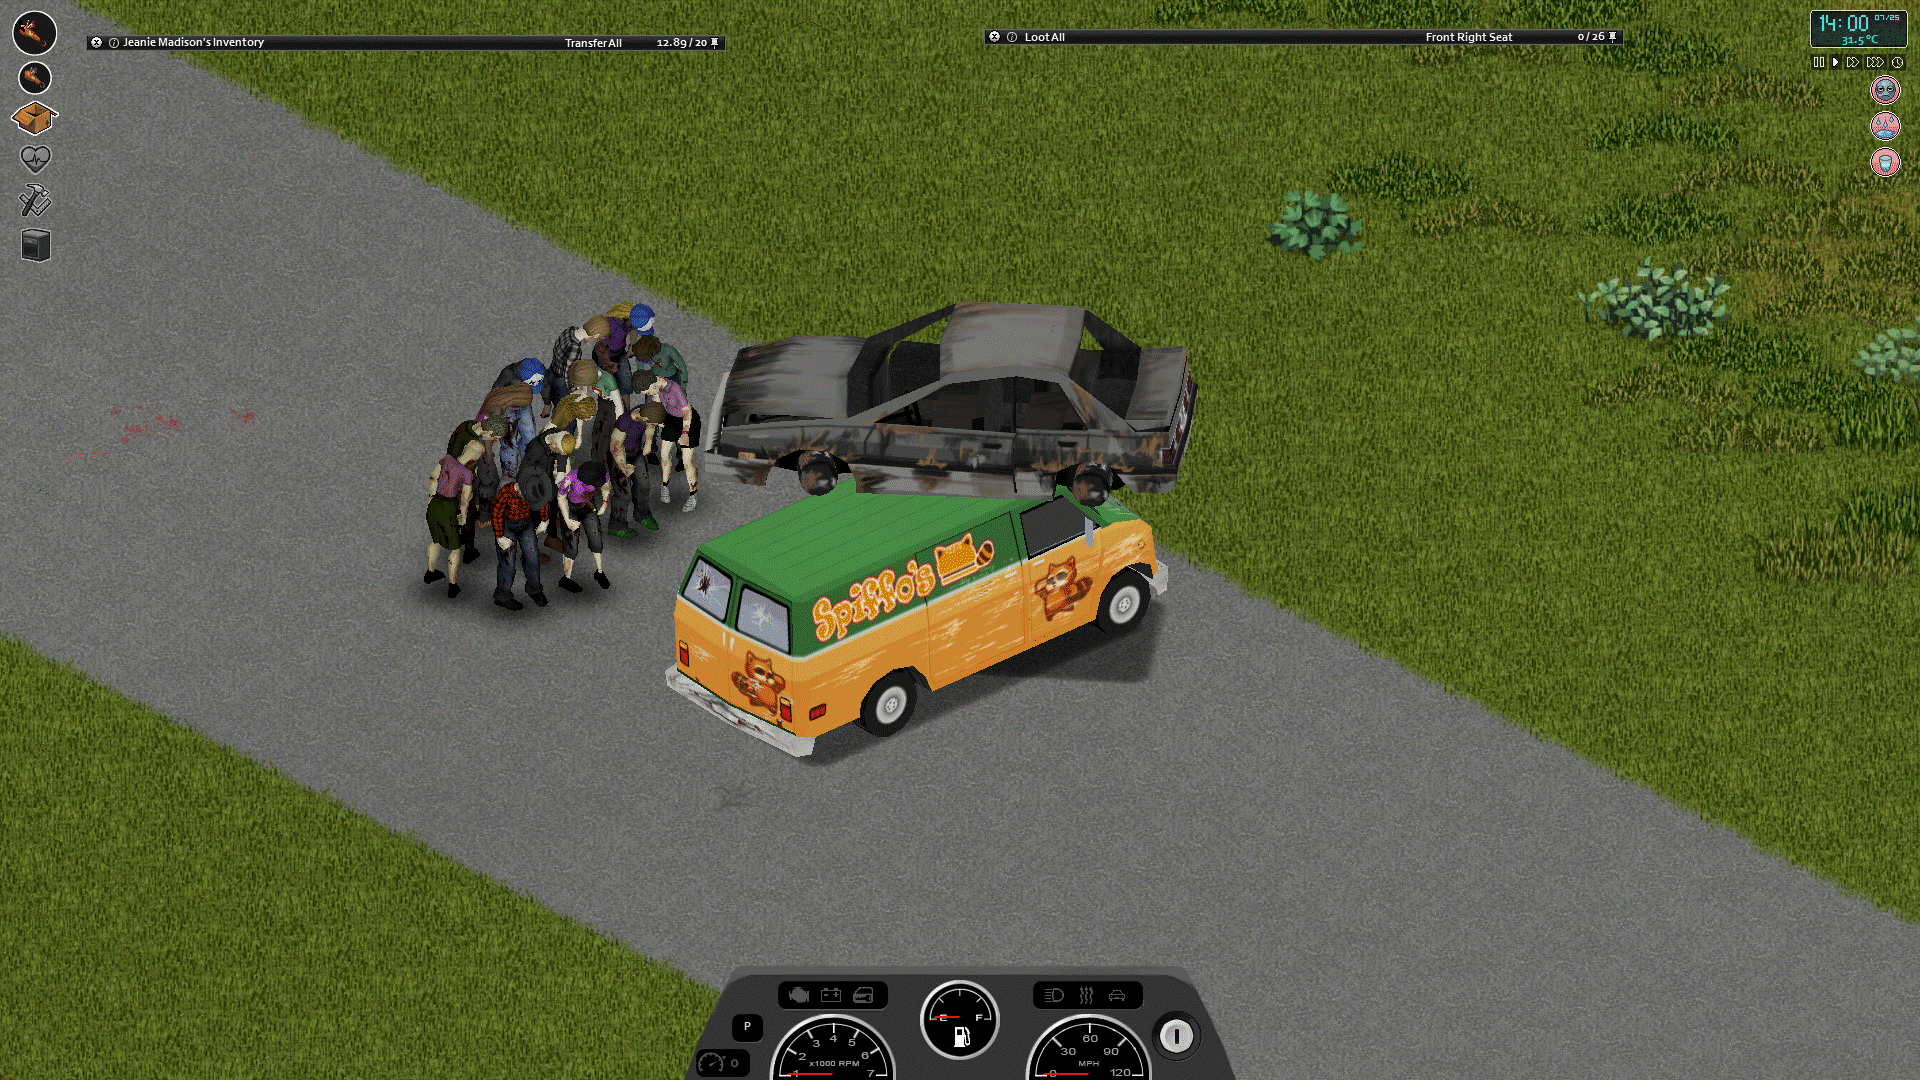
Hi dont know if this been reported. i did a search, but came up empty. I crashed in to the carwreck and sent it flying, i turned around to see what happend. and saw the wreck stand on its front/back bumper veriticaly. I crashed in to it again to lay it down. and it got up on the roof of my van instead. Now its to heavy so i cant drive my car much, it goes very slow. I cant get out from either sides and the zombies does not care. they just stand around. I have to wait on starvation. Any tips? Edit: I got out, i pushed forward (W) and exit (e) the same time. dont know how it happend. almost got eaten.
-
Not sure if this was addressed earlier. If it was, let me know. With that behind, I suggest icing on roads to form as a result of freezing temperatures after a rain or fog. I'm pretty sure there's a grip mechanic regarding tires so shouldn't be hard to implement (hopefully, I'm not a dev). This would add a bit more realism and challenge to driving a car. Imagine just casually driving and then losing control which ends with a glorious crash. Well technically even water on a road should decrease the grip in some way. Dirt roads could get muddy as well, slowing a car down. What is your opinion on this suggestion?
-
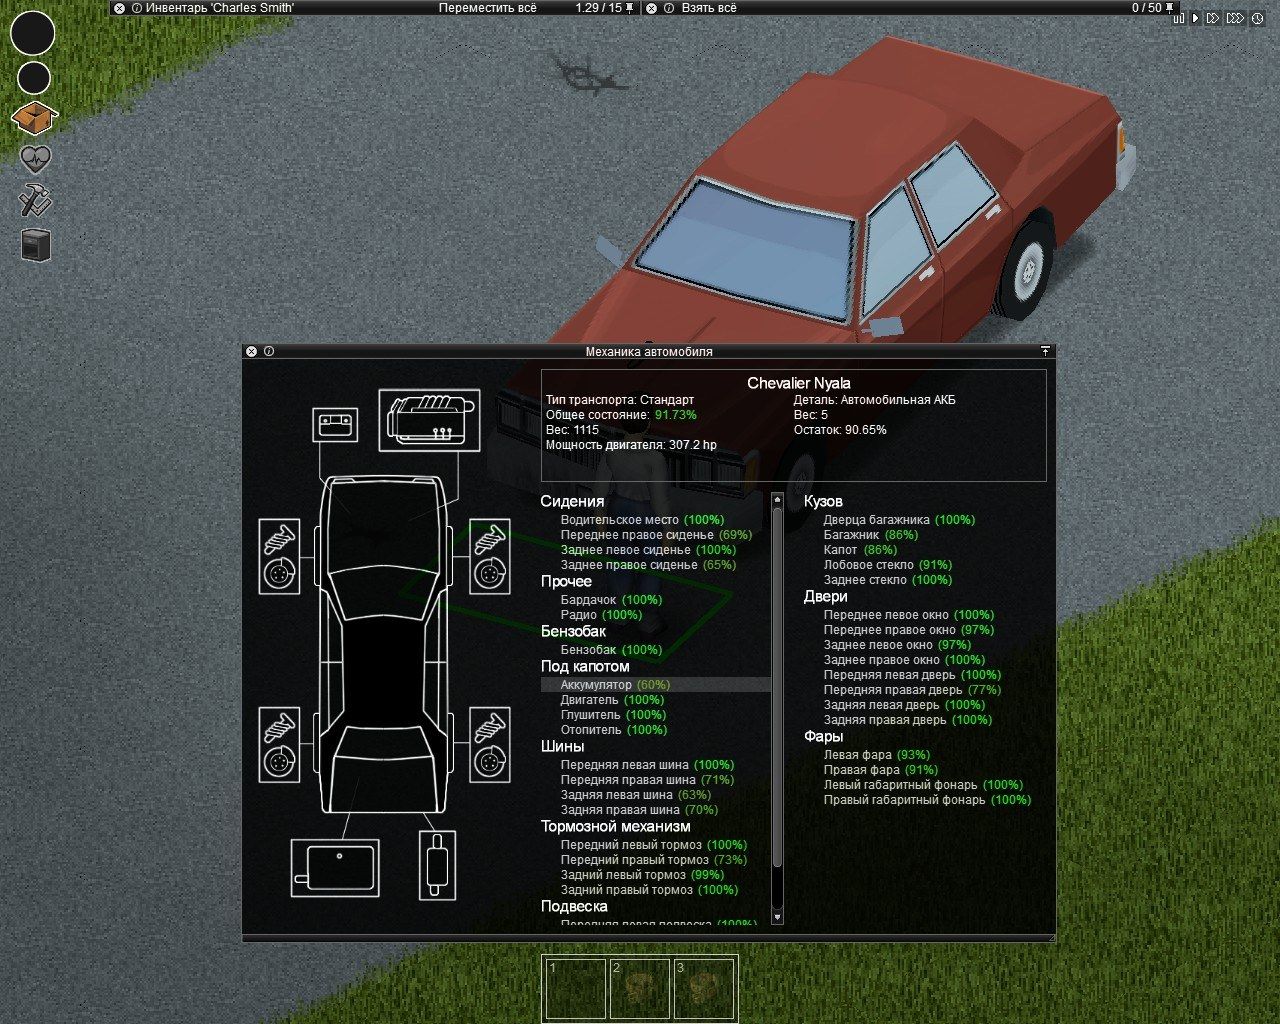
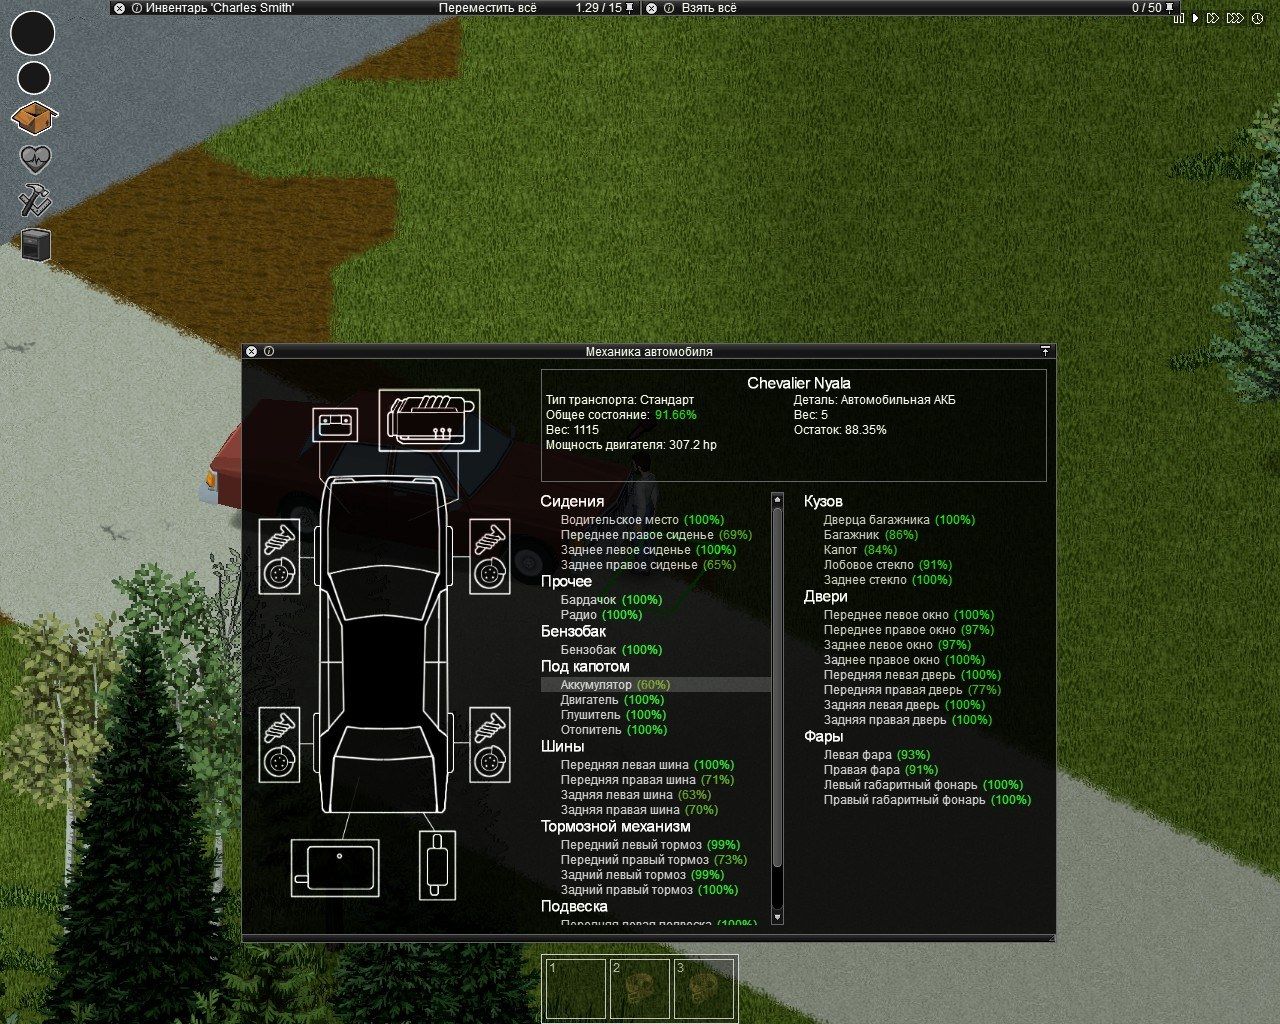
Batteries do not charge while the engine is running when I playing in 1 day = 12 hours Fix is needed as soon as possible, because using machines is now not really work I do not use mods in contact with cars In the first screenshot, the state is 90%, and in the second it’s already less, I drove for about a minute. Initially, when I found the car, the battery was 95% charged. build 41.37 upd. For the test, I left the car wound up for an hour of playing time, and when I returned the battery was charged up to 94%, but if I drive a wound machine, the battery does not charge. upd. 2 I reinstalled the game and the problem did not disappear, but I 100% understood how it works. When the car starts up, it spends ~ 2% of the charge, but the battery starts charging after some time (~ 5-15 game minutes). It turns out that short trips by car plant a battery, this is very strange, there wasn’t such a thing before. And in real life, the car generator starts to work when the engine starts, and not after 5-15 minutes.


.thumb.png.055256257ae72c8583439a16fcfcd28a.png)

![Хибити\Hibiti [BLR]](https://theindiestone.com/forums/uploads/monthly_2019_04/1490530983_32.thumb.png.93f456c53647bc1dfbbece9aac064197.png)