Search the Community
Showing results for tags 'lua'.
-

help I tried adding new clothes, but it didn't work
Tashendal posted a topic in Tutorials & Resources
Hi. I decided to add a new type of clothing: a hard hat, jacket, and pants. Based on the standard ones: Jacket_Camo Green, Hat_Army, and Trousers_camogreen. Changed textures, drew new icons, and created the necessary files. Here is a list of files and what I wrote in them: Folder: \media\clothing\clothingItems Files: Jacket_CamoMP.xml, MP_Hat_Army.xml, Trousers_CamoMP.xml I changed two lines in each file. The path to the texture: <textureChoices>clothes\jacket\jacket_camomp</textureChoices> <textureChoices>clothes\jacket\jacket_camomp</textureChoices> <textureChoices>armyhelmetmp</textureChoices> and unique GUID for each subject (im use www.guidgenerator.com/online-guid-generator.aspx) <m_GUID>7fde9ae9-a876-46d2-ab46-24da3952c9f5</m_GUID>... and so on Folder: \media\clothing Files: clothing.xml In this file, I registered a new type of zombie spawn and specified the items that appear on it. Specified previously assigned Guids. Assigned a unique Guid to the zombie type. <m_FemaleOutfits> <m_Name>ArmyCamoMP</m_Name> <m_Guid>e9047c42-479b-4d28-975b-7dd1af366f79</m_Guid> <m_Top>false</m_Top> <m_Pants>false</m_Pants> <m_AllowPantsHue>false</m_AllowPantsHue> <m_AllowTopTint>false</m_AllowTopTint> <m_AllowTShirtDecal>false</m_AllowTShirtDecal> <m_items> <itemGUID>7fde9ae9-a876-46d2-ab46-24da3952c9f5</itemGUID> </m_items> <m_items> <itemGUID>5b7f2fb6-953c-4496-91df-0a6a1d0f2273</itemGUID> </m_items> <m_items> <itemGUID>edd70d8d-6f04-4a7b-9162-1f12ef96bb3b</itemGUID> </m_items> <m_items> <itemGUID>b81f298c-cf92-47bf-b854-649308ba17b0</itemGUID> </m_items> <m_items> <itemGUID>19504103-de6a-44bd-ac48-b9079ce0e355</itemGUID> </m_items> <m_items> <itemGUID>1aad0762-7886-4295-be32-448343be62aa</itemGUID> </m_items> <m_items> <itemGUID>1a437dbb-cee9-4013-8e8a-e158acf98b62</itemGUID> </m_items> <m_items> <itemGUID>2b0756ac-57f3-415e-bfed-24b28d1ca4d6</itemGUID> </m_items> <m_items> <itemGUID>fb86bd5f-1931-4b24-a5d7-bd6a43769991</itemGUID> </m_items> <m_items> <itemGUID>cbe793fe-97d9-4585-88e0-bc18be39d714</itemGUID> </m_items> <m_items> <itemGUID>227cb2d5-05a5-44ed-872d-ac4ca16e80bc</itemGUID> </m_items> </m_FemaleOutfits> Folder: media\lua\shared\NPCs Here I specified the probability of spawning a new type of zombie. WPIZombiesZoneDefinition = ZombiesZoneDefinition or {}; WPIZombiesZoneDefinition.Army = { ArmyCamoDesert = { name="ArmyCamoDesert", chance=20, }, ArmyCamoGreen = { name="ArmyCamoGreen", chance=30, }, ArmyCamoMP = { name="ArmyCamoMP", chance=30, }, } WPIZombiesZoneDefinition.SecretBase = { ArmyCamoDesert = { name="ArmyCamoDesert", chance=20, }, ArmyCamoGreen = { name="ArmyCamoGreen", chance=30, }, ArmyCamoMP = { name="ArmyCamoMP", chance=30, }, } -- total chance can be over 100% we don't care as we'll roll on the totalChance and not a 100 (unlike the specific outfits on top of this) WPIZombiesZoneDefinition.Default = ZombiesZoneDefinition.Default or {}; table.insert(WPIZombiesZoneDefinition.Default,{name = "ArmyCamoDesert", chance=3}); table.insert(WPIZombiesZoneDefinition.Default,{name = "ArmyCamoGreen", chance=5}); table.insert(WPIZombiesZoneDefinition.Default,{name = "ArmyCamoMP", chance=5}); Folder: media\lua\shared\Translate - spit Folder: media\scripts\clothing here I specified the item characteristics and icon name item Jacket_CamoMP { Type = Clothing, DisplayName = Military Police Camo Jacket, ClothingItem = Jacket_CamoMP, BodyLocation = Jacket, Icon = JacketCamoMP, BloodLocation = Jacket, RunSpeedModifier = 0.93, CombatSpeedModifier = 0.95, BiteDefense = 40, ScratchDefense = 60, NeckProtectionModifier = 0.5, Insulation = 0.5, WindResistance = 0.35, FabricType = Cotton, WaterResistance = 0.5, Weight = 2, } item Trousers_CamoMP { Type = Clothing, DisplayName = Military Police Camo Pants, ClothingItem = Trousers_CamoMP, BodyLocation = Pants, Icon = TrousersCamoMP, BloodLocation = Trousers, BiteDefense = 20, ScratchDefense =30, Insulation = 0.55, WindResistance = 0.4, WaterResistance = 0.50, FabricType = Cotton, } item MP_Hat_Army { Type = Clothing, DisplayName = Military Police Helmet, ClothingItem = MP_Hat_Army, BodyLocation = Hat, Icon = HelmetArmyMP, CanHaveHoles = false, BloodLocation = Head, BiteDefense = 100, ScratchDefense = 100, ChanceToFall = 10, Insulation = 0.3, WaterResistance = 0.3, } Folder: media\textures here are the icons and texture of the helmet: ArmyHelmet.png Item_HelmetArmyMP.png Item_JacketCamoMP.png Item_TrousersCamoMP.png Folder: media\textures\Clothes\Jacket Texture jacket: Jacket_CamoMP.png Folder: media\textures\Clothes\Trousers_Mesh Texture trousers: Trousers_CamoMP.png I know it's not exactly the right texture and path. camouflage pants are on a different path. I got them mixed up a bit. it doesn't matter now, because it's not just the pants that are the problem. and folder: \media File: FileGuidTable.xml here I re-registered the GUIDs of new items. <?xml version="1.0" encoding="utf-8"?> <fileGuidTable> <files> <path>media/clothing/clothingItems/MP_Hat_Army.xml</path> <guid>5b7f2fb6-953c-4496-91df-0a6a1d0f2273</guid> </files> <files> <path>media/clothing/clothingItems/Jacket_CamoMP.xml</path> <guid>7fde9ae9-a876-46d2-ab46-24da3952c9f5</guid> </files> <files> <path>media/clothing/clothingItems/Trousers_CamoMP.xml</path> <guid>edd70d8d-6f04-4a7b-9162-1f12ef96bb3b</guid> </files> </fileGuidTable> and now the crux of the problem. none of this helped. the desired type of zombie appears, but there are no three new items on it - only those that were originally in the game. what did I forget to do? maybe you will notice the mistake you made? maybe I forgot to add another file or made a mistake with the model? I don't work all three items: helmet, jacket and pants. please help me, I have been struggling with this problem for about a day and tried a lot of things. unfortunately, nothing helps. I know, activity on the forum is low and hints are rarely given. if you understand the essence of the issue-help, do a good deed. -
Just a few bullet points for now, will expand on it later: Will fill this out as I go, we're uploading an SI test release btw Must be in debug mode (either hold left shift while booting the game, or for more permanently run game with -debug / -Ddebug params (depends, try both))* - alternatively try holding left shift while booting the game.There is an edit box above the filename browser that you can use to search for files containing case insensitive strings F11 breaks into the debugger at the next available Lua entry point. Key is bindable.F5 steps into code, F6 steps over code.Left double click lua line to place / remove breakpoint.Local variables panel is something that required a lot of guesswork and fiddling this end, and was by far the most complicated thing, and there may be times where it doesn't show something it should. Will get to all these in time.Still some issues with java objects in object viewer etcJust occured to me I didn't update the main dev branch with the new map debugging stuff (showing characters / collision, will get that in another release)Right click object viewer for menu to put a breakpoint on the data on read / write, or to add to the watch window.Left double click stuff to open info in a window is the general rule for object viewers, stacks etc.Line numbers may occasionally be a line off in errors / stack. Will look to improve this if possible, but its tricky. Even ProDG the official Sony Playstation debugger suffered this problem the entire time I used it.If UI breakpoints aren't enough, call the function breakpoint() in lua this will always break every time it runs. Expect bugs and slightly unfinished things. It's all very experimental, but is already MASSIVELY useful for any lua modder, so get used to using it if you do lua and you're not using it, then you are MAD. *Mac Users need to follow these steps to use the debugger: Open your PZ.app and look for a file called "Info.plist" then search for this line: <string>-noverify -XX:+UseNUMA -XX:+AggressiveOpts -XX:+TieredCompilation -XX:Tier2CompileThreshold=70000 -XX:CompileThreshold=1500 -Xms64m -Xmx512m -XX:+UseAdaptiveSizePolicy -XX:GCTimeRatio=50 -XX:MaxGCPauseMillis=20</string>add "-Ddebug" to it (of course before the last </string> tag).
- 42 replies
-
- 1
-

-
- Instructions
- Tutorial
- (and 2 more)
-
https://pzwiki.net/wiki/Lua_Events/OnServerCommand Can I define a module in Lua to use this with? Or does it have to reference a known/pre-existing vanilla module? My goal is to create custom server commands to trigger functions I've created via the terminal. I've looked in https://projectzomboid.com/modding/zombie/scripting/ but can't figure out how modules are defined and if they live in the java space or lua space or if I can define them.
-
Like on the old forums people can post their requests for lua additions in this thread. Please just post requests here and don't debate about the ones made. The devs are perfectly capable of deciding what to add and what not to add Anyway, here we go: New / Changed Events: EveryMinute: Self explanatory.EveryHour: Self explanatory.OnUnequip: When Item is unequipped from the primary or secondary slot.OnItemUse: When item is used in the inventory. (E.g. "Eat Food" or "Bandage Wound")OnContainerUpdate: When the item containers are updated (parameters: table of contained items, getType() of the updated container) New / Changed Functions: IsoFloorBloodSplats(): in the Chunk class (or whatever is necessary to retrieve blood on walls and floors and remove it)FIX ItemContainer:isInCharacterInventory()getFps() in GameWindow.Getter / Setter for amount of splattered blood. Finished (already in the game) setPermaLocked(boolean) in IsoWindow -- RM : Done for 2.9.9.17isPermaLocked() in IsoWindow -- RM: Done for 2.9.9.17OnRainStart -- RJ : Done for 2.9.9.14OnRainStop -- RJ : Done for 2.9.9.14OnEquipPrimary: Fires when an item is equipped as primary weapon.-- RJ : Done for 2.9.9.14, param : player, itemOnEquipSecondary: Fires when an item is equipped as secondary weapon.-- RJ : Done for 2.9.9.14, param : player, itemOnItemEquipAny -- RJ : Use the OnPrimaryItem/OnSecondaryItem instead OnAmbientSound: Fires when ambient sounds is played (helicopters, gunshots ... etc.) - RJ : Done for 2.9.9.14, param : name of the ambient sound (like "chopper1", "pistolgun2",..)getClosedSprite() -- RJ : use getSprite()setClosedSprite()-- RJ : use setSprite(IsoSprite)getOpenSprite(...)-- RJ : Done for 2.9.9.14setOpenSprite(...)-- RJ : Done for 2.9.9.14setSmashed(...)-- RJ : Done for 2.9.9.14, use isDestroyed() to know if it's already smashed or notgetSmashedSprite()-- RJ : Done for 2.9.9.14
-
 First of all, I would like to apologize in advance for my english. It's not my first language, but I promise that'll do my best. For the past days I've been trying to create a mod for a custom trait, but I haven't found much about it. I've been posting on forums, watching tutorials, and even downloading other mods to see and analyze their structure, hoping to being able to do some reverse engineering. So, here's the issue -- I know how to create a new trait and add some buffs for X skill, like: CustomTrait:addXPBoost(Perks.Strength, 4) or: CustomTrait:addXPBoost(Perks.Lightfoot, 1) which would add one (1) level on that skill, and a XP boost (75%). But I have no idea on how to make that CustomTrait to have the effects of another (vanilla) trait as well. I.e making my "CustomTrait" to have the effects of "Brave". I've tried testing with: TraitFactory.addTrait("Illiterate", getText("UI_trait_Illiterate"), -8, getText("UI_trait_IlliterateDesc"), false); but it doesn't work -- I guess this only work with professions. Also tried with: player:getTraits():add("MyTrait") Doesn't work either. I supposed that I should use: require('NPCs/MainCreationMethods'); to call the traits from the main folder, but still. Not working. I just wanted to make a simple trait, with minor buffs to skills and to contain the effects of Brave and Outdoorsman.
 -
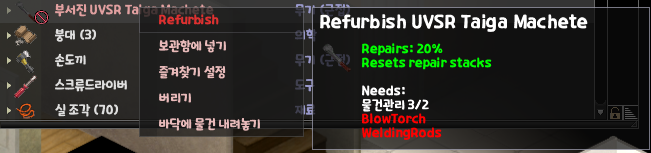
i used "Refurbish" mod. this is repair mod i just want to translate my own language this mod. but there is NO TRANSLATE FORDER and this mod is just one lua file(mods\Refurbish\media\lua\client\ LUA TEXT FILE) plus, Not in the same form as "module, base item, like that" and just written in the notepad. [spoiler][code]require "TimedActions/ISBaseTimedAction" require('luautils'); FixerWithContext = {}; FixerWithContext.createInventoryMenu = function(playerIndex, context, items) local player = getSpecificPlayer(playerIndex); if #items > 1 then return; end local item; for _, entry in ipairs(items) do --keeping this just in case if type(entry) == "table" then item = entry['items'][1]; else item = entry end end --player:Say(tostring(item:getCategory()), 0.0, 1.0, 0.0, UIFont.Small, 30.0, "radio") if item and item:getContainer() == player:getInventory() and (item:getCondition() ~= item:getConditionMax() or item:getHaveBeenRepaired() > 1) and item:getCategory() ~= "Clothing" and item:getCategory() ~= "Food" then if (item:getCategory() == "Weapon" and item:isAimedFirearm()) then --shooty shooty bang bangs, use toothbrush and a piece of cloth to clean local tool = "Toothbrush" local fixer = "RippedSheets" local skill = Perks.Reloading local skillLvl = 3 local anim = CharacterActionAnims.Craft local time = 1200 + 400 * item:getHaveBeenRepaired() local repAmount = 0.1 FixerWithContext.createInventoryObjectMenuEntry(player, context, item, tool, fixer, skill, skillLvl, anim, time, repAmount); --open context menu return;[/code][/spoiler] I want to translate it while comparing it to other mods' translations, but it's hard because I don't understand modding. If you look at the translation folder of other mods, it usually looks like "ItemName_EN = {", but this mod just says local tool = "Toothbrush", so it was impossible to translate when I tried. this is Screen Shot in game. I DONT KNOW why just [Perks.Maintenance] is translated only

-
While coding my mod I faced with another problem. I'm trying to make a character say a phrase when dressing a certain item. I tried to implement this with Events.OnClothingUpdated.Add(). When this event was called, it was checked whether this item (CI141.KRNDHazmat) was dressed. I did this through a method getBodyLocation() ~= "". But every time it gave an error. I suspect that the problem is that item CI141.KRNDHazmat belongs to a different class, but getBodyLocation() method belongs to the class Clothes. But no matter how hard I tried, I couldn't determine the class of the object CI141.KRNDHazmat. I need help from someone who understands. I paste code below. Script [media/scripts/CI141_items.txt] item KRNDHazmat { DisplayCategory = Clothing, Type = Clothing, DisplayName = KRND Hazmat Suit, ClothingItem = CI141_KRNDHazmat, BodyLocation = FullSuitHead, Icon = KRNDHazmat, BloodLocation = Trousers;Jumper, Icon = Hazmatsuit, RunSpeedModifier = 0.75, ScratchDefense = 25, BiteDefense = 25, Insulation = 0.65, WindResistance = 0.9, WorldStaticModel = Hazmat_Ground, } the .xml file works fine, so I don't see the point in attaching it here LUA [media/lua/client/CI141_maincore.lua] function HazmatvoiceFc(player) local hazmat = "CI141.KRNDHazmat" if player:getInventory():contains(hazmat) then if hazmat:getBodyLocation() ~= nil then <- Error comes from this line player:Say("TESTPHRASE") end end end Events.OnClothingUpdated.Add(HazmatvoiceFc)
-
Hi... again... so after a long hours of trying to make corpse removal i got to the point that i remove corpses but only on server side (after i respawn i dont see corpses, but everyone else sees it) For testing purpouses I make that OnPlayerDeath event on server side and it worked then, but thats not what i need. I need it strict client -> server. Here im sending player object to the server function PlayerDataCollector.OnPlayerDeath(player) if PlayerDataCollector.isReviving then debugPrint("OnPlayerDeath - Player died while reviving. Skipping.") sendClientCommand("RevivingClient", "isReviving", { true }) return end sendClientCommand("RevivingClient", "isReviving", { false }) PlayerDataCollector.isReviving = true end Here im receiving it on the server and im putting player square to the array function commandModule.RevivingClient.isReviving(player, args) if player ~= nil then if args[1] == true then debugPrint("RemovePlayersServer - OnPlayerDeath - Putting square to the alt list.") altDeathSquares[#altDeathSquares+1] = player:getSquare() elseif args[1] == false then debugPrint("RemovePlayersServer - OnPlayerDeath - Putting square to the list.") deathSquares[#deathSquares+1] = player:getSquare() end else debugPrint("RemovePlayersServer - isReviving - Player object is null.") end end Here im executing checks on the squares to see if there is a body function OnTick(ticks) checkDeathSquares(deathSquares, bodyIds) checkDeathSquares(altDeathSquares, altBodyIds) clearDeadCorpses(bodyIds, false) clearDeadCorpses(altBodyIds, true) end function checkDeathSquares(squares, bodyids) for key, square in pairs(squares) do local bodies = square:getDeadBodys() if bodies == nil or bodies:size() == 0 then return end for i=0, bodies:size() - 1 do local body = bodies:get(i) bodyids[body:getObjectID()] = body end squares[key] = nil end end Here im deleting corpses and dropping player items on the ground function clearDeadCorpses(bodyids, fullclear) for objectId, body in pairs(bodyids) do local bodysquare = body:getSquare() if not fullclear then local bodyinv = body:getContainer() local items = bodyinv:getItems() local itemsarray = {} if items then for i=1, items:size() do local item = items:get(i-1) table.insert(itemsarray, item) end end for i=1,#itemsarray do bodysquare:AddWorldInventoryItem(itemsarray[i], ZombRandFloat(0, 0.99), ZombRandFloat(0, 0.99), 0); bodyinv:Remove(itemsarray[i]) end end bodysquare:removeCorpse(body, false) bodyids[objectId] = nil end end Unfortunately the lack of modding documentation with examples makes it more difficult to understand the problem maybe someone more experienced with project zomboid modding could help me
-
 Bug present in: 41.78.16 In media/lua/server/Vehicles/Vehicles.lua we can see the generation of the success/failure chances for vehicle part installation/removal, on line 1350 with calculateInstallationSuccess() It generates and returns a tuple with the success and failure chance, using some math. The math results in, for example, success=65, failure=35 for being 1 level under the part's 'desired' skill level. This tuple is consumed for vehicle part uninstallation in the function starting on line 96 in media/lua/server/Vehicles/VehicleCommands.lua, in the uninstallPart() function. The problem is that on line 127, you do... -- from uninstallPart(), failure chance structured incorrectly if ZombRand(100) < success then [...] elseif ZombRand(failure) < 100 then -- <- Mistake, note the transposed 'failure' and '100'. Compare to above and below examples. [...] But this makes no sense. Compare it to the installPart() function above this one, which is almost identical but structured correctly... -- from installPart(), written correctly if ZombRand(100) < success then [...] elseif ZombRand(100) < failure then [...] The issue: You are generating a random number between 0 and 35 (to use our '1 level too low, 35% failure chance' example), and then checking if it's < 100. Well, of course it will be. Compare this to what it SHOULD be in the second code block above from installPart(), which actually gives a 35% chance. Technically it's actually still possible to 'not succeed and not damage the part' with this code by having a >= 6 level difference, because that will produce a 110% chance of failure, and thus have a 10% chance of actually 'missing' that code block. I'm sure someone just inverted the order of things there and meant to put the 100 as the argument to ZombRand and compare the result to failure instead of the other way around in uninstallPart() and nobody caught it.
 -
I'm trying to make a simple mod to add car windows to the loot pools for mechanics / car supply stores. I have a file called CarWindowProceduralDistributions.lua under media>lua>server>items here and CarWindowDistributions.lua, also under media>lua>server>items But none of the items are appearing in-game. I don't see any obvious syntax errors, and no errors are being logged. All loots settings on the world are set to abundant so I would assume at least one roll would land. Any help would be appreciated. Thanks!
-
41.71 Multiplayer & Singleplayer Host No mods Old & New save Reproduction steps: 1. toggle setAllowSprint to false ==> getPlayer():setAllowSprint(false) 2. double tap sprint key 3. Player is now able to sprint, and furthermore player's movement is now limited to only sprinting
-
I added my item to the zombie loot and it worked fine. This is the function I use, referring to other people's modules: table.insert(SuburbsDistributions["all"]["inventoryfemale"].items, "TWI.PillsHWJGreenOil"); table.insert(SuburbsDistributions["all"]["inventoryfemale"].items, 0.1); table.insert(SuburbsDistributions["all"]["inventorymale"].items, "TWI.PillsHWJGreenOil"); table.insert(SuburbsDistributions["all"]["inventorymale"].items, 0.1); However, when I try to spawn my items from paperbag, I get the error in debug mode. Here is my function: table.insert(SuburbsDistributions["all"]["Paperbag_Jays"].items, "TWI.BobaStraw"); table.insert(SuburbsDistributions["all"]["Paperbag_Jays"].items, 50); table.insert(SuburbsDistributions["all"]["Paperbag_Spiffos"].items, "TWI.BobaStraw"); table.insert(SuburbsDistributions["all"]["Paperbag_Spiffos"].items, 50); I don't understand. They are all in the same format, why do I get error in paperbag? And how do I fix it?
-
I'm new to modding. I'm trying to get the specific player's IsoPlayer by the author name of a chat message. For now, the only way I think up is to compare the author name with all player's username. Is there better method? Edit: Seems like I was referencing old javadoc... There is actually getUserName() in the new version. By the way, I haven't got a idea how to create a sound on the world space with lua code. I'm figuring it out.
-
RoboMat's Modding Tutorials - An introduction to modding for Project Zomboid - I - Introduction I1 - Where to start I2 - What is needed I3 - Lua Tutorials I4 - Other Resources II - The first steps II1 - Getting the connection II2 - The entry point: Events III - The first mod III1 - Preparations III1a - Folders III1b - Our mod's identification card III1c - The actual lua script III2 - Adding items to the inventory III3 - Handling keys III4 - Detecting the correct key IV - Custom professions IV1 - Creating a custom profession IV1a - The foundation IV1b - Creating the profession IV1c - Creating a new trait IV1d - Custom Spawnpoints IV1e - Custom Profession Clothing IV1f - Putting it all together IV2 - Linking Professions / Traits to game mechanics I. Introduction Hello there, this is my attempt to write a few modding tutorials for the community. I will try to update this whenever I have some spare time. 1. Where to start First things first. When I started looking into the code of Project Zomboid and the different mods I was a bit confused. There was the source code in Java, the additional code in Lua and the scripting language and I didn't really know which one to look into. To spare you this confusion I'll explain their purpose shortly: Java: Most of the source code of Project Zomboid is written in Java. While you can modify the java files it is not recommended. According to the developers changing the java source code won’t be necessary in future versions of Project Zomboid, so we won’t look into that. Eggplanticus has made a nice post about how to spelunk in the Java source if you want to try it nonetheless. Lua: There already are parts of the source of PZ that have been ported to lua. If you really want to get into modding, you won't get around learning its syntax. Scripting: At the moment it is only used for easily adding items to the game. While we will cover some of the basics of the scripting language we will mostly work with lua coding. 2. What is needed Basically to edit a lua file you can use any standard text editor that is capable of saving simple (unformatted) text files. So Wordpad (Windows) or TextEdit (Mac OS) will do. While it is possible to create a script with those programs they miss many features a specific IDE will give you (syntax-highlighting, auto-formatting, etc...). I prefered working with Eclipse IDE with an extra lua plugin installed for quite some time, but recently switched to IntelliJIdea - haven't been looking back ever since. There are other free alternatives like gedit, Notepad++, ZeroBraneStudio or XCode for example. Find one that works for you and stick with it. Remember: It's not the program that does the work. None of them will turn you into a RobertJohnson over night, they only make your life easier. 3. Lua Tutorials If you have some experience with programming already Lua will probably be fairly easy to pick up for you. I mainly used the official manual to learn the language, but of course there are many other great tutorials out there. From time to time I check the lua wiki and of course stack overflow. Just to be as clear about this as possible: This won't be a tutorial about lua. It will be a tutorial about modding Project Zomboid. If you don't understand parts of my code, you probably should learn some basic lua syntax first. If there is one thing I don't like then it's people who don't even take the time to read through the tutorial notes, then copy&paste the code and finally spam the thread with questions about "why it doesn't work". Don't be that person (unless you are Rathlord). 4. Other Resources For more tutorials you should visit pz-mods.net and the tutorial section on the indiestone forums. If you have further questions you can post them in the modding help section of the the indiestone forums and one of the many coders will help you for sure. TOC Last updated: 12.11.2013 II. The first steps Okay now that we got that out of the way let's move on to the actual modding part. 1. Getting the connection To mod the game we somehow have to interact it. Lua's main purpose lies on extending existing programs written in other programming languages. As mentioned in the previous chapter the main base of Project Zomboid was written in Java. That's where the connection between lua and the java source code happens. With lua we can access all the public functions written in the Java source code. -- lua function function doStuffInLua(_player) -- getSpecificPlayer() is a public method defined in the java source code -- that returns the player. We can access it through lua. getSpecificPlayer(_player); end But how do we know which methods there are!? Well, we can look at the javadoc. It's basically a complete list of all methods in the Java source code and it has even been updated to 2.9.9.15 recently. If you want to be on the save side I suggest that you open the source code and look through it yourself. I use a small programm called JD-GUI for that purpose. It has a useful search function that can search through the whole source code. In the course of this tutorial I will mark methods we call from java so you don't have to worry too much about that at the moment. Eggplanticus also released a good tutorial on how to decompile the java source over here. 2. The entry point: Events So now we know that we can call Java methods from our lua code, but we still don't know how we actually execute our lua code. We need something that runs our code, when Project Zomboid runs. This will be done with Events. You can think of events as entry points to the source code of the Project Zomboid source code. Once Project Zomboid encounters an Event from a mod it calls the associated function. -- the function we want to execute function sayStuff() -- Java: we get the first player local player = getSpecificPlayer(0); -- Java: let the player speak player:Say("I like turtles."); end -- this event will be fired every ten ingame minutes. -- In this case sayStuff() is the associated method and -- thus will be executed every ten minutes. Events.EveryTenMinutes.Add(sayStuff); This short "mod" lets the player talk about his love for testudines every ten minutes in the game. Nothing great but it gets the point across. There are already many different events added to the game which we can use for our mods and the developers are constantly adding new ones. For a somewhat complete list check out the Event Reference on pz-mods.net. Don't worry though, we will use some of them throughout this tutorial so you will slowly get the hang of it. TOC Last updated: 01.10.2013 III. The first mod Let's continue with a little more complex example. We will create a small cheat script that adds some items to the player's inventory when a certain key is pressed. 1. Preparations At first we're going to set up a proper folder structure and all the files we'll need to get the mod to work with Project Zomboid. Please note that this tutorial has Version 2.9.9.17 and later in mind and thus is going to use the structure needed to work with the modloader. If everything is done right our mod will later on appear in the game like this: The almighty RobertJohnson has released a more in-depth tutorial about the modloader and mod.info functions. Once that version is released I'm going to update this post too! a.) Folders Please note, that the folder structure might slightly variate depending on what IDE you are using. I'm going to show you the end-structure which I use when I release my mods: I named the topmost folder (we are going to call this the base folder from now on) after our mod: CheatMod. This base folder is going to contain ALL of our mod files. The "media/lua" folder is basically the location of the vanilla lua files. When we drop our mod into the modloader it is going to copy the files in our base folder to their specified location in the PZ source files. This way our mods don't overwrite any base files and the mod can be removed from the game at any time without breaking it. Yay for the nifty modloader! b.) Our mod's identification card The modloader needs some way of identifying the mods given to it. This is done by the so called mod.info file. It is a simple (unformatted!) text file which contains some important information about our mod. It must be put into the base folder: To make it work we will have to fill it with information of course. Copy this to your mod.info file: name=Cheat Mod (1.0.0) poster=poster.png description=This mod is used to explain modding for Project Zomboid. It is going to show several aspects of modding from start to finish. -by RoboMat id=CheatMod name: The name of the mod. poster: The image file that is displayed in the mod menu in PZ. description: A short description of your mod. I am not sure how many characters this supports. id: The id of our mod. This is used to identify our mod. The id must have the same name as the base folder of our mod (in this case: CheatMod). If you drop you folders into your Project Zomboid "mods" folder now it would already display it as a mod in the game: Of course this isn't really a mod yet. We still need to give it some functionality c.) The actual lua script The last file we need to create is the lua script file. We are going to call it "AddItems.lua" and put it into "media/lua/Mods/CheatMod". Make sure that you really are using the correct suffix of ".lua". Now we are set and ready to begin working on our first mod! 2. Adding items to the inventory We are going to start with a simple script that allows us to add a few items to the player inventory as soon as a certain key is pressed. Adding items is a fairly easy task as you will see. Open your AddItems.lua and enter the following code. local function addItems() local player = getSpecificPlayer(0); -- Java: get player one local inv = player:getInventory(); -- Java: access player inv -- Java: add the actual items to the inventory inv:AddItem("Base.Axe"); inv:AddItem("Base.RippedSheets"); inv:AddItem("camping.TentPeg"); end As with the previous examples our starting point is the player. We need to "get" him first with getSpecificPlayer(0). We then can access his inventory with the getInventory() call. "getInventory()" returns an ItemContainer which happens to be the player's main inventory. This means we now can use all the java functions defined for the ItemContainer.class and one of them happens to be the nifty AddItem(...) function. If you look at the javadoc of this function you will notice that it expects a String as a parameter. What it doesn't tell you is, that it actually needs the module of the item you want to add and the name of the item itself. You can read our example above as "add item Axe from module Base". The code above would give the player an axe, some bandages and a tent peg from the camping module. How do you find out the modules and names of the items? Of course by looking through the source files. All items are currently located in "/media/scripts/items.txt", "/media/scripts/newitems.txt", "/media/scripts/camping.txt" and "/media/scripts/farming.txt". Just take a look at these files - the rest should be self explanatory. 3. Handling keys As we haven't defined an event yet, the function is pretty useless right now. We want the items to be added whenever the player presses a key and luckily the devs have given us the great OnKeyPressed event for that purpose. Let's add it to our mod: local function addItems() local player = getSpecificPlayer(0); -- Java: get player one local inv = player:getInventory(); -- Java: access player inv -- Java: add the actual items to the inventory inv:AddItem("Base.Axe"); inv:AddItem("Base.RippedSheets"); inv:AddItem("camping.TentPeg"); end -- Will be fired whenever we press a key. Events.OnKeyPressed.Add(addItems); This event will be called whenever a key is pressed in the game. The only problem is, that the event doesn't care which key that is. If we would leave our mod like this, the player would get spammed with countless items. We need to fix that! 4. Detecting the correct key One of the great things about events is, that some of them pass useful parameters to the function which is called through the event. The OnKeyPressed event for example passes the number of the pressed key to the function. The called function in this case is of course "addItems()". To use the parameter we have to slightly modify our code another time: -- We added the parameter to the function which -- will be passed to the function as soon as the -- event fires. local function addItems(_keyPressed) local key = _keyPressed; -- Store the parameter in a local variable. print(key); -- Prints the pressed key to the console. -- We test if the correct key is pressed. if key == 25 then local player = getSpecificPlayer(0); -- Java: get player one local inv = player:getInventory(); -- Java: access player inv -- Java: add the actual items to the inventory inv:AddItem("Base.Axe"); inv:AddItem("Base.RippedSheets"); inv:AddItem("camping.TentPeg"); end end -- This will be fired whenever a key is pressed. Events.OnKeyPressed.Add(addItems); Notice the _keyPressed parameter that was added to our function. You might wonder about the leading undaerscore. It is just a thing of coding style that I like to do, to be able to distinguish parameters from local variables in the function's body. The same goes for storing the parameter in the local variable "key". It might seem superfluous at first, but if you want to change the content of this variable later on, you can easily do that by changing its declaration at the top of the functions instead of having to track down every single occurence. Anyway, they _keyPressed parameter will receive a number corresponding to the pressed key and pass it into our function. Unfortunately I'm not to sure which numbering method is used in Project Zomboid, but I think it might be the one from LWJGL. You can use the print(key) call in the function to easily find out all numbers you need to know anyway. Basically we just have finished our first real mod. Save the AddItems.lua and copy your base folder into the Project Zomboid-mods folder. Now you can go into the game and enable your mod (restart the game afterwards!). Once you are in the game now, you should be able to cheat items into your character's inventory by pressing the 'P' key on your keyboard. TOC Last updated: 12.11.2013 IV. Custom professions Admittedly our first mod isn't very impressive so we are going to expand it a bit. The biggest problem at the moment is, that the player can cheat weapons into his or her inventory every playthrough, which might ruin legit savegames. 1. Creating a custom profession That's why we are going to create a custom "Cheater" Profession and link the cheat code to it. a.) The foundation Of course we need to create a new lua script. I'm gonna call it "CheaterProfession.lua" and save it in its own folder (Note: Basically it doesn't matter where you save your lua files, but good structuring will make it easier for you and others to organize and understand your project). After creating the file open it and add the following lines: -- CheaterProfession.luarequire'NPCs/MainCreationMethods';require'NPCs/ProfessionClothing'; This basically makes sure that the file is loaded after those two files which enables us to use their functions. (If someone has a more technical explanation feel free to PM me or comment below!). b.) Creating the profession Now we can start with actually creating the new profession. Add these lines to your CheaterProfession.lua -- CheaterProfession.lua require'NPCs/MainCreationMethods'; require'NPCs/ProfessionClothing'; local function initProfessions() -- Java: Create a new profession. local cheater = ProfessionFactory.addProfession("cheater", "Cheater", "Prof_rm_Cheater"); -- Java: Add a custom trait called Undesireable (no one likes cheaters ). cheater:addFreeTrait("rm_undesireable"); -- Java: Add the vanilla trait Nightowl. cheater:addFreeTrait("NightOwl"); end Lets go through the code. The part of it which actually creates / registers the new profession is: local cheater = ProfessionFactory.addProfession("cheater", "Cheater", "Prof_rm_Cheater"); It calls the addProfession(String type, String name, String IconPath) function of the ProfessionFactory. The parameters are used like this: type: Used to identify the profession internally in the game's code. name: Human readable name which appears in the game's menus etc. iconPath: Name of the custom icon to be displayed in the game. If we would leave the code here it would create a fine new profession without any traits though. That's where the remaining two lines come into play: cheater:addFreeTrait("rm_undesireable"); This adds a (you probably guessed it) trait to the profession we just created. "rm_Undesireable" is the trait we are going to create in a few seconds whereas "NightOwl" is one of the vanilla traits. Of course PZ doesn't know "rm_undesireable" yet, so we still have to actually create it. Lets do it. c.) Creating a new trait We add a new function above the one we created above to initialise the traits. local function initTraits() TraitFactory.addTrait("rm_undesireable", "Undesireable", 0, "Allows you to cheat.\nShame on you!", true); end Quite similar to the ProfessionFactory we used above, the TraitFactory class allows us to add a new trait by calling addTrait(String type, String name, int cost, String desc, boolean profession). Let me explain those parameters: type: This is the internal name used in the games code. It's also the name of the custom icon to be displayed in the game. ! Has to be lower case ! name: The human readable name displayed in menus etc. cost: Determines how many trait points it will cost to select this trait. desc: The description which appears when you hover over the trait. profession: If set to true the trait won't appear as a selectable trait but instead stays a "profession-only" trait. It really is as easy as that Now you actually already have a fully functional profession which you could play with. But it still is lacking two important parts of the profession system: Spawn points and custom clothing colours. d.) Custom Spawnpoints Spawnpoints determine where in the Gameworld the player will appear when the game starts. Before we can add a new spawnpoint though we of course need to find out its coordinates in the game. For this purpose I have created the "Coordinate Viewer", which displays the player's coordinates as a small overlay in the game. So if our cheater profession should start in the large warehouse (where else!?) the game will show us a player position of X: 3110 and Y: 1809. Unfortunately we can't use those "absolute" coordinates for the spawning code. We have to calculate the "relative" coordinates instead. Don't worry though - it is pretty easy. Basically you just need to divide the absolute coordinates by 300 to get the cells, but more importantly you have to ignore the remainder. Our coordinates for the big warehouse would be X: 10 and Y: 6 then. Now we have the cell in which the player should spawn. Relative to that position we need the exact coordinates and this is where the remainder comes into play. Still using the above coordinates the remainders of the division would be for X: 110 and for Y: 9. This probably sounds more complicated than it is. I suggest that you read through this post by The_Real_AI who maybe explains it a bit better. Now that we have calculated the coordinates, we need to tell the game to use them. -- Set custom spawn points for this profession. -- Modelled after spawn code by RegularX. Thanks to -- The_Real_Ai for his explanation on how to calculate -- them. local function initSpawnPoints() local spawn; -- Create a Spawnpoint in the large Warehouse. spawn = { { worldX = 10, worldY = 6, posX = 110, posY = 8, }, } -- Add our profession to the list of spawnpoints for Muldraugh. BaseGameCharacterDetails.spawnPoint.MuldraughKY.cheater = spawn; spawn = { { worldX = 39, worldY = 23, posX = 138, posY = 100, }, } -- Add our profession to the list of spawnpoints for West Point. BaseGameCharacterDetails.spawnPoint.WestPointKY.cheater = spawn; end Basically we have created a local table which holds our calculated coordinates and added it to the global table BaseGameCharacterDetails.spawnPoint. Take a look at the last line of the function: BaseGameCharacterDetails.spawnPoint.WestPointKY.cheater = spawn; We create a new index cheater and give it the value of our spawnpoint. It is essential that this index uses the type (check the parameters above) of your profession or else it won't work. It is probably self evident but MuldraughKY holds all spawns for Muldraugh, whereas WestPointKY creates spawns in West Point. e.) Custom Profession Clothing Finally we are going to add some custom colors for the profession clothing. The System is quite similar to the spawn points above: Basically we are going to create a table which holds all values for male and female "cheaters". ----- Set custom clothing and clothing colors for this -- profession. local function initClothing() local clothes = {} ProfessionClothing.rm_Burglar = clothes; end We create a table called clothes which will hold all of the necessary values. Then we have to make two nested tables to separate the "male" and "female" clothes (this means the guy can have blue and the lady pink colors for example - yay ). local function initClothing() local clothes = { male = { }, female = { }, } end Now we will add all the values need to create the clothes. First we declare which type of clothing item the character should wear. The male character is going to wear a Shirt and Trousers and the female character gets a Blouse and Skirt. ----- Set custom clothing and clothing colors for this -- profession. local function initClothing() local clothes = { male = { topPal = "Shirt_White", top = "Shirt", bottomPal = "Trousers_White", bottom = "Trousers", }, }, female = { topPal = "Blouse_White", top = "Blouse", bottomPal = "Skirt_White", bottom = "Skirt", }, } end You probably are wondering why there are two variables (top and topPal) for each item for example. As far as I understand the system the "pal" stuff just sets the color palette for the specific item. Why we have to do that ... I don't know It is something we gotta have to ask the devs. Last but not least we are going to give some colours to those clothes. Those values will be stored in two seperat tables called topCol and bottomCol. As you probably figured the first determines the colours of the top the character wears, whereas the latter determines the clothes for pants, skirts, etc. PZ uses the three values Red, Green and Blue (RGB) to calculate the final colour. Those values have a floating point range from 0 to 1 which was a bit strange for me at first considering that most programs and games I've used use values from 0 to 255 I will leave it to you to figure out which values return which colour. In my example here all clothes will be black: ----- Set custom clothing and clothing colors for this -- profession. local function initClothing() local clothes = { male = { topPal = "Shirt_White", top = "Shirt", bottomPal = "Trousers_White", bottom = "Trousers", topCol = { r = 0.1, g = 0.1, b = 0.1, }, bottomCol = { r = 0.1, g = 0.1, b = 0.1, }, }, female = { topPal = "Shirt_White", top = "Shirt", bottomPal = "Trousers_White", bottom = "Trousers", topCol = { r = 0.1, g = 0.1, b = 0.1, }, bottomCol = { r = 0.1, g = 0.1, b = 0.1, }, }, } ProfessionClothing.cheater = clothes end Just like the spawnpoints we add the table of our cheater profession to the global table called ProfessionClothing with the last line of the function. f.) Putting it all together We still need to tell PZ to call our functions once the game boots so that our custom values are initialised. We wlll use our beloved Events for that. Add these lines to the end of your CheaterProfession.lua file: Events.OnGameBoot.Add(initTraits); Events.OnGameBoot.Add(initProfessions); Events.OnGameBoot.Add(initSpawnPoints); Events.OnGameBoot.Add(initClothing); We are done here. Congratulations you have created your first custom Profession The complete file should look like this: TOC Last updated: 12.11.2013 2. Linking Professions / Traits to game mechanics What we want to do now is link a special game mechanic to the trait of the profession we just created. Of course this isn't a must, but it doesn't make much sense to implement a trait that doesn't have any effect in the game, does it? You will see that it is actually pretty easy. Let's get to it. Coming soon™... TOC Last updated: 08.11.2013
- 80 replies
-
- 17
-
-
Hi all, Has anyone got all the explanations of the Sandboxvars file? I have the below for my server with the explanations I know, Please can someone fill in the blanks?; SandboxVars = { VERSION = 3, Zombies = 4, (How many zombies when the server starts, 1 is insane amount, 5 is none) Distribution = 1, (Where the zombies gravitate to, 1 is urban (in cities), 2 is uniform (everywhere)) DayLength = 3, (1 is 15 minutes, 2 is 30 minutes, 3 is 1 hour, 4 is 2 hours, 5 is 3 hours, 6 is 4 hours, 7 is 5 hours, 8 is 12 hours, 9 is real-time) StartYear = 1, (1 is the 1st year etc) StartMonth = 4, (1 is Jan, 12 is Dec) StartDay = 1, (1 is the 1st of the month etc) StartTime = 2, (1 is 7AM, 2 is 9AM, 3 is 12PM, 4 is 2PM, 5 is 5PM, 6 is 9PM, 7 is 12AM, 8 is 2AM, 9 is 5AM) WaterShut = 7, (1=instant, 2=0-30days, 3=0-2month, 4=0-6month, 5=0-1years, 6=0-5years, 7=2-6month, 7=6-12month) ElecShut = 7, (1=instant, 2=0-30days, 3=0-2month, 4=0-6month, 5=0-1years, 6=0-5years, 7=2-6month, 7=6-12month) WaterShutModifier = 500, (the number of days before water is shut off -1 mean instant) ElecShutModifier = 480, (the number of days before electricity is shut off -1 mean instant) FoodLoot = 4, (1 is extremely rare, 5 is abundant) WeaponLoot = 2, (1 is extremely rare, 5 is abundant) OtherLoot = 3, (1 is extremely rare, 5 is abundant) Temperature = 3, (1 is very cold, 5 is very hot) Rain = 3, (How often it rains, 1 is very dry, 5 is is very rainy) ErosionSpeed = 5, (How fast erosion occurs, 1 is very fast (20 days), 5 is very slow (500 days)) XpMultiplier = 15.0, (Obvious) Farming = 1, (How fast crops grow, 1 is very fast, 5 is very slow) CompostTime = 1 Determines how long it will take for food to decay in a composter. (1Week=1 2Weeks=2 3Weeks=3 4Weeks=4 6Weeks=5 8Weeks=6 10Weeks=7 12Weeks=8) StatsDecrease = 4, (How fast Stats Decrease when not being used, 1 is very fast, 5 is very slow) NatureAbundance = 3, (1 is very poor, 5 is very abundant) Alarm = 6, (How often houses are alarmed, 1 is never, 6 is very often) LockedHouses = 6, (How often houses are locked, 1 is never, 6 is very often) StarterKit = false, (To start with some basic essentials) Nutrition = false, (To enable the Nutrition system, calorie intake etc) FoodRotSpeed = 5, (How fast food rots, 1 is very fast, 5 is very slow) FridgeFactor = 5, (How effective refrigeration is, 1 is very low, 5 is very high) LootRespawn = 3, (How often loot respawns, 1 is none, 2 is every day, 3 is every week, 4 is every month, 5 is every two months) SeenHoursPreventLootRespawn = 0 This value is an integer defining the number of hours. When >0, loot will not respawn in zones that have been visited within this number of hours. [Default=0] TimeSinceApo = 1, (How many days since the start of the Apocalypse) PlantResilience = 3, (Plants resilience against disease/weather. 1 is very low, 5 is very high) PlantAbundance = 3, (How much farm plants produce. 1 is very poor, 5 is very abundant) EndRegen = 3, (Endurance regeneration (how fast you regain endurance). 1 is very fast, 5 is very slow) Helicopter = 3, (how regularly helicopters pass over the event zone. 1=never, 2 =once, 3=sometimes, 4=often) MetaEvent = 2, (how often zombie attacking meta-game events like distant gunshots will occur. 1=never, 2=sometimes, 3=often) SleepingEvent = 2, (governs night-time meta-game events during the player's sleep. 1=never, 2=sometimes, 3=often) GeneratorSpawning = 3, (increase/decrease the chance of electrical generators spawning on the map. 1=very low, 2=low, 3=normal, 4=high, 5=very high) GeneratorFuelConsumption = 1.0, (impacts how much fuel is consumed by generators. No fuel required= 0 . Minimum = 0, Maximum=100) SurvivorHouseChance = 3, (increase/decrease probability of discovering randomized safe houses on the map: either burnt out, containing loot stashes, dead survivor bodies etc. 1=never, 2=extremly rare, 3=rare, 4=sometimes, 5=often, 6=very often) AnnotatedMapChance = 4, (impacts on how often a looted map will have annotations marked on it by deceased survivors. 1=never, 2=extremely rare, 3=rare, 4=sometimes, 5=often, 6=very often) CharacterFreePoints = 10, (adds free traits points during character creation) ConstructionBonusPoints = 3, (Player-built construction strength. 1=very low, 2=low, 3=normal, 4=high, 5=very high) NightDarkness = 2, (Darkness during night. 1=pitch black, 2=dark, 3=normal, 4=bright) InjurySeverity = 2, (increases and decreases the impact injuries on your body, and their healing time. 1=low, 2=normal, 3=high) BoneFracture = true, (False=no fractures, true=bones can break) HoursForCorpseRemoval = 72, (number of in-game hours before zombies corpses are automatically removed from the map) DecayingCorpseHealthImpact = 3, (governs impact that nearby decaying bodies has on the player's health and emotions. 1=none 2=low, 3=normal, 4=high) BloodLevel = 4, (how much blood spatter when getting injured or killing zombies. will 1=none 2=low, 3=normal, 4=high, 5=ultra gore) ClothingDegradation = 2, (governs how quickly clothing degrades, becomes dirty and bloodied. 1=disabled, 2=slow, 3=normal, 4=fast) FireSpread = false, (fire can spread or not. false=off, true=on) DaysForRottenFoodRemoval = 4, (number of in game days before rotten food is removed from the map. -1 means that rotten food is never removed.) AllowExteriorGenerator = true This allows generators to power exterior tiles, and for example can get gas pumps working after the electricity has turned off. (True or False) ZombieAttractionMultiplier = 1 Use this to multiply or reduce engine general loudness. [Minimum=0] [Maximum=100] [Default=1] CarSpawnRate = 2 (Low=1 Normal=2 High=3) ChanceHasGas = 1 Governs the chances of finding vehicles with gas in the tank. (Low=1 Normal=2 High=3) InitialGas = 2 Governs how full gas tanks will be in discovered cars. (VeryLow=1 Low=2 Normal=3 High=4 VeryHigh=5 Full=6) CarGasConsumption = 1.0 The rate in which vehicles will consume fuel. [Minimum=0.0] [Maximum=100] [Default=1.0]. LockedCar = 4 How frequent the doors of a vehicle will be locked. (Never=1 ExtremelyRare=2 Rare=3 Sometimes=4 Often=5 VeryOften=6) CarGeneralCondition = 2 In what condition new cars will spawn. (VeryLow=1 Low=2 Normal=3 High=4 VeryHigh=5) CarDamageOnImpact = 3 Governs how much damage a vehicle will take after collisions. (VeryLow=1 Low=2 Normal=3 High=4 VeryHigh=5) TrafficJam = true Enable or disable traffic jams that spawn on the main roads of the map. (True or False) CarAlarm = 4 The frequency in which a car alarm will be triggered when opening a door. This will attract zombies to the vehicle's position. (Never=1 ExtremelyRare=2 Rare=3 Sometimes=4 Often=5 VeryOften=6) PlayerDamageFromCrash = true Enable or disable player getting damage from being in a car accident. (True or False) SirenShutoffHours = 1 Number of hours before the siren sound of a car alarm will stop playing. 0.0 means it will play until the car battery is dead. [Minimum=0] [Maximum=168] [Default=0] RecentlySurvivorVehicles = 1 Governs whether the player can discover a car that has been maintained and cared for after the infection struck, i.e. is still in working order. (Low=1 Normal=2 High=3) EnableVehicles = true Enable or disable vehicles from spawning into the game. (True or False) VehicleEasyUse = false If true, cars will all be unlocked with a full gas tank and low engine loudness. (True or False) ZombieLore = { Speed = 3, (1 is sprinters (fastest), 2 is fast shamblers, 3 is shamblers (slowest)) Strength = 3, (1 is superhuman, 2 is normal, 3 is weak) Toughness = 3, (1 is tough, 2 is normal, 3 is fragile) Transmission = 1, (1 is blood/saliva, 2 is everyone is infected, 3 is no transmission) Mortality = 6, (This governs how deadly infection is. 1 is instant, 6 is 1 to 2 weeks) Reanimate = 1, (How fast zombies come back to life...again. 1 is instant, 6 is 1 to 2 weeks) Cognition = 3, (How smart zombies are. 1 is Navigate/Use Doors, 3 is basic navigation only) Memory = 2, (How much zombies will remember. 1 is long, 4 is none) Decomp = 1, (1 is slows/weakens them, 4 is no effect) Sight = 2, (How well zombies can see. 1 is eagle-eyed, 3 is poor) Hearing = 2, (How well zombies can hear. 1 is pinpoint, 3 is poor) Smell = 2, (How well zombies can smell. 1 is bloodhound, 3 is poor) ThumpNoChasing = false, (environmental attacks. zombies that have not seen/heard a player can attack doors and constructions while roaming. true=on, false=off) ThumpOnConstruction = true, (damage construction. governs whether or not zombies can destroy player constructions and defences. true=on, false=off) ActiveOnly = 1, (governs whether zombies are more active during the day, or whether they act more nocturnally. Inactive zombies will be slower and tend not to give a chase. 1=both, 2=night, 3=day) TriggerHouseAlarm = true Allows zombies to trigger house alarms when breaking through windows and doors. Enabling this option will cause zombies to constantly be movie around populated areas, making the early game much more difficult. (True or False) }, ZombieConfig = { PopulationMultiplier = 0.5, (Depends on "Zombies" in the SandboxVars. population multiplier: (old var. "zombie intensity") set how many zombies you want to begin with) Minimum=0,Maximum=4,Default=1) PopulationStartMultiplier = 1.0, (Adjusts the desired population at the start of the game. it's a start multiplier: how much of the "population multiplier" you want at game start (it will slowly increase) Minimum=0,Maximum=4,Default=1) PopulationPeakMultiplier = 2.0, (Adjusts the desired population on the peak day. Set how many zombies you want at X days (and forever after) Minimum=0,Maximum=4,Default=1) PopulationPeakDay = 100, (The day when the population reaches it's peak. Minimum=1, Maximum=365, Default=28) RespawnHours = 96, (The number of in-game hours that must pass before zombies may respawn in a cell. If zero spawning is disabled. Minimum=0, Maximum=8760, Default=72) RespawnUnseenHours = 10, (The number of in-game hours that a chunk must be unseen before zombies may re-spawn in it. Minimum=0, Maximum=8760, Default=16) RespawnMultiplier = 0.1, (The fraction of a cells desired population that may re-spawn every RespawnHours. Minimum=0, Maximum=1, Default=0.1) RedistributeHours = 12.0, (The number of in-game hours that must pass before zombies migrate to empty parts of the same cell. If zero, migration is disabled. Minimum=0, Maximum=8760, Default=12) FollowSoundDistance = 200, (The distance a virtual zombie will try to walk towards the last sound it heard. Minimum=10, Maximum=1000, Default=100) RallyGroupSize = 20, (The size of groups real zombies form when idle. Zero means zombies don't form groups. Groups don't form inside buildings or forest zones. Minimum=5, Maximum=1000, Default=20) RallyTravelDistance = 30, (The distance real zombies travel to from groups when idle. Minimum=5, Maximum=50, Default=20) RallyGroupSeparation = 15, (The distance between zombie groups. Minimum=5, Maximum=25, Default=15) RallyGroupRadius = 4, (How close members of a group stay to the group's leader. Minimum=1, Maximum=10, Default=3) }, } This I am sure will help a lot of people out too. I also have the settings for the servertest.ini file with the explinations that I know... nightlengthmodifier=1.0 (Length of the night, 0.5 would make the night go twice as fast) PVP=false (False is PvE, True is PvP) PauseEmpty=true (time in game pauses when the server is empty) GlobalChat=true (Enables in game chat) Open=true (Allows anyone to join) ServerWelcomeMessage= <RGB:0,0,0> To chat locally press 't', to global chat press 'y' or add '/all' before chatting <LINE> Type '/help' to have a list of available commands <LINE> <RGB:0,0,0> (Message that is displayed when joining the server) LogLocalChat=true (Logs all local chat for server admins to view) AutoCreateUserInWhiteList=true (Adds user to Whitelist when they join the server) DisplayUserName=true (Displays player’s usernames in game) SpawnPoint=0,0,0 (Use this to define a custom spawn point instead of the random one from character creation) SafetySystem=true (Allow the user to change their safety (if false and if PVP=true, then the safety will always be off) ShowSafety=true (Allow the players to see if someone have his safety off with the skull icon) SafetyToggleTimer=100 (When the player disable safety it take some times before HE enable it (tho the other players see it instantly), define it here) SafetyCooldownTimer=120 (Every time you hit someone in safety off, add this timer to the cool down before you can actually toggle safety off) SpawnItems= (Define specific items for everyone to spawn with) DefaultPort=16261 (Your server game port) ResetID= (Leave alone) Mods=Hydrocraft (Mods added to server) Map=Muldraugh, KY (Maps added to server) DoLuaChecksum=true (Do the lua checksum. Players with modified Lua files that differ from the server files will not be able to connect. true=Lua check, false=no lua check) Public=true (Everyone can see the server in the server list) PublicName= (Name of the server) PublicDescription= (Description of the server that is displayed in the server list) MaxPlayers=64 (Max number of players for the server) PingFrequency=10 (How often to ping clients in seconds) PingLimit=400 (Max ping in ms, if client exceeds this amount they will be kicked) HoursForLootRespawn=2 (How many in-game hours for loot to re-spawn) MaxItemsForLootRespawn=6 (Max items to spawn in each container) ConstructionPreventsLootRespawn=true (If you start building on a house for example, loot will stop respawning in that house) DropOffWhiteListAfterDeath=false (Takes you off the Whitelist if you die) NoFireSpread=true (Fire doesn’t spread) NoFire=true (No Fire) AnnounceDeath=true (Death is announced to all players) MinutesPerPage=1.0 (How long books take to read. Lower number faster, higher number slower) HoursForCorpseRemoval=2.0 (How many in-game hours before corpses disappear) SaveWorldEveryMinutes=10 (How often to save the server in minutes) PlayerSafehouse=true (Allows players and Admins to claim houses etc as safehouses) AdminSafehouse=false (Allows only Admins to claim safehouses) SafehouseAllowTrepass=false (Allow players to trespass through other players safehouses) SafehouseAllowFire=false (Allow fire in safehouses) SafehouseAllowLoot=false (Allow players to loot other players safehouses) SafehouseAllowRespawn=true (Allow owner of safehouse to respawn in their safehouse) SafehouseDaySurvivedToClaim=1 (How many days you need to survive before you can claim a safehouse) SafeHouseRemovalTime=144 (If you do not visit your safehouse in this many game days it will be released) AllowDestructionBySledgehammer=true (Allow walls to be knocked down with the Sledgehammer) KickFastPlayers=false (Kick players that appear to be moving faster than is possible. May be buggy -- use with caution) ServerPlayerID= (Leave alone) RCONPort=27015 (Port for RCON) RCONPassword= (Password for RCON) Password= (Password for server. Leave blank if you want anyone to join your server) MaxAccountsPerUser=0 (Limits the number of different accounts a single Steam unser may create on this server. Ignored when using the hosts button) SleepAllowed=false (Enable sleep) SleepNeeded=false (If true you will need to sleep when exhausted) SteamPort1=8766 (Leave alone) SteamPort2=8767 (Leave alone) WorkshopItems= (MOD IDs - When you run the server with these ID's in the Mods will auto update) SteamScoreboard=true (show steam usernames and avatars in the player list. true=visible to everyone, false=visible to no one, admin=visible to admins) SteamVAC=true (Steam anti cheat) UPnP=true (attempt to configure a UPnP-enabled internet gateway to automatically setup port forwarding rules. The server will fall back to default ports if this fails) UPnPLeaseTime=86400 (port lease time in seconds (86400 == 24 hours). This should not be changed) UPnPZeroLeaseTimeFallback=true (retry with zero lease time if port-mapping fails (helps with some routers). This should not be changed.) UPnPForce=true (remove existing port mappings. This should not be changed) CoopServerLaunchTimeout=20 CoopMasterPingTimeout=60 VoiceEnable=true (In game Voip) VoiceComplexity=5 VoicePeriod=20 VoiceSampleRate=24000 VoiceBuffering=8000 VoiceMinDistance=1.0 VoiceMaxDistance=50.0 Voice3D=true server_browser_announced_ip= UseTCPForMapDownloads=false PlayerRespawnWithSelf=false PlayerRespawnWithOther=false FastForwardMultiplier=40.0 PlayerSaveOnDamage=true SaveTransactionID=false DisableSafehouseWhenPlayerConnected=false Faction=true (enable Factions) FactionDaySurvivedToCreate=2 (How many days you must survive to create a Faction) FactionPlayersRequiredForTag=1 AllowTradeUI=true (Allows you to trade among players) HoursForWorldItemRemoval=0.0 WorldItemRemovalList=Base.Vest,Base.Shirt,Base.Blouse,Base.Skirt,Base.Shoes ItemRemovalListBlacklistToggle=false DisableRadioStaff=false DisableRadioAdmin=true DisableRadioGM=true DisableRadioOverseer=false DisableRadioModerator=false DisableRadioInvisible=true ClientCommandFilter=-vehicle.*;+vehicle.damageWindow;+vehicle.fixPart;+vehicle.installPart;+vehicle.uninstallPart ItemNumbersLimitPerContainer=0 If anyone can fill in the gaps, I and i'm sure the whole community would be very thankful. Cheers all, M700N
- 19 replies
-
- 3
-
-
- sandboxvars
- config
- (and 8 more)
-
Like in media\lua\shared\Foraging\forageSystem.lua There are a bunch of defination variables for forageSystem: forageSystem = { isInitialised = false, -- definition tables itemDefs = {}, -- item table catDefs = {}, -- category definitions zoneDefs = {}, -- zone definitions -- forage system loot tables lootTables = {}, -- the loot table - see generateLootTable for structure lootTableMonth = nil, -- used to keep the loot table in line with the game date -- maxIconsPerZone = 2000, -- sandbox settings -- (Abundance Settings) NatureAbundance = { -75, -50, 0, 50, 100 }, -- bonus percent density per zone OtherLoot = { -75, -50, 0, 50, 100 }, -- bonus percent density per zone } Can you make a file to overwrite some of these variables, but not overwriting the entire file? Because that would be a lot of problems when future updates come up.
-
Hi, while i did not have a need for it yet, i noticed the method "setOnClick" of ISButton to take the function and up to 4 parameters for the on click function. Issue is, that it seems to set the button's onClick parameters (arguments/args) to arg1, arg2, arg3, arg3 instead of arg1, arg2, arg3, arg4. File containing it: media / lua / client / ISUI / ISButton.lua , line #387 It is from what I've seen currently not used by the base game (with up to 4 args that is) and as such should not cause any issue regarding base functionality. Thank you for your work!
-
I have a mod that adds new traits. Some of these traits add items to the player on spawn. However, I'm unable to add items that aren't in Base without causing mod errors. I assume I need to somehow properly reference these non-Base items from "camping" and so on. Could someone help? For instance, when I use: iteminv.AddItem("camping.CampfireKit"); I just get errors. All items in Base work however.
-
The test case on line 125 of file media/lua/client/ISUI/ISInventoryPaneContextMenu.lua to check if a Dish Cloth or Bath Towel can be used to dry the player off needs parentheses around testItem:getType() == "DishCloth" or testItem:getType() == "BathTowel" to make the line look like if (testItem:getType() == "DishCloth" or testItem:getType() == "BathTowel") and playerObj:getBodyDamage():getWetness() > 0 then in order to fix a bug where the dry dish cloth has the option to be used when the player is dry because it's only checking if there's a dish towel, or if there's a bath towel and you are wet; instead of checking if they have a dish cloth or bath towel, as well as being wet.
-
I've been pouring over the code and found the IsoDummyCameraCharacter class and the IsoCamera class, but I don't know if that's right or how to put it together. I'd like to make a mod that allows the player to "peek" around a corner if a mirror is equipped. I thought maybe make an IsoDummyCameraCharacter one IsoSquare away and then set IsoCamera to it, but is that right? How? I'm stuck. Thanks, Scruffy Fren
-
Not sure if this is intentional, but it looks like there is every other tool in the list, including club hammers and wooden mallets.
-
Hi. I'm thinking about the creation of a mod for our roleplay PZ server : an icon showing on the character while its player is typing something in local chat. Being aware that another player is currently typing could be very useful on a roleplay server. I'm looking for solutions, as no Lua event is linked to this specific situation. As for now, I have tried to simply capture the "OnKeyPressed" event for the "Return" key (I know it's not either an elegant or a pro approach as keybinding could change.) But I can't even manage to capture the event... Is the return key out of "OnKeyPressed" range ? What am I doing wrong ? My current test is : -- If player(0) press "ENTER" key, log it and say it local function typingIconShow(_keyPressed) local key = _keyPressed; -- Store the parameter in a local variable. print(key); -- Prints the pressed key to the console. -- We test if the correct key is pressed. local player = getSpecificPlayer(0); if key == 13 then print('TYPINGICON MOD - RETURN key hit !'); player:Say("I press the RETURN key !"); else print('TYPINGICON MOD - '..key..' key hit !'); player:Say("I press the "..key.." key !"); end end -- Register the function to key pressed event Events.OnKeyPressed.Add(typingIconShow); Current results : the mod is loaded, but no output, nor in game nor in the console (I tested it by hosting a test multiplayer game). I'm also wondering... How to get the "typing icon" to appear on other players' client ? I mean, which mechanic should I use to place a small icon on the typing player character and make it visible for every other players ? Does anyone can help me please ?
-
For example, ClothingRecipesDefinitions.lua by now: ClothingRecipesDefinitions = {}; ClothingRecipesDefinitions["Sheet"] = {materials="Base.RippedSheets:4" } --ClothingRecipesDefinitions["Belt2"] = {materials="Base.LeatherStrips:1"} ClothingRecipesDefinitions["FabricType"] = {} ClothingRecipesDefinitions["FabricType"]["Cotton"] = {}; ClothingRecipesDefinitions["FabricType"]["Cotton"].material = "Base.RippedSheets"; ClothingRecipesDefinitions["FabricType"]["Denim"] = {}; ClothingRecipesDefinitions["FabricType"]["Denim"].material = "Base.DenimStrips"; ClothingRecipesDefinitions["FabricType"]["Denim"].tools = "Base.Scissors"; ClothingRecipesDefinitions["FabricType"]["Denim"].noSheetRope = true; ClothingRecipesDefinitions["FabricType"]["Leather"] = {} ClothingRecipesDefinitions["FabricType"]["Leather"].material = "Base.LeatherStrips"; ClothingRecipesDefinitions["FabricType"]["Leather"].tools = "Base.Scissors"; ClothingRecipesDefinitions["FabricType"]["Leather"].noSheetRope = true; Should be: ClothingRecipesDefinitions = { Sheet = { materials="Base.RippedSheets:4" }, --Belt2 = { materials="Base.LeatherStrips:1" }, FabricType = { Cotton = { material = "Base.RippedSheets", }, Denim = { material = "Base.DenimStrips", tools = "Base.Scissors", noSheetRope = true, }, Leather = { material = "Base.LeatherStrips", tools = "Base.Scissors", noSheetRope = true, }, }, };
-
Is there any event when the game (dedicated server) is about to go down just before saving the game?
-
I'm trying to set current real time. local SEC_TO_HOUR = 1 / (60 * 60) function makeRealTime() local tm = getGameTime() local t = os.time() --utc local day = tm:getDay() --8 local month = tm:getMonth() -- 6 local year = tm:getYear() -- 1993 local current = tm:getTimeOfDay() --in hours local hour = round(current) --9 local game_t = os.time{year=year, month=month+1, day=day+1, hour=0, min=0} --utc local diff = round(t - game_t) --in seconds current = current + diff * SEC_TO_HOUR -- OK to increment days (tested) tm:setTimeOfDay(current) end Events.OnCreatePlayer.Add(function() makeRealTime() end) But it doesn't work: zombie.ui.UIManager render SEVERE: null java.lang.ArrayIndexOutOfBoundsException: 16425 at zombie.ui.Clock.render(Clock.java:153) at zombie.ui.UIManager.render(UIManager.java:431) at zombie.gameStates.IngameState.renderFrameUI(IngameState.java:1126) at zombie.core.profiling.AbstractPerformanceProfileProbe.invokeAndMeasure(AbstractPerformanceProfileProbe.java:71) at zombie.gameStates.IngameState.renderframeui(IngameState.java:1114) at zombie.gameStates.IngameState.renderInternal(IngameState.java:1266) at zombie.core.profiling.AbstractPerformanceProfileProbe.invokeAndMeasure(AbstractPerformanceProfileProbe.java:71) at zombie.gameStates.IngameState.render(IngameState.java:1217) at zombie.gameStates.GameStateMachine.render(GameStateMachine.java:37) at zombie.core.profiling.AbstractPerformanceProfileProbe.invokeAndMeasure(AbstractPerformanceProfileProbe.java:71) at zombie.GameWindow.renderInternal(GameWindow.java:327) at zombie.GameWindow.frameStep(GameWindow.java:726) at zombie.GameWindow.run_ez(GameWindow.java:640) at zombie.GameWindow.mainThread(GameWindow.java:467) at java.lang.Thread.run(Thread.java:745) What am I doing wrong?