Search the Community
Showing results for tags 'vehicles'.
-
Vehicle mechanics in PZ is absolutely outstanding, and in my opinion, one of the most fun aspects of the whole game. I've observed a certain detail about it and came up with this suggestion. Removing "Engine Quality" and adding a car part named "Starter Motor" Like in real life, the starter motor would be a car part located underneath the hood. With a proper level of mechanics skill and the correct tools, it could be replaced or fixed, and it should obey the car categories (Standard/Heavy-duty/Sports). Engine quality would no longer exist, and chances of successfully starting the car's engine would be determined by two factors: the starter motor health and the remaining charge of the car battery. This would provide a more immersive experience in car mechanics, without making it excessively realistic and fun-spoiling. I always enjoyed the way emergency vehicles often have higher chances of reliably starting the engine, as I assume these vehicles are regularly maintained in real life, but on the other hand, I see no reason why civilian vehicles cannot have engine qualities higher than a 60. If a player is s mechanic, it should be fun and rewarding to have the possibility to excel at maintaining your civilian vehicle, making it as reliable as any police cruiser. Please tell me any thoughts about my suggestion!
-
The vehicles in the game all have the some looking dashboard HUD so I was thinking different vehicles should have different dashboard HUDs. You know with differently arranged and shaped odometers, fuel gauges, rev counter etc. Makes the game more realistic and authentic.
-
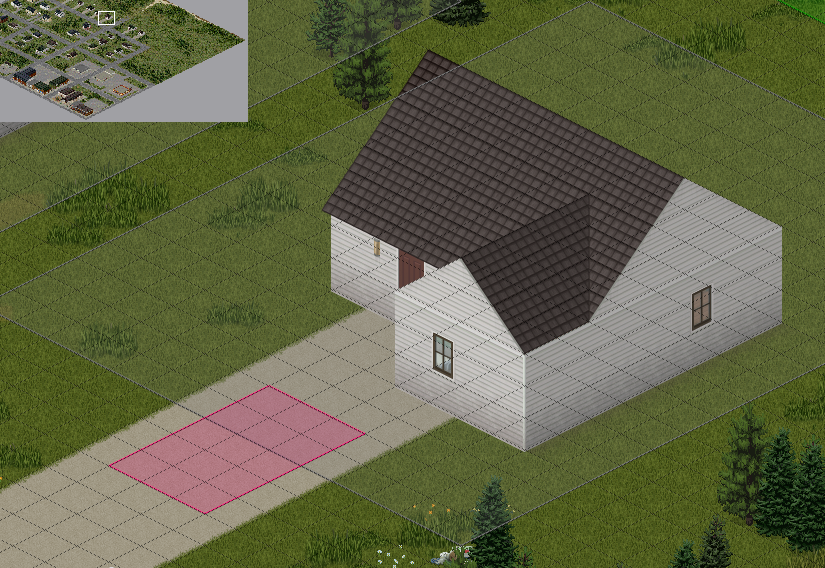
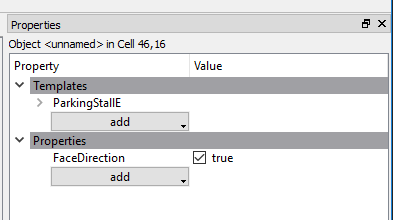
This is very similar to adding foraging zones to your map, (step 6 of this tutorial: https://theindiestone.com/forums/index.php?/topic/21951-the-one-stop-tilezed-mapping-shop/ ) Simply add the following code to your map mods' PZW file the same way as in step 6 of the above guide: <objecttype name="ParkingStall"/> <objectgroup name="ParkingStall" color="#85929e" defaulttype="ParkingStall"/> List of vehicle zone names to use in WorldEd: bad good medium sport farm junkyard trafficjams trafficjamn trafficjame trafficjamw rtrafficjams rtrafficjamn rtrafficjame rtrafficjamw police ranger fire mccoy fossoil postal spiffo radio ambulance burnt The first group is the most common type of vehicle zones used. The second group are for traffic jams pointing in specific directions to immitate the flow of traffic. The ones prefixed with r will spawn less than the regular trafficjam zones. The third group are specific zones for the type of vehicles listed, they are still also spawn random cars but will also spawn the vehicle listed. The final one will add random burn out vehicles. Vehicle zones should be placed as a multiple of 4x3 tiles (4x3, 8x6, 28x3 etc) with 4x3 being a single vehicle, 4 being its side and 3 being its front/back. You can choose any color values you want for the different zones, just make sure they are hex color codes. Once done, load your map mod up in WorldEd, open a cell and add your new vehicle zones as you would foraging zones. Whenever you add a zone you need to use the objects panel on the left of the WorldEd window to give the zone a name (use the names listed above) that will be visible in WorldEd as a tag over the zone, making it easier to keep track of what you have placed where, if these are left blank then the game will default back to grabbing random vehicles from the ParkingStall zone. Example: After you have added vehicle zones to all of your cells, save your map. Once saved, generate your lots and then write objects to lua. You now have vehicle spawns in your map. If you are having trouble with your vehicle zones, you can always take a look at the vanilla objects.lua within the muldraugh folder of your zomboid install, once opened just search for "ParkingStall" to see examples of vehicle zones used in the vanilla vehicle branch. For aligning vehicles in parking stalls: Select a ParkingStall object. In the Properties panel, click the "add" button under Templates. Choose one of the 4 ParkingStallX templates. You should see "Direction=X" where the object name is displayed. The direction controls where the front (or back) edge of each vehicle is aligned. In the picture you can see a Direction=E ParkingStall facing a Direction=W ParkingStall. This is used to ensure the vehicles don't overlap each other, and leaves space for the player (and zombies) to walk between them. For single parking stalls, there is usually no need to choose a direction. The FaceDirection property can be added to ParkingStall objects to align the front of a vehicle to the edge specified by the Direction property. When this property is "false" or isn't assigned to a ParkingStall object, the vehicle will face in a random direction as before. This can be used for parallel-parked vehicles for example.

-
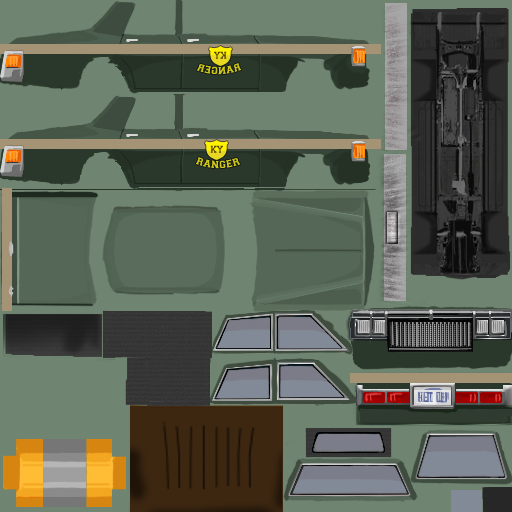
1) The first thing you want to do, as with most mods is to create your mods folder structure, use the image below as a reference, replacing MOD_NAME with the name of your mod: Don't worry about the files shown above, you will be creating them as you follow this guide, just make sure to remember, anytime you see "MOD_NAME" in this guide, replace that with the name you chose for your mod. 2) In your "..mods/MOD_NAME" folder, create your "mod.info" text file which contains the following code: Remember to replace all "MOD_NAME"'s with the actual name of your mod. 3) In the same folder, create/place your MOD_NAME.png , this will be the thumbnail used in game as the poster/picture for your mod. 4) Next up, in your "mods/MOD_NAME/media/lua/client" folder, create your MOD_NAME.lua file with the following code inside: This is the script that will load your model and scripts into the game, it also controls the spawn rate for the car in each type of zone as well as providing the vehicle mechanic overlay. Remember to replace all instances of "MOD_NAME" with the actual name you chose for your mod. 5) Next, in your "mods/MOD_NAME/media/scripts/vehicles" folder, create your MOD_NAME.txt file containing the following code: This script example contains all of the parameters to control the simulation of the vehicle, such as engine power, gear ratios, collision cube and much more. You will (hopefully) find it well commented to give you an idea of what each parameter does. You can look in the games "media\scripts\vehicles" folder for a vanilla vehicle script that more closely reflects the vehicle you are adding rather than starting with the example above, have a good look through them all to get a sense of the different templates you can use and the various changes that can be made to different components. 6) Now you need to (if you have not already) make the 3d model for your vehicle. We suggest using Blender, but as long as you're experienced in 3d modelling, any program that can export .ply files should work, just make sure your faces are triangulated, in Blender you can do this by selecting your model in Edit mode then pressing Ctrl + T. Then drag and drop the exported ply file onto the converter supplied below (unzip the below file, drag your .ply directly onto the .exe, do not double click the exe), it will output a new txt file with the same name as the .ply in the same directory. Copy the new .txt file into your "mods/MOD_NAME/media/models" folder as "Vehicles_MOD_NAME.txt This is the .ply to PZ convertor: PZ_PLYtoPZconverter.zip 7) Now it's time to create your vehicles texture files, these should all go into the "mods/MOD_NAME/media/textures/Vehicles" folder. First up is your "Vehicles_MOD_NAME_Shell.png" , this is the main texture image for your vehicle and needs to be 512x512 pixels, as do all of your textures, below is an example: Next there are 6 different overlay/detail png's to create, the first is for the vehicle lights ("Vehicles_MOD_NAME_Lights.png"): Then the vehicle rust ("Vehicles_MOD_NAME_Rust.png"): The next 2 image examples ("Vehicles_MOD_NAME_Shell_Damaged01.png" and "Vehicles_MOD_NAME_Shell_Damaged02.png") are to show light and heavy damage, respectively, on the vehicle's shell. They are used to represent dents in the bodywork: The next 2 image examples ("Vehicles_MOD_NAME_Overlays_Damaged01.png" and "Vehicles_MOD_NAME_Overlays_Damaged02.png") are very similar to the previous 2 except they are for showing damage on windows and lights as well as scratched on the body work: The last file we need is the vehicle colour mask ("Vehicles_MOD_NAME_Mask.png"), which should also be placed in your "mods/MOD_NAME/media/textures/Vehicles" folder. This tells the game which parts of your vehicle texture correspond to which part of your vehicle model and is needed to display damage, lowered windows and removed elements etc: Here the colour values to be used: Copy your complete mod folder structure into your C:\Users\YourUsernameHere\Zomboid\Mods folder, load the game, turn the mod on in the mod menu and start a new game, your new vehicle is now ready to be found and taken for a spin. Finally, here: ZAZ968M.zip - you can find an example vehicle mod using the above instructions. Notice the included example mod uses a slightly different process with its textures/overlays. The main texture is transparent while the detail has been shifted onto the vehicle_lights .png. This allows the game to automatically and procedurally generate different colours of your car when they are spawned in. Happy Modding!
-
I am here today as an everyday real life bicycle commuter and a new fan of Project Zomboid to advocate for Bicycles. In short, my claim is that bicycles would be a great addition to the game because they are 1) realistic, 2) fill a good spot in the game's difficulty curve, 3) have a good risk/reward gameplay mechanic, and 4) have their own depth. I'll detail each below. 1) realistic I understand a primary goal of PZ is to be a realistic simulation. In a real zombie apocolypse, I believe a bicycle would absolutely, certainly, without doubt be my #1 form of transportation. A human in reasonable fitness level can travel about 40-80 miles in a day depending on slope and average speed. 1. Efficient mode of human transportation (see Steve Jobs quote on locomotion per km, humans as tool makers) 2. Few moving parts, serviceable with common tools 3. Tolerant of parts failure (eg: brakes fail? can still slow down in other ways. Chain fails? can still scoot/coast. Tire fails? can still roll, slowly, damages wheel hub.) 4. Few external world dependencies (plenty of inner tubes and chains in the world to last my natural lifespan) 2) Fits well into the game's difficulty progression My first couple play throughs, I thought cars were impossible. Keys, skills, gas, noise, broken parts. Bikes fill a gap in between walking and driving (+1 from axiomatic) -- they aren't as safe or high capacity, but it's easier to get one going. I would guess that fewer than 5% of players have seen more than 5% of the map's buildings. (not sure if you have stats like that) -- it's really hard for a new player like me to get out and see some of the amazing and detailed locations that have been modeled out. 3) Good risk/reward gameplay mechanics. Bikes are fast, long range, and easy -- but the tradeoff is they're incredibly exposed. Similar to a "glass cannon" build in an RPG. Crashing on a bike is more dangerous (exposure, injury) than crashing on car Good to get around, but carrying cargo is a real pain (drop stuff, slower, no free hands, turn slower) Inverse relationship between cargo weight and safety/stability -- could even model high center of mass penalty (backpacks) if wanted. mountain bike tires are loud on a road at speed. road bike tires are terrible on bumpy/grassy terrain long legged pants protect from scratches but get caught in chain 😂 4) They have their own depth Depending on how deep you'd like each skill tree, bikes have this option. Bikes can have trailers and other bolt on parts (lights, baskets, etc) Big range of bike types Skill with riding could be distinct from fitness/finesse/lightfootedness Other support on the forum: mrtrololo thiago marco7 etsamaru roach extrema Implementation details: Lots of new animations needed here. Mount, dismount, go, turn, crash, wobble, bump, attack. This is tough. Maybe there's a way to test the gameplay mechanic without going all-in on animations. Eg, in a beta build; just represent the bicycle and a shadow of the person, but not your specific character. If it takes off in beta and seems fun, then you know the animations are worth funding. Physics. Hard to say without seeing how it feels, but it could be that vehicle physics are good enough with added visual feedback for falling down, bumpy terrain, and wobbling/about to fall down. I wouldn't want to build a whole two wheel balance thing, instead just assume if the player slows they are walking over the bike. Summary Really amazing (and long term!) project, you've done incredible work here. I am advocating for bikes. I know it has been asked before. I know it's been asked for years before. But still. It's such a realistic apocalypse option and fits the game so freakin' well. And think of the FUN! Zombie-slaying knights on bikes 🚴♂️ 🐉. Bikes at night 🚴♀️ 🌙. Bike with friends 🚵♂️ 🚴♀️ 🚴♂️. It's not my right to have bikes, but I sure would like bikes. Thanks!
-
Hello and welcome to my tutorial. It covers full workflow of vehicle creation for PZ. If you are a complete beginner in 3D modelling, you'll have to watch/read additional tutorials, I won't cover every aspect of model creation and 'where this button is located'. I divide vehicle creation in these stages: 1) Modelling 2) Wheels texture and modelling 3) Texturing 4) Packing files in folders 5) Editing scripts and .lua 6) In-game editing and tests 7) Workshop publish STAGE 1 - MODELLING Today I am creating a 1960 Ford Falcon I prefer using blender as it is my everyday 3d modelling software. Now, find references for your vehicle and ideally it will be a blueprint/outline scheme, like this one: There are some tips in modelling for PZ: 1) Do not care too much about topology and good shading. There is no actual shading in game, only windows have reflections. 2) Avoid n-gons or triangulate them before export 3) DO NOT make edges to outline body panels/parts. All dividing of parts will be done with texture mask. You can do it in UVs if there will be a point for that. 4) Place spindiel imitations in wheel wells to hide rear part of wheel models 5) In the UVs parts of body have to be straight-oriented without any non-90 degrees rotation, so pixels in texture will lay parallel with polygon flow. 6) To avoid physics artifacts in game import model of one of vanilla game cars models to your scene and model in consistent scale. Or import mine, that is available in the end of topic. This is what I consider a well done model There is nothing special in UV unwrapping process, just remember to place the least amount of seams possible and keep island aligned. Here are the UVs of my model: I've unwrapped the model without applied mirror modifier, so now we will have to texture just one half of the car. I'll fix mirroring later. STAGE 2 - WHEELS There are many ways to make a wheel and texture it, but I'll show the most efficient one. Make the wheel's face with simple materials, but unwrap the 'road touching part' to flat surface, like this: Then place an orthographic camera facing the wheel, scale it to fit the whole wheel-dish. Place a ring with emission material to light the wheel. Switch your renderer to Cycles and go to camera view, now use a rendered shading mode to adjust materials and lights to your taste. Set rendering resolution to something like 120x120-175-175 for best results Check the 'transparent' box in film settings to have alpha backround in texture: Now increase the sample count to something like 512-1024 and hit render. You will end up with a result of a ready-to-go wheel texture: The example file with scene for rendering and the model of this wheel you can download here: *google drive .blend file* Now make a lowpoly model of the wheel to use this texture on. I prefer using 18-24 edge circles for wheels. The unwrapping will be later, but eventually you'll end up with this: This method takes 10-15 minutes when you get used to it and gives a stunning and clear result. STAGE 3 - TEXTURING NOTE: I use a pretty complicated way of texturing and adding light to model. All rules of using textures the default way are covered in "HOW TO CREATE NEW VEHICLE MODS" topic by RingoD123, one of PZ devs. You can access it here: *boop* I'll show you my way, using Substance Painter to apply lighting and fake chrome parts to model. But first comes the base color and details of the car, so let's dive into it. Create a texture with 0 alpha and resolution 256x256. You can go for 512x512, but personally I like pixelated look of lo-res texture. Here are the settings for initial image: To preview the texture you are painting with different car colors, use this node setup. But switch filtering mode from "Linear" to "Closest", I forgot to do it on screenshot. There are two types of texture details: somewhat transparent and absolutely opaque. Half-transparent parts will be affected by car color, so they are mostly shadow/highlight details. Headlights, fixtures and things like that have to be opaque and painted with 100% brush hardness. It is easier to keep 3d view just to see what are you doing and paint texture in image editing mode, right there: First, paint the outlines of doors and other opening parts. Here are some brush hardness values: 0.2 - Outline shadow 0.5 - Outline 1.0 - Fake chrome and rubber window sealing Some work in progress screenshots Now when you have windows frames, save the image you just painted and go to photoshop and mask out glass sections like that Well, time for Substance Painter. You can use photoshop gradients for windows and blender lighting for lighting of the body, but I'll use SP "Baked lighting" filter for that, and for chrome especially. I will briefly describe what I've done in SP: 1) Mask out windows, give them mirror metal material and add a filter to them 2) Mask out chrome parts, made them mirror metal and added the same filter with slightly different settings. 3) Apply the same filter to all body parts left. 4) Add a position gradient to the windows Now I have this result, it is not shaded model, just basecolor: Also export the AO map you baked in SP. You can download file with this scene to look through and get ideas using this link: *boop* Now paint additional details you want on the car and open Photoshop. This is your layers layout: Now save it as .psd for future color editing and as .png to see what the you've done. Plug .png direcly as BaseColor in shader settings. Set your shading setting like this: And check if everything looks ok. This is my result: And this is the vehicle's look with wheels that we made before Sweet, isn't it? Now, it is time to get rid of mirroring. You can make new UV, bake it and... get A LOT of offset artifacts resulting in jagged pixel edges. There is a lazy but effective method: 1) In the UV editor place cursor in the 0,0 coordinates. 2) Set Pivot to 2D cursor: 3) Scale all UV islands to 0.5 EXACTLY 4) Apply mirror modifier to your model. Now select FACES of any half of the model and move it in UVs on Y by value 0.5 EXACTLY or you'll eventually mess everything up. 5) In Photoshop expand canvas of your PSD file we made before 6) Duplicate everything and move to the upper left corner, like in UVs. You can merge color layer(s) to operate color on export more easily. Now you have half of the texture empty... You do not want to waste it, right? Then drop in the wheel texture here without scaling, and you won't need additional texture file for it! 7) Create a layer beneath all others and paint it black or grey to cover alpha-holes in the textures. 8 ) Now unwrap the wheel to this new texture and let it shine! We painted the car and fixed mirroring. DOWNLOAD THE .PSD FILE: *bloop* There are 3 more types of textures to make: 1) Rust 2) Damage (1 or 2 levels, I'm lazy, I prefer using single one) 3) ID Color Mask or just Mask It wasn't possible to make them right with mirroring. Everything about these textures are explained clearly in Ringo's guide, again: *boop* I'll just show results I ended up with. Now you have to use 512x512 clear images for these textures, do not forget it. RUST Painted it with jitter brush and 0.2 hardness. To see what I am doing used the same node setup, as for base texture. DAMAGE Painted gradients with black and white with 0.1 hardess with repetitive strokes. MASK Mask texture tells game where are separate parts of car: doors, windows, lights and others. Every part has it's own color in palette, you can find color table in Ringo's guide. Copy and paste color HEX to use it in blender brush or fill tools. I've missed some of the parts because they do not really matter. AEUGH Texturing is finished. Go to photoshop and make all color variations you want and save them as .png, name them Vehicles_[vehicle name]_ Vehicle name mustn't containt spaces These are color palettes of my car: Now you have to export your vehicle body and wheel models. Copy them to an empty scene and save as separate file. If you used blender default orientations (front, back, right, left, top), then rotate the car on Z axis by 180 degrees. Game rotates it for some reason, so you'll have to do it. Now position everything in scene like this and continue to export settings. Export body and wheel separately with these settings: STAGE 5 - Packing files in folders The folder hierarchy and naming the files you can find in Ringo's guide. The mod file and all of my project files you will be able to download in the end of this topic. make up an Id name for your car. It has to be short, but unique and do not contain spaces. For this car I use '60falcon'. _____________________________________________ workshop.txt properties of the mod for Steam Workshop _____________________________________________ mod.info properties of the mod for in-game mod menu _____________________________________________ models_X folder -> vehicles this folder contains 3d meshes of the vehicle - body and wheel _____________________________________________ textures -> vehicles easy to guess, all vehicle textures are placed here null.png - completely transparent image, used as placeholder later on _____________________________________________ scripts -> vehicles there shoud be a .txt file named with you vehicle's ID name. Open it up and follow these instructions: change invertX to 'TRUE' if vehicle appears to be mirrored by left and right in game. Do not care about scale, offset and other geometric parameters. Insert all your color variation textures as shown below: All vehicle driving parameters are self-explanatory. Remember to set seats count, I'm creating a car with 4 seats. If you want to make less seats or add new, delete passenger[Seat code] records or add new. Also remember Seat[position] records down below. Add or delete the templates, loaded from Game default files: _____________________________________________ LUA SCRIPTS lua -> server -> vehicles -> [car id name]dis.lua Vehicle trunk type distribution file. There is a file with all vehicle distribution types in game files, I'll put it in project folder in the end if the article. This is game files distibution types, select one of them in respect to the vehicle type you are creating. I'll use CarNormal type for Ford Falcon. This is what distribution lua file has to be: _____________________________________________ lua -> shared -> [car id name]SpawnList.lua This file describes spawn zones of your car in game world with certain chance. I've typed in all default zones of spawn, you just have to change the chance and set [Base.60falcon] to [Base.(your car id name)] _____________________________________________ lua -> shared -> Translate -> EN -> IG_UI_EN.txt This is the name of the car in UI - keys name, mechanics window name and such. STAGE 6 - In-game editing and tests Launch PZ and disable all mod exept the one you will be debugging. Now close the game and go to Steam. In application setting set startup parameter to -debug It enables many debug options in-game. Now launch the Game again and, if menu doesn't appear, you've done something wrong in lua scripts. Check them for probles, and I hope, you'll figure out what is wrong. Now start a new game in world with no zombies and big amount of cars. Leave the house and find any car vibing in the street. Right click, -> Vehicle -> Set Script -> [your car ID name]. Car will switch to yours. This is what I've got on first time in-game spawning: YEET, it is all coming along. But wheel positions are a bit off, and we have to place the entering areas of doors. Go to Right click on car -> [DEBUG] Vehicle -> Vehicle Editor. Chassis Place extents and physics shape to outline the car Areas These are access areas to different parts of the car. There is nothing to describe, really, just place them where you can explain it and continue to next section Right click in mechanics tab to enable cheat options for the car. Now right click in mechanics panel. Here you can get key for that car or repair it. Final result in different variations Make a suitable preview image for your mod and crop it in Photoshop to 256x256. Place it in mod folder as preview.png In game menu go WORKSHOP -> create or update mod -> Go to your profile workshop items and find the new mod. Add the description, more screenshots and set visibility to 'Public' ALL PROJECT FILES: *YEET* ZE END Congratulations if you followed my guide to this point. Comment any issues or mistakes I've made.
-
I think it'd be nice if tow trucks were added to the game for the following reasons. 1. You could tow a car with the crane in the rear of the truck without having to get out of your car to hook it up. 2. Tow trucks would have high horse power by default so they'd be especially good for towing vehicles. 3. The crane in the back could lift the car upwards creating less drag since only 2 tires would be making contact with the road. 4. They'd be a great way of sorting vehicles out rather than have to drive each one individually to put into place or have each be towed manually by another car. 5. You could clear the road of any accident obstructions of too wrecked to even get into cars or just regular cars. I was thinking the tow crane could be controlled like raised or lowed by the v menu from flat to a predetermined height/angle. Also you could set from the menu whether to hook up to a car or release it from the tow hook. I was thinking they could be found around at tow garages or along the road at accident events.
-
For example, if you remove a door from a green car and install it on a red car, it should have a green colored door instead of the same color as the rest of the vehicle. I think this would give vehicles a more post-apocalyptic look.
-
There should be motorcycles in the game that can be filled with gas like cars. They'd be more maneuverable than cars and can even fit in the player's home/base through a normal door. Disadvantages would be less protection against zombies (and soon to be hostile NPCs) as well as the potential to be flung off the vehicle in a crash. There are already motorcycle helmets in the game but no motorcycle to go with them btw!
-
What if in Project Zomboid you could find a tool called a Slim Jim (which is basically a fancy metal stick or wire) to open up locked car doors without having to break them? I was thinking you could find the tool in some houses, auto shops and maybe even the burglar occupation could spawn with it by default. The V menu for a car could have a "use Slim Jim" option for the Slim Jim to lockpick it. Might take a couple tries though like hotwiring the car does.
-
1) First create a folder structure for your mod, call the first folder something like "MyCarReskinMod". Inside that create a "media" folder, inside your media folder create 2 more folders, one called "textures" and one called "scripts". Inside the texture folder create a folder called "Vehicles" and inside the scripts folder create a folder called "vehicles". Your final folder structure should look like: MyCarReskinMod media textures Vehicles scripts vehicles Don't forget to place your mod.info and poster.png files inside your first folder alongside the media folder. 2) Copy, paste and rename the vehicles main texture that you want to edit/reskin from the ProjectZomboid/Media/Textures/Vehicles folder to your media/textures/vehicles folder. Use this texture along with the vehicles texture mask (also found in the same folder) as a template for your skin. The vehicle mask is listed in the code snippet below ("textureMask = ...") and dictates what part of your vehicle texture gets assigned to each part of the 3d vehicle. 3) Find and copy the original script of the vehicle you want to reskin from the ProjectZomboid/Media/Scripts/Vehicles folder and paste it into your media/scripts/vehicles folder. Below is what the start of your vehicle script should look like, in this example we are editing the taxi skin: Change the line "texture = Vehicles/Vehicle_CarTaxiShell" to "texture = Vehicles/"YourVehicleSkinPNGNameHere" and save. Add your entire mod folder structure into your users/zomboid/mods folder, enable the mod on the in game mods page and play, your edited vehicle skin should now be in game. You can download an example here: RingoCarSkinEdit.zip
-
I think it'd be nice to be able to lock pick in the game like for car doors as well as regular doors. I think this mechanic could be some kind of lock picking skill that you'd improve from picking locks as well as boost through lock picking books. Maybe there could even be a locksmith occupation that gets you started on the functional capabilities of said skill. Perhaps the skill could also be in the burglar occupation. I think for the tools needed it'd be standard lock picks or maybe you could even make some out of the paperclips you find in the game. For starters, It'd be nice to be able to unlock a car without having to find the key or smash the window in addition to hotwiring it. As for doors it'd be nice being able to get in the building without having to find the key or bash my way in through said door or other entrance. For padlocks it'd be nice to get through those too. I guess for the mechanic to work, with all the proper items and skills in hand you'd right click the you want to lock pick and select "pick lock" and the progress meter would fill up as you pick the lock. It will take a few tries until success and fewer tries and faster ones as you level up.
-
 Okay so get this, the guy on the cover of Project Zomboid is a on car and yet we can't climb vehicles in the game? I mean if we could climb up cars that would add some protection from the zombies. You know, in a "I have the high ground!" kind of sense. The zombies would either not be able to climb up making you completely safe but surrounded; not able to climb up but able to pull you down if you're too close to the edge making it so you should go inwards on top of the car as much as possible; or they can climb up and maul you to death in addition to pulling you down. If they can't climb up but you're surrounded it would give you the opportunity to pick them off with your gun or strike them dead downwards with a melee weapon. Same thing if they could pull you down which is a bit more challenging. It the most extreme case they can climb up or pull you down making it so you have to attack the most immediately threatening zombie. Like the one that gets up first, that's who you kill. The most extreme case would force you to fight quickly and sequentially to at least endure a bit longer. Might want to add some kind of move to knock off climbing zombies or swat away zombies trying to pull you down. Personally I prefer it if they couldn't climb or grab you down. The balancing factor would still be that if you're out of gun(s) rounds you got to pull out your melee weapon. If your melee weapon(s) breaks then you could very well be screwed. Screwed because you'd essentially be stranded on your car which would eventually lead to your death due to hunger and dehydration not to mention you probably could sleep too well. I mean a horde of zombies growling at me inches away while I'm on a hard cold car roof ain't exactly a sleep number bed experience. The car could also serve as a temporary barrier between you and the zombies. For example, they're chasing you, you quickly vault over a car (or climb it and jump off the other end) and now the zombies have to go around rather than just making a beeline for you. That could buy you some time which is always of the essence in the game in every conceivable way! So yeah I want to be able to use a car roof to my advantage as well as be like the chad on the cover!
 -
I noticed in project zomboid you can't see the inside of your vehicle. The windows are opaque and when they get broken there's this weird gray shade that shows up in the window frame. I was thinking windows should be transparent and show the inside of the vehicle like the seats and the player driving of course. Useful for seeing the player as well as their condition. Transparent windows are possible for buildings so I figure they'd be possible for vehicles. They gray shading where the window used to be could be mistaken for a window since it's opaque like the windows are just gray.
-
I noticed when you hook up cars to cars the towing chain is invisible. So I think the chain should be visible as in actually modeled and textured. If you have an invisible chain then it looks like the cars are just floating together which doesn't look right.
-
I think it'd be awesome to be able to customize makeshift weaponry for your vehicles in the game. Like weld some armor plates main body of the vehicular particularly the doors. That'd be nice protection. Some reinforced bumpers with spikes to slice up the zombies as you ram into them would be great! Some open/closeable gun ports would allow the player to shoot out of the car and be protected. They wouldn't overpowered since they'd still be damageable plus they'd take a lot of resources to make the protection for.
-
While it would likely be game-breaking to have an invulnerable vehicle you could rampage with, there is absolutely a sensible path to up-armoring a car. I used to play the tabletop game Car Wars which dealt, in less detail actually, with vehicular combat, but a significant portion of that is adding armor (and weapons) to a vehicle. Given how the current vehicle UI is so detailed, with all of its parts-- except it appears that quarter-panels don't exist, nor do bumpers or a front grill-- it would be logical to add new vehicle slots for welded attachments. The slots could be used for armor of various types (even cloth would prevent your being seen inside a car, while limiting your view, of course). The trade-off (just as it is in Car Wars) would be weight-- good armor is quite heavy and would affect every aspect of vehicle handling. As for weapons, it's also not that out of the question to either mount certain kinds of weapons (e.g., a flamethrower) to a vehicle, or to provide for the ability of the character to fire their handheld weapons both from stationary and moving vehicles in any direction, if the vehicle configuration allows (e.g., I remove all the glass and replace it with metal that has firing slots in it). I'm not so hot on the mounted weapons thing, but it seems logical that someone would/could do that in the "real-world" situation. The armoring is much more sensible, particularly on the front of the vehicle. You all have done such a great job with the vehicles-- I'd love to see that extended further.
-
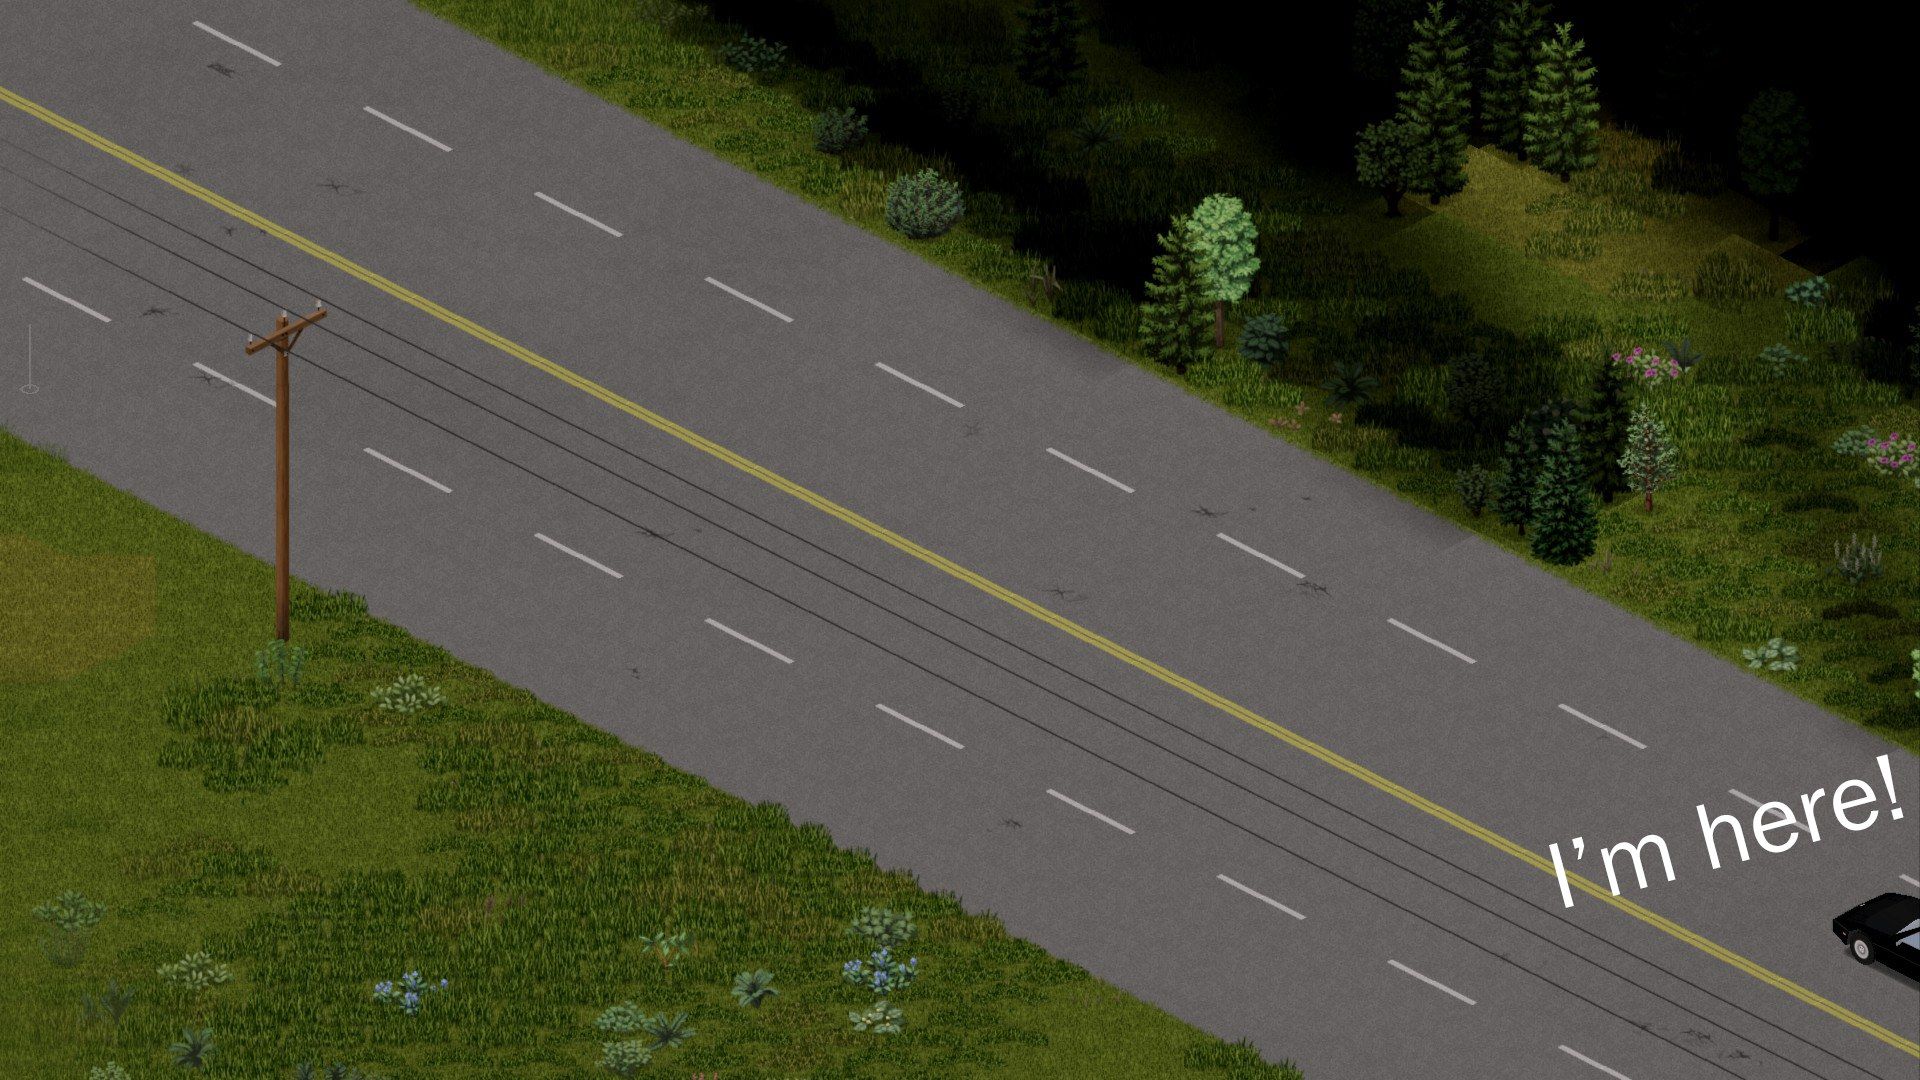
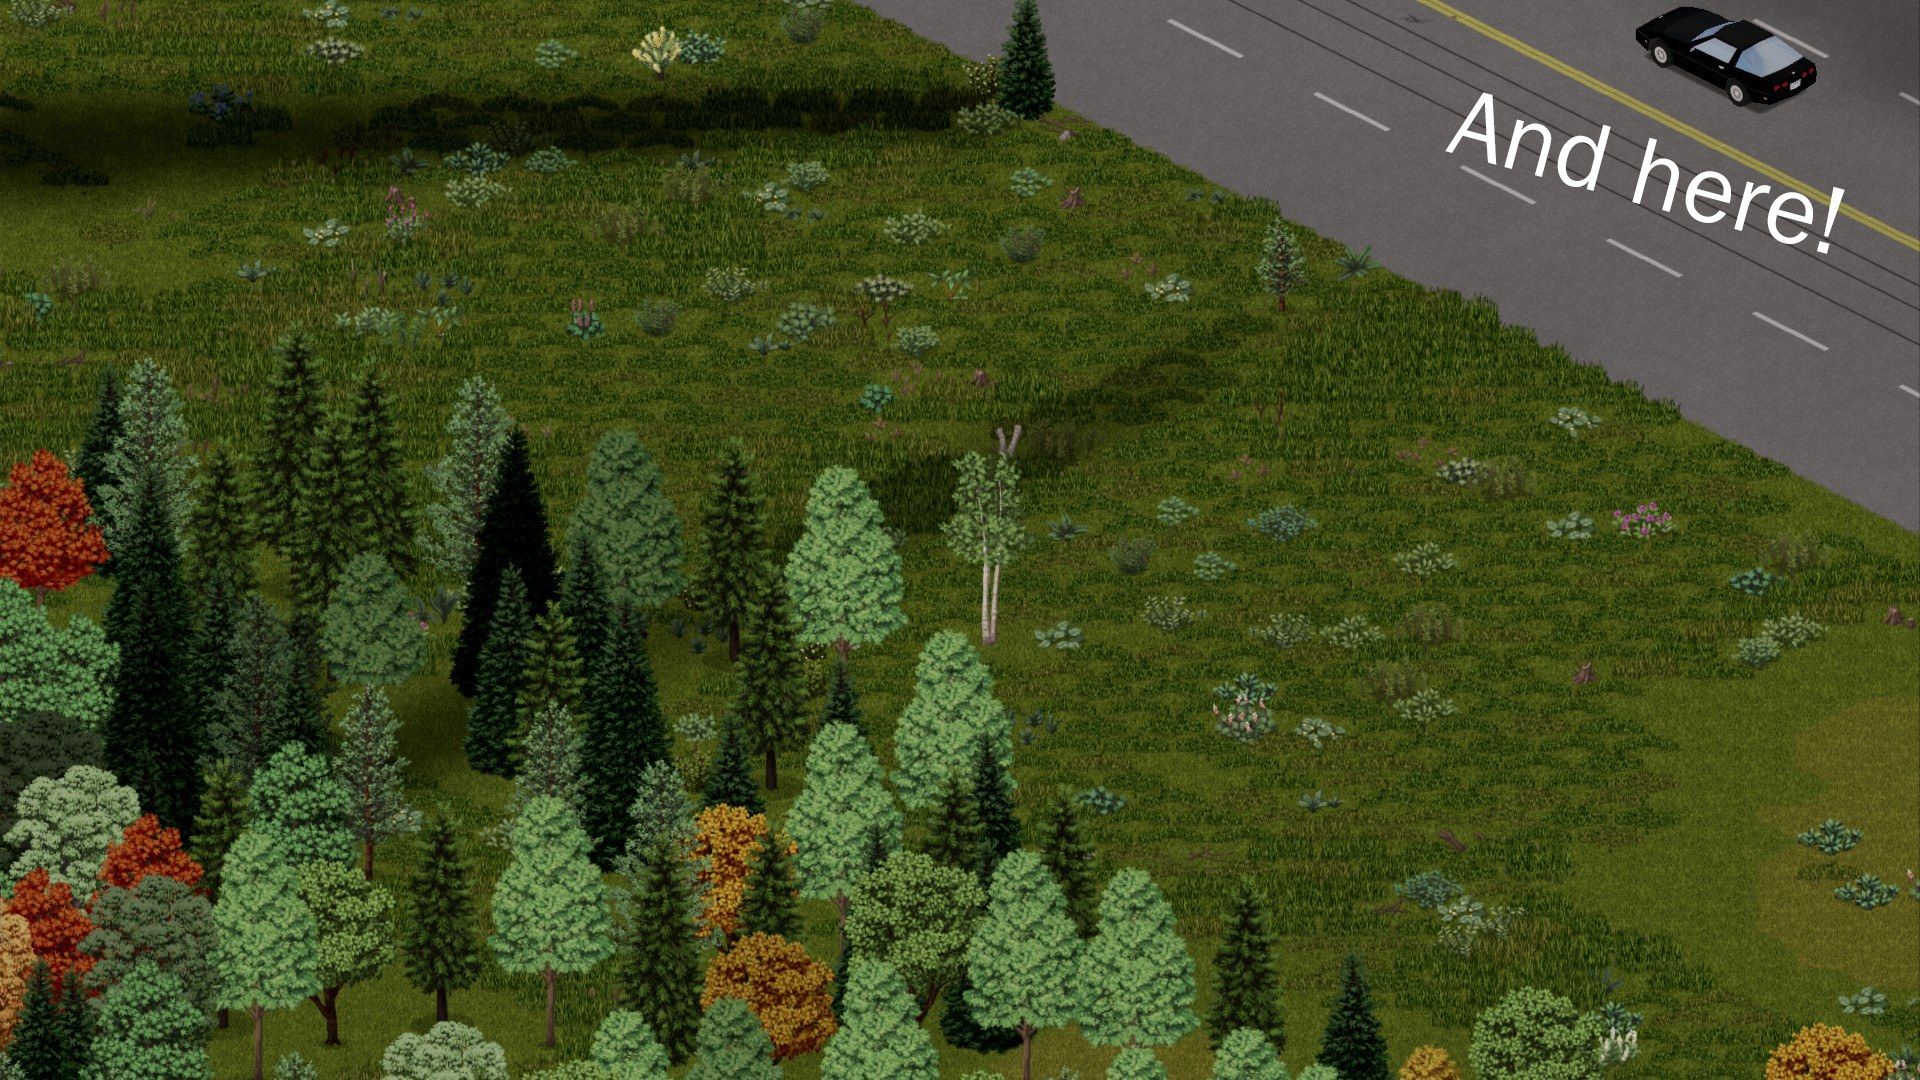
Hi! How often do survivors drive cars? Personally, I can't imagine the early days of the game without a car. This is a means of protection, transportation of your person and other good you need in this or that case. I would like to suggest making trips even more comfortable, correct, in my opinion. I noticed that if you get into the car while aiming, the player will be able to independently control the camera - I found it very convenient! You can see what is in the distance in front/ behind /on the side of the car without speeding up. Or move the camera much farther, which will help at high speeds. And everything is smooth and fast, without some “jitter” in contrast to the automatic mode (with disabled vertical synchronization) It would be great if the player, sitting in the car, could independently control the camera. Just the same as he does it on his own two feet - looking around and gazing into any distance. Perhaps it would be possible to add a separate toggle switch in the control settings for this...? All these screenshots were taken from the car. (Edited) You can assign a button to pan the camera and use it while driving. Go to settings, then key bindings, UI section and set a key to "pan the camera".
-
Every now and then (maybe 1 in every 10) vehicles, when I enter the maintenance menu (by pressing E at their bonnets), I cannot right click on the "engine" component. Nothing happens. I can always right click on the muffler, wheels, windows, gas tank, etc, everything else, just not the engine. Even if the engine is in great condition/green. I get no feedback/sound, as well as no context menu opening up. If I right click on a red <10% engine I can usually get a menu saying it needs to be ">10% to take engine parts" or whatever it says, but randomly I just cannot right click on the engine. I do this because I want to take the engine parts, I mean.
-
In some situations it is really hard to hit the enter-vehicle-zone. Depending on the angle where you come from and related to the car type, size and how it was parked it's nearly impossible to enter without using the radial menu (too many clicks in a dangerous situation). I would prefer larger zones and automatic assignment to the driver seat. On MP this could work also just by entering from the side of the car (with larger enter-zones) and you get assigned to the first free seat of the car in order. That would make entering a car on the run way easier
-
Hi all! Here I would like to give some small wishes that would not greatly change the existing mechanics of the game. Also, I don't think it's very hard to implement. Nevertheless, with it, without it, nothing fundamentally should change. I will touch on the topic of cars and a little on the topic of weapons. What I would like to see in the near future in Project Zomboid and what I think would be really useful (Important): Just one thing - a quick exit from the car, without closing the door. It seems to me, but this will save a couple of “milliseconds” so that after the character appears at the door from which he left, he could immediately move, without delay. And besides, it's just realistic, if, for example, you need to run out of the car, take / throw something away, do something very quickly, then why close the door with these loud sounds? No, the sounds are great, I have nothing against it, but that's not about it now. How do I propose to implement this? Well, you can make a keyboard shortcut, for example Shift + E. Like if the character is given the action to drain / fill up the car with gasoline - holding the Shift key will make him hurry up ;P What I would like to see in Project Zomboid someday (Doesn't matter too much): Just 5 things: Then, when the rendered states of open/closed doors/trunks and other things are added, make the windows of the cars transparent by half or so. So that the characters and the interior inside could be seen without opening/dismantling the doors. Possibility to switch high/low beam. The state of the brakes/suspension could be understood through the sounds of road bumps/braking/cornering. There was a decal of a tire track on the road during sharp turns with a handbrake at speed. With the same way, for example, how blood is displayed. The side lights of the car illuminate everything around them with red light within a radius of 1-2 cells when braking. And now I would like to talk about firearms. I will not talk about something global. I want to touch on the topic of "repulsion" with firearms. For example, I never considered pushing off with a pistol in my hands as something effective. It's slow and doesn't stun zombies at all. My suggestion is to make it maybe a little faster and add a stun effect to the zombie, like getting hit with a blunt weapon. So that, at least, a melee fight, when you only have a gun in your hands, does not end with an endless repulsion and the hope that the zombie will fall. It is necessary to give the character a head start in order, for example, to take a step / jerk after successfully repulsing a zombie with a pistol. Or, for example, the animation of hitting the back of the head with a butt of a zombie is too good to be left on stealth. Here, too, you can think of something. For example, to enable the player and the character to perform this technique even in a normal fight. I am not a developer, not a modder, but I know for sure that the game has already implemented a system of “interaction areas” in combat. If the zombie is too close - the character repels it, if it is at a sufficient distance, then it produces a normal blow. I hope you understand what I mean. So, why not use this “technology” in the moment, for example, close combat with a shotgun / rifle in your hands? If, for example, the zombie is out of the character's reach, he swings, starts hitting with the butt, and at the moment the zombie enters the combat area of the character's interaction, the character hits the zombie with the butt, stunning him and causing some amount of damage. And if the zombie is already in the character's combat area, then the character simply pushes him away, because this is the fastest and most logical way to move the zombie away from himself, but without stunning and damage. In my opinion, this should not be something effective in combat with large groups of zombies, but should be very effective, for example, in the case of a fight in a closed room with only a shotgun in hand. Well, or against single zombies, when you need to save ammo. That's all I wanted to offer. I think these are really small things and I don’t expect to see them in the next patches, but I think that just the same small things bring pleasure and immersion in the game itself. With love from Milove for Big Love (The Indie Stone)
-
Issue : Vehicle teleport/disappear when leaving it Version 41.65 Multiplayer (Dedicated Server) Not any mod I'm playing with a friend on dedicated server I host myself. We're experiencing multiple issues with vehicles on our last(fifth) session (nothing like that before). I'm not sure about the reproduction steps but it seems like that : Start the dedicated server and join the server with a friend Hitch a trailer to car OR tow a car with another Get in the "main" car, drive a bit, stop the engine, leave the vehicle Leave the server (without unhooking the trailer/unhitching the towed car) Stop the server (quit command) correctly Start the dedicated server and join the server with a friend The trailer/towed car is disconnected ??!!?!?! Get in your "main" car and drive a couple of meters Get out of the car Vehicle fly back at the step 8 initial position, or if the distance is way bigger simply disappear (same for the "attachment") Here the logs (I'm not an expert but tons of "NullPointerException" when it happened). logs.zip
-
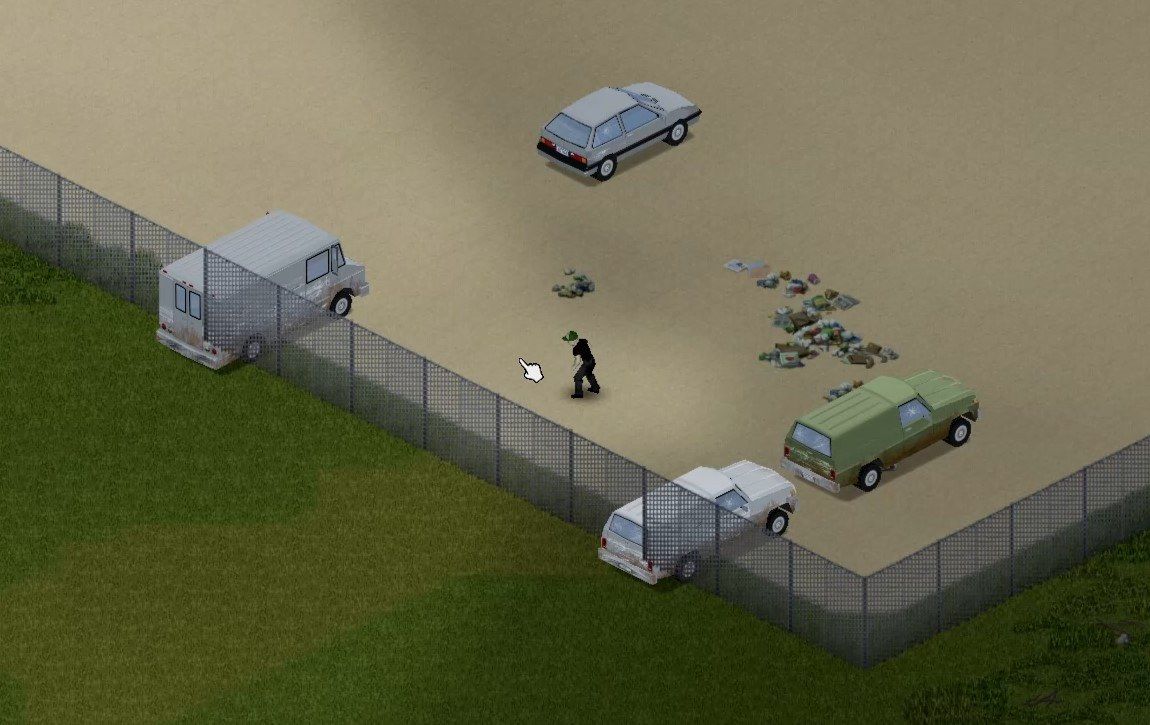
Vehicle spawn in fences at Riverside junkyard Version : Stable 41.65 Singleplayer No mods Just had a couple games in Riverside today when I encountered that at junkyard (see image below).
-
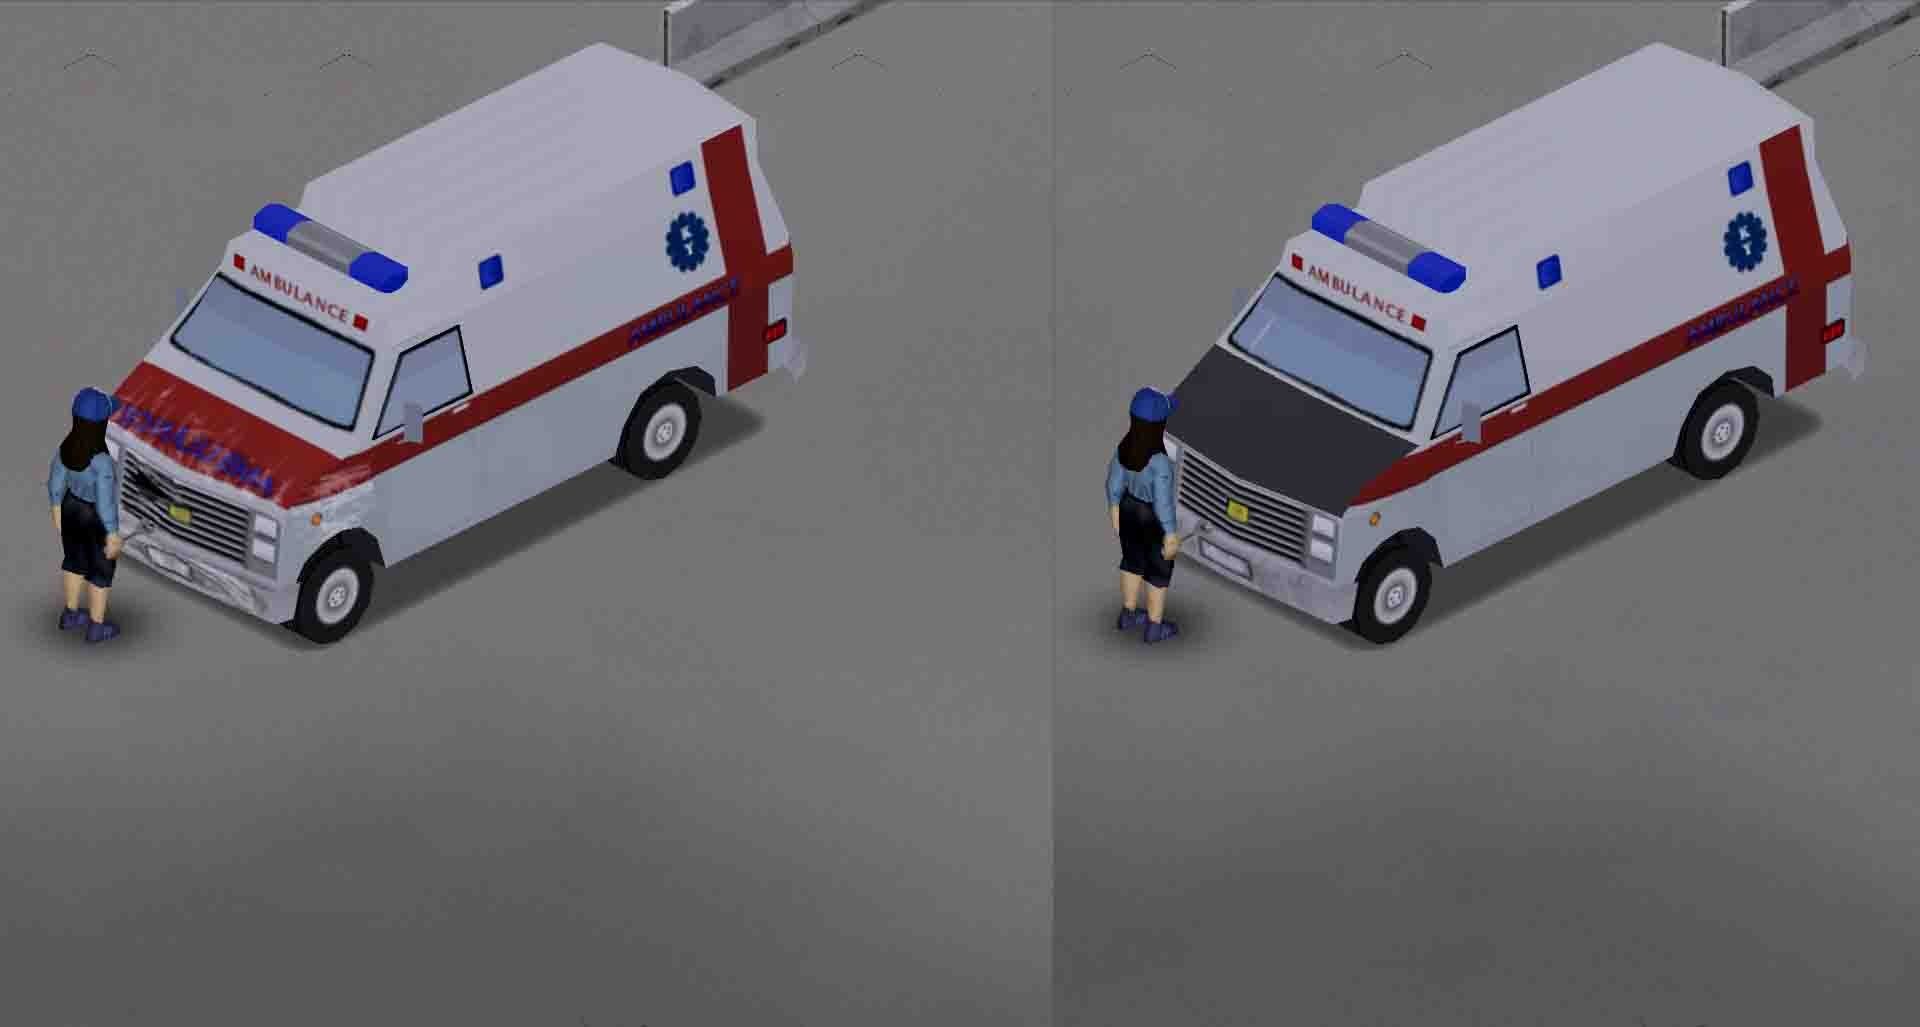
How to reproduce it: 1. Take any car, vanilla or mod 2. Do some damage to the front 3. Remove the hood, the whole frontal damage is gone, install the hood back on, the damage is back Same bug was observed by multiple users on different zomboid installations of b41.65. Also, the rear door of ambulance has a wrong mask so only break lights are removed when the door is uninstalled.
-
I play on a vanilla map without mods. I drive cars often and a lot. I am driving at high speed on the highway, and I have problems with the viewing range in the direction of movement. It seems to me that the viewing range is extremely insufficient. I suggest developers to think: 1. when putting the character in the car, move the camera further away than it moves away, as far as possible when playing the character without a car, increasing the viewing range in all directions (this is not the best option) 2. When the speed increases, gradually move the car on the screen to the edge of the screen so that the viewing range in the direction of movement is greater. When braking, the car with the character should move back to the middle of the screen (it seems to me that this option is better)