Search the Community
Showing results for tags 'Mod'.
-
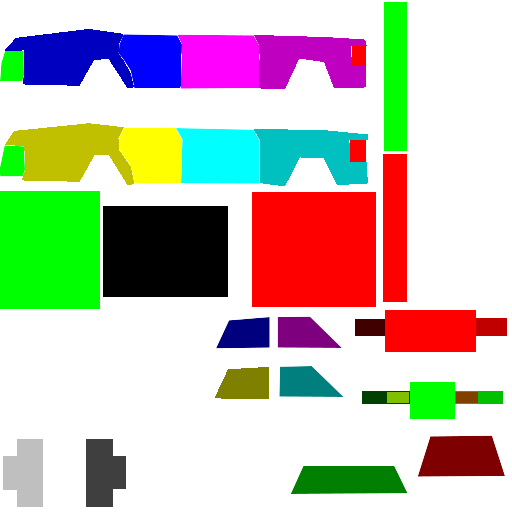
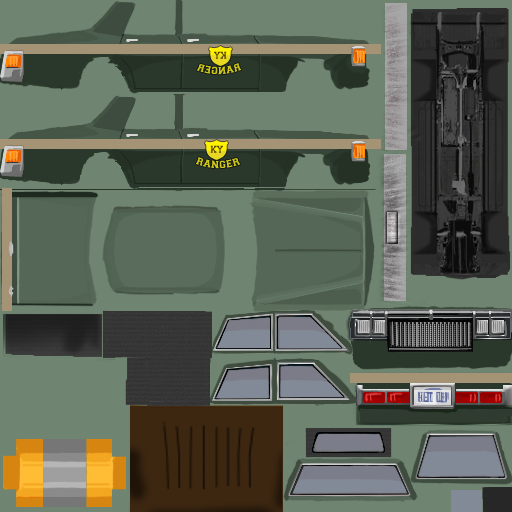
Alright you as a player die a lot in PZ and i use a lot , alot of mods. More cars, rv interiors, raven creek and so on. Always when i start a new game i have to select the mods again and believe me i have a lot. I believe there should be presets of mods like for example presets of characters! Picture of some of my mods i use and there´s more. Apologies my game is in Finnish. In this photo you can only see the car mods i use i do have other mods as i said Raven Creek and many more

-
 I just released a new mod called Bard Interactive Music, allowing you to play music from your keyboard or with your mouse on a virtual keyboard. You can right click an instrument and play notes from C2 to C5. It also works on Pianos Zombies will hear you play! Multiplayer is supported Sound volume decreases with distance Electric guitar has a distortion mod you can enable with the lighting in the virtual keyboard window title bar Notes keybinds can be changed from the keybind menu A virtual piano keyboard can be used to play from the mouse Buttons in the title bar can show notes and binds on the virtual keyboard Each instrument has its own animation Each instrument has its own sounds You can trait lock the ability to play with the Trait Lock mod The mod is released under the MIT license. Checkout the Github.
 -
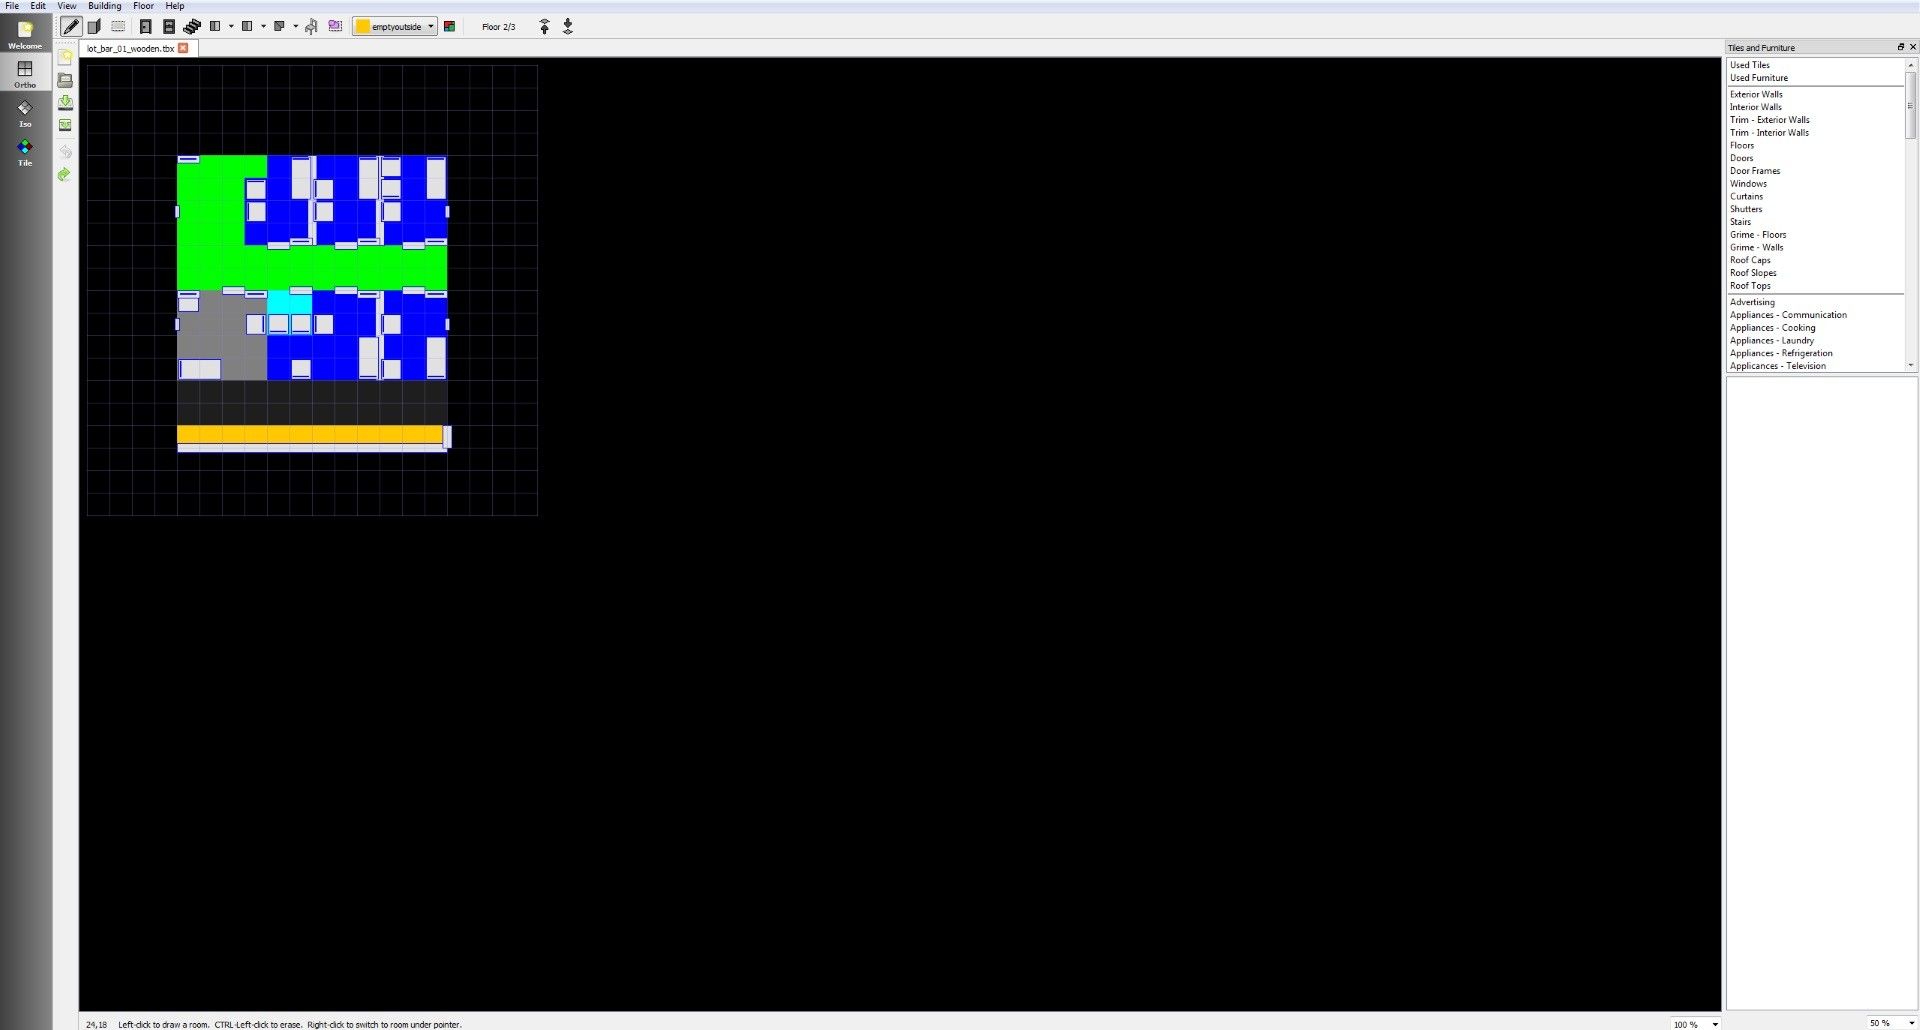
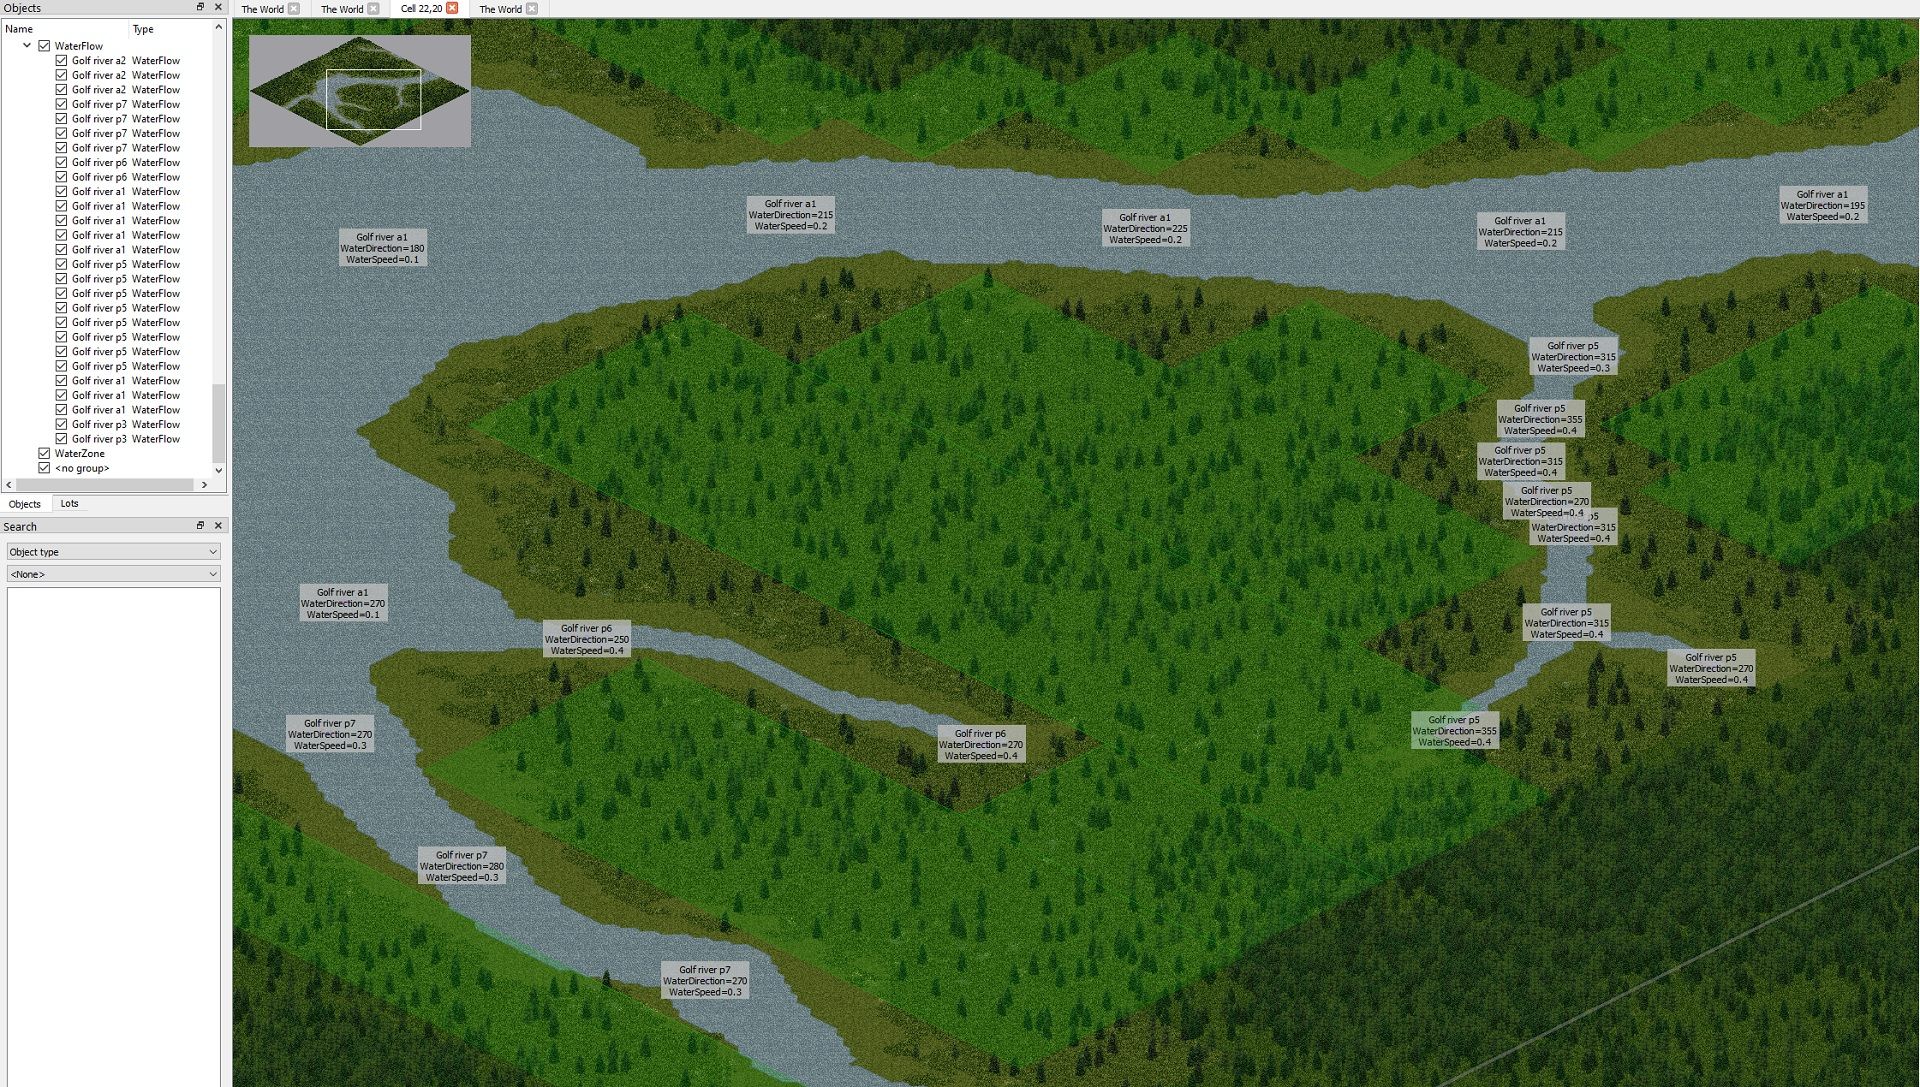
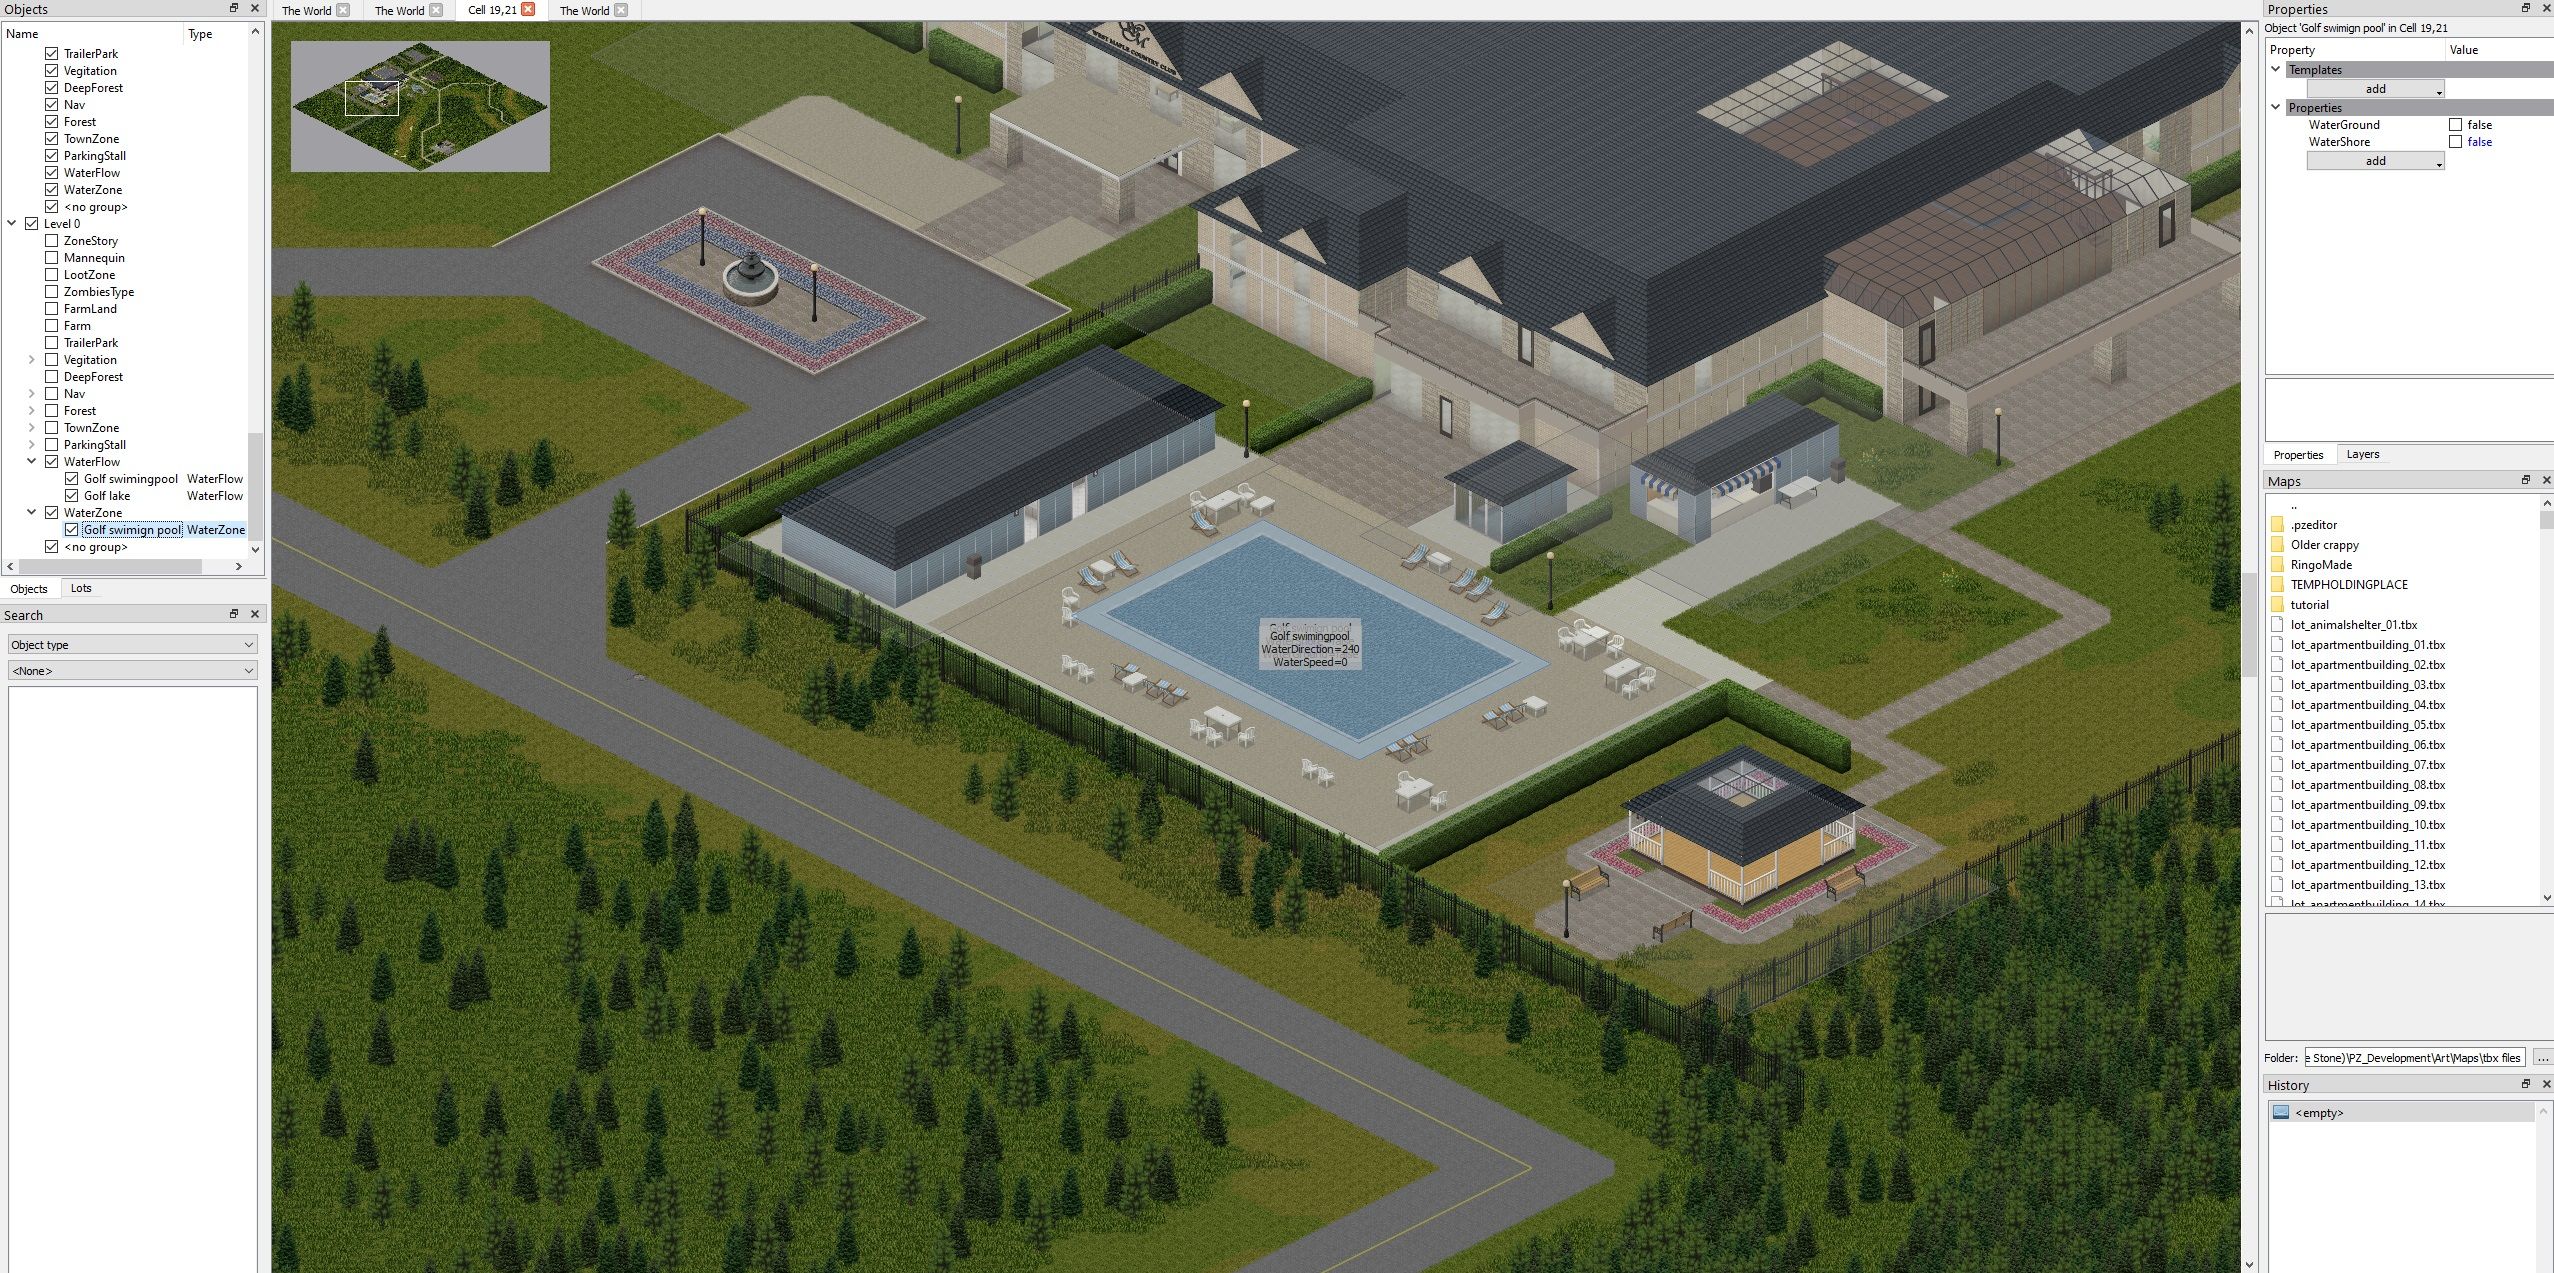
Here you will find a (hopefully) comprehensive guide to map modding using TileZed, from scratch, to uploading to Steam Workshop. Step 1) Installation and setup Spoiler - Download the latest version of TileZed here: https://theindiestone.com/forums/index.php?/forum/64-mapping/ 3 Step 2) Creating a new map - Creating A Master Image Spoiler The first thing you need to do to create a new map mod is to create some basic images you can import into WorldEd. You will need a paint program such as Paintshop, Gimp or Paint.Net (I use paint.net and it works great). Open your paint program of choice and create a new image, each pixel of the image will correlate to 1 tile when in game, so, if you want to create a map that is a single "cell" in size, you would create a 300x300 pixel image. If you wanted to make a 2x2 cell map you would create a 600x600 pixel image etc. Once you have created your new blank image save it as a png file (eg. MainMaps.png), this is so you can work with multiple layers, which will make your life way easier! - Creating The Base Map Image Spoiler Now you have your blank map image up and ready we need to setup the exact colours we will be using to draw the game world (when importing your image into WorldEd every pixel gets read and converted into the relevant tile (if the colour is recognised by WorldEd)). Use your programs colour palette to enter the colours below using the RGB values given: -----Base Map Colours---- Dark Grass | 90 100 35 Medium Grass | 117 117 47 Light Grass | 145 135 60 Sand | 210 200 160 Light Asphalt | 165 160 140 Dark Asphalt (main roads) | 100 100 100 Medium Asphalt | 120 120 120 Gravel Dirt | 140 70 15 Dirt | 120 70 20 Dirt Grass | 80 55 20 Dark Pothole | 110 100 100 Light Pothole | 130 120 120 Water | 0 138 255 ----Veg Map Colours---- Dense Forest | 255 0 0 Dense Trees + grass | 200 0 0 Trees + grass | 127 0 0 Fir Trees + grass | 64 0 0 Mainly grass, some trees | 0 128 0 Light long grass | 0 255 0 Bushes grass + few trees | 255 0 255 Dead corn 1 | 255 128 0 Dead corn 2 | 220 100 0 None (black) | 0 0 0 Now you are ready to start drawing your base map, for now you should ignore all the colours listed after water as you will be drawing these onto separate vegetation map layers. Example: Spoiler MAKE SURE TO TURN ANTIALIASING OFF AND CHANGE BLEND MODE TO OVERWRITE BEFORE HAND! (otherwise you will get colours not recognized by WorldEd, leading to extra work later). - Creating The vegetation Map Image Spoiler Now you have created your base layer which should contain your main roads (using the dark asphalt colour), paths and side roads (light asphalt, dirt, gravel dirt), dirt, water, sand and grassy ground (dark/medium/light grass), save this image as a BMP (eg. MyMap.BMP) (if warned about flattening the image just select yes/continue/ok) it's now time to start drawing the vegetation map on a new layer. Close the BMP image you just saved and create a new layer on your original .png,have it above your base layer (it should put itself there automatically), copy your original layer and paste it onto the new layer, then hide/untick your base layer. On this new layer start by selecting the None(black) colour from above and flood fill all the roads (and any other area where you do not want vegetation to grow such as water, sand etc (erosion vegetation will still work fine)) and delete any/every other colour from this layer, leaving just the black areas you just created. Now start drawing the other five colours (the ones you ignored when creating your base map) on places where you do want vegetation to spawn. Start off with using a seperate layer for each colour, starting with the Light long grass, just flood fill that entire layer with it, then drag your black "no veg" layer above it, this allows you to see the road/building layout easily. Then work your way up through the other colours (creating new layers for each one, each one above the last in the order list) as needed, all the way to the dense forest one. Save your PNG now, you're going to make some temporary changes you dont want to save. To save this as a vegetation image, make sure your base layer is still hidden/unticked (so only your vegetation layers are visible) and then start merging your vegetation layers together, from the top down. You should now be left with 2 layers, a single vegetation layer, and your hidden base layer, save the image as a BMP (eg. MyMap_veg.BMP) (if warned about flattening the image just select yes/continue/ok), note that this image MUST be saved with the same name as your base map BMP with the added "_veg" at the end, it must also be saved in the same folder as your base map BMP. Once you have saved the veg map BMP, close that image and then close your PNG WITHOUT saving, unless you want your vegetation layers to be permanently merged, making it a lot harder to make edits, if needed, in the future. Example: Spoiler - Creating The Zombie Spawn Map Image Spoiler You will also need to create a new image called a zombie spawn map to tell the game about the density of zombies in our map, this is a black and white image that is 10x smaller than your base and vegetation images, so, if your map image is 600x600 pixels, your zombie spawn map would be 60x60. Start by flood filling it black (black means no zombies), then add white and grey lines/circles/patches where you want zombies to spawn, white is highest density, getting lower and lower with darker greys. (example), Save this in the same folder as your base map and veg map, again giving it the same name but this time with the "_ZombieSpawnMap" suffix (eg. MyMap_ZombieSpawnMap.BMP). It can be handy to make sure anti-aliasing is enabled when creating this image as it will naturally add shades of darker grey around any white or greys you place. You now have all the required images to create a new world in WorldEd. Example: Spoiler - Importing into WorldEd Spoiler Open TileZed, click on the Tools menu and then Click on WorldEd, this will open a new window, click on New, give it the size of your map (e.g. 2 cells x 2 cells) and click ok, you will now see a number of numbered squares depending on the size of your map. Each one of these squares represents an in game Cell (300x300 tiles). Now, navigate to the folder where your map mod images are stored and drag and drop the base image (MyMap.BMP) into the WorldEd window, making sure it covers all the numbered squares correctly. Once done, click on File and then BMP to TMX, on the window that pops up, click on the 3 dots in export directory and create a new folder (e.g. MyMapMod) for your mod and click on select folder, then before you press ok, make sure "Assign generated maps to world" and "Report unknown colours" are both ticked, then click ok. Click ok on the sanity check (make sure you aren't accidentally overwriting the wrong mod etc) and WorldEd will do it's magic. You MUST have at least your base map image and your veg image made and in the same folder before WorldEd will allow you to import a map image. Now, if you forgot to turn anti-aliasing off, WorldEd will probably pop up and tell you your image contains rogue colours, it will then list each rogue colour found along with the co-ordinates (in pixels) of every pixel with this rogue colour, you will need to open your images, find ALL of these pixels/colours, replace them with the correct colour(s) from step 2 then re-import into Worlded, otherwise you will end up with errors in your game world when it comes time to play. If WorldEd didnt throw up any colour errors then all you need to do now is click on file and save, give your world a name (I like to use the same name as the map to avoid confusion) and save, you now have the basics of a new map, to which you can now start adding buildings and world detail! Step 3) Creating/Adding custom buildings Navigate to your TileZed folder and create a new folder inside named Buildings, this is where you are going to save any buildings you make or download. - How to create custom buildings Spoiler Open TileZed. Click on Tools then Building Editor In the new window click on New Building. In the settings window that pops up you can choose a template and the plot size for your building. The templates provide pre-made room definitions for certain types of buildings, which are crucial for spawning the correct loot in the right places. For now choose “none” for the template and leave the plot size at 20x20 tiles. It's always best to make your plot a bit bigger than your actual building and surroundings will be as you can shrink your plot to match your finished building later. Click OK. You will be presented with a grey screen with a grid of 20x20 squares. For now, make sure Iso is selected on the left of the window. The first thing you need to do now is create some room definitions for your new building, this will allow the game to spawn the correct loot into the right places, such as food into kitchens, clothes into bedrooms, medicine into bathrooms etc. At the top of the window, click on Buildings and then Rooms (or you can use the Rooms icon on the toolbar). In the small window that popped up. click on the + in the bottom left to add a new room type. On the right you can now give your new room a name which can be anything you want, and an internal name, which MUST match one of the names in this list: You can now draw your new room on the tile grid by clicking and dragging with the left mouse button (make sure the Draw Room tool is selected at the top of the window). Notice how the colour of the tiles turns to the colour you selected for your room in the previous step. Once you let go of your left mouse button your room will appear. You can change the shape of the room by clicking and dragging more pieces that connect up, or by holding CTRL and clicking/clicking and dragging to delete parts of a room. You will see that placing tiles of the same room type next to each other will automatically delete the internal wall between them, and placing tiles of different room types (e.g. living room and kitchen) next to each other will maintain the internal walls. You can create new internal walls (or delete internal walls) using the Place Wall tool (located to the right of the Draw Room tool). Simply click on the Place Wall icon, select the tiles you want to use for it's interior and exterior facing walls as well as grime etc and then left click and drag your wall on the tile grid, right clicking on a wall you place will delete, to edit it's length, left click on one of its "ends" and drag. So now you've finished placing the rooms for your ground floor you probably want to place some windows and doors. Click on the Place Doors tool at the top left of the window, then using the tile and furniture menu on the right, use the Doors and Door Frames options to select the door you want to use, then simply click on the tile grid where you would like the door to go. Exactly the same method is used for placing windows, except using the Place Windows tool at the top of the window instead (located to the right of Place Doors). You've now placed your windows and doors, but maybe you realised that your building is 1 tile too wide and you need to make it smaller. Just select the Draw Room tool, hold CTRL and click and drag on the area you want to delete. That worked, but your doors and windows that were on that side of the building are now floating in thin air, 1 tile out from the "new" wall. You can easily get around this by selecting the Select and Move Objects icon at the top of the window, then clicking and dragging the area select over the doors/windows etc you want to move, then clickng and dragging one of the rectangles at the base of one of the objects, all objects will move together as one, making bulk/mass changes easier to deal with. Now it's time to place some furniture down, simply use the Tiles and Furniture menu on the right of the window to browse through and select the furniture piece you want, then at the top of the window the Place Furniture icon should now be clickable, once selected simply left click on the tile grid where you would like your furniture to go. Right click will delete a previously placed piece. You will notice that items will automatically orient themselves to have their backs to the wall if placed against one. If put up against 2 walls (such as the corner of a room) you can change its' orientation by moving your mouse cursor within the tile it's to be placed on. You can also select the orientation of furniture by holding the left click down as you place it and moving your mouse round, once in the desired orientation, simply let go of the left mouse button. If you are placing multiple objects on the same tile then the last object added will be drawn on top, so if you want to have a chair on top of a rug, make sure you place the rug first and then the chair. Your ground floor is complete, now it's time to add some stairs and a first/top floor. Click on the Place Stairs icon on the toolbar at the top of the window, select the stairs you want to use in the Tiles and Furniture menu on the right and then left click on the tile grid where you would like to place your stairs. Right clicking on previously placed stairs will delete them. Now click on the Floor icon on the toolbar, this will pop up a new window that lists the floors of the current building (currently only Floor 1). Click on the blue + icon to add a new floor, you should see that it has added Floor 2 to the list, above Floor 1, click OK. Now that you are back to the tile grid you will notice that your building currently looks darker, however if you look at the toolbar you will also notice that the floor icon has changed (now reads Floor 2/2), indicating that you currently have your new floor selected, and any room/items you place will be on this floor. You can now place rooms and furniture etc like before (making sure the correct tool is selected in the toolbar), notice that when you add a room that sits above your previously placed stairs on the floor below, BuildingEd will automatically "cut holes" in the floor to allow the player to move between floors. If any of your lower floors are not covered by rooms on higher floors then don't forget to add some roof pieces over the gaps. To do this, navigate to the floor above and then click on the Place Roof icon in the toolbar and select a roof type (e.g. Flat Top), then on the right of the window select Roof Tops (or Caps/Slopes depending on the roof type being used) under Tiles and Furniture and select a roof tile to use in the area below. Then click on the tile grid where you would like to place the roof tile (e.g. a flat roof tile to cover a ground floor room is placed on the "floor" of the next floor up). When you want to add a roof to your top floor, create a new floor using the Floor icon like before, then select the Place Roof icon in the toolbar, select the type of roof tile you want to add and place on that new layer. Flat roof tiles are by far the easiest to add, bu the prettier sloped roofs can be figure out with a little bit of trial and error, again using right click to remove any previously placed pieces, just remember to have the correct roof type selected in the Place Roof tool depending on what tile you're trying to add. Finally you might want to add detail around the outside of the house such as gardens and paths. To do this, first click on Tile (underneath Iso) on the left side of the window, you should notice that the options on the right of the window have changed. At the top right is a list of every layer, ticked layers have all tiles placed on that layer visible in the tile grid, un-ticking them makes those tiles invisible, allowing you to hide the buildings walls when placing flowers or ground tiles for example. At the bottom right as a list of all of the different tiles you can use. Click on the category and then the desired tile on the right. Left clicking on the tile grid will place the selected tile on the selected layer, overwriting any tile that is already at that location and on that layer. Hold CTRL and left click to remove a tile from the currently selected layer. Lastly you will need to add a room definition for any full tile roof peice that is not over an internal room of your building. This is to allow the new roof occlusion system to function correctly. For any bits that are above an internal room, simply make sure that room has a room definition (all room in buildings should, even hallways etc). If the roof bit is over an outside area (such as a porch) then instead of giving it an internal room definition, which could possibly mess with loot tables etc, use the new room definition made for this situation - emptyoutside. In the example below you can see that this building has a porch roof outside the front door, all other bits of roof are already over a pre-existing room definition and so we don't need to worry about them. We do need to add an emptyoutside room definition on/under the porch roof however as there currently is no room definition outside the building. In this example, the porch roof is on the roof layer of floor 2. If we check Ortho view you can see that a room definition of emptyoutside yellow) has been applied to the corrosponding tiles on floor 2. If you're having problems getting it to work properly, remember: every "full tile" roof peice (the little overhang peices you see in the example above do not need to adhere to this rule, just leave them as is if you have any) must be "over/on" a room definition, so make sure every room in your buildings has a room definition (including hallways etc). Add a room definition of "emptyoutside" (without " ") to any full tile roof peices that do not sit "over/on" an internal room definition. Now your building is complete, its time to save it. If you havn't already, create a folder inside you TileZed folder called buildings, you can create any number of sub-folders in here to help organise your buildings if you like. Now, in BuildingEd, click on File and Save As, navigate to your buildings folder, give your building a name and save it. To make life easier when creating similar buildings in the future it's a good idea to save your buildings template, so when you create a new building you can select it's template and have all of your room definitions, wall tiles etc already set up for you. To do this, click on Building and the Properties, here you can see the default tiles that will be used on any building created with this template. To the left is also a button for checking/editing the room definitions. Clicking on Save Template will ask you for a name and then save it to the list of templates. As you can see you can quickly edit and create multiple templates rather fast using this method. - How to add buildings to your map Spoiler If it's not already open, open WorldEd (open TileZed, clikck Tools and then WorldEd) and load your previously saved map. You can now edit your map by double clicking on one of the cells, it will open a new tab (named cell x,x) containing a preview of what that cell will look like in game. You can use the sliders to navigate the camera around the map as well as holding down control and using your scroll wheel to zoom in/out. To the right of the preview window you will see a couple of areas, one labeled "maps" and one labeled "history", in the maps section, navigate to your buildings folder, you will see all of your buildings listed as tbx files (you can create multiple folders within the buildings folder if you like to help organise your buildings to make them easier to find). All you need to do now is click and drag a tbx from the section on the right onto the preview window (make sure "Select and move lots" is selected on the toolbar at the top of the screen), you will see the building moving with your mouse cursor over the world, just drop it wherever you want it to go. Once you have placed all the buildings you want on this cell click on File and then Save and then close the tab (named cell x,x). You should now be back to seeing your entire map. You can now repeat the process for each other cell. Once you are finished adding buildings (you can always add more later if you want to start off small and test a few things first) come back to the world view and save your map. Step 4) Exporting and testing the map - Exporting Spoiler Before adding world detail such as lamposts, road markings, road signs etc you probably want to load your map up and run around in game to make sure everything is as you want it because any world detail changes you make will be lost if you need to make edits to your BMP files and re-import them into WorldEd. The first thing you are going to need to do is add a spawn point (or more) on your map. To do this you will first need to create a spawnpoints.lua file, just navigate to the folder you created when you imported your BMP's into WorldEd (e.g. MyMapMod) which by default will have been created in your TileZed folder. Once there create a new text document, open it and then click on save as, change Save as type to All files, name it spawnpoints.lua and click save. Then open WorldEd and load your map, double click on the cell you want to add a spawn point to, once it opens, click on the "add spawn point" tool at the top of the window and click on the map where you want your spawn point to go, it will place down a prism to allow you to keep a visual track of your spawn points as well as opening a dialogue box to select the profession that can spawn here (if no boxes are ticked then nothing will be added to the spawnpoints.lua file when you write spawn points). Once finished, save the cell, come back to the world view (close the cell's tab) and click on File and then Write Spawn Points, on the dialogue box which pops up, navigate to and select the spawnpoints.lua you created above and save. Once you have created your spawn point(s), save your map then click on File and then Genrate Lots>All Cells. Here you will be asked for 4 things, the first being the directory your lot files will be saved in, click on the 3 dots and navigate to the folder you created for your map mod when you imported your BMP into WorldEd, then right click and create a new folder called Lots, select this folder. Secondly it needs your zombie spawn map, just click on the 3 dots and navigate to your zombie spawn map and select it. Third is the Tile Definitions folder, again click on the 3 dots and this time navigate to your Project Zomboid Steam Install folder (c:\Program Files\Steam\SteamApps\Common\Project Zomboid), click on the Media folder and then click Select Folder. The last thing is the World Origin. If you are making a stand alone map which is not connected to any other maps then you can just leave this as is. If however you are wanting to add your map to an exisiting world or overwrite a cell(s) in an existing world you will need to change these values. The cell of your map that is at 0,0 (the one furthest to the north west) will be given the values you use here, allowing you to offset your map to make existing maps bigger or overwite cells of an existing map. Once ready, click ok - Getting it in game Spoiler OK now you have all of the files you need to test your map in game, so lets go ahead and do that. First, create a new folder on your desktop (or somehwere easily accesible) and give it a name (e.g. MyMapMod), inside create another folder called media, inside there create a 3rd folder called maps and then inside there, create a final folder called MyMapMod (or whatever the name of your map is). Inside this final folder is where you want to put all of the .lotheader, .lotpack and .bin files that were created when you generated the lots for your map, as well as the spawnpoints.lua file and and objects.lua (dont worry about this for now, you will create one when you add foraging zones later). You also want to create a text file(it will actually be saved as a .info file), using Notepad, in this folder, called map, include the following: Spoiler title=Your map name here lots=Muldraugh, KY description= Your map description here fixed2x=true (in this example were adding/overwriting cells in the base games map, but all the files will be kept seperate so the mod only appears when selected in game(hence the lots=Muldraugh, KY)). Click on File and Save as, now instead of saving it as a text file, at the bottom, select Save as type and choose All Files, then name the file map.info The next file you need in this folder is a PNG file called thumb.png, this is the thumbnail used in the games menu for your mod, for now you can just create a blank one using your paint program and save it in this folder. From this folder, navigate up 3 folders until your in the first one and can see the Media folder, in this first folder, alongside the media folder you want to create 2 final files, the first is a mod.info file, again just create a txt file (saved as .info instead of .txt) this time called mod and include this info: Spoiler name=The Name Of Your Mod Here id=The Name Of the First Folder You Created Here (e.g. MyMapMod) description=Description Of Mod Here poster=poster.png The very last file you need is another png, just copy your thumb.png you created a little earlier, paste it here and rename it to poster.png All that's left to do now is drag and drop (or copy and paste) that entire folder structure into: C:\Users\YourUsernameHere\Zomboid\mods Then load up Project Zomboid, click on Mods, enable your mod, create a new game and select your map on the world selection screen. You should find yourself spawning in on one of the spawn points you created earlier. Step 5) Adding world detail Spoiler Now that you have had a run around your map in game and are happy with the layout, vegetation, bulding placement etc it's time to start beautifying your map by adding detail. To start, open TileZed and then open WorldEd, load your map. Right click on the cell you want to add detail to and then click on "open in tileZed". Bring TileZed to the front (or minimise WorldEd) and you will notice you have a zoomed in view of that cell. In map window to the right of the screen, click on the layers tab halfway down, the window above should populate with a number for layers with different names, these are what you will use to place your various bits of detail, allowing you to stack multiple things on top of each other without overriding the previous one (such as road markings on roads, trees on tiles with grass etc). Below this will be a tilesets window listing all of the different tilesets currently used in game, clicking on one of the names will display its contents directly to the right, as you will see, most tilesets have multiple tiles. Adding detail to your world is simply a matter of finding the item you want to place from the tilesets, making sure you're on the correct layer (so placing a tree wont delete the ground tile etc) and then clicking where you want to peice to go (making sure the stamp brush tool at the top of the window is selected). There's a lot of useful tools listed along the top to help you, such as undo and a rectangular select to allow you to copy and paste areas of detail, for example, simply place down some road markings from the street_trafficline_01 tileset on to the FloorOverlay layer, then select the Rectangle Select tool, select the cells with the road markings on, press CTRl+C and then CTRL+V, now you can click away, placing copies of that area (only tiles on the currently selected layer) with a single click, allowing you to place large amounts of detail rather quickly. Once you are finished adding detail to your cell, click on File and Save then close the tab. You can now go back to WorldEd and repeat the process with each other cell, once complete come back to WorldEd, click on File and Generate Lots. Your world detail has now been saved and can be seen in game. Any time you make changes to your map and want to test it in game you will want to re-copy all the .lotpack, .lotheader and .bin files along with your spawnpoints.lua and objects.lua into the folder structure you created in the step above "Getting It In Game", overwriting old files as you go, then copy into: C:\Users\YourUsernameHere\Zomboid\mods as you did before, again overwriting if asked. Step 6) Zoning Your Map Spoiler A - Foraging and Loot Respawn Zones Find the .pzw file for your map mod (generally in the parent folder to your mods .lot files) and open it in a text editor (e.g. Notepad). Look for the line(s) that starts with "<bmp path= ...", after the last one, paste this chunk of code: Spoiler <objecttype name="TownZone"/> <objecttype name="Forest"/> <objecttype name="DeepForest"/> <objecttype name="Nav"/> <objecttype name="Vegitation"/> <objecttype name="TrailerPark"/> <objecttype name="Farm"/> <objectgroup name="TownZone" color="#aa0000" defaulttype="TownZone"/> <objectgroup name="Forest" color="#00aa00" defaulttype="Forest"/> <objectgroup name="Nav" color="#55aaff" defaulttype="Nav"/> <objectgroup name="DeepForest" color="#003500" defaulttype="DeepForest"/> <objectgroup name="Vegitation" color="#b3b300" defaulttype="Vegitation"/> <objectgroup name="TrailerPark" color="#f50000" defaulttype="TrailerPark"/> <objectgroup name="Farm" color="#55ff7f" defaulttype="Farm"/> Save the file and close it. It is possible that your pzw file will already contain this code, in which case it is not necessary to add it again. Open TileZed and then WorldEd and load your world, dbl click on the cell you want to add foraging to. Click the "create object" button at the top of the window. At the bottom of the window you will see 2 selection boxes ("Level: 0" and "Obj Grp: <none>") Click on "Obj Grp <none>" and you will see the list of foraging zones you can add to the world. Select the type you want, you can then draw a rectangle on the game world by clicking and holding left mouse button. You can add multiple rectangles of any type and size to each cell, allowing you to be as specific or general as you want. Once done, save the cell, close it and move on to the next. These zones are used for respawning loot and new zombies, the nav zone is used for zombie horde migration, basically marking the path of least resistance through a town/area. More specifically, only buildings that are within "TownZone", "TrailerPark" or "Farm" zones will be allowed to respawn loot. B - Vehicle Zones Adding vehicle zones is very similar to adding the forging zones. Simply add the following code to your map mods' PZW file the same way as you did for the foraging zones above. Again, if your pzw file already contains this code then there is no need to add it again. <objecttype name="ParkingStall"/> <objectgroup name="ParkingStall" color="#85929e" defaulttype="ParkingStall"/> List of vehicle zone names to use in WorldEd: bad good medium sport farm junkyard trafficjams trafficjamn trafficjame trafficjamw rtrafficjams rtrafficjamn rtrafficjame rtrafficjamw police ranger fire mccoy fossoil postal spiffo radio ambulance burnt The first group is the most common type of vehicle zones used. The second group are for traffic jams pointing in specific directions to immitate the flow of traffic. The ones prefixed with r will spawn less than the regular trafficjam zones. The third group are specific zones for the type of vehicles listed, they are still also spawn random cars but will also spawn the vehicle listed. The final one will add random burn out vehicles. Vehicle zones should be placed as a multiple of 4x3 tiles (4x3, 8x6, 28x3 etc) with 4x3 being a single vehicle, 4 being its side and 3 being its front/back. Once done, load your map mod up in WorldEd, open a cell and add your new vehicle zones as you would foraging zones. Whenever you add a zone you need to use the objects panel on the left of the WorldEd window to give the zone a name (use the names listed above) that will be visible in WorldEd as a tag over the zone, making it easier to keep track of what you have placed where, if these are left blank then the game will default back to grabbing random vehicles from the ParkingStall zone. Example: After you have added vehicle zones to all of your cells, save your map. If you are having trouble with your vehicle zones, you can always take a look at the vanilla objects.lua within the muldraugh folder of your zomboid install, once opened just search for "ParkingStall" to see examples of vehicle zones used in the vanilla vehicle branch. C - Water Zones As above, the first thing you want to do is add the needed code to your map mods' .pzw file, if already present there is no need to add the code snippets again. Look at the beginning of your pzw file and find where the "propertydef"' lines are and add the first chunk of code to the end of that block, same for the "template" and "objecttype" chunks, find their respective blocks and add to the end. Spoiler <propertydef name="WaterDirection" default="0.0"/> <propertydef name="WaterSpeed" default="0.0"/> <propertydef name="WaterGround" default="false"/> <propertydef name="WaterShore" default="true"/> <template name="WaterFlowN"> <property name="WaterDirection" value="0"/> <property name="WaterSpeed" value="1.0"/> </template> <template name="WaterFlowS"> <property name="WaterDirection" value="180"/> <property name="WaterSpeed" value="1.0"/> </template> <template name="WaterFlowE"> <property name="WaterDirection" value="90"/> <property name="WaterSpeed" value="1.0"/> </template> <template name="WaterFlowW"> <property name="WaterDirection" value="270"/> <property name="WaterSpeed" value="1.0"/> </template> <template name="WaterZone"> <property name="WaterGround" value="false"/> <property name="WaterShore" value="true"/> </template> <objecttype name="WaterFlow"/> <objecttype name="WaterZone"/> Now you will see 2 new zones in WorldEd in the same place your other zones reside, WaterFlow and WaterZone. WaterFlow zones are single tile-sized objects that you can place down on any body of water to make it flow in a given direction and at a given speed, any water tile connected to the tile you placed the zone on in a given cell is affected. You can then follow the flow downstream adding more WaterFlow zones to change its direction/speed to match the landscape/route the river/stream takes. Here's an example from the vanilla map: WaterDirection is in degrees with 0 being North and 90 being East etc. WaterSpeed goes from 0.0 to 1.6. The second new water zone is.... WaterZone. WaterZones allow you to play/remove with the blends that you will normally see where water meets land. This allows you to do things like have pools without the water in the pool creating a shore-like blend with the tiles next to it, which obviously for a pool, wouldn't make sense, here is an example from the vanilla world where a WaterZone has been used is this exact way, notice how the WaterGround and WaterShore properties are both set to false: It might be a little hard to tell from the picture but the WaterZone completely covers the pool and all tiles bordering it, allowing it to remove the shoreline blend from said tiles. You can play with the settings and placement of WaterZones to get different effects/looks depending on your needs. D - Zombie Zones Zombie Zones allow you to specify specific costumes for zombies that spawn within certain areas on your map (such as in and around buildings). As you did for the water zones etc first you need to add the following code to your map mods' .pzw file. Add the objecttype line at the end of the existing ones, same for the objectgroup line: Spoiler <objecttype name="ZombiesType"/> <objectgroup name="ZombiesType" color="#555500" defaulttype="ZombiesType"/> As before you will now have a new zone in WorldEd called ZombieType, you can select it and place zones as usual, the larger your zones the better chance of zombies spawning within them. These zones do not add "extra" zombies, they just affect zombies that spawn within them. Each ZombieType zone must be named, similarly to vehicle zones, the list of current ZombieType zone names is: Spoiler School Prison VariousFoodMarket Wedding Fossoil Offices Seahorse Dinner Restaurant Doctor Pharmacist FarmingStore Police ConstructionSite Gigamart Bank FancyHotel Spiffo CarRepair Factory Gas2Go ThunderGas McCoys TrailerPark CountryClub Athletic Spa PizzaWhirled Pony Jays Survivalist Boxing CoffeeShop Butcher Baseball StreetSports FireDept NursingHome Church Football Rocker PileOCrepe Bar Nightclub Army Above you can see an example of 2 Factory ZombieType zones and 1 TrailerPark ZombieType zone. The factory zones have been made to mainly only affect the zombies that spawn inside the buildings where as the trailer park zone has been made to cover the enitire park. E - Story Zones Story zones allow you to add small "scenes" to your map, such as a camping trip "gone wrong" as well as some others. As with the previous zones we first need to start off by adding the code snippets for these new zones to our maps .pzw file, once again add the objecttype line to the end of that section of code and the same with the objectgroup line, and if they already exist, they do not need to be added again: Spoiler <objecttype name="ZoneStory"/> <objectgroup name="ZoneStory" color="#ffffff" defaulttype="ZoneStory"/> You can now use the regular object tool to add Story Zones to your map. Best practice is to make the zone at least 10x10 tiles but you can also make them much larger to add a bit more randomization as to where they spawn in your zone. The zones themselves, like other zones do not guarantee a spawn of a story, only a chance. There are currently 3 different Story Zones used in vanilla, just like with vehicle zones and zombie type zones you will want to name each zone one of the following: Spoiler Lake Forest Beach As you can imagine, each one spawns vehicles/items/zombies you might expect to find in a "scene" from a zone of that type (eg. a bunch of tents, a campfire and a zombie eating some hiker/camper corpses). Above you can see an example of a Forest story zone and a Lake story zone. F - Loot Zones The new loot zones work alongside the new loot distribution system to allow us to take loot customization to a whole new level, 2 identical houses, but one with a loot zone over the top can produce wildly different loot spawns if you want it to. You do not need to add any loot zones to your map but they will offer wider loot variety and easier control of it. As with the previous sections, you will first need to add the code for these new zones to your map mods .pzw file: Spoiler <objecttype name="LootZone"/> <objectgroup name="LootZone" color="#ff00ff" defaulttype="LootZone"/> You can now add loot zones to the map the same way as any other zones. There are currently only a few zones used in the vanilla game (Rich, Poor, TrailerPark and Army), with more on the way, but you can easily create and use your own loot zones too. Here is a seperate guide about customizing loot for your map mod: Once all cells have had their zones added close any cells left open so you are back to the main world overview in WorldEd. Click on File and the Generate Lots>All Cells. If they aren't already then make sure your path to your lots directory and zombie spawn image are complete. Then for your tiles definitions folder you want to point that to the media folder inside your Project Zomboid installation folder (steam>common>... etc). Once done, click ok. Click File and then "Write spawn points to lua", then click on File and click "Write objects to lua". G - Map Zones Build 41.6 introduced the new in-game mapping system which allows your map to be procedurally drawn from a top down and an isometric view in game. All it requires is to tag your buildings in buildingEd with a type (commercial, industrial etc) and to add some simple zones over your roads/trails. There is a simple standalone guide on how to add these and get your map mod working with the new in game system here: Step 7) Uploading to steam workshop Spoiler Create a folder (anywhere for now, desktop is handy) with the name of your mod (e.g MyMapMod), place your mods preview picture (named preview.png) and a .txt file called "Workshop" which includes the following code: Spoiler version=1 title=Your Mod Name Here description=Your mod description here description=Second line of your mod description here (you can add more description= lines if you like) tags= visibility=public then save the file. Within the same folder as these 2 files create a new folder called "Contents", and inside the Contents folder add another folder called "mods". Inside this folder is where you want to copy and paste your mods main folder (the one you have been placing into c:\Users\Yourusernamehere\Zomboid\Mods when you test your mod in game). Once this is done cut/copy/paste the entire folder structure into your C":\Users\YourUserName\Zomboid\Workshop" folder and load up PZ. Click the "Workshop" button towards the bottom left and the click "create and update items", then select your mod (if it doesn't show dbl check you added it to the correct folder which will be shown at the top of the screen). Make sure the items details are correct and then press next, your mod will then be uploaded to steam workshop (wait for the upload confirmation)and should be viewable within the hour. You now have a map mod on steam workshop! Anytime you update your mod, simply copy/paste the updated files over the existing ones in your "C:\Users\YourUserName\Zomboid\Workshop" folder and follow the above step again from loading up Project Zomboid, anyone subscribers will have the update pop up in their downloads automatically. Tips Spoiler Map Image Creation: If you are using paint.net, I recommend the Selective Palette plugin. You can choose a palette of colors and all pixels in your image will be assigned to the closest color. Find it here: http://forums.getpaint.net/index.php?/topic/8043-curtis-plugin-pack-update-for-354/ - Ciber Ninja More Coming Soon FAQ's Spoiler Coming Soon Other Helpful Guides Spoiler Building Making - Current Room Definitions How To Add Custom Texture Packs And Tile Definitions Blackbeard06's Video Mapping Tutorial - How to create lootable maps for your map mod How to customize Loot Spawns Big thanks to Capt_Paradox, Blackbeard06, Suomiboi, Thuztor and the whole modding community ❤️
- 216 replies
-
- 19
-

-

-
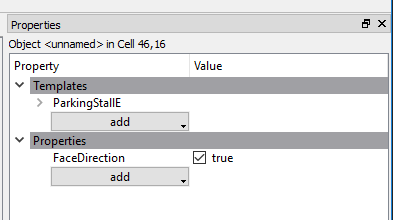
This is very similar to adding foraging zones to your map, (step 6 of this tutorial: https://theindiestone.com/forums/index.php?/topic/21951-the-one-stop-tilezed-mapping-shop/ ) Simply add the following code to your map mods' PZW file the same way as in step 6 of the above guide: <objecttype name="ParkingStall"/> <objectgroup name="ParkingStall" color="#85929e" defaulttype="ParkingStall"/> List of vehicle zone names to use in WorldEd: bad good medium sport farm junkyard trafficjams trafficjamn trafficjame trafficjamw rtrafficjams rtrafficjamn rtrafficjame rtrafficjamw police ranger fire mccoy fossoil postal spiffo radio ambulance burnt The first group is the most common type of vehicle zones used. The second group are for traffic jams pointing in specific directions to immitate the flow of traffic. The ones prefixed with r will spawn less than the regular trafficjam zones. The third group are specific zones for the type of vehicles listed, they are still also spawn random cars but will also spawn the vehicle listed. The final one will add random burn out vehicles. Vehicle zones should be placed as a multiple of 4x3 tiles (4x3, 8x6, 28x3 etc) with 4x3 being a single vehicle, 4 being its side and 3 being its front/back. You can choose any color values you want for the different zones, just make sure they are hex color codes. Once done, load your map mod up in WorldEd, open a cell and add your new vehicle zones as you would foraging zones. Whenever you add a zone you need to use the objects panel on the left of the WorldEd window to give the zone a name (use the names listed above) that will be visible in WorldEd as a tag over the zone, making it easier to keep track of what you have placed where, if these are left blank then the game will default back to grabbing random vehicles from the ParkingStall zone. Example: After you have added vehicle zones to all of your cells, save your map. Once saved, generate your lots and then write objects to lua. You now have vehicle spawns in your map. If you are having trouble with your vehicle zones, you can always take a look at the vanilla objects.lua within the muldraugh folder of your zomboid install, once opened just search for "ParkingStall" to see examples of vehicle zones used in the vanilla vehicle branch. For aligning vehicles in parking stalls: Select a ParkingStall object. In the Properties panel, click the "add" button under Templates. Choose one of the 4 ParkingStallX templates. You should see "Direction=X" where the object name is displayed. The direction controls where the front (or back) edge of each vehicle is aligned. In the picture you can see a Direction=E ParkingStall facing a Direction=W ParkingStall. This is used to ensure the vehicles don't overlap each other, and leaves space for the player (and zombies) to walk between them. For single parking stalls, there is usually no need to choose a direction. The FaceDirection property can be added to ParkingStall objects to align the front of a vehicle to the edge specified by the Direction property. When this property is "false" or isn't assigned to a ParkingStall object, the vehicle will face in a random direction as before. This can be used for parallel-parked vehicles for example.
-
1) The first thing you want to do, as with most mods is to create your mods folder structure, use the image below as a reference, replacing MOD_NAME with the name of your mod: Don't worry about the files shown above, you will be creating them as you follow this guide, just make sure to remember, anytime you see "MOD_NAME" in this guide, replace that with the name you chose for your mod. 2) In your "..mods/MOD_NAME" folder, create your "mod.info" text file which contains the following code: Remember to replace all "MOD_NAME"'s with the actual name of your mod. 3) In the same folder, create/place your MOD_NAME.png , this will be the thumbnail used in game as the poster/picture for your mod. 4) Next up, in your "mods/MOD_NAME/media/lua/client" folder, create your MOD_NAME.lua file with the following code inside: This is the script that will load your model and scripts into the game, it also controls the spawn rate for the car in each type of zone as well as providing the vehicle mechanic overlay. Remember to replace all instances of "MOD_NAME" with the actual name you chose for your mod. 5) Next, in your "mods/MOD_NAME/media/scripts/vehicles" folder, create your MOD_NAME.txt file containing the following code: This script example contains all of the parameters to control the simulation of the vehicle, such as engine power, gear ratios, collision cube and much more. You will (hopefully) find it well commented to give you an idea of what each parameter does. You can look in the games "media\scripts\vehicles" folder for a vanilla vehicle script that more closely reflects the vehicle you are adding rather than starting with the example above, have a good look through them all to get a sense of the different templates you can use and the various changes that can be made to different components. 6) Now you need to (if you have not already) make the 3d model for your vehicle. We suggest using Blender, but as long as you're experienced in 3d modelling, any program that can export .ply files should work, just make sure your faces are triangulated, in Blender you can do this by selecting your model in Edit mode then pressing Ctrl + T. Then drag and drop the exported ply file onto the converter supplied below (unzip the below file, drag your .ply directly onto the .exe, do not double click the exe), it will output a new txt file with the same name as the .ply in the same directory. Copy the new .txt file into your "mods/MOD_NAME/media/models" folder as "Vehicles_MOD_NAME.txt This is the .ply to PZ convertor: PZ_PLYtoPZconverter.zip 7) Now it's time to create your vehicles texture files, these should all go into the "mods/MOD_NAME/media/textures/Vehicles" folder. First up is your "Vehicles_MOD_NAME_Shell.png" , this is the main texture image for your vehicle and needs to be 512x512 pixels, as do all of your textures, below is an example: Next there are 6 different overlay/detail png's to create, the first is for the vehicle lights ("Vehicles_MOD_NAME_Lights.png"): Then the vehicle rust ("Vehicles_MOD_NAME_Rust.png"): The next 2 image examples ("Vehicles_MOD_NAME_Shell_Damaged01.png" and "Vehicles_MOD_NAME_Shell_Damaged02.png") are to show light and heavy damage, respectively, on the vehicle's shell. They are used to represent dents in the bodywork: The next 2 image examples ("Vehicles_MOD_NAME_Overlays_Damaged01.png" and "Vehicles_MOD_NAME_Overlays_Damaged02.png") are very similar to the previous 2 except they are for showing damage on windows and lights as well as scratched on the body work: The last file we need is the vehicle colour mask ("Vehicles_MOD_NAME_Mask.png"), which should also be placed in your "mods/MOD_NAME/media/textures/Vehicles" folder. This tells the game which parts of your vehicle texture correspond to which part of your vehicle model and is needed to display damage, lowered windows and removed elements etc: Here the colour values to be used: Copy your complete mod folder structure into your C:\Users\YourUsernameHere\Zomboid\Mods folder, load the game, turn the mod on in the mod menu and start a new game, your new vehicle is now ready to be found and taken for a spin. Finally, here: ZAZ968M.zip - you can find an example vehicle mod using the above instructions. Notice the included example mod uses a slightly different process with its textures/overlays. The main texture is transparent while the detail has been shifted onto the vehicle_lights .png. This allows the game to automatically and procedurally generate different colours of your car when they are spawned in. Happy Modding!
-
Hello and welcome to my tutorial. It covers full workflow of vehicle creation for PZ. If you are a complete beginner in 3D modelling, you'll have to watch/read additional tutorials, I won't cover every aspect of model creation and 'where this button is located'. I divide vehicle creation in these stages: 1) Modelling 2) Wheels texture and modelling 3) Texturing 4) Packing files in folders 5) Editing scripts and .lua 6) In-game editing and tests 7) Workshop publish STAGE 1 - MODELLING Today I am creating a 1960 Ford Falcon I prefer using blender as it is my everyday 3d modelling software. Now, find references for your vehicle and ideally it will be a blueprint/outline scheme, like this one: There are some tips in modelling for PZ: 1) Do not care too much about topology and good shading. There is no actual shading in game, only windows have reflections. 2) Avoid n-gons or triangulate them before export 3) DO NOT make edges to outline body panels/parts. All dividing of parts will be done with texture mask. You can do it in UVs if there will be a point for that. 4) Place spindiel imitations in wheel wells to hide rear part of wheel models 5) In the UVs parts of body have to be straight-oriented without any non-90 degrees rotation, so pixels in texture will lay parallel with polygon flow. 6) To avoid physics artifacts in game import model of one of vanilla game cars models to your scene and model in consistent scale. Or import mine, that is available in the end of topic. This is what I consider a well done model There is nothing special in UV unwrapping process, just remember to place the least amount of seams possible and keep island aligned. Here are the UVs of my model: I've unwrapped the model without applied mirror modifier, so now we will have to texture just one half of the car. I'll fix mirroring later. STAGE 2 - WHEELS There are many ways to make a wheel and texture it, but I'll show the most efficient one. Make the wheel's face with simple materials, but unwrap the 'road touching part' to flat surface, like this: Then place an orthographic camera facing the wheel, scale it to fit the whole wheel-dish. Place a ring with emission material to light the wheel. Switch your renderer to Cycles and go to camera view, now use a rendered shading mode to adjust materials and lights to your taste. Set rendering resolution to something like 120x120-175-175 for best results Check the 'transparent' box in film settings to have alpha backround in texture: Now increase the sample count to something like 512-1024 and hit render. You will end up with a result of a ready-to-go wheel texture: The example file with scene for rendering and the model of this wheel you can download here: *google drive .blend file* Now make a lowpoly model of the wheel to use this texture on. I prefer using 18-24 edge circles for wheels. The unwrapping will be later, but eventually you'll end up with this: This method takes 10-15 minutes when you get used to it and gives a stunning and clear result. STAGE 3 - TEXTURING NOTE: I use a pretty complicated way of texturing and adding light to model. All rules of using textures the default way are covered in "HOW TO CREATE NEW VEHICLE MODS" topic by RingoD123, one of PZ devs. You can access it here: *boop* I'll show you my way, using Substance Painter to apply lighting and fake chrome parts to model. But first comes the base color and details of the car, so let's dive into it. Create a texture with 0 alpha and resolution 256x256. You can go for 512x512, but personally I like pixelated look of lo-res texture. Here are the settings for initial image: To preview the texture you are painting with different car colors, use this node setup. But switch filtering mode from "Linear" to "Closest", I forgot to do it on screenshot. There are two types of texture details: somewhat transparent and absolutely opaque. Half-transparent parts will be affected by car color, so they are mostly shadow/highlight details. Headlights, fixtures and things like that have to be opaque and painted with 100% brush hardness. It is easier to keep 3d view just to see what are you doing and paint texture in image editing mode, right there: First, paint the outlines of doors and other opening parts. Here are some brush hardness values: 0.2 - Outline shadow 0.5 - Outline 1.0 - Fake chrome and rubber window sealing Some work in progress screenshots Now when you have windows frames, save the image you just painted and go to photoshop and mask out glass sections like that Well, time for Substance Painter. You can use photoshop gradients for windows and blender lighting for lighting of the body, but I'll use SP "Baked lighting" filter for that, and for chrome especially. I will briefly describe what I've done in SP: 1) Mask out windows, give them mirror metal material and add a filter to them 2) Mask out chrome parts, made them mirror metal and added the same filter with slightly different settings. 3) Apply the same filter to all body parts left. 4) Add a position gradient to the windows Now I have this result, it is not shaded model, just basecolor: Also export the AO map you baked in SP. You can download file with this scene to look through and get ideas using this link: *boop* Now paint additional details you want on the car and open Photoshop. This is your layers layout: Now save it as .psd for future color editing and as .png to see what the you've done. Plug .png direcly as BaseColor in shader settings. Set your shading setting like this: And check if everything looks ok. This is my result: And this is the vehicle's look with wheels that we made before Sweet, isn't it? Now, it is time to get rid of mirroring. You can make new UV, bake it and... get A LOT of offset artifacts resulting in jagged pixel edges. There is a lazy but effective method: 1) In the UV editor place cursor in the 0,0 coordinates. 2) Set Pivot to 2D cursor: 3) Scale all UV islands to 0.5 EXACTLY 4) Apply mirror modifier to your model. Now select FACES of any half of the model and move it in UVs on Y by value 0.5 EXACTLY or you'll eventually mess everything up. 5) In Photoshop expand canvas of your PSD file we made before 6) Duplicate everything and move to the upper left corner, like in UVs. You can merge color layer(s) to operate color on export more easily. Now you have half of the texture empty... You do not want to waste it, right? Then drop in the wheel texture here without scaling, and you won't need additional texture file for it! 7) Create a layer beneath all others and paint it black or grey to cover alpha-holes in the textures. 8 ) Now unwrap the wheel to this new texture and let it shine! We painted the car and fixed mirroring. DOWNLOAD THE .PSD FILE: *bloop* There are 3 more types of textures to make: 1) Rust 2) Damage (1 or 2 levels, I'm lazy, I prefer using single one) 3) ID Color Mask or just Mask It wasn't possible to make them right with mirroring. Everything about these textures are explained clearly in Ringo's guide, again: *boop* I'll just show results I ended up with. Now you have to use 512x512 clear images for these textures, do not forget it. RUST Painted it with jitter brush and 0.2 hardness. To see what I am doing used the same node setup, as for base texture. DAMAGE Painted gradients with black and white with 0.1 hardess with repetitive strokes. MASK Mask texture tells game where are separate parts of car: doors, windows, lights and others. Every part has it's own color in palette, you can find color table in Ringo's guide. Copy and paste color HEX to use it in blender brush or fill tools. I've missed some of the parts because they do not really matter. AEUGH Texturing is finished. Go to photoshop and make all color variations you want and save them as .png, name them Vehicles_[vehicle name]_ Vehicle name mustn't containt spaces These are color palettes of my car: Now you have to export your vehicle body and wheel models. Copy them to an empty scene and save as separate file. If you used blender default orientations (front, back, right, left, top), then rotate the car on Z axis by 180 degrees. Game rotates it for some reason, so you'll have to do it. Now position everything in scene like this and continue to export settings. Export body and wheel separately with these settings: STAGE 5 - Packing files in folders The folder hierarchy and naming the files you can find in Ringo's guide. The mod file and all of my project files you will be able to download in the end of this topic. make up an Id name for your car. It has to be short, but unique and do not contain spaces. For this car I use '60falcon'. _____________________________________________ workshop.txt properties of the mod for Steam Workshop _____________________________________________ mod.info properties of the mod for in-game mod menu _____________________________________________ models_X folder -> vehicles this folder contains 3d meshes of the vehicle - body and wheel _____________________________________________ textures -> vehicles easy to guess, all vehicle textures are placed here null.png - completely transparent image, used as placeholder later on _____________________________________________ scripts -> vehicles there shoud be a .txt file named with you vehicle's ID name. Open it up and follow these instructions: change invertX to 'TRUE' if vehicle appears to be mirrored by left and right in game. Do not care about scale, offset and other geometric parameters. Insert all your color variation textures as shown below: All vehicle driving parameters are self-explanatory. Remember to set seats count, I'm creating a car with 4 seats. If you want to make less seats or add new, delete passenger[Seat code] records or add new. Also remember Seat[position] records down below. Add or delete the templates, loaded from Game default files: _____________________________________________ LUA SCRIPTS lua -> server -> vehicles -> [car id name]dis.lua Vehicle trunk type distribution file. There is a file with all vehicle distribution types in game files, I'll put it in project folder in the end if the article. This is game files distibution types, select one of them in respect to the vehicle type you are creating. I'll use CarNormal type for Ford Falcon. This is what distribution lua file has to be: _____________________________________________ lua -> shared -> [car id name]SpawnList.lua This file describes spawn zones of your car in game world with certain chance. I've typed in all default zones of spawn, you just have to change the chance and set [Base.60falcon] to [Base.(your car id name)] _____________________________________________ lua -> shared -> Translate -> EN -> IG_UI_EN.txt This is the name of the car in UI - keys name, mechanics window name and such. STAGE 6 - In-game editing and tests Launch PZ and disable all mod exept the one you will be debugging. Now close the game and go to Steam. In application setting set startup parameter to -debug It enables many debug options in-game. Now launch the Game again and, if menu doesn't appear, you've done something wrong in lua scripts. Check them for probles, and I hope, you'll figure out what is wrong. Now start a new game in world with no zombies and big amount of cars. Leave the house and find any car vibing in the street. Right click, -> Vehicle -> Set Script -> [your car ID name]. Car will switch to yours. This is what I've got on first time in-game spawning: YEET, it is all coming along. But wheel positions are a bit off, and we have to place the entering areas of doors. Go to Right click on car -> [DEBUG] Vehicle -> Vehicle Editor. Chassis Place extents and physics shape to outline the car Areas These are access areas to different parts of the car. There is nothing to describe, really, just place them where you can explain it and continue to next section Right click in mechanics tab to enable cheat options for the car. Now right click in mechanics panel. Here you can get key for that car or repair it. Final result in different variations Make a suitable preview image for your mod and crop it in Photoshop to 256x256. Place it in mod folder as preview.png In game menu go WORKSHOP -> create or update mod -> Go to your profile workshop items and find the new mod. Add the description, more screenshots and set visibility to 'Public' ALL PROJECT FILES: *YEET* ZE END Congratulations if you followed my guide to this point. Comment any issues or mistakes I've made.
-
 We can change the settings but the mod ignores the settings we change and continues with default settings, which means we can't disable bullet casings or make them deposit into player inventory. What are we doing wrong?
 -
I'm making some modded items that I want zombies to occasionally have in their inventory when killed. I found some posts that got me started for adding said items into inventorymale and inventoryfemale loot tables. My issue is that there are too many of my items spawning per corpse. My rolls are set to 1 and my chances are set to values well below 1. However dead zombies sometimes have 3 or more items per corpse, and manually checking the collected item distribution is nowhere near what I set their chance distribution to be. Someone on Discord said that each item that I have added to zombie loot tables has 1 chance to roll which explains the multiple items showing up (unique per roll). Why doesn't it seem to abide by my chance values though? Like one item is set to 0.0001 for testing and it was the second most found item after kill 500 zombies. Basically how to I actually get really rare drops from the items I'm adding? I have about 50 items I'm adding and they are WAY to common with my current settings.
-
 Hello forum, I wanted to try modding Project Zomboid so for the past day or two I have been making a barbwire baseball bat mod (that works like the nail bat) using posts from here at the forum and the PZ modding wiki. I've almost finished the core of the mod which is just the weapon, the repair scripts, model , & texture(s) and everything works fine until you strike with the weapon. There seems to be a 1/5(and if not the first, then at some point in the next four swings) chance that the game fades to black with error codes like (1,2,3,4,5, or 6) just a single number seemingly increasing by one with every crash. This has happened when striking a zombie or just swinging in the air, but only when my character swings the bat, not while idle with it. the screen fades to black and then loads the main menu. Ive narrowed it down in the debug logs to this one line that seems to cause the crash, ExceptionLogger.logException> Exception thrown java.lang.NullPointerException: Cannot invoke "zombie.inventory.types.HandWeapon.getSwingAnim()" because "<parameter1>.bareHands" is null at SwipeStatePlayer.CalcAttackVars line:651.. I've looked up "zombie.inventory.types.HandWeapon.getSwingAnim()" through this page https://projectzomboid.com/modding/zombie/inventory/types/HandWeapon.html and am not entirely sure what is going wrong. I will attach the mod itself (forgive me if its formatted oddly or if i made some mistakes of somekind, and please let me know if i did) so you can see for yourself. I have attached the FBX model file for the bat the Fixing script the weapon script itself and mod.info And if you want to recreate the error for yourself here is a dropbox link to all of the Mod https://www.dropbox.com/scl/fo/ru8vdce4b3sqtkftwndmz/h?rlkey=0l3mq81dvlgx2oiy5h798gl8z&dl=0 the work folder in their is just to keep track of files I was using. And help is greatly appreciated! edit: rewording WiredBaseballBat.fbx fixing.txt items_weapons.txt mod.info
 -
Marre de l'entraide ? Marre du PVE ? Rejoinds notre serveur FULL PVP ou les RAIDS sont autoriser !!! fraichement wipe ce serveur n'attend plus que toi pour vivre une aventure jamais vu dans project zomboid !!!! n'hésites pas à rejoindre notre discord pour plus d'infos !!!!! Serveur encadré , nombreux EVENT , MOD , CARTES etc !!! venez check c'est par ici : https://discord.gg/F68EzAda7z
-
Is it possible to use the XML markup for probability inside of a subitem branch? <m_items> <itemGUID>cbe793fe-97d9-4585-88e0-bc18be39d714</itemGUID> <subItems> <probability>0.25</probability> <itemGUID>48efaf62-6a65-474a-8773-886e05ea7632</itemGUID> </subItems> </m_items> In the example above, would this work such that one of these items would guarantee to be on the zombie, but Item A (main item GUID) would appear 75% of the time versus Item B (subitem GUID) spawning 25% of the time?
-
I'm making a small mod that should add recipes to the game for crafting special alcoholic drinks that give different bonuses. Bonuses should include gaining experience, receiving a buff for certain player characteristics (attack speed, running speed, etc.). With gaining experience, everything turned out to be extremely easy (I’ll probably even add a switch/case later for some types of alcohol that will give random experience). Now I'm stuck at the temporary bonuses stage. I tried to use the examples from the TimedActions folder, but I feel like I'm going down the wrong road. I would be grateful for any help or advice. Here is the link to the mod's github: blackrainbowtest/PZ_SHALCO: PZ Shelter server alcohol mod (github.com)
-
Good day, dear forum users. I recently started making mods (I'm not very familiar with the lua language, but its syntax is not much different from the languages I'm familiar with). I came up with a little idea to create a small mod for the server that adds special alcoholic drinks. These drinks give the player experience or increase his characteristics for a while. I was able to easily implement gaining experience when using it, but I have not yet figured out how to temporarily increase the player’s characteristics. As for me, adding an event listener for each tick, checking the condition and removing it will not be very effective in saving resources. Maybe someone has already encountered a similar problem and successfully implemented it? I would be grateful for links or references to posts/sources where I can obtain the necessary knowledge on this issue.
-
I'm having trouble getting my mod to work. The poster is selected in the mod.info but it refuses to display it, after enabling the mod the professions do not show up in character creation menu even after a restart. I looked over the file organization and code it all looked right but I'm not even close to being experienced in modding any help would be greatly appreciated thank you in advance! ZNGO.zip
-
I wanted to change the population settings so i added the mod mid game, since i heard that it's working if you're adding the mod mid game, but when i open the world, it would load for 5 seconds and then error 4 would pop up and then the game crashes. I think it has to do something with the mod, i'm not sure tho. Before i added the mod the world would run perfectly.
-
Hi, I'm very embarassed to be another random guy needing help with this issue but even with 2 hours of reading and searching, I couldn't find anything to solve my problem. So when I launch the game in solo it works just fine (even if a bit laggy despite my relatively good computer, but I have a LOT of mods and maps). But when I try to locally host the server with the same mods/maps, it shows "Normal termination" without launching the server. I allocated 16Gb of ram, tried with default and modified sandbox settings and tried to delete the "multiplayer" folder (in User/Me/Zomboid/Saves). I hope someone will be able to help me, whoever read this, I wish you a good night and hope you'll find my issue.
-
Hi everyone. I spent two nights trying to solve a problem with my mod. I wanna create a bag that can be filled with money. I was able to write part of money taking out code, but filling is too hard for me. At the bottom I paste my current code. At the moment, when I try to fill the bag by one unit (500$ is 1 unit; 5000$ is max), it is immediately filled completely. Please help who understands [LUA] media/lua/server/moneybag.lua function Recipe.OnCreate.moneyin(items, result, player) for i=0, items:size()-1 do if items:get(i):getType() == "PERCOM.moneybag" then if items:get(i):getUsedDelta() == 0 then result:setUsedDelta(0.1) else result:setUsedDelta(items:get(i):getUsedDelta() + 0.1) end end end end [SCRIPT] media/scripts/PERCOM_recipes.txt module PERCOM { imports { Base } item moneybag { Weight = 1.1, Type = Drainable, UseWhileEquipped = FALSE, DisappearOnUse = FALSE, UseDelta = 0.1, DisplayName = Moneybag, Icon = Moneybag, WeightEmpty = 0.1, } recipe put500dollars { destroy moneybag, Money = 500, Result: moneybag, Time: 1, Category: Money, CanBeDoneFromFloor: TRUE, OnCreate: Recipe.OnCreate.moneyin, } recipe take500dollars { PERCOM.moneybag = 1, Result: Money = 500, Time: 1, Category: Money, CanBeDoneFromFloor: TRUE, } }
-
Adjust the consumption of more than 100 items in sandbox options and let your imagination run wild to create your dream game/server. ◽ Supported Version: 41.73 / 41.76 Unstable ◽ Compatible with Singleplayer and Multiplayer (▲) ◽ Works on existing saves (*) (*) Need to use an other mod to modify sandbox settings on a existing save: Change Sandbox Options. Tutorial: How to proceed? (▲) How to use this mod in a multiplayer game?. Tutorial (very simple): How to proceed? What items can be ajusted? Crafting: Thread, Duct Tape, Twine, Wire, Glue and Wood Glue, Gravel Bag, Dirt Bag, Sand Bag, Compost Bag Medical: Disinfectant, Painkillers, Antidepressants, Beta Blockers, Sleeping Tablets, Vitamins, Alcohol Wipes Item Condition: Generator, Lightbulb and colored lightbulb Metalworking: Propane Torch, Propane Tank, Welding Rods Battery consumption: Car Battery, Walkie Talkie, Radio, Ham Radio, Hand Torch, Flashlight Farming: Watering Can, Mildew Spray, Insecticide Spray, Fertilizer Food: Flour, Baking Soda, Corn Flour, Yeast, Vinegar, Gravy Mix, Pancake Mix Cleaning: Bleach, Cleaning Liquid, Soap Other: Petrol Can, Lighter, Matches, CandleLit, Paints, Bucket of Plaster, Bucket of Water, Gunpowder, Fishing Line, Paint Bucket with Water, Hair Dyes, Extinguisher, Dish Towel, Bath Towel, Charcoal Some crazy ideas with this mod: 🔹 Organize a Candle Light Parade in the streets of Muldraugh. 🔹 Wash for months with the same soap. 🔹 Decrease the number of use of certain pills for a hardmore game. 🔹 Build your entire house with a single bag of plaster. 🔹 Invent your own rules... This mod can be added to or removed from a save file at any time. Want more sandbox options on an item consumption? Another mod is not compatible with this one? Let me know here! Report a bug or any issue here! Workshop ID: 2930480208 Mod ID: CustomConsumption Link to workshop mod Good game to all!
-
I just started looking into PZ modding and my first effort is going to be a Memory skill mod. The goal is to help the player remember explored information in a way that feels natural in the PZ world, which means imperfect memory but you can work at it to improve. I thought I'd post to get general feedback and maybe some tips and modding words of wisdom focused on what I'm looking into. I'm already looking over the wiki modding section. There's a lot to cover. The mod will add a new skill: Memory. The first piece I want to implement is vehicles, starting with the content of the "Vehicle Mechanics" window. When the player closes this window the mod will store everything. When remembering is triggered (TBD) the same info will be presented to the player but some pieces will be missing or incorrect. The higher the memory skill, the more complete and accurate the info will be. So far I've only just hooked into the Vehicle Mechanics window close operation to log the first set of into I want to store. The things I still need to explore are: Storing and accessing memory data in a persistent way Add the ability to open the remembered data either from a context menu or on mouseover with a small delay Add map markers with a way to show the remembered data from the full view map Reuse or clone the Vehicle Mechanics window to use with memory data I'm not sure if this will allow for weird interactions like starting a repair from far away I want to avoid the associated action of opening and closing the hood Record vehicle data abstractly. Right now I'm checking a number of specific fields and getters such as vehicle:getEngineLoudness(). There doesn't seem to be a copy/clone method on vehicles. Expand the behavior to all containers, storing the inventory memory on close crates, shelves, fridges, and all the standard containers vehicle trunks vehicle glove compartments vehicles with special indoor containers from mods (stretch goal) bags?
-
Hi all I am making a mod for the first time and need advice on creating a mod event I did not find instructions for creating a mod event, perhaps this is unacceptable, The game contains events, such as a helicopter, or a story event, which are created when exploring the game world. My idea is that it would be cool to create a mission event, and around the event a zombie respawn I would like to take the Survivors mod as a basis, for non-player characters
-
Hello, I posted some time ago about me not being able to get any part of my mod to work in game. A removable Back Up Beeper will be added to the game's Step Van, which will make noise when the player puts the van in reverse. You would need a little electrical skill to remove it. I was also planning on giving it a little extra storage, to balance. It is a very big vehicle, after all. I managed now to get the Back-Up Beeper part to function as a part in the world. It is not in the van yet. I now need to have it be a part that's in the Step Van, which I could not seem to work properly. Back up beepers on real vehicles seem to be mounted on the underside, out of sight, so I'm not concerned about having a model that appears on the Step Van. What I'm asking is this: How can I modify the base game's Step Van so that it will include this part, a Back Up Beeper? I have looked at similar mods which have added new cars with new parts, but I wasn't able to figure out the specifics. If it would help, I have attached below the files in which the Back Up Beeper is defined. If it is necessary, I could send more of what I have currently written. Simply adding "template BackUpBeeper," to the Step Van's script did not seem to work. I will greatly appreciate any insight that you may be able to offer. Have a good evening. Thank you for reading, Blockbot20 BackUpBeeper.txt BackUpBeeper_models.txt template_BackUpBeeper.txt
-
Introducing My Ears Are Covered Mod for Project Zomboid, a mod that adjusts the sound effects in the game when your ears are covered, providing a more immersive and realistic gaming experience. Now, ear muffs and other hats that cover ears really muffle the sound, enhancing the gameplay and depth in both single and multiplayer modes. Here are some features of the mod: Adjusts sound effects when your ears are covered, making the game more realistic and immersive. Compatible with Shark's Law Enforcement Overhaul, Shark's (and Peach's) Military Uniform Improvements, Authentic Z, and Paw Low Loot (41.50) + PATCH. Enhances gameplay and depth in both single and multiplayer modes. If you are using any of the mods listed above, the My Ears Are Covered Mod is a perfect addition to your gaming experience. Get ready to dive into a more immersive and challenging gameplay experience with this mod. Steam Workshop Link
-
Greetings, survivors! We are excited to introduce the Project Zomboid Sanity Mod, a realistic and immersive addition that factors in your character's mental health during survival. With mechanics like fatigue, hunger, and stress affecting sanity, this mod enhances gameplay and depth in both single and multiplayer modes. MECHANICS: Fatigue, Hunger, Thirst, StressFromNotSmoking, and Unhappiness (Also Smell if using Excrementum Mod) affect Sanity. Wetness, Panic, Pain, Boredom, Stress, and Health work as multipliers for Sanity change. For example, if your character is extremely hungry and stressed out, they will lose sanity faster. Once your character loses enough sanity, they will start mumbling and performing self-harm. Mumbling is server-sided and can be seen by other players and heard by zombies. ADDITIONAL FEATURES: Settings for this mod can be adjusted in the sandbox. The mod adds a new item called Xanax (which does not increase sanity yet) and new traits. Optional setting for nightmares and new ambiences. WORKS WELL WITH: Excrementum - now when you sh*t yourself, it actually affects your sanity. INCOMPATIBLE WITH: Danger Moodles (Insanity) MoodleSanity Steam Workshop Link
-
Hi, I'm making a mod that adds a removable (with some electrical skill) back-up beeper to spawn with the game's step vans, while adding a little extra trunk room (the downside being putting the vehicle in reverse will make a looping loud beep from the vehicle, which will attract zombies until the part can be uninstalled). This will not be visible from looking at the step van, but checking at the mechanics tab will reveal whether it's installed or not. It will always be installed when the vehicle spawns into the world. I know of older versions of the game where something very similar was on all commercial vehicles, but I couldn't find the code for that in those versions files, and the seemed to have a problem where the sound would play as soon as the reverse button was pressed, and rapidly tapping would quickly, repeatedly play the sound. My goal was to avoid that and place a minimum time limit between each beep. Hopefully, this is understandable and enough information. This is my first mod, I have a little familiarity with coding, but not much with lua, so I'd like to apologize, I had to take inspiration from similar vehicle mods already on the workshop. Unfortunately, I'm not quite sure what exactly is causing this issue. Booting up the game with only this mob enabled shows no change from the base game. The step vans in the world will not have the part on them and will not beep in reverse. The console give the following: ERROR: template "BackUpBeeper" not found. (The name I have used throughout the code to specify this back-up beeper.) I have below attached files I suspect to be causing the problem. "beeper_vehiclesitems" gives the qualities of the back-up beeper itself, while "template_beeper" explains the qualities of the item in the vehicle, if that's the correct information. I also have attached the revised step van code for the game. The changes I have made it to where the back-up beeper ("template = BackUpBeeper") and an increase of 10 to the step van's trunk size, increasing it to 170. These were taken after the example of the base game's code for adding vehicle items, so I'm not quite sure what bits are necessary for this item. For example, some of the code that specified an item of a vehicle had a "lua" segment at the end, which I believe gave the variables such as "create" and "update" and I believe all of them had "test" under the specifications for uninstalling the part. This can be seen as the last written code in my "template_beeper". Is this necessary? What, exactly, does it do? I have additionally attached below the code which specifies what functions of the back-up beeper (I have my intended functions for the beeper at the top of this message) The code runs through the game as the mod is but it may cause errors in the future once the mod's functionality changes. I apologize if this was too much to read, I just wasn't sure how to get the mod functioning properly. Thank you. beeper_vehiclesitems.txt template_beeper.txt vehicle_stepvan.txt ReverseBeeper.lua
-
hello everyone please help me with something , I have the pirated project zomboid or let s say it s not from steam and I m from Mac , and I would like to know how to download mods In my situation