Search the Community
Showing results for tags 'vehicle'.
-
The vehicles in the game all have the some looking dashboard HUD so I was thinking different vehicles should have different dashboard HUDs. You know with differently arranged and shaped odometers, fuel gauges, rev counter etc. Makes the game more realistic and authentic.
-
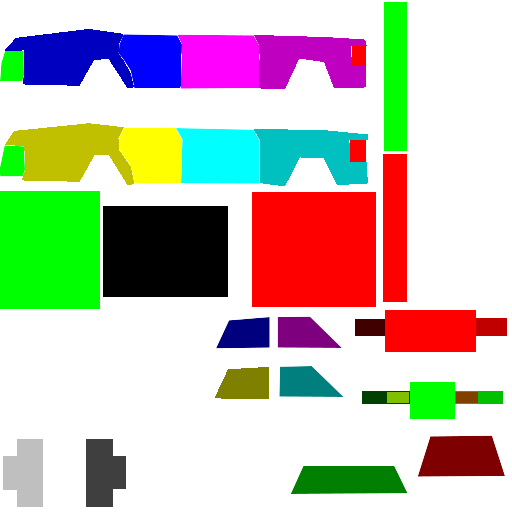
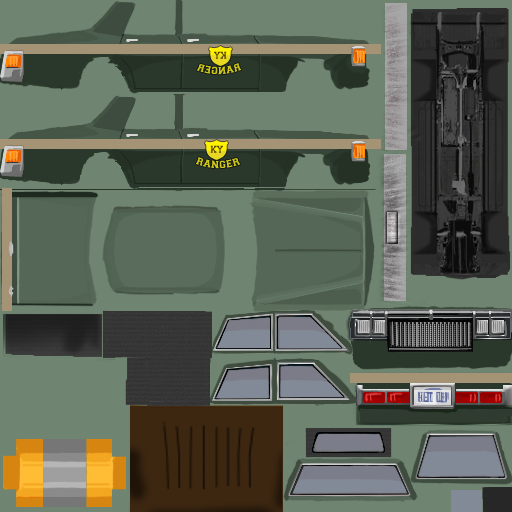
1) The first thing you want to do, as with most mods is to create your mods folder structure, use the image below as a reference, replacing MOD_NAME with the name of your mod: Don't worry about the files shown above, you will be creating them as you follow this guide, just make sure to remember, anytime you see "MOD_NAME" in this guide, replace that with the name you chose for your mod. 2) In your "..mods/MOD_NAME" folder, create your "mod.info" text file which contains the following code: Remember to replace all "MOD_NAME"'s with the actual name of your mod. 3) In the same folder, create/place your MOD_NAME.png , this will be the thumbnail used in game as the poster/picture for your mod. 4) Next up, in your "mods/MOD_NAME/media/lua/client" folder, create your MOD_NAME.lua file with the following code inside: This is the script that will load your model and scripts into the game, it also controls the spawn rate for the car in each type of zone as well as providing the vehicle mechanic overlay. Remember to replace all instances of "MOD_NAME" with the actual name you chose for your mod. 5) Next, in your "mods/MOD_NAME/media/scripts/vehicles" folder, create your MOD_NAME.txt file containing the following code: This script example contains all of the parameters to control the simulation of the vehicle, such as engine power, gear ratios, collision cube and much more. You will (hopefully) find it well commented to give you an idea of what each parameter does. You can look in the games "media\scripts\vehicles" folder for a vanilla vehicle script that more closely reflects the vehicle you are adding rather than starting with the example above, have a good look through them all to get a sense of the different templates you can use and the various changes that can be made to different components. 6) Now you need to (if you have not already) make the 3d model for your vehicle. We suggest using Blender, but as long as you're experienced in 3d modelling, any program that can export .ply files should work, just make sure your faces are triangulated, in Blender you can do this by selecting your model in Edit mode then pressing Ctrl + T. Then drag and drop the exported ply file onto the converter supplied below (unzip the below file, drag your .ply directly onto the .exe, do not double click the exe), it will output a new txt file with the same name as the .ply in the same directory. Copy the new .txt file into your "mods/MOD_NAME/media/models" folder as "Vehicles_MOD_NAME.txt This is the .ply to PZ convertor: PZ_PLYtoPZconverter.zip 7) Now it's time to create your vehicles texture files, these should all go into the "mods/MOD_NAME/media/textures/Vehicles" folder. First up is your "Vehicles_MOD_NAME_Shell.png" , this is the main texture image for your vehicle and needs to be 512x512 pixels, as do all of your textures, below is an example: Next there are 6 different overlay/detail png's to create, the first is for the vehicle lights ("Vehicles_MOD_NAME_Lights.png"): Then the vehicle rust ("Vehicles_MOD_NAME_Rust.png"): The next 2 image examples ("Vehicles_MOD_NAME_Shell_Damaged01.png" and "Vehicles_MOD_NAME_Shell_Damaged02.png") are to show light and heavy damage, respectively, on the vehicle's shell. They are used to represent dents in the bodywork: The next 2 image examples ("Vehicles_MOD_NAME_Overlays_Damaged01.png" and "Vehicles_MOD_NAME_Overlays_Damaged02.png") are very similar to the previous 2 except they are for showing damage on windows and lights as well as scratched on the body work: The last file we need is the vehicle colour mask ("Vehicles_MOD_NAME_Mask.png"), which should also be placed in your "mods/MOD_NAME/media/textures/Vehicles" folder. This tells the game which parts of your vehicle texture correspond to which part of your vehicle model and is needed to display damage, lowered windows and removed elements etc: Here the colour values to be used: Copy your complete mod folder structure into your C:\Users\YourUsernameHere\Zomboid\Mods folder, load the game, turn the mod on in the mod menu and start a new game, your new vehicle is now ready to be found and taken for a spin. Finally, here: ZAZ968M.zip - you can find an example vehicle mod using the above instructions. Notice the included example mod uses a slightly different process with its textures/overlays. The main texture is transparent while the detail has been shifted onto the vehicle_lights .png. This allows the game to automatically and procedurally generate different colours of your car when they are spawned in. Happy Modding!

-
Hello and welcome to my tutorial. It covers full workflow of vehicle creation for PZ. If you are a complete beginner in 3D modelling, you'll have to watch/read additional tutorials, I won't cover every aspect of model creation and 'where this button is located'. I divide vehicle creation in these stages: 1) Modelling 2) Wheels texture and modelling 3) Texturing 4) Packing files in folders 5) Editing scripts and .lua 6) In-game editing and tests 7) Workshop publish STAGE 1 - MODELLING Today I am creating a 1960 Ford Falcon I prefer using blender as it is my everyday 3d modelling software. Now, find references for your vehicle and ideally it will be a blueprint/outline scheme, like this one: There are some tips in modelling for PZ: 1) Do not care too much about topology and good shading. There is no actual shading in game, only windows have reflections. 2) Avoid n-gons or triangulate them before export 3) DO NOT make edges to outline body panels/parts. All dividing of parts will be done with texture mask. You can do it in UVs if there will be a point for that. 4) Place spindiel imitations in wheel wells to hide rear part of wheel models 5) In the UVs parts of body have to be straight-oriented without any non-90 degrees rotation, so pixels in texture will lay parallel with polygon flow. 6) To avoid physics artifacts in game import model of one of vanilla game cars models to your scene and model in consistent scale. Or import mine, that is available in the end of topic. This is what I consider a well done model There is nothing special in UV unwrapping process, just remember to place the least amount of seams possible and keep island aligned. Here are the UVs of my model: I've unwrapped the model without applied mirror modifier, so now we will have to texture just one half of the car. I'll fix mirroring later. STAGE 2 - WHEELS There are many ways to make a wheel and texture it, but I'll show the most efficient one. Make the wheel's face with simple materials, but unwrap the 'road touching part' to flat surface, like this: Then place an orthographic camera facing the wheel, scale it to fit the whole wheel-dish. Place a ring with emission material to light the wheel. Switch your renderer to Cycles and go to camera view, now use a rendered shading mode to adjust materials and lights to your taste. Set rendering resolution to something like 120x120-175-175 for best results Check the 'transparent' box in film settings to have alpha backround in texture: Now increase the sample count to something like 512-1024 and hit render. You will end up with a result of a ready-to-go wheel texture: The example file with scene for rendering and the model of this wheel you can download here: *google drive .blend file* Now make a lowpoly model of the wheel to use this texture on. I prefer using 18-24 edge circles for wheels. The unwrapping will be later, but eventually you'll end up with this: This method takes 10-15 minutes when you get used to it and gives a stunning and clear result. STAGE 3 - TEXTURING NOTE: I use a pretty complicated way of texturing and adding light to model. All rules of using textures the default way are covered in "HOW TO CREATE NEW VEHICLE MODS" topic by RingoD123, one of PZ devs. You can access it here: *boop* I'll show you my way, using Substance Painter to apply lighting and fake chrome parts to model. But first comes the base color and details of the car, so let's dive into it. Create a texture with 0 alpha and resolution 256x256. You can go for 512x512, but personally I like pixelated look of lo-res texture. Here are the settings for initial image: To preview the texture you are painting with different car colors, use this node setup. But switch filtering mode from "Linear" to "Closest", I forgot to do it on screenshot. There are two types of texture details: somewhat transparent and absolutely opaque. Half-transparent parts will be affected by car color, so they are mostly shadow/highlight details. Headlights, fixtures and things like that have to be opaque and painted with 100% brush hardness. It is easier to keep 3d view just to see what are you doing and paint texture in image editing mode, right there: First, paint the outlines of doors and other opening parts. Here are some brush hardness values: 0.2 - Outline shadow 0.5 - Outline 1.0 - Fake chrome and rubber window sealing Some work in progress screenshots Now when you have windows frames, save the image you just painted and go to photoshop and mask out glass sections like that Well, time for Substance Painter. You can use photoshop gradients for windows and blender lighting for lighting of the body, but I'll use SP "Baked lighting" filter for that, and for chrome especially. I will briefly describe what I've done in SP: 1) Mask out windows, give them mirror metal material and add a filter to them 2) Mask out chrome parts, made them mirror metal and added the same filter with slightly different settings. 3) Apply the same filter to all body parts left. 4) Add a position gradient to the windows Now I have this result, it is not shaded model, just basecolor: Also export the AO map you baked in SP. You can download file with this scene to look through and get ideas using this link: *boop* Now paint additional details you want on the car and open Photoshop. This is your layers layout: Now save it as .psd for future color editing and as .png to see what the you've done. Plug .png direcly as BaseColor in shader settings. Set your shading setting like this: And check if everything looks ok. This is my result: And this is the vehicle's look with wheels that we made before Sweet, isn't it? Now, it is time to get rid of mirroring. You can make new UV, bake it and... get A LOT of offset artifacts resulting in jagged pixel edges. There is a lazy but effective method: 1) In the UV editor place cursor in the 0,0 coordinates. 2) Set Pivot to 2D cursor: 3) Scale all UV islands to 0.5 EXACTLY 4) Apply mirror modifier to your model. Now select FACES of any half of the model and move it in UVs on Y by value 0.5 EXACTLY or you'll eventually mess everything up. 5) In Photoshop expand canvas of your PSD file we made before 6) Duplicate everything and move to the upper left corner, like in UVs. You can merge color layer(s) to operate color on export more easily. Now you have half of the texture empty... You do not want to waste it, right? Then drop in the wheel texture here without scaling, and you won't need additional texture file for it! 7) Create a layer beneath all others and paint it black or grey to cover alpha-holes in the textures. 8 ) Now unwrap the wheel to this new texture and let it shine! We painted the car and fixed mirroring. DOWNLOAD THE .PSD FILE: *bloop* There are 3 more types of textures to make: 1) Rust 2) Damage (1 or 2 levels, I'm lazy, I prefer using single one) 3) ID Color Mask or just Mask It wasn't possible to make them right with mirroring. Everything about these textures are explained clearly in Ringo's guide, again: *boop* I'll just show results I ended up with. Now you have to use 512x512 clear images for these textures, do not forget it. RUST Painted it with jitter brush and 0.2 hardness. To see what I am doing used the same node setup, as for base texture. DAMAGE Painted gradients with black and white with 0.1 hardess with repetitive strokes. MASK Mask texture tells game where are separate parts of car: doors, windows, lights and others. Every part has it's own color in palette, you can find color table in Ringo's guide. Copy and paste color HEX to use it in blender brush or fill tools. I've missed some of the parts because they do not really matter. AEUGH Texturing is finished. Go to photoshop and make all color variations you want and save them as .png, name them Vehicles_[vehicle name]_ Vehicle name mustn't containt spaces These are color palettes of my car: Now you have to export your vehicle body and wheel models. Copy them to an empty scene and save as separate file. If you used blender default orientations (front, back, right, left, top), then rotate the car on Z axis by 180 degrees. Game rotates it for some reason, so you'll have to do it. Now position everything in scene like this and continue to export settings. Export body and wheel separately with these settings: STAGE 5 - Packing files in folders The folder hierarchy and naming the files you can find in Ringo's guide. The mod file and all of my project files you will be able to download in the end of this topic. make up an Id name for your car. It has to be short, but unique and do not contain spaces. For this car I use '60falcon'. _____________________________________________ workshop.txt properties of the mod for Steam Workshop _____________________________________________ mod.info properties of the mod for in-game mod menu _____________________________________________ models_X folder -> vehicles this folder contains 3d meshes of the vehicle - body and wheel _____________________________________________ textures -> vehicles easy to guess, all vehicle textures are placed here null.png - completely transparent image, used as placeholder later on _____________________________________________ scripts -> vehicles there shoud be a .txt file named with you vehicle's ID name. Open it up and follow these instructions: change invertX to 'TRUE' if vehicle appears to be mirrored by left and right in game. Do not care about scale, offset and other geometric parameters. Insert all your color variation textures as shown below: All vehicle driving parameters are self-explanatory. Remember to set seats count, I'm creating a car with 4 seats. If you want to make less seats or add new, delete passenger[Seat code] records or add new. Also remember Seat[position] records down below. Add or delete the templates, loaded from Game default files: _____________________________________________ LUA SCRIPTS lua -> server -> vehicles -> [car id name]dis.lua Vehicle trunk type distribution file. There is a file with all vehicle distribution types in game files, I'll put it in project folder in the end if the article. This is game files distibution types, select one of them in respect to the vehicle type you are creating. I'll use CarNormal type for Ford Falcon. This is what distribution lua file has to be: _____________________________________________ lua -> shared -> [car id name]SpawnList.lua This file describes spawn zones of your car in game world with certain chance. I've typed in all default zones of spawn, you just have to change the chance and set [Base.60falcon] to [Base.(your car id name)] _____________________________________________ lua -> shared -> Translate -> EN -> IG_UI_EN.txt This is the name of the car in UI - keys name, mechanics window name and such. STAGE 6 - In-game editing and tests Launch PZ and disable all mod exept the one you will be debugging. Now close the game and go to Steam. In application setting set startup parameter to -debug It enables many debug options in-game. Now launch the Game again and, if menu doesn't appear, you've done something wrong in lua scripts. Check them for probles, and I hope, you'll figure out what is wrong. Now start a new game in world with no zombies and big amount of cars. Leave the house and find any car vibing in the street. Right click, -> Vehicle -> Set Script -> [your car ID name]. Car will switch to yours. This is what I've got on first time in-game spawning: YEET, it is all coming along. But wheel positions are a bit off, and we have to place the entering areas of doors. Go to Right click on car -> [DEBUG] Vehicle -> Vehicle Editor. Chassis Place extents and physics shape to outline the car Areas These are access areas to different parts of the car. There is nothing to describe, really, just place them where you can explain it and continue to next section Right click in mechanics tab to enable cheat options for the car. Now right click in mechanics panel. Here you can get key for that car or repair it. Final result in different variations Make a suitable preview image for your mod and crop it in Photoshop to 256x256. Place it in mod folder as preview.png In game menu go WORKSHOP -> create or update mod -> Go to your profile workshop items and find the new mod. Add the description, more screenshots and set visibility to 'Public' ALL PROJECT FILES: *YEET* ZE END Congratulations if you followed my guide to this point. Comment any issues or mistakes I've made.
-
Is there a way to set vehicle spawns with coordinates and/or to have a vehicle spawn with a player/specific player when they spawn? Looking for the server to do it rather than mods or admin commands. Any help is appreciated
-
 • 41.78.16 • multiplayer • dedicated server • without/with mods (doesn't make difference) • Multiplayer - bug appears, but in singleplayer everything works fine short explanation: whenever car you're discovering by opening a hood, and alarm is triggered - zombies don't give a f... BUT, when u smash another one car with alarm - everything works fine here's the video demonstration of this bug:
 -
I think it'd be nice if tow trucks were added to the game for the following reasons. 1. You could tow a car with the crane in the rear of the truck without having to get out of your car to hook it up. 2. Tow trucks would have high horse power by default so they'd be especially good for towing vehicles. 3. The crane in the back could lift the car upwards creating less drag since only 2 tires would be making contact with the road. 4. They'd be a great way of sorting vehicles out rather than have to drive each one individually to put into place or have each be towed manually by another car. 5. You could clear the road of any accident obstructions of too wrecked to even get into cars or just regular cars. I was thinking the tow crane could be controlled like raised or lowed by the v menu from flat to a predetermined height/angle. Also you could set from the menu whether to hook up to a car or release it from the tow hook. I was thinking they could be found around at tow garages or along the road at accident events.
-
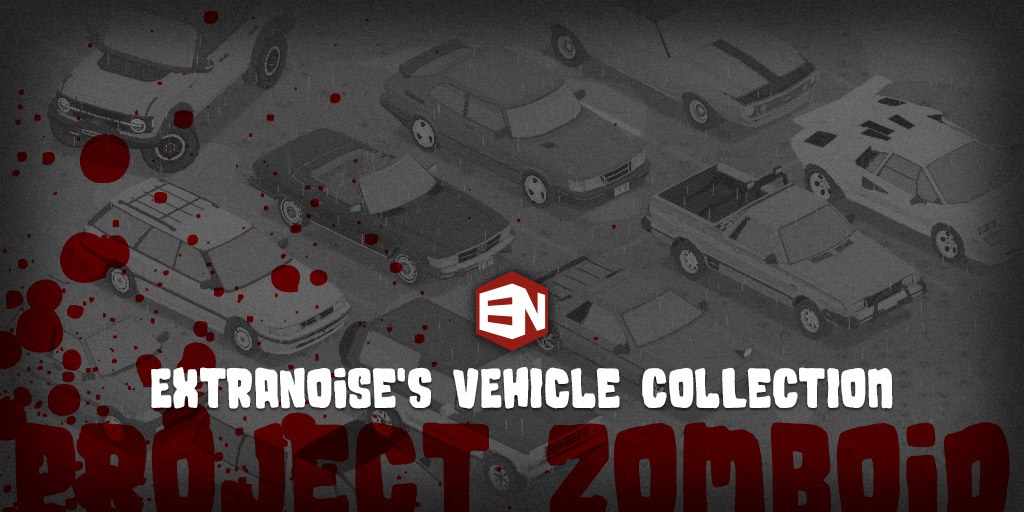
Hi all, I wanted to create a thread here on the official forums to help facilitate communication with folks outside of my personal communities. I thought this would be a good way to problem solve any issues that might arise with my vehicles, let everyone know when a new one is released, or a place where folks can request a vehicle to be made. My goal is to make vehicles for the game that match the game's original vehicle art style as well as function just like the game's original vehicles without making them overpowered or game-breaking in some way. With that said, I've also added animations for doors, windows, hoods, and trunks that utilize the features being included in a future update. My vehicles do not require dependencies. All my vehicles in one Workshop collection: https://steamcommunity.com/workshop/filedetails/?id=2990894264 1990 Chevrolet Lumina APV 1984 Ford Bronco II 1985 Pontiac Fiero 1982 Subaru Brat 1987 Lamborghini Countach 5000 QV 1985 Honda Civic Wagovan 1992 Subaru Legacy Wagon 1979 Mercedes-Benz 450SL 1993 Saab 900 Turbo 2021 Ford Bronco Wildtrak 1972 AMC Javelin AMX 1991 Mitsubishi Eclipse GSX & Eagle Talon TSi 1988 Ferrari F40 I have a Patreon that has some fun perks such as a poll where my patrons choose which car I work on next (they've selected almost all of these) plus acts as a way to stay updated first when I release a new vehicle. Check it out: https://www.patreon.com/ExtraNoise And finally, I also have a Discord that is a great place to come chat with other folks who love weird cars and Zomboid as much as you (among other topics of discussion). Plus you get a sneak peak at what I'm working on next and can suggest what you'd like to see. The Discord can be accessed using this link: https://discord.gg/ZyeW8puzmh Feel free to use this thread to make suggestions as well. I love to hear what you'd like to see in the game!
-
Im having an issue with a server with my friend that the car even though is full condition and gas, but won't start. We have mods and even used the mod menu to repair it and still doesn't work. The engine is grey on the dash, but green in the hood.
-
Car not starting with full condition and gas
HabbaTheYut replied to HabbaTheYut's topic in Bug Reports
My friend is trying to host a server, and we ran into a big problem with the vehicles. We spawned in a car to test if everything is working, and it spawned in with perfect condition, gas, and I had the key. The dash shows grey on the engine, but green on the battery. Under the hood it shows everything perfectly fine. We have mods, and we messed around with stuff, but we don't have errors. I tried making another post, but I dont know if it went through, so my apologies for a second post if so. -
There should be motorcycles in the game that can be filled with gas like cars. They'd be more maneuverable than cars and can even fit in the player's home/base through a normal door. Disadvantages would be less protection against zombies (and soon to be hostile NPCs) as well as the potential to be flung off the vehicle in a crash. There are already motorcycle helmets in the game but no motorcycle to go with them btw!
-
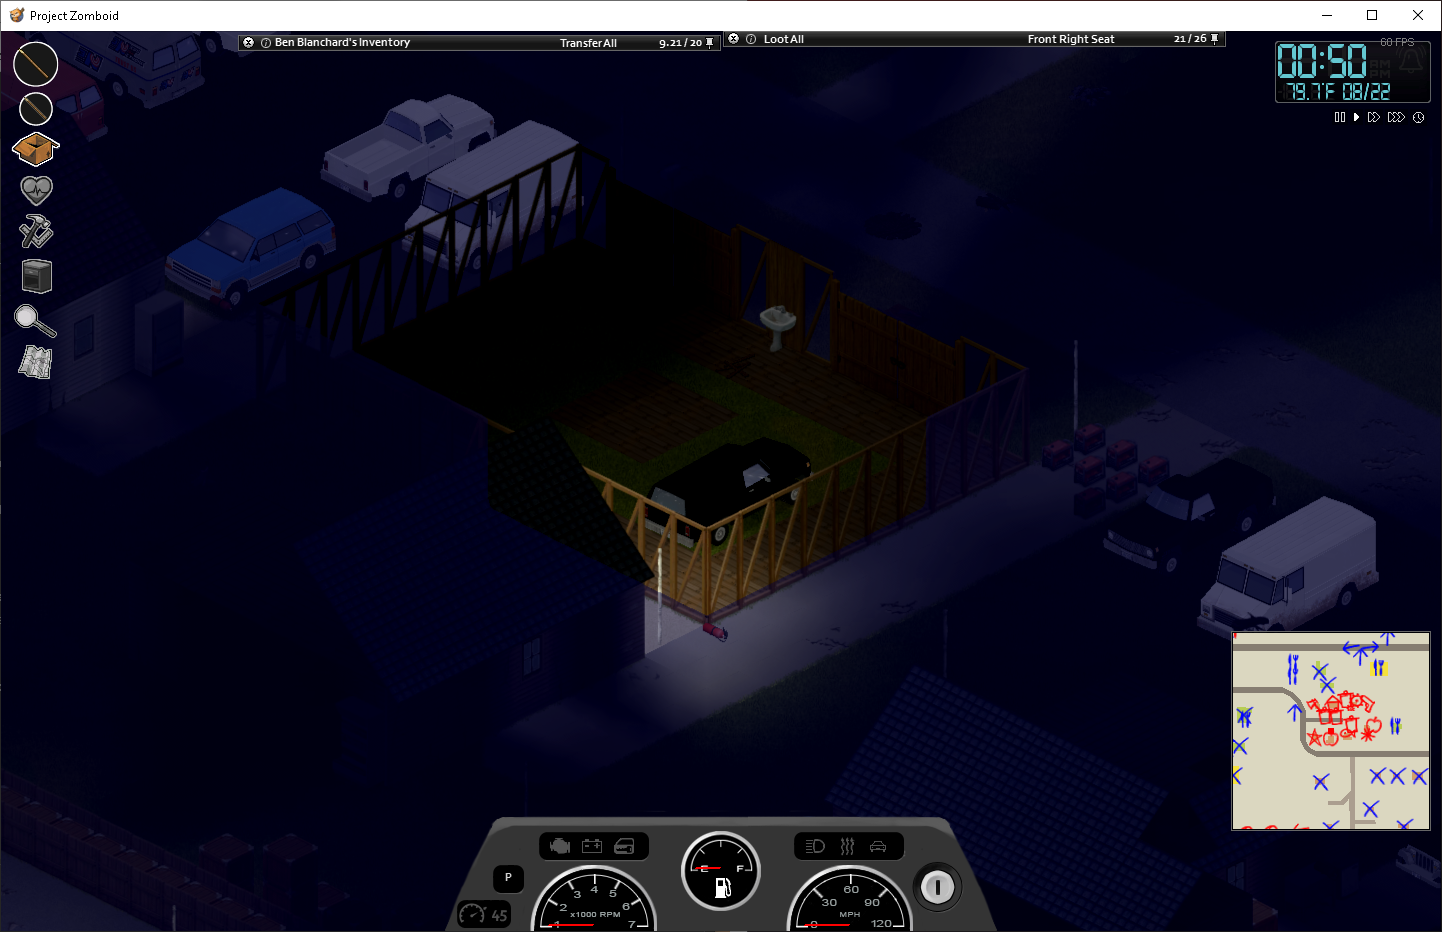
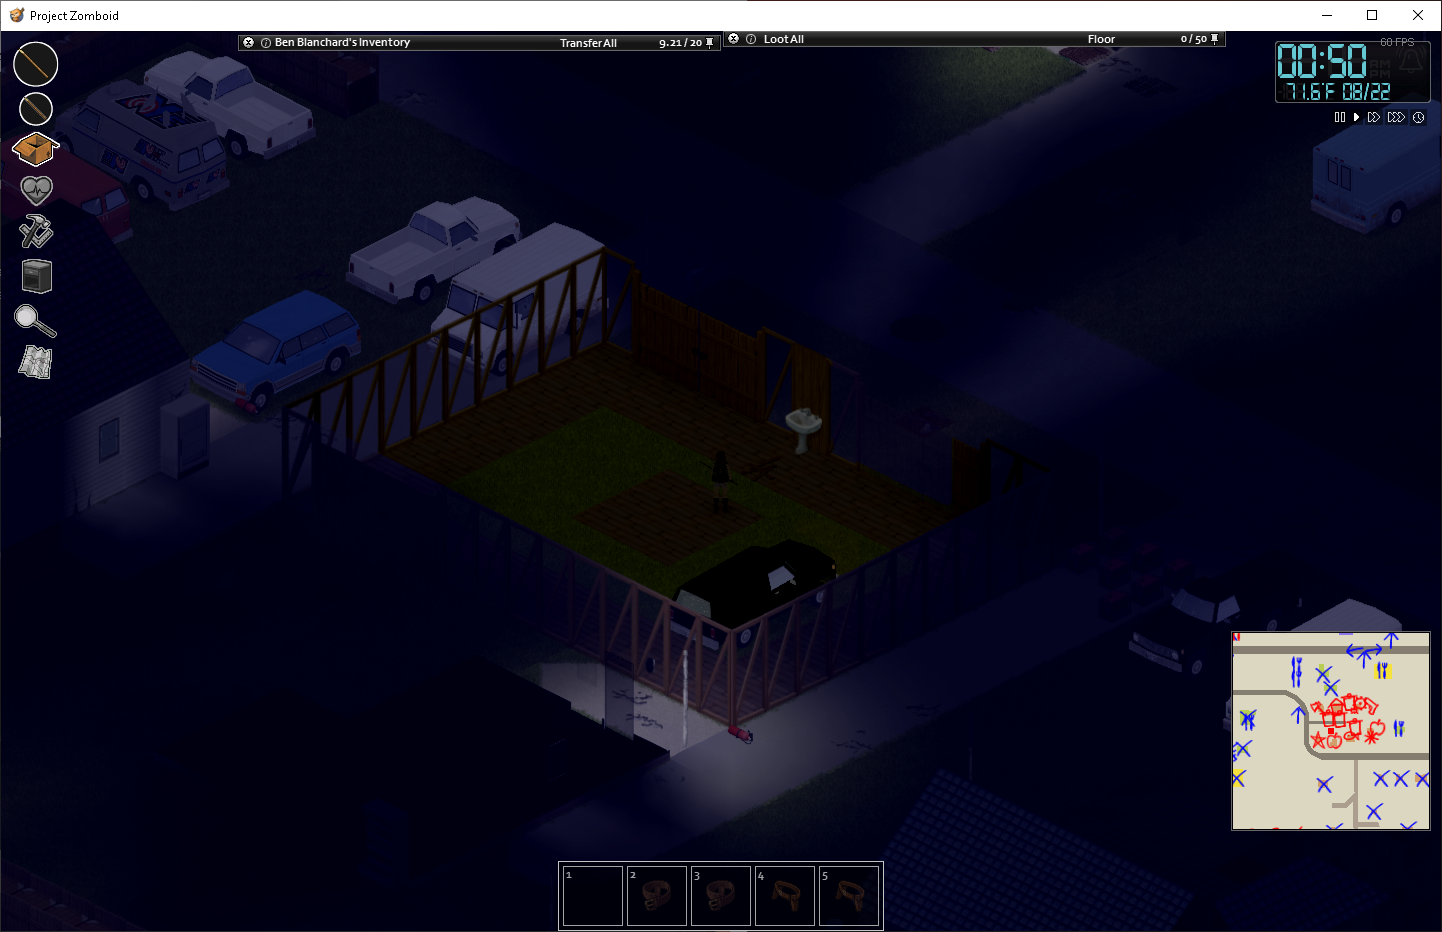
This is not a new bug. I feel like the phrasing needed an update, thus the new post. The ONLY reason I built a garage was to test this out, because EVERY time I enter my vehicles, the temperature is a lot hotter than normal daily outside temperature and I wanted to get indoor temperature for the vehicle I use most often. Vehicles parked inside a building with indoor temperatures should inherit indoor temperature of the building it is parked in. Other posts on this topic say it happens in Winter as well, with cold temperatures (vehicle parked indoors do not inherit warmer/indoor temperature). I am playing solo in sandbox settings, no mods, 41.78.16, on Aug 22 @ 00:50 (just past midnight). The temperature outside is 70.7 degrees F. The temperature inside the garage is 71.6 degrees F. Vehicle parked outside, when entering the vehicle, the vehicle's interior temperature is 79.7 degrees F. Vehicle parked inside my player-built garage, when entering the vehicle, the vehicle's interior temperature is 79.7 degrees F. Essentially, there is no point (no benefit) of parking a vehicle inside a garage to keep the vehicle's interior temperature moderated by the indoor temperature. This makes zero sense. The vehicle should inherit the temperature around it while indoors inside a garage. The lighting is not great at night, but here are a couple screenshots, #1 standing inside garage (71.6 F) and #2 inside the vehicle parked inside garage (79.7 F).
-
There should be an option to plant pipe bombs inside of a car in order to make a car bomb. Imagine if you are bitten and desire to take out as many zombies as you can so you drive to a horde at maximum speed and blow them up. Detonator could be set with a clock, remote or on impact
-
Hello, I posted some time ago about me not being able to get any part of my mod to work in game. A removable Back Up Beeper will be added to the game's Step Van, which will make noise when the player puts the van in reverse. You would need a little electrical skill to remove it. I was also planning on giving it a little extra storage, to balance. It is a very big vehicle, after all. I managed now to get the Back-Up Beeper part to function as a part in the world. It is not in the van yet. I now need to have it be a part that's in the Step Van, which I could not seem to work properly. Back up beepers on real vehicles seem to be mounted on the underside, out of sight, so I'm not concerned about having a model that appears on the Step Van. What I'm asking is this: How can I modify the base game's Step Van so that it will include this part, a Back Up Beeper? I have looked at similar mods which have added new cars with new parts, but I wasn't able to figure out the specifics. If it would help, I have attached below the files in which the Back Up Beeper is defined. If it is necessary, I could send more of what I have currently written. Simply adding "template BackUpBeeper," to the Step Van's script did not seem to work. I will greatly appreciate any insight that you may be able to offer. Have a good evening. Thank you for reading, Blockbot20 BackUpBeeper.txt BackUpBeeper_models.txt template_BackUpBeeper.txt
-
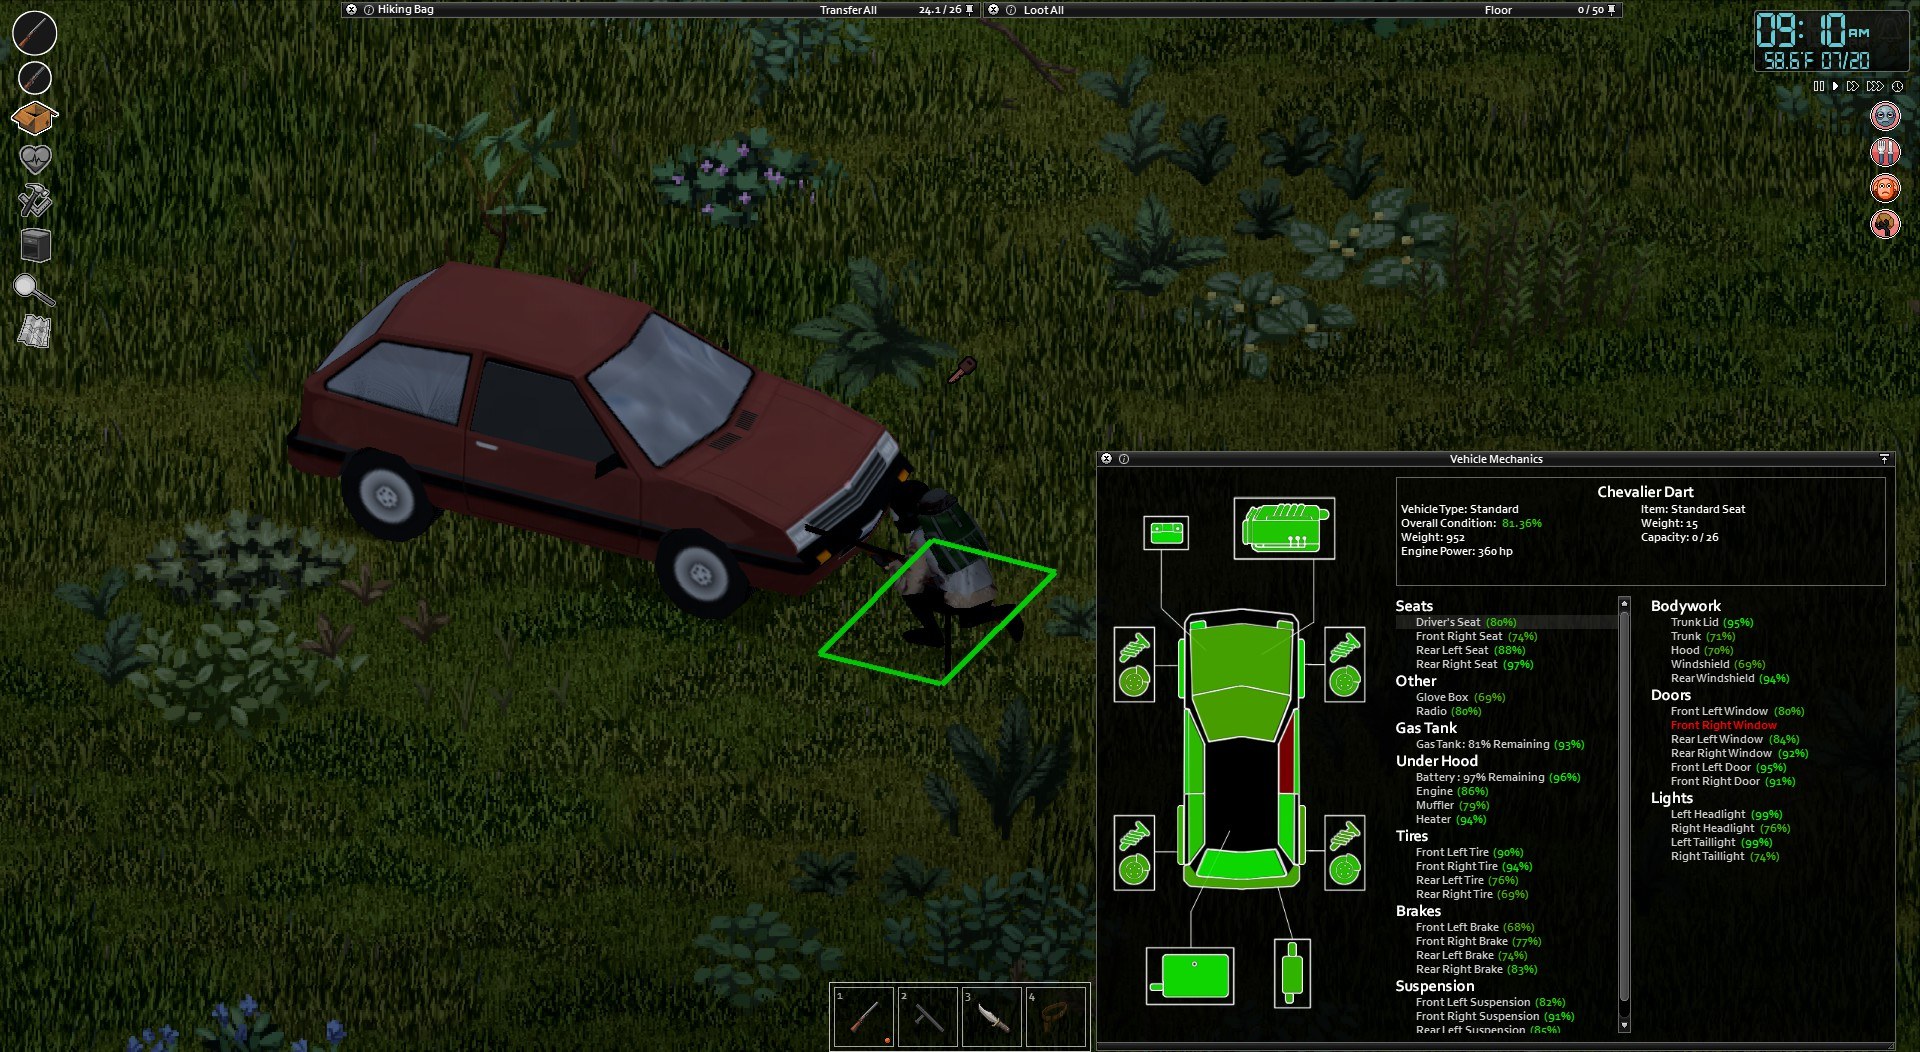
Every time I use cruise control at 40mph while driving a Chevy Dart the music stops playing. It does not do this at any other speed, I've attached a video of this event along with an image of the cars condition. (Though the video shows it bugging at 45mph it doesn't normally, only if you were going 40mph before hand) OS: Linux Mint PZ Version: 41.78.16 Single Player Vanilla If you need any additional info just ask PZbug-2023-04-11.mp4
-
Hi, I'm making a mod that adds a removable (with some electrical skill) back-up beeper to spawn with the game's step vans, while adding a little extra trunk room (the downside being putting the vehicle in reverse will make a looping loud beep from the vehicle, which will attract zombies until the part can be uninstalled). This will not be visible from looking at the step van, but checking at the mechanics tab will reveal whether it's installed or not. It will always be installed when the vehicle spawns into the world. I know of older versions of the game where something very similar was on all commercial vehicles, but I couldn't find the code for that in those versions files, and the seemed to have a problem where the sound would play as soon as the reverse button was pressed, and rapidly tapping would quickly, repeatedly play the sound. My goal was to avoid that and place a minimum time limit between each beep. Hopefully, this is understandable and enough information. This is my first mod, I have a little familiarity with coding, but not much with lua, so I'd like to apologize, I had to take inspiration from similar vehicle mods already on the workshop. Unfortunately, I'm not quite sure what exactly is causing this issue. Booting up the game with only this mob enabled shows no change from the base game. The step vans in the world will not have the part on them and will not beep in reverse. The console give the following: ERROR: template "BackUpBeeper" not found. (The name I have used throughout the code to specify this back-up beeper.) I have below attached files I suspect to be causing the problem. "beeper_vehiclesitems" gives the qualities of the back-up beeper itself, while "template_beeper" explains the qualities of the item in the vehicle, if that's the correct information. I also have attached the revised step van code for the game. The changes I have made it to where the back-up beeper ("template = BackUpBeeper") and an increase of 10 to the step van's trunk size, increasing it to 170. These were taken after the example of the base game's code for adding vehicle items, so I'm not quite sure what bits are necessary for this item. For example, some of the code that specified an item of a vehicle had a "lua" segment at the end, which I believe gave the variables such as "create" and "update" and I believe all of them had "test" under the specifications for uninstalling the part. This can be seen as the last written code in my "template_beeper". Is this necessary? What, exactly, does it do? I have additionally attached below the code which specifies what functions of the back-up beeper (I have my intended functions for the beeper at the top of this message) The code runs through the game as the mod is but it may cause errors in the future once the mod's functionality changes. I apologize if this was too much to read, I just wasn't sure how to get the mod functioning properly. Thank you. beeper_vehiclesitems.txt template_beeper.txt vehicle_stepvan.txt ReverseBeeper.lua
-
I created a mod a while back probably a year ago or so to add my own car into the game, and I had it working fine but then I didn't play for a while and now I tried adding it again in the current PZ version, with the same mod folder I created back then, and now the wheels are huge and when I change the wheel size, radius, and width settings in my vehicle script it does nothing. I also tried changing the model size in blender and replacing the fbx file but it still didn't make a difference. It's confusing because the wheel model is proportional to the car model when I exported them as fbx files but then in PZ it's like monster truck wheels. The only thing that I can figure out that changes the wheel size is reducing the scale of the model reference in the vehicle creation (line 47), which then also makes the doors access disappear into the body of the car. Additionally, I had to set the scale of the model itself kind of wacky to get it right in game, if I set the scale inside ScionxBBase to 1 (line 7) and the scale inside the model reference in the ScionxB vehicle to 1 (line 47) the model of the car itself is way bigger than the game object/ScionxB vehicle that gets placed into the game, and then the model is off center for some reason (it definitely was not off center when I exported the fbx file) As it is right now, the car is the correct size and the doors work and everything, it's just that the wheels appear to be huge and stick through the body and I can't figure out how to change the size of them anymore. Additionally I am having an issue where the sound of the engine revving when upshifting while turning doesn't properly line up with the acceleration and I think it might have something to do with the gear ratio settings but I can't figure that out either so if anyone has any suggestion about that I'd appreciate it. Code below EDIT: somehow now changing the wheel scale to 0.45 works after I moved the mod folder from zomboid/workshop/mods to zomboid/mods... I don't understand I tried changing it so many times before and it did literally nothing. Thanks
-
 Bug present in: 41.78.16 In media/lua/server/Vehicles/Vehicles.lua we can see the generation of the success/failure chances for vehicle part installation/removal, on line 1350 with calculateInstallationSuccess() It generates and returns a tuple with the success and failure chance, using some math. The math results in, for example, success=65, failure=35 for being 1 level under the part's 'desired' skill level. This tuple is consumed for vehicle part uninstallation in the function starting on line 96 in media/lua/server/Vehicles/VehicleCommands.lua, in the uninstallPart() function. The problem is that on line 127, you do... -- from uninstallPart(), failure chance structured incorrectly if ZombRand(100) < success then [...] elseif ZombRand(failure) < 100 then -- <- Mistake, note the transposed 'failure' and '100'. Compare to above and below examples. [...] But this makes no sense. Compare it to the installPart() function above this one, which is almost identical but structured correctly... -- from installPart(), written correctly if ZombRand(100) < success then [...] elseif ZombRand(100) < failure then [...] The issue: You are generating a random number between 0 and 35 (to use our '1 level too low, 35% failure chance' example), and then checking if it's < 100. Well, of course it will be. Compare this to what it SHOULD be in the second code block above from installPart(), which actually gives a 35% chance. Technically it's actually still possible to 'not succeed and not damage the part' with this code by having a >= 6 level difference, because that will produce a 110% chance of failure, and thus have a 10% chance of actually 'missing' that code block. I'm sure someone just inverted the order of things there and meant to put the 100 as the argument to ZombRand and compare the result to failure instead of the other way around in uninstallPart() and nobody caught it.
 -
Quando eu abro o jogo pelos arquivos locais/aplicativo "ProjectZomboid32", a função de rebocar carros fica dando erro o tempo inteiro! Me incapacitando de rebocar veículos! Não é nenhum mod que causa o erro, ele acontece sempre que eu abro por esse "aplicativo"! Meu jogo não tem um bom desempenho quando eu jogo pela versão normal de 64 bits, então eu jogo apenas na versão de 32, mas acontece esse erro sempre!
-
Suggestions 1. Change Vehicle camera positioning. The center of the screen should be shifted forward in the direction of the vehicle. 2. Allow camera movement with RMB like in a normal person view. Currently it is only possible to "aim" the camera when the front window is open... which is illogical. 3. It would be better to introduce "Vehicle camera offset" option to let players configure how far the camera is moved when they enter a vehicle. Rationale 1. In most cases a player does not really need to observe half of the screen behind the car. At the other hand the player needs to look forward and the further he can see the road - the better. It is not possible to "aim" the camera with RMB in a car when the front window is closed but it is possible to do so when you open that window. As the result I found myself in an illogical situation where I open a window to look further by aiming the camera and positioning it so that the car would be at the border of my screen. Because I don't need to know what is BEHIND my car when I move at 100mph speed. The only exception is a situation where I intentionally aim my camera backwards. 2. It is useful to be able to use "aim" camera. I don't really get why we can't use it with closed windows. It would be better to allow players to use this camera and look through the windows of the car exactly the same as they can do with open windows now. 3. In case someone does not like the offset - they can tune it.
-
Hello, let us place colored light bulbs as headlights A possibility to paint light bulbs somehow would be cool too. thanks in advance
-
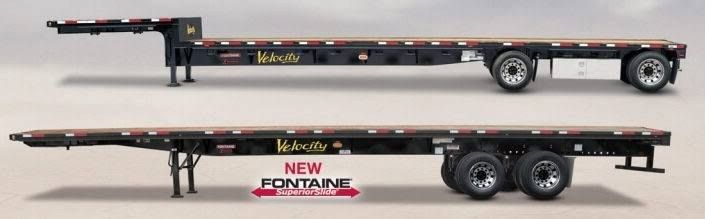
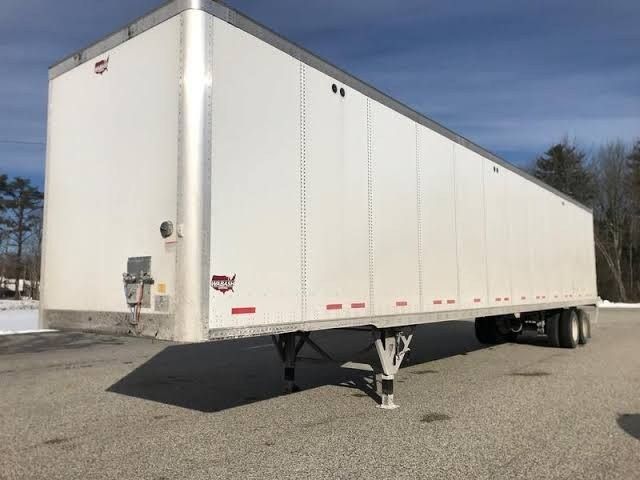
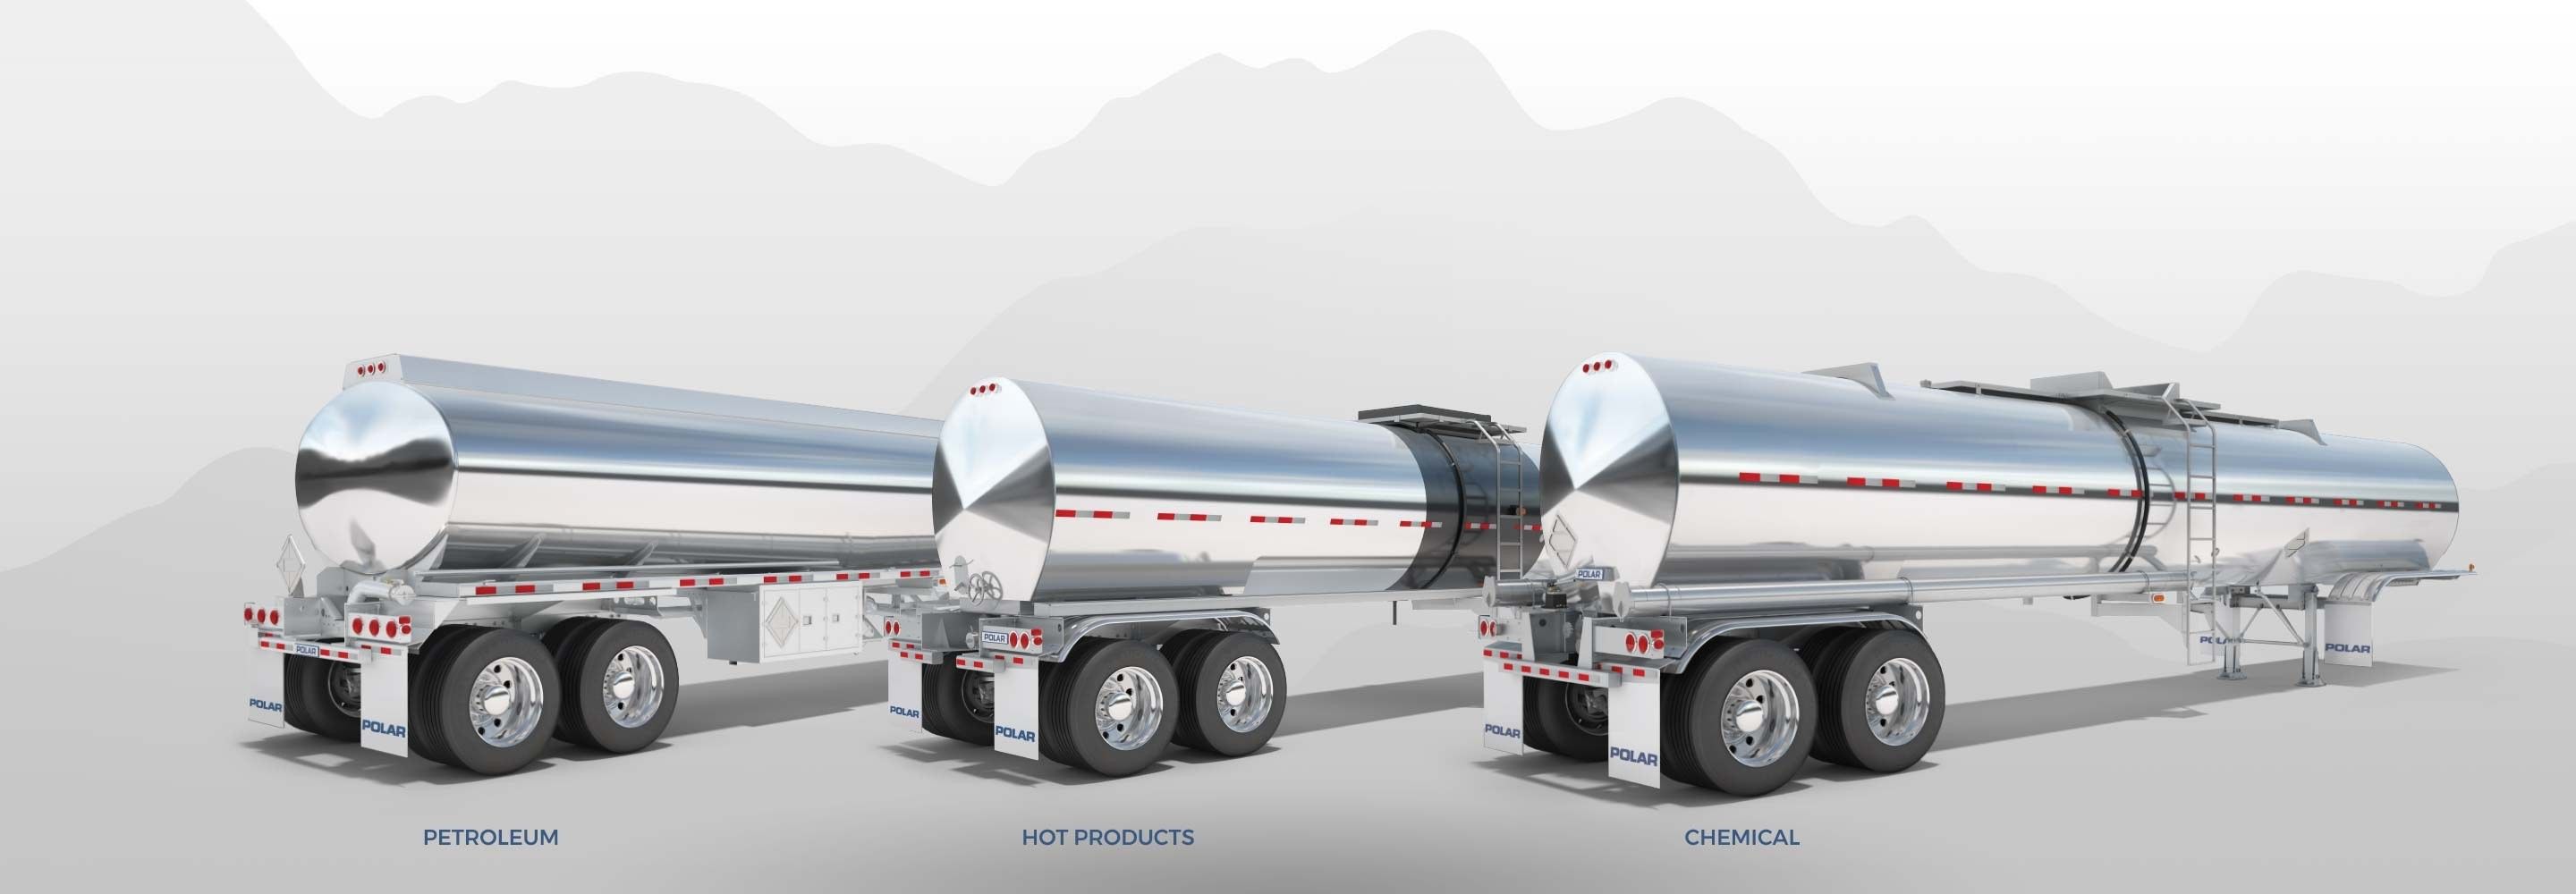
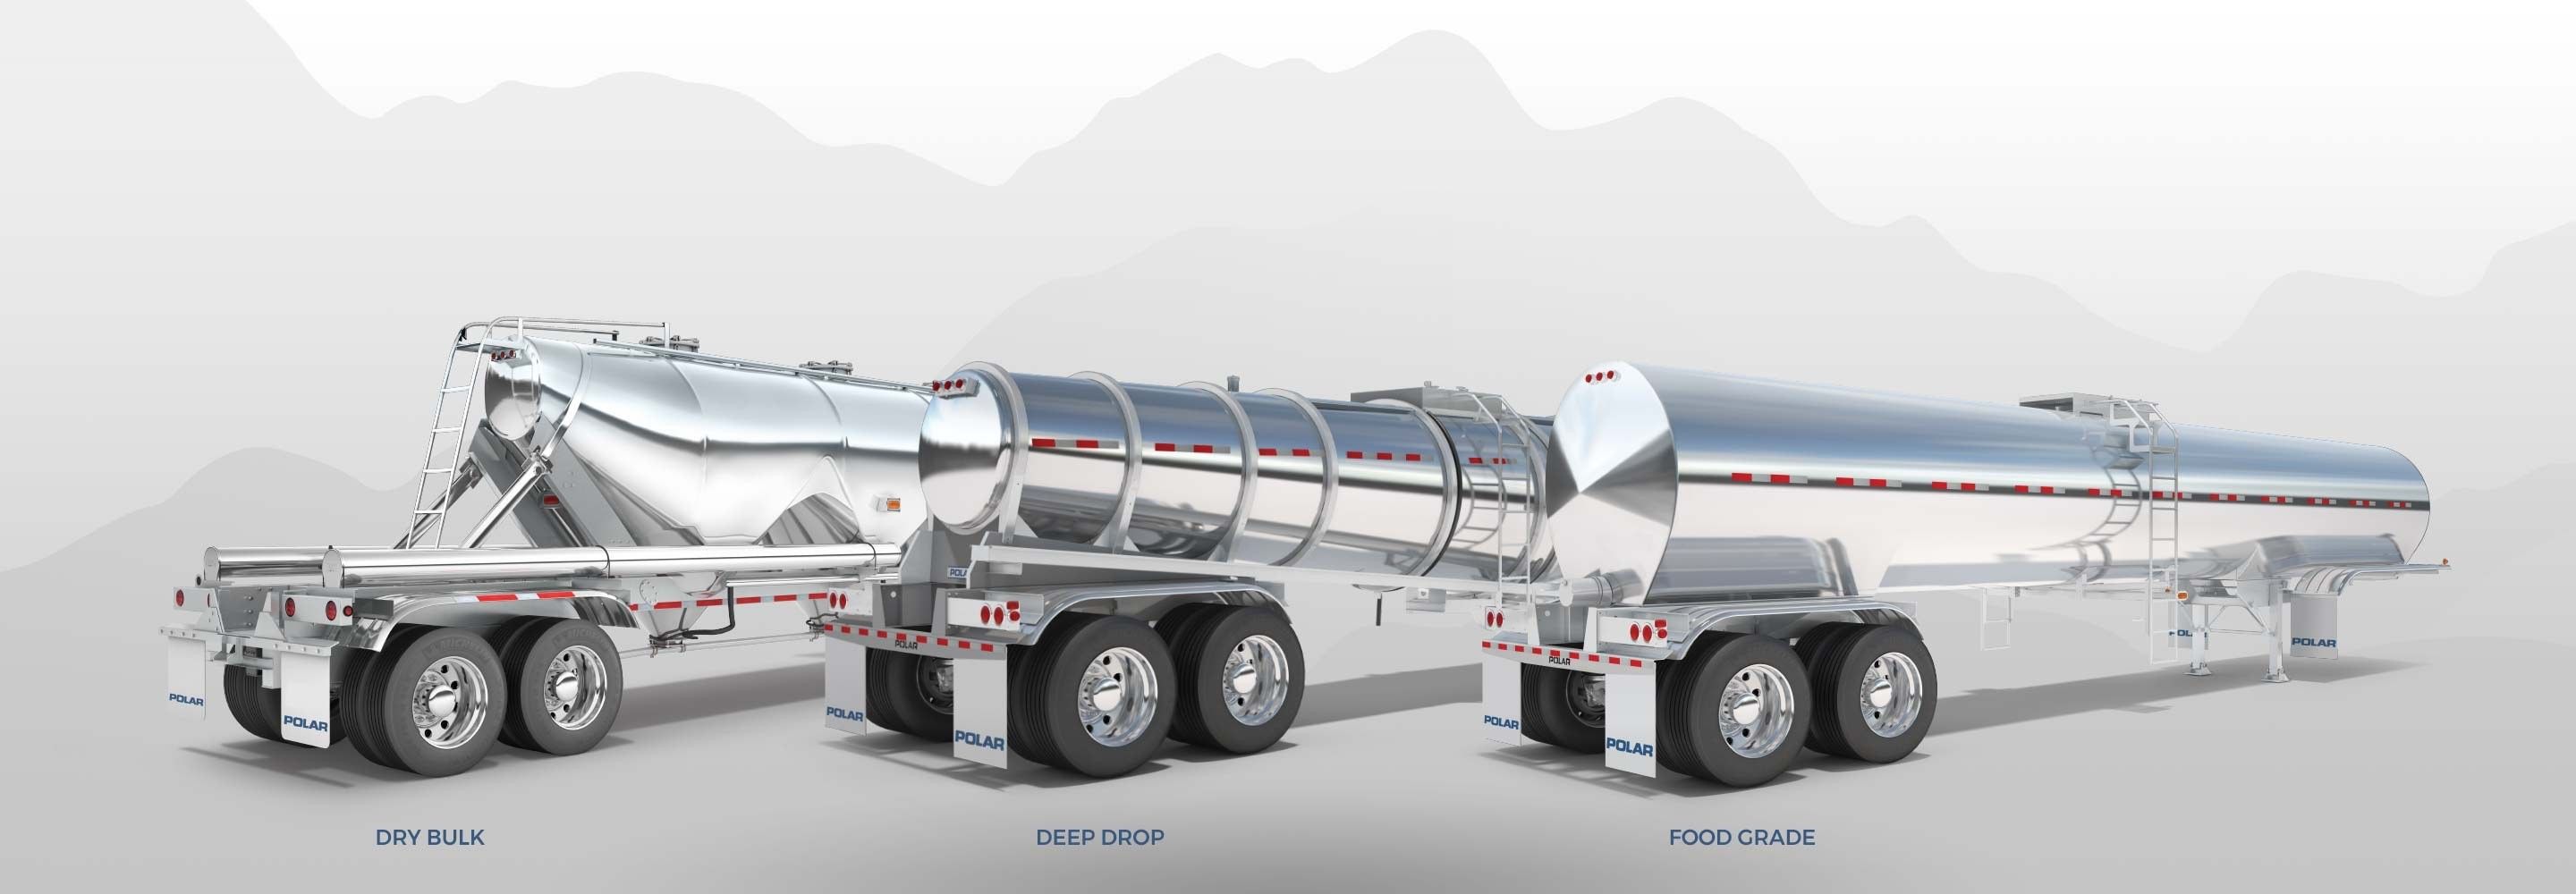
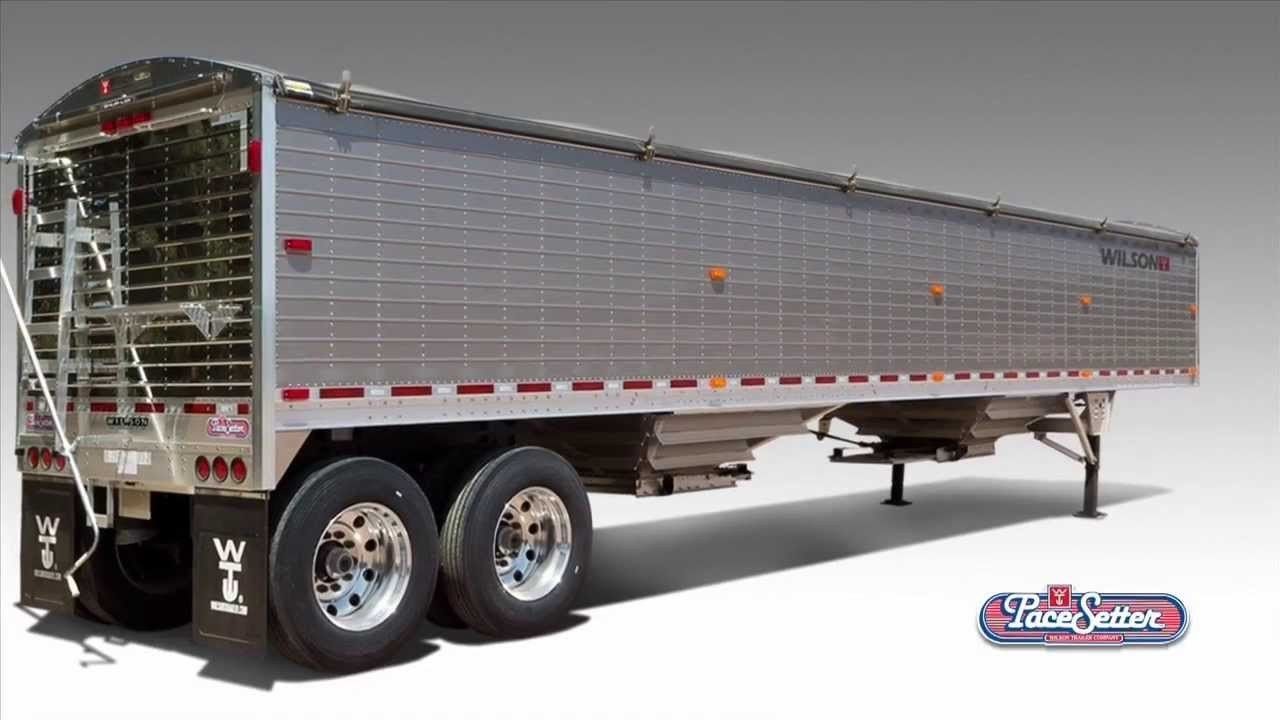
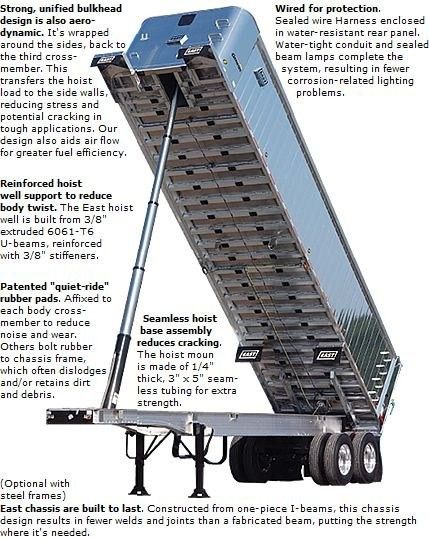
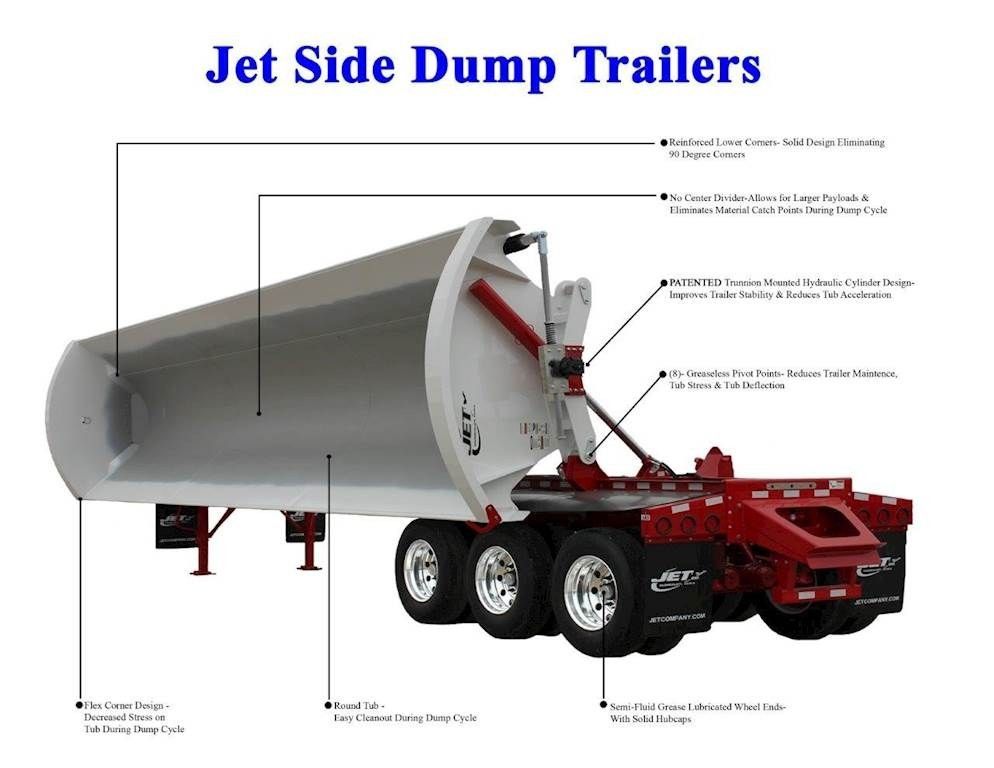
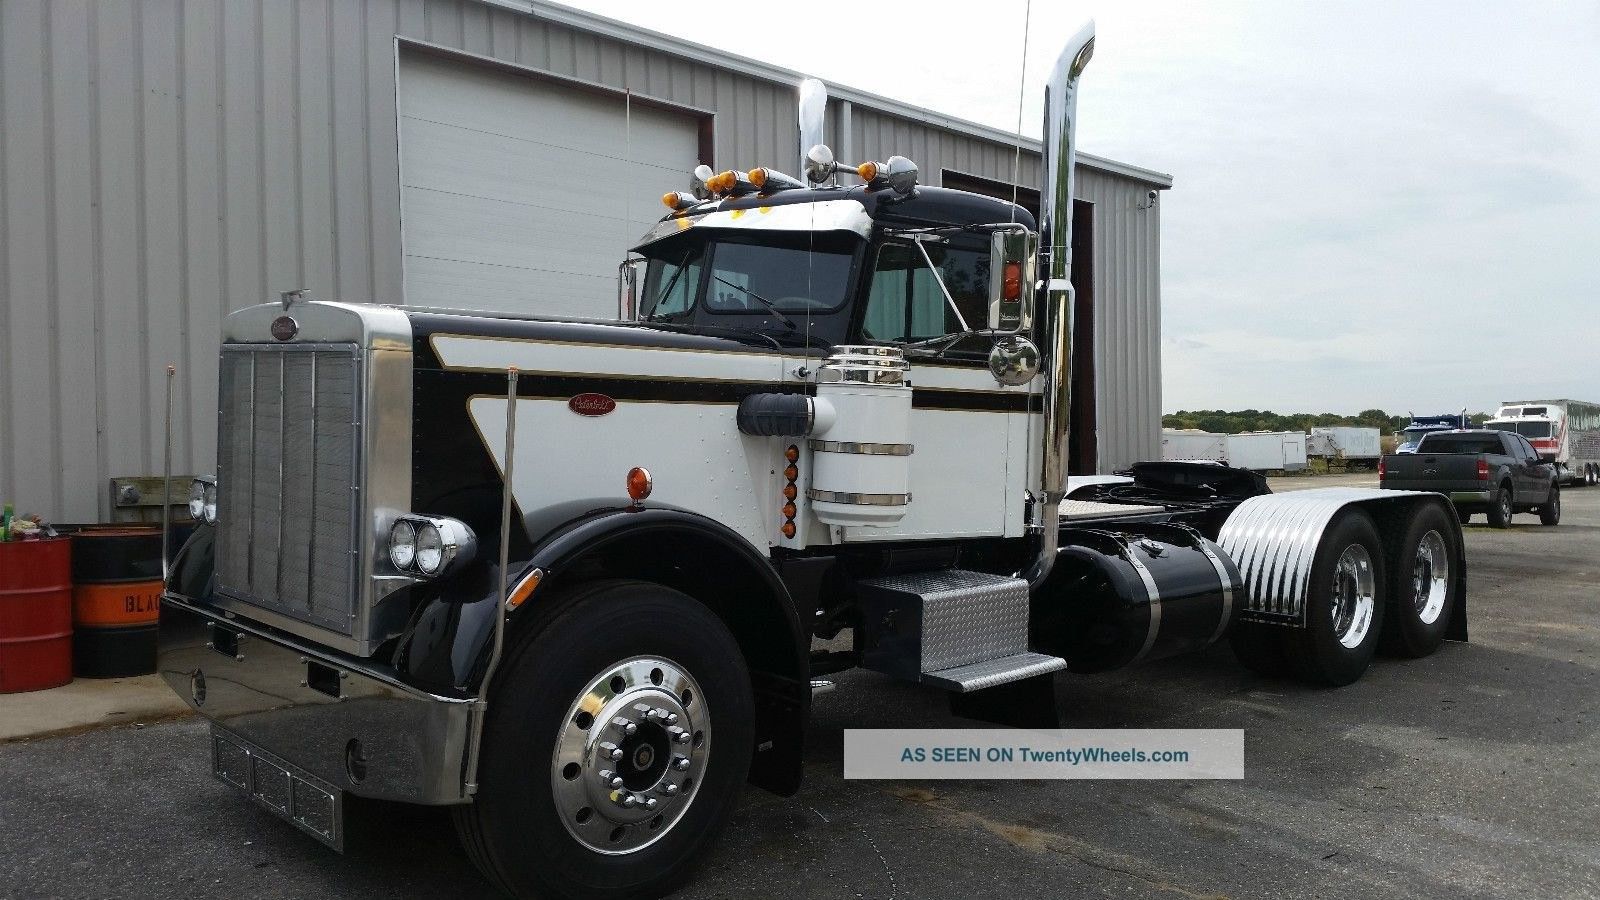
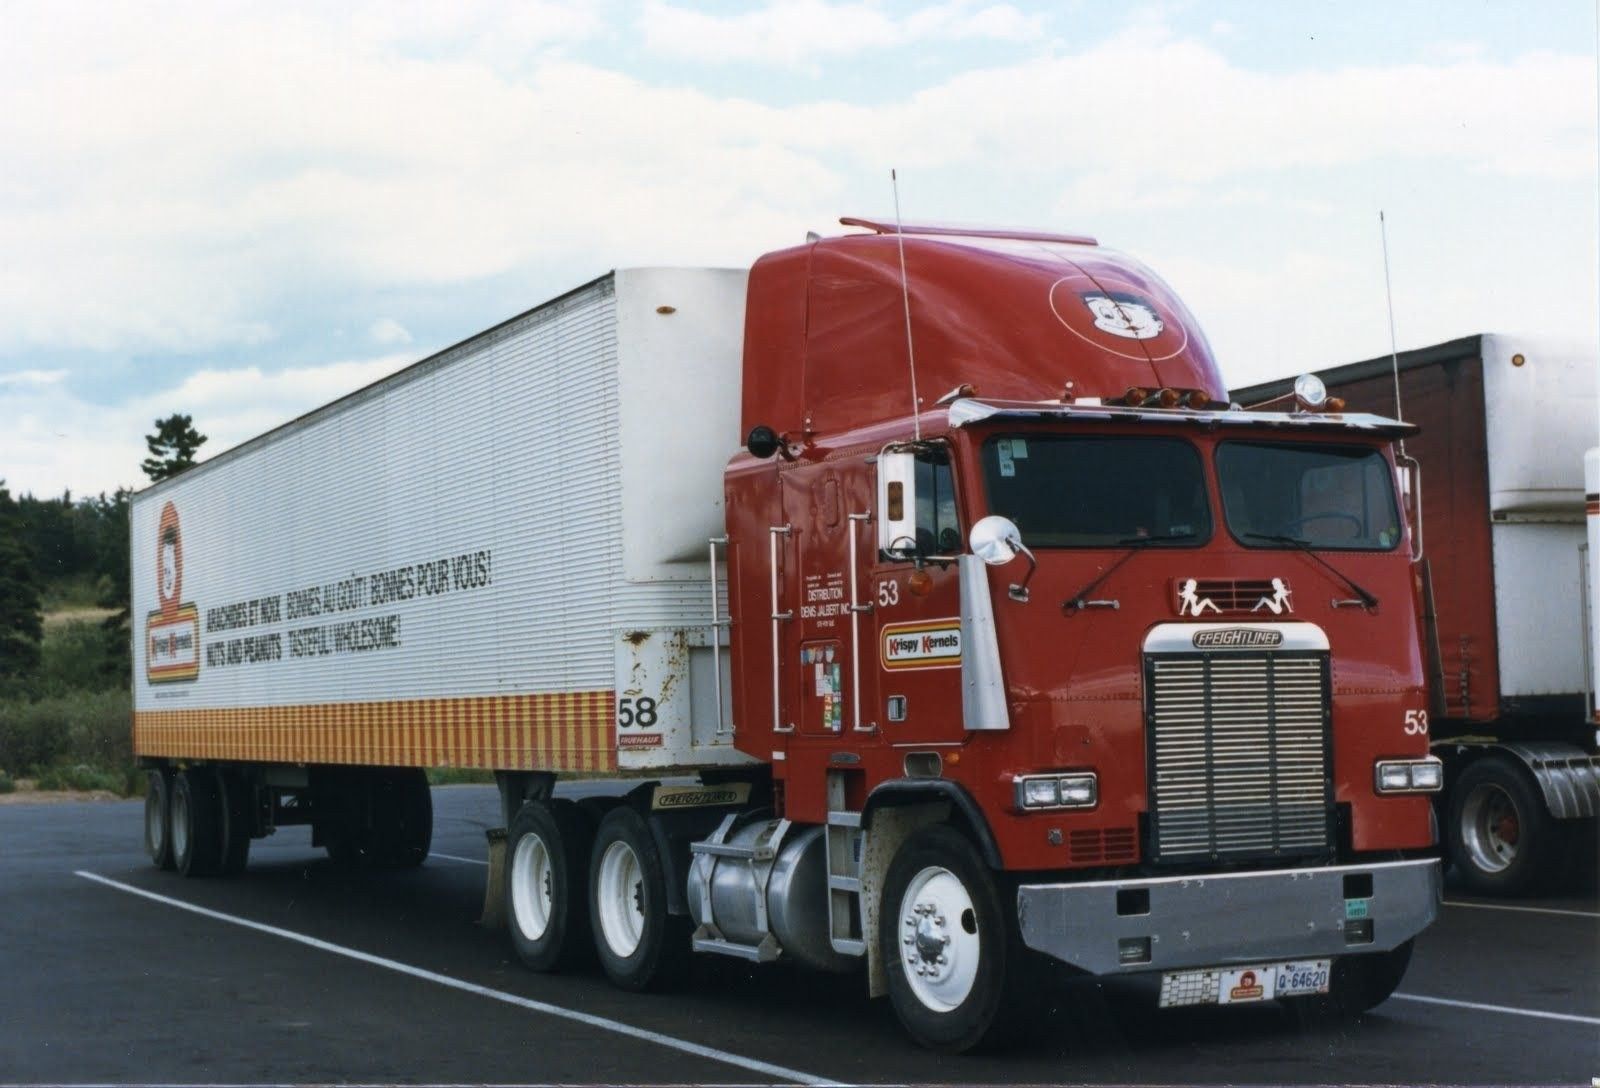
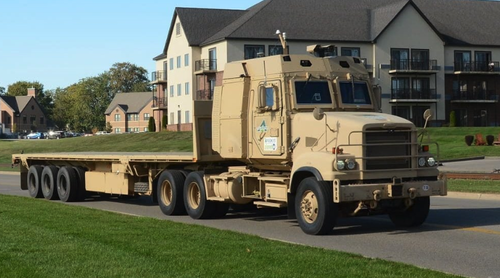
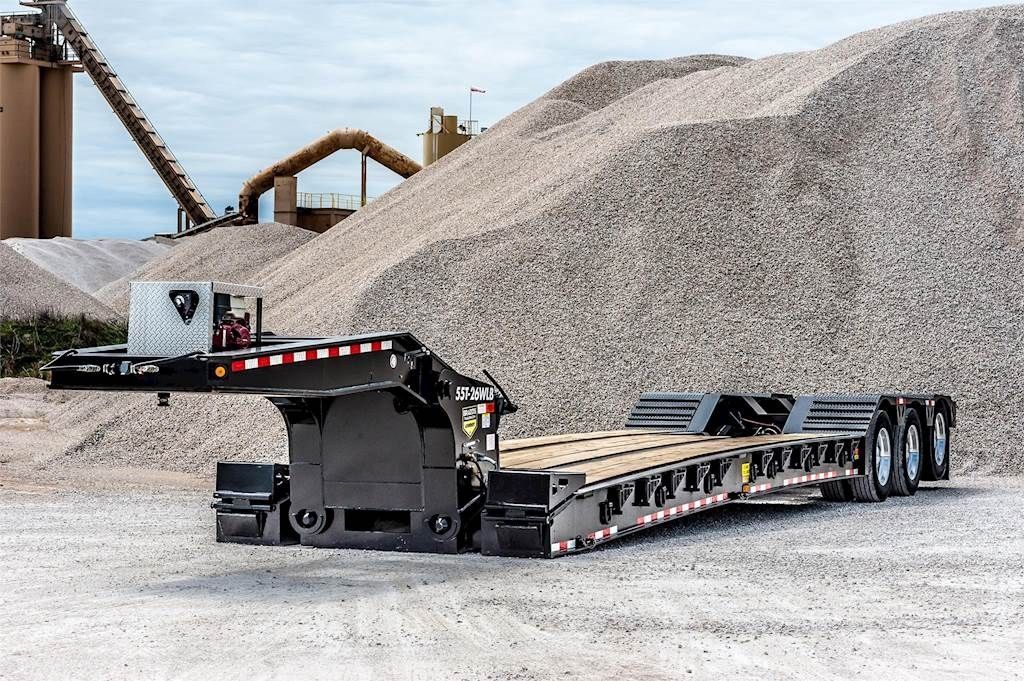
TRUCKS Since this is set in America, this should have one of the most iconic things America has, and it is its long nosed Diesel semi trucks. These trucks would have a lot of use for players that wants to live the travelling nomad life, they would be safe in a large truck with a Sleeper behind.(A Sleeper is a the part of the truck where Truckers sleep, eat and entertain themselves). It would also give a lot of utility to communities if the time ever comes to Multiplayer where large groups of players have banded together with NPCs. These trucks could be their lifeline in supplies themselves or blockading a street. The challenge in having a truck in the Apocalypse would be: Repairing it and up keeping it. Trucks have larger tires than normal cars, so after a while, finding replacement wheels would be extremely hard(Trucks usually have 22.5 tires). Refueling a truck could take a lot of effort. For example, a 1980s Peterbilt 359 with a Sleeper and 6X4 Chassis would need at least 300 Gallons per Football Field to be fully refueled. Maintenance would be a nightmare as trucks do not have usual parts that you could use on cars and you would need to find a Truck shop to get the proper parts for it. Space, trucks need a ton of space to be stored, so unless you have a warehouse as a Safehouse, you would have to park it in the open, for everyone to see. Lights, trucks have a TON of lights, from the roof of the cab to the sides of the Cab and Sleeper, some would even have Spotlights, old time trucks in the 1980s would have Spotlights and Long Reverse lights attached to the top of their chrome driver and passenger side windows. These bad boys uses 4 car batteries, good luck with that. Majority of trucks use 12 Speed or 18 Speed Eaton Fullers, so the player has a lot of shifts to do to get it up to speed. Some like logging trucks has High and Low gears for Hills and Mountain roads. There are different types of trucks too, Day Cab, Flat top, Cabovers, Logging, Military and Sleepers. Day Cab: A truck that only consists of the Cab, it is shorter and used for local trucking industries as it could fit in almost anywhere and has a smaller turn circle Flat top: One of the most famous types of trucks in the 1980s and early 90's. These trucks has sleepers that has flat roofs. Cabovers: A very old design of trucks used way back then in the 80s and 90s when road regulations on truck length wasn't harsh one many states. Logging: These are the types that could plow through large hordes with ease, they are city trucks equipped for the harsh muddy roads of the Mountains. Large bullbars and headache racks. Mostly seen in Day cab with the headache rack behind the cab to protect the driver from the Logs his hauling. Military: The military uses many types of Civilian trucks converted for military use like the M915A5. A Freightliner converted for Military transport. Day Cab 1978 Peterbilt 359 Flat Top 1984 Peterbilt 359 Cabover 1994 Freightliner FLA Kenworth T800 Logging truck, the thing you see behind the cab is what truckers call "Headache" rack. United States Military M915A5 with a M1015 Flatbed Trailer (If this is too modern, there is always the M35 Semi used way back in the 70s) The benefits would be great for anyone. A truck could travel a thousand kilometers in a single tank, large hordes would be nothing as you just plow through them with a trailer, and it would be good as an intimidation to players on the road or walking along it. But one should always remember that trucks have air brakes, so you cannot just be constantly be tapping the brakes since it would lock and would take a lot seconds of revving up the engine(It is to pump air into the brakes) to unlock. They would also be noisy, and more noisy with the trailer jumping on and on in tight turns or just from speed. TRAILERS In terms of trailers, the usual 48ft Fontaine Flatbed and 53ft Wabash Dry Vans and 48ft Refrigerated Reefers you see everyday should be scattered on Industrial areas, these are their Pros and Cons: They would have large utility, but are hard to use since if you do not have a Semi truck, they cannot be moved. Replacing their tires would also be hard after a Month into the survival since they also use the same size as the Semi trucks. Hooking up a trailer would also be a hard thing if you do not know which airline to attach and how to hitch the 5th wheel. Though the creativity that could spark if you have a 48ft Flatbed, you could turn it into a house, towed battlewagon, and car/parts/object carrier while the Dry Van would serve the same purpose just excluding the battlewagon but instead as troop carrier or a more enclosed house or moving storage facility. The Dry Van could be used as a temporary or permanent blockade since 53ft is a very long length and could block off Highways and entire entrances to towns. The Reefers(Basically large fridges) could be used to freeze captured players to death or store large amount of foods. But it has a Generator and would need to be attached to a Truck to work properly. These trailers has the ability to "slide" their axles to balance out the weight, but since this is the Apocalypse, they'd be just there as an option if you want to slide the Axles backward. Examples: Wabash 53ft Dry Van trailer Velocity Fontaine 48ft Flatbed. The one on top is a Dropdeck with Spread Axles Here is a link to how Axles slide on Dry Vans: Now for the more complex trailers like Bulk tankers and specialized trailers, these should only appear in specified areas like construction sites and Gas stations. There are multiple types of Bulk Trailers and you'd see. I'll just post a picture since it would be complex to explain it all. The examples I'll use are from a Tanker Company named Polar Tanks. I don't know all the liquids they carry but the examples I could give is: Petroleum: Used to store Diesel and other types of Gasses. Up to 80,000lbs. Dry Bulk: Used for Cement and other types of Construction materials that are in liquid form. Chemicals: Used to haul dangerous chemicals from factories and is often called as the most dangerous type of trailer as if one could leak, an entire town could die. I cannot explain the others as my American Truck Simulator knowledge on tankers ends there, you guys might have to ask actual truckers on what they do. Here are more types of trailers: Wilson 42ft Grain Trailer, these should be found in large farms. There is two types of Dump trailers, one that is called "Side" Dump trailer and "Full" Dump Trailer, here are examples: EAST Full Frame Dump Trailer JET Side Dump Trailer And here is an example of a "Lowboy" trailer: JET Tri Axle Lowboy trailer, these are used to haul Construction equipment or just heavy vehicles in general. Thanks for looking into my suggestions! Keep doing great Devs!
-
For some reason at 1:06:18 of this playthrough I died: I start rapidly losing health even though I'm not encumbered, fractured, bitten, or anything and then at 1:08:29 I die in the driver's seat of my truck. All I was doing was moving inventory. What happened?
-
I think it'd be nice to be able to lock pick in the game like for car doors as well as regular doors. I think this mechanic could be some kind of lock picking skill that you'd improve from picking locks as well as boost through lock picking books. Maybe there could even be a locksmith occupation that gets you started on the functional capabilities of said skill. Perhaps the skill could also be in the burglar occupation. I think for the tools needed it'd be standard lock picks or maybe you could even make some out of the paperclips you find in the game. For starters, It'd be nice to be able to unlock a car without having to find the key or smash the window in addition to hotwiring it. As for doors it'd be nice being able to get in the building without having to find the key or bash my way in through said door or other entrance. For padlocks it'd be nice to get through those too. I guess for the mechanic to work, with all the proper items and skills in hand you'd right click the you want to lock pick and select "pick lock" and the progress meter would fill up as you pick the lock. It will take a few tries until success and fewer tries and faster ones as you level up.
-
 Okay so get this, the guy on the cover of Project Zomboid is a on car and yet we can't climb vehicles in the game? I mean if we could climb up cars that would add some protection from the zombies. You know, in a "I have the high ground!" kind of sense. The zombies would either not be able to climb up making you completely safe but surrounded; not able to climb up but able to pull you down if you're too close to the edge making it so you should go inwards on top of the car as much as possible; or they can climb up and maul you to death in addition to pulling you down. If they can't climb up but you're surrounded it would give you the opportunity to pick them off with your gun or strike them dead downwards with a melee weapon. Same thing if they could pull you down which is a bit more challenging. It the most extreme case they can climb up or pull you down making it so you have to attack the most immediately threatening zombie. Like the one that gets up first, that's who you kill. The most extreme case would force you to fight quickly and sequentially to at least endure a bit longer. Might want to add some kind of move to knock off climbing zombies or swat away zombies trying to pull you down. Personally I prefer it if they couldn't climb or grab you down. The balancing factor would still be that if you're out of gun(s) rounds you got to pull out your melee weapon. If your melee weapon(s) breaks then you could very well be screwed. Screwed because you'd essentially be stranded on your car which would eventually lead to your death due to hunger and dehydration not to mention you probably could sleep too well. I mean a horde of zombies growling at me inches away while I'm on a hard cold car roof ain't exactly a sleep number bed experience. The car could also serve as a temporary barrier between you and the zombies. For example, they're chasing you, you quickly vault over a car (or climb it and jump off the other end) and now the zombies have to go around rather than just making a beeline for you. That could buy you some time which is always of the essence in the game in every conceivable way! So yeah I want to be able to use a car roof to my advantage as well as be like the chad on the cover!
 -
Hi, does anyone know why when I try to spawn a vehicle in debug mode its name doesn't appear? I followed the creation guide to the letter and it doesn't appear :c [18:35] If anyone could help me I would be eternally grateful.