Search the Community
Showing results for tags 'maps'.
-
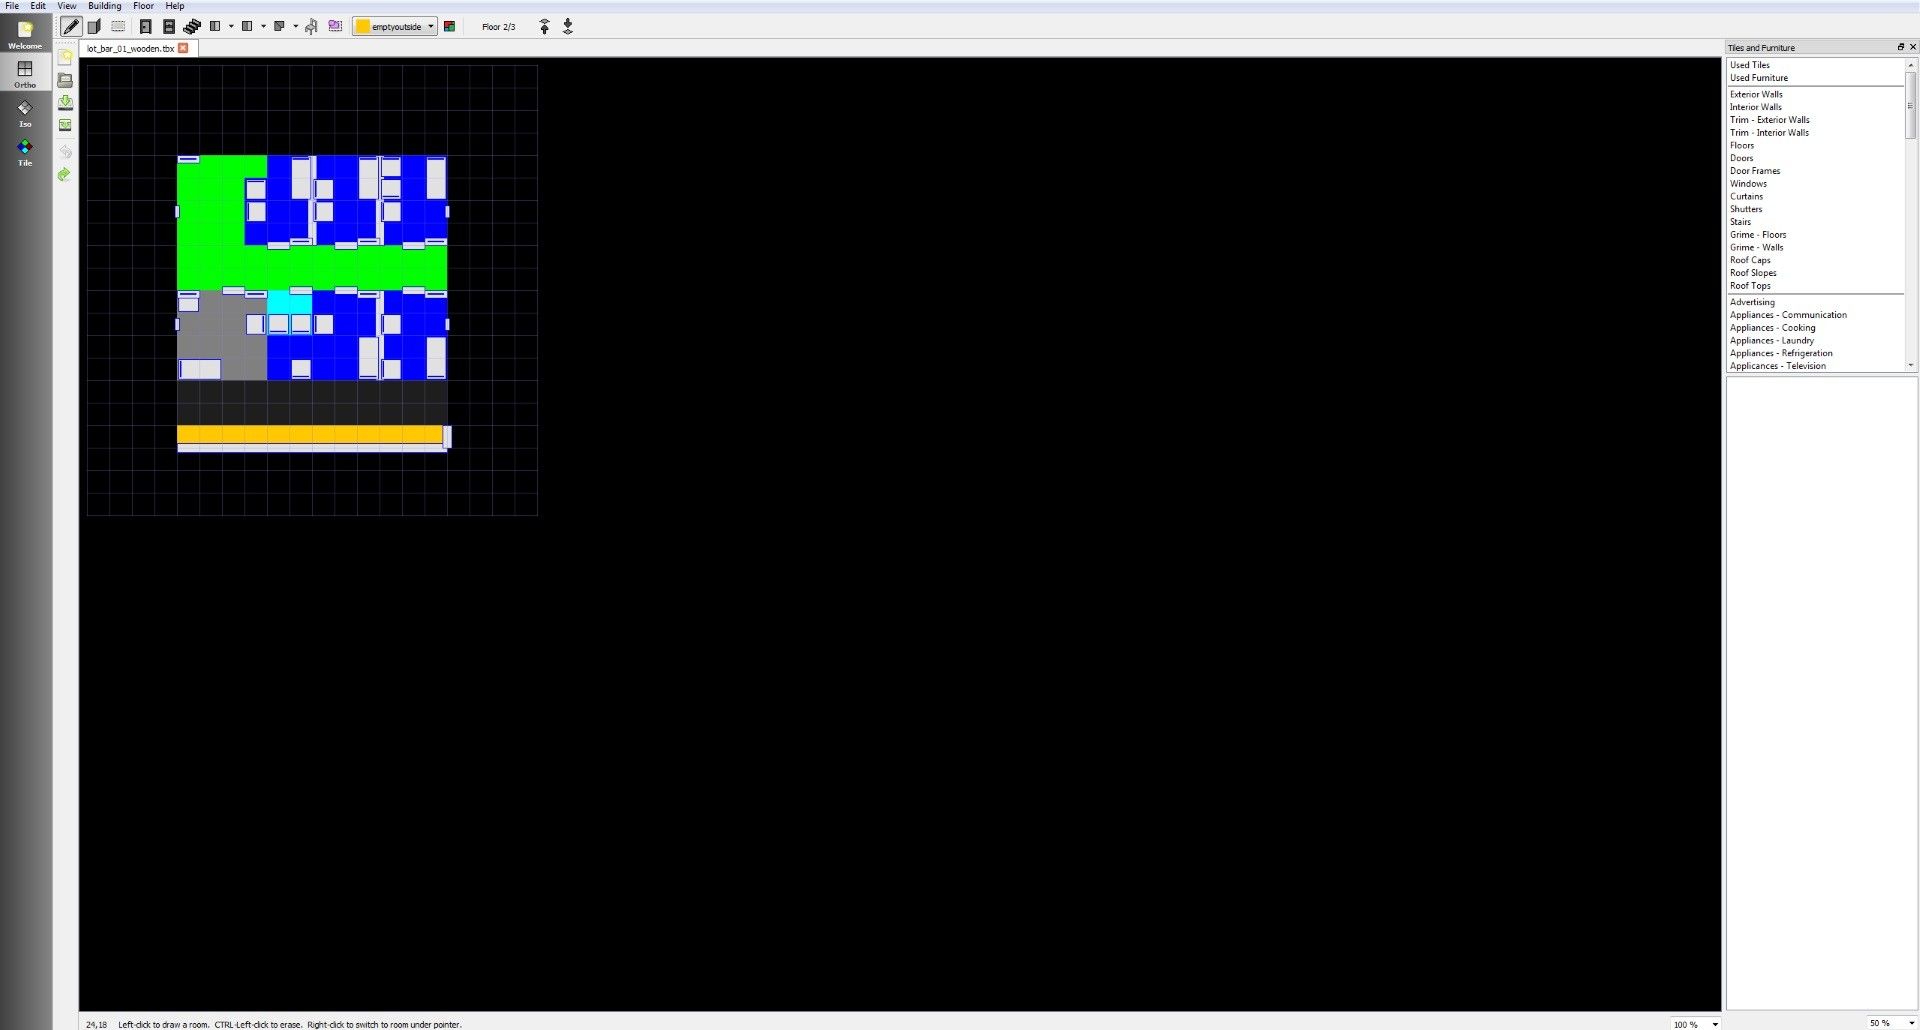
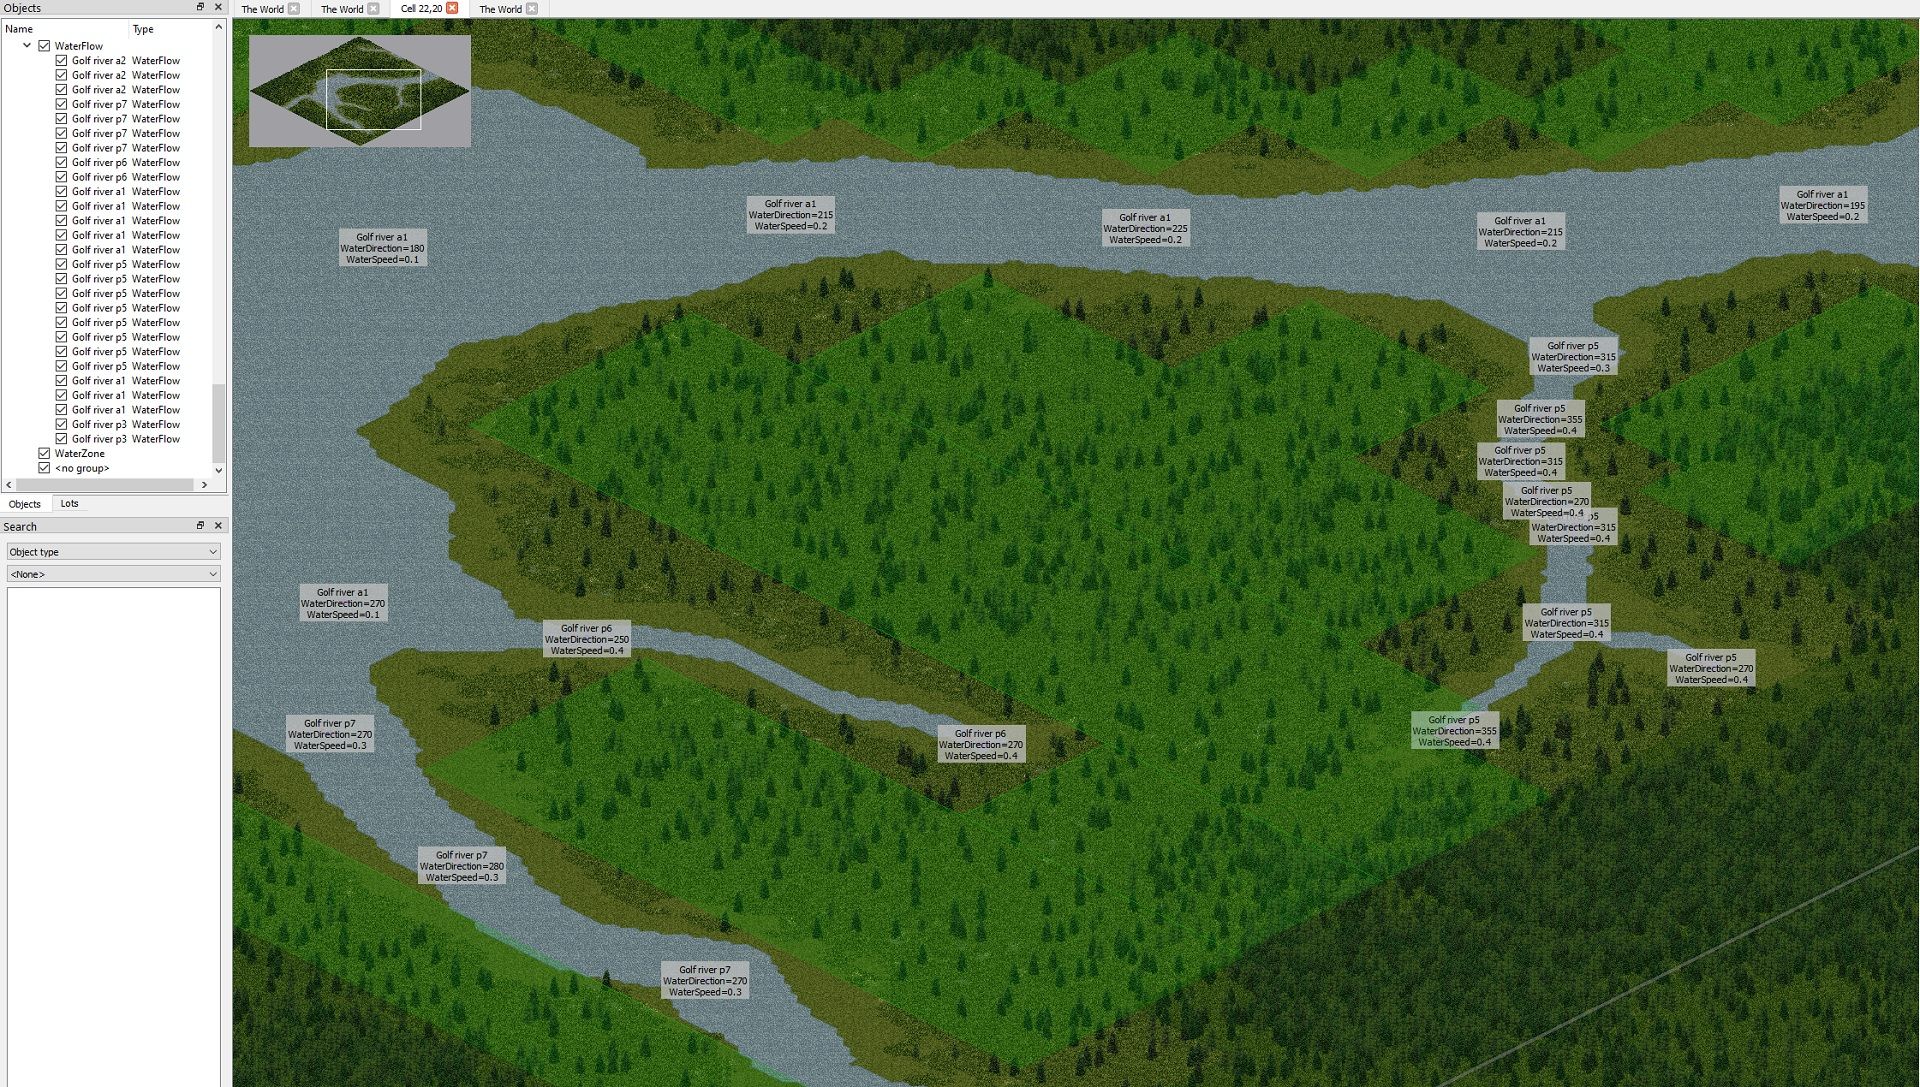
Here you will find a (hopefully) comprehensive guide to map modding using TileZed, from scratch, to uploading to Steam Workshop. Step 1) Installation and setup Spoiler - Download the latest version of TileZed here: https://theindiestone.com/forums/index.php?/forum/64-mapping/ 3 Step 2) Creating a new map - Creating A Master Image Spoiler The first thing you need to do to create a new map mod is to create some basic images you can import into WorldEd. You will need a paint program such as Paintshop, Gimp or Paint.Net (I use paint.net and it works great). Open your paint program of choice and create a new image, each pixel of the image will correlate to 1 tile when in game, so, if you want to create a map that is a single "cell" in size, you would create a 300x300 pixel image. If you wanted to make a 2x2 cell map you would create a 600x600 pixel image etc. Once you have created your new blank image save it as a png file (eg. MainMaps.png), this is so you can work with multiple layers, which will make your life way easier! - Creating The Base Map Image Spoiler Now you have your blank map image up and ready we need to setup the exact colours we will be using to draw the game world (when importing your image into WorldEd every pixel gets read and converted into the relevant tile (if the colour is recognised by WorldEd)). Use your programs colour palette to enter the colours below using the RGB values given: -----Base Map Colours---- Dark Grass | 90 100 35 Medium Grass | 117 117 47 Light Grass | 145 135 60 Sand | 210 200 160 Light Asphalt | 165 160 140 Dark Asphalt (main roads) | 100 100 100 Medium Asphalt | 120 120 120 Gravel Dirt | 140 70 15 Dirt | 120 70 20 Dirt Grass | 80 55 20 Dark Pothole | 110 100 100 Light Pothole | 130 120 120 Water | 0 138 255 ----Veg Map Colours---- Dense Forest | 255 0 0 Dense Trees + grass | 200 0 0 Trees + grass | 127 0 0 Fir Trees + grass | 64 0 0 Mainly grass, some trees | 0 128 0 Light long grass | 0 255 0 Bushes grass + few trees | 255 0 255 Dead corn 1 | 255 128 0 Dead corn 2 | 220 100 0 None (black) | 0 0 0 Now you are ready to start drawing your base map, for now you should ignore all the colours listed after water as you will be drawing these onto separate vegetation map layers. Example: Spoiler MAKE SURE TO TURN ANTIALIASING OFF AND CHANGE BLEND MODE TO OVERWRITE BEFORE HAND! (otherwise you will get colours not recognized by WorldEd, leading to extra work later). - Creating The vegetation Map Image Spoiler Now you have created your base layer which should contain your main roads (using the dark asphalt colour), paths and side roads (light asphalt, dirt, gravel dirt), dirt, water, sand and grassy ground (dark/medium/light grass), save this image as a BMP (eg. MyMap.BMP) (if warned about flattening the image just select yes/continue/ok) it's now time to start drawing the vegetation map on a new layer. Close the BMP image you just saved and create a new layer on your original .png,have it above your base layer (it should put itself there automatically), copy your original layer and paste it onto the new layer, then hide/untick your base layer. On this new layer start by selecting the None(black) colour from above and flood fill all the roads (and any other area where you do not want vegetation to grow such as water, sand etc (erosion vegetation will still work fine)) and delete any/every other colour from this layer, leaving just the black areas you just created. Now start drawing the other five colours (the ones you ignored when creating your base map) on places where you do want vegetation to spawn. Start off with using a seperate layer for each colour, starting with the Light long grass, just flood fill that entire layer with it, then drag your black "no veg" layer above it, this allows you to see the road/building layout easily. Then work your way up through the other colours (creating new layers for each one, each one above the last in the order list) as needed, all the way to the dense forest one. Save your PNG now, you're going to make some temporary changes you dont want to save. To save this as a vegetation image, make sure your base layer is still hidden/unticked (so only your vegetation layers are visible) and then start merging your vegetation layers together, from the top down. You should now be left with 2 layers, a single vegetation layer, and your hidden base layer, save the image as a BMP (eg. MyMap_veg.BMP) (if warned about flattening the image just select yes/continue/ok), note that this image MUST be saved with the same name as your base map BMP with the added "_veg" at the end, it must also be saved in the same folder as your base map BMP. Once you have saved the veg map BMP, close that image and then close your PNG WITHOUT saving, unless you want your vegetation layers to be permanently merged, making it a lot harder to make edits, if needed, in the future. Example: Spoiler - Creating The Zombie Spawn Map Image Spoiler You will also need to create a new image called a zombie spawn map to tell the game about the density of zombies in our map, this is a black and white image that is 10x smaller than your base and vegetation images, so, if your map image is 600x600 pixels, your zombie spawn map would be 60x60. Start by flood filling it black (black means no zombies), then add white and grey lines/circles/patches where you want zombies to spawn, white is highest density, getting lower and lower with darker greys. (example), Save this in the same folder as your base map and veg map, again giving it the same name but this time with the "_ZombieSpawnMap" suffix (eg. MyMap_ZombieSpawnMap.BMP). It can be handy to make sure anti-aliasing is enabled when creating this image as it will naturally add shades of darker grey around any white or greys you place. You now have all the required images to create a new world in WorldEd. Example: Spoiler - Importing into WorldEd Spoiler Open TileZed, click on the Tools menu and then Click on WorldEd, this will open a new window, click on New, give it the size of your map (e.g. 2 cells x 2 cells) and click ok, you will now see a number of numbered squares depending on the size of your map. Each one of these squares represents an in game Cell (300x300 tiles). Now, navigate to the folder where your map mod images are stored and drag and drop the base image (MyMap.BMP) into the WorldEd window, making sure it covers all the numbered squares correctly. Once done, click on File and then BMP to TMX, on the window that pops up, click on the 3 dots in export directory and create a new folder (e.g. MyMapMod) for your mod and click on select folder, then before you press ok, make sure "Assign generated maps to world" and "Report unknown colours" are both ticked, then click ok. Click ok on the sanity check (make sure you aren't accidentally overwriting the wrong mod etc) and WorldEd will do it's magic. You MUST have at least your base map image and your veg image made and in the same folder before WorldEd will allow you to import a map image. Now, if you forgot to turn anti-aliasing off, WorldEd will probably pop up and tell you your image contains rogue colours, it will then list each rogue colour found along with the co-ordinates (in pixels) of every pixel with this rogue colour, you will need to open your images, find ALL of these pixels/colours, replace them with the correct colour(s) from step 2 then re-import into Worlded, otherwise you will end up with errors in your game world when it comes time to play. If WorldEd didnt throw up any colour errors then all you need to do now is click on file and save, give your world a name (I like to use the same name as the map to avoid confusion) and save, you now have the basics of a new map, to which you can now start adding buildings and world detail! Step 3) Creating/Adding custom buildings Navigate to your TileZed folder and create a new folder inside named Buildings, this is where you are going to save any buildings you make or download. - How to create custom buildings Spoiler Open TileZed. Click on Tools then Building Editor In the new window click on New Building. In the settings window that pops up you can choose a template and the plot size for your building. The templates provide pre-made room definitions for certain types of buildings, which are crucial for spawning the correct loot in the right places. For now choose “none” for the template and leave the plot size at 20x20 tiles. It's always best to make your plot a bit bigger than your actual building and surroundings will be as you can shrink your plot to match your finished building later. Click OK. You will be presented with a grey screen with a grid of 20x20 squares. For now, make sure Iso is selected on the left of the window. The first thing you need to do now is create some room definitions for your new building, this will allow the game to spawn the correct loot into the right places, such as food into kitchens, clothes into bedrooms, medicine into bathrooms etc. At the top of the window, click on Buildings and then Rooms (or you can use the Rooms icon on the toolbar). In the small window that popped up. click on the + in the bottom left to add a new room type. On the right you can now give your new room a name which can be anything you want, and an internal name, which MUST match one of the names in this list: You can now draw your new room on the tile grid by clicking and dragging with the left mouse button (make sure the Draw Room tool is selected at the top of the window). Notice how the colour of the tiles turns to the colour you selected for your room in the previous step. Once you let go of your left mouse button your room will appear. You can change the shape of the room by clicking and dragging more pieces that connect up, or by holding CTRL and clicking/clicking and dragging to delete parts of a room. You will see that placing tiles of the same room type next to each other will automatically delete the internal wall between them, and placing tiles of different room types (e.g. living room and kitchen) next to each other will maintain the internal walls. You can create new internal walls (or delete internal walls) using the Place Wall tool (located to the right of the Draw Room tool). Simply click on the Place Wall icon, select the tiles you want to use for it's interior and exterior facing walls as well as grime etc and then left click and drag your wall on the tile grid, right clicking on a wall you place will delete, to edit it's length, left click on one of its "ends" and drag. So now you've finished placing the rooms for your ground floor you probably want to place some windows and doors. Click on the Place Doors tool at the top left of the window, then using the tile and furniture menu on the right, use the Doors and Door Frames options to select the door you want to use, then simply click on the tile grid where you would like the door to go. Exactly the same method is used for placing windows, except using the Place Windows tool at the top of the window instead (located to the right of Place Doors). You've now placed your windows and doors, but maybe you realised that your building is 1 tile too wide and you need to make it smaller. Just select the Draw Room tool, hold CTRL and click and drag on the area you want to delete. That worked, but your doors and windows that were on that side of the building are now floating in thin air, 1 tile out from the "new" wall. You can easily get around this by selecting the Select and Move Objects icon at the top of the window, then clicking and dragging the area select over the doors/windows etc you want to move, then clickng and dragging one of the rectangles at the base of one of the objects, all objects will move together as one, making bulk/mass changes easier to deal with. Now it's time to place some furniture down, simply use the Tiles and Furniture menu on the right of the window to browse through and select the furniture piece you want, then at the top of the window the Place Furniture icon should now be clickable, once selected simply left click on the tile grid where you would like your furniture to go. Right click will delete a previously placed piece. You will notice that items will automatically orient themselves to have their backs to the wall if placed against one. If put up against 2 walls (such as the corner of a room) you can change its' orientation by moving your mouse cursor within the tile it's to be placed on. You can also select the orientation of furniture by holding the left click down as you place it and moving your mouse round, once in the desired orientation, simply let go of the left mouse button. If you are placing multiple objects on the same tile then the last object added will be drawn on top, so if you want to have a chair on top of a rug, make sure you place the rug first and then the chair. Your ground floor is complete, now it's time to add some stairs and a first/top floor. Click on the Place Stairs icon on the toolbar at the top of the window, select the stairs you want to use in the Tiles and Furniture menu on the right and then left click on the tile grid where you would like to place your stairs. Right clicking on previously placed stairs will delete them. Now click on the Floor icon on the toolbar, this will pop up a new window that lists the floors of the current building (currently only Floor 1). Click on the blue + icon to add a new floor, you should see that it has added Floor 2 to the list, above Floor 1, click OK. Now that you are back to the tile grid you will notice that your building currently looks darker, however if you look at the toolbar you will also notice that the floor icon has changed (now reads Floor 2/2), indicating that you currently have your new floor selected, and any room/items you place will be on this floor. You can now place rooms and furniture etc like before (making sure the correct tool is selected in the toolbar), notice that when you add a room that sits above your previously placed stairs on the floor below, BuildingEd will automatically "cut holes" in the floor to allow the player to move between floors. If any of your lower floors are not covered by rooms on higher floors then don't forget to add some roof pieces over the gaps. To do this, navigate to the floor above and then click on the Place Roof icon in the toolbar and select a roof type (e.g. Flat Top), then on the right of the window select Roof Tops (or Caps/Slopes depending on the roof type being used) under Tiles and Furniture and select a roof tile to use in the area below. Then click on the tile grid where you would like to place the roof tile (e.g. a flat roof tile to cover a ground floor room is placed on the "floor" of the next floor up). When you want to add a roof to your top floor, create a new floor using the Floor icon like before, then select the Place Roof icon in the toolbar, select the type of roof tile you want to add and place on that new layer. Flat roof tiles are by far the easiest to add, bu the prettier sloped roofs can be figure out with a little bit of trial and error, again using right click to remove any previously placed pieces, just remember to have the correct roof type selected in the Place Roof tool depending on what tile you're trying to add. Finally you might want to add detail around the outside of the house such as gardens and paths. To do this, first click on Tile (underneath Iso) on the left side of the window, you should notice that the options on the right of the window have changed. At the top right is a list of every layer, ticked layers have all tiles placed on that layer visible in the tile grid, un-ticking them makes those tiles invisible, allowing you to hide the buildings walls when placing flowers or ground tiles for example. At the bottom right as a list of all of the different tiles you can use. Click on the category and then the desired tile on the right. Left clicking on the tile grid will place the selected tile on the selected layer, overwriting any tile that is already at that location and on that layer. Hold CTRL and left click to remove a tile from the currently selected layer. Lastly you will need to add a room definition for any full tile roof peice that is not over an internal room of your building. This is to allow the new roof occlusion system to function correctly. For any bits that are above an internal room, simply make sure that room has a room definition (all room in buildings should, even hallways etc). If the roof bit is over an outside area (such as a porch) then instead of giving it an internal room definition, which could possibly mess with loot tables etc, use the new room definition made for this situation - emptyoutside. In the example below you can see that this building has a porch roof outside the front door, all other bits of roof are already over a pre-existing room definition and so we don't need to worry about them. We do need to add an emptyoutside room definition on/under the porch roof however as there currently is no room definition outside the building. In this example, the porch roof is on the roof layer of floor 2. If we check Ortho view you can see that a room definition of emptyoutside yellow) has been applied to the corrosponding tiles on floor 2. If you're having problems getting it to work properly, remember: every "full tile" roof peice (the little overhang peices you see in the example above do not need to adhere to this rule, just leave them as is if you have any) must be "over/on" a room definition, so make sure every room in your buildings has a room definition (including hallways etc). Add a room definition of "emptyoutside" (without " ") to any full tile roof peices that do not sit "over/on" an internal room definition. Now your building is complete, its time to save it. If you havn't already, create a folder inside you TileZed folder called buildings, you can create any number of sub-folders in here to help organise your buildings if you like. Now, in BuildingEd, click on File and Save As, navigate to your buildings folder, give your building a name and save it. To make life easier when creating similar buildings in the future it's a good idea to save your buildings template, so when you create a new building you can select it's template and have all of your room definitions, wall tiles etc already set up for you. To do this, click on Building and the Properties, here you can see the default tiles that will be used on any building created with this template. To the left is also a button for checking/editing the room definitions. Clicking on Save Template will ask you for a name and then save it to the list of templates. As you can see you can quickly edit and create multiple templates rather fast using this method. - How to add buildings to your map Spoiler If it's not already open, open WorldEd (open TileZed, clikck Tools and then WorldEd) and load your previously saved map. You can now edit your map by double clicking on one of the cells, it will open a new tab (named cell x,x) containing a preview of what that cell will look like in game. You can use the sliders to navigate the camera around the map as well as holding down control and using your scroll wheel to zoom in/out. To the right of the preview window you will see a couple of areas, one labeled "maps" and one labeled "history", in the maps section, navigate to your buildings folder, you will see all of your buildings listed as tbx files (you can create multiple folders within the buildings folder if you like to help organise your buildings to make them easier to find). All you need to do now is click and drag a tbx from the section on the right onto the preview window (make sure "Select and move lots" is selected on the toolbar at the top of the screen), you will see the building moving with your mouse cursor over the world, just drop it wherever you want it to go. Once you have placed all the buildings you want on this cell click on File and then Save and then close the tab (named cell x,x). You should now be back to seeing your entire map. You can now repeat the process for each other cell. Once you are finished adding buildings (you can always add more later if you want to start off small and test a few things first) come back to the world view and save your map. Step 4) Exporting and testing the map - Exporting Spoiler Before adding world detail such as lamposts, road markings, road signs etc you probably want to load your map up and run around in game to make sure everything is as you want it because any world detail changes you make will be lost if you need to make edits to your BMP files and re-import them into WorldEd. The first thing you are going to need to do is add a spawn point (or more) on your map. To do this you will first need to create a spawnpoints.lua file, just navigate to the folder you created when you imported your BMP's into WorldEd (e.g. MyMapMod) which by default will have been created in your TileZed folder. Once there create a new text document, open it and then click on save as, change Save as type to All files, name it spawnpoints.lua and click save. Then open WorldEd and load your map, double click on the cell you want to add a spawn point to, once it opens, click on the "add spawn point" tool at the top of the window and click on the map where you want your spawn point to go, it will place down a prism to allow you to keep a visual track of your spawn points as well as opening a dialogue box to select the profession that can spawn here (if no boxes are ticked then nothing will be added to the spawnpoints.lua file when you write spawn points). Once finished, save the cell, come back to the world view (close the cell's tab) and click on File and then Write Spawn Points, on the dialogue box which pops up, navigate to and select the spawnpoints.lua you created above and save. Once you have created your spawn point(s), save your map then click on File and then Genrate Lots>All Cells. Here you will be asked for 4 things, the first being the directory your lot files will be saved in, click on the 3 dots and navigate to the folder you created for your map mod when you imported your BMP into WorldEd, then right click and create a new folder called Lots, select this folder. Secondly it needs your zombie spawn map, just click on the 3 dots and navigate to your zombie spawn map and select it. Third is the Tile Definitions folder, again click on the 3 dots and this time navigate to your Project Zomboid Steam Install folder (c:\Program Files\Steam\SteamApps\Common\Project Zomboid), click on the Media folder and then click Select Folder. The last thing is the World Origin. If you are making a stand alone map which is not connected to any other maps then you can just leave this as is. If however you are wanting to add your map to an exisiting world or overwrite a cell(s) in an existing world you will need to change these values. The cell of your map that is at 0,0 (the one furthest to the north west) will be given the values you use here, allowing you to offset your map to make existing maps bigger or overwite cells of an existing map. Once ready, click ok - Getting it in game Spoiler OK now you have all of the files you need to test your map in game, so lets go ahead and do that. First, create a new folder on your desktop (or somehwere easily accesible) and give it a name (e.g. MyMapMod), inside create another folder called media, inside there create a 3rd folder called maps and then inside there, create a final folder called MyMapMod (or whatever the name of your map is). Inside this final folder is where you want to put all of the .lotheader, .lotpack and .bin files that were created when you generated the lots for your map, as well as the spawnpoints.lua file and and objects.lua (dont worry about this for now, you will create one when you add foraging zones later). You also want to create a text file(it will actually be saved as a .info file), using Notepad, in this folder, called map, include the following: Spoiler title=Your map name here lots=Muldraugh, KY description= Your map description here fixed2x=true (in this example were adding/overwriting cells in the base games map, but all the files will be kept seperate so the mod only appears when selected in game(hence the lots=Muldraugh, KY)). Click on File and Save as, now instead of saving it as a text file, at the bottom, select Save as type and choose All Files, then name the file map.info The next file you need in this folder is a PNG file called thumb.png, this is the thumbnail used in the games menu for your mod, for now you can just create a blank one using your paint program and save it in this folder. From this folder, navigate up 3 folders until your in the first one and can see the Media folder, in this first folder, alongside the media folder you want to create 2 final files, the first is a mod.info file, again just create a txt file (saved as .info instead of .txt) this time called mod and include this info: Spoiler name=The Name Of Your Mod Here id=The Name Of the First Folder You Created Here (e.g. MyMapMod) description=Description Of Mod Here poster=poster.png The very last file you need is another png, just copy your thumb.png you created a little earlier, paste it here and rename it to poster.png All that's left to do now is drag and drop (or copy and paste) that entire folder structure into: C:\Users\YourUsernameHere\Zomboid\mods Then load up Project Zomboid, click on Mods, enable your mod, create a new game and select your map on the world selection screen. You should find yourself spawning in on one of the spawn points you created earlier. Step 5) Adding world detail Spoiler Now that you have had a run around your map in game and are happy with the layout, vegetation, bulding placement etc it's time to start beautifying your map by adding detail. To start, open TileZed and then open WorldEd, load your map. Right click on the cell you want to add detail to and then click on "open in tileZed". Bring TileZed to the front (or minimise WorldEd) and you will notice you have a zoomed in view of that cell. In map window to the right of the screen, click on the layers tab halfway down, the window above should populate with a number for layers with different names, these are what you will use to place your various bits of detail, allowing you to stack multiple things on top of each other without overriding the previous one (such as road markings on roads, trees on tiles with grass etc). Below this will be a tilesets window listing all of the different tilesets currently used in game, clicking on one of the names will display its contents directly to the right, as you will see, most tilesets have multiple tiles. Adding detail to your world is simply a matter of finding the item you want to place from the tilesets, making sure you're on the correct layer (so placing a tree wont delete the ground tile etc) and then clicking where you want to peice to go (making sure the stamp brush tool at the top of the window is selected). There's a lot of useful tools listed along the top to help you, such as undo and a rectangular select to allow you to copy and paste areas of detail, for example, simply place down some road markings from the street_trafficline_01 tileset on to the FloorOverlay layer, then select the Rectangle Select tool, select the cells with the road markings on, press CTRl+C and then CTRL+V, now you can click away, placing copies of that area (only tiles on the currently selected layer) with a single click, allowing you to place large amounts of detail rather quickly. Once you are finished adding detail to your cell, click on File and Save then close the tab. You can now go back to WorldEd and repeat the process with each other cell, once complete come back to WorldEd, click on File and Generate Lots. Your world detail has now been saved and can be seen in game. Any time you make changes to your map and want to test it in game you will want to re-copy all the .lotpack, .lotheader and .bin files along with your spawnpoints.lua and objects.lua into the folder structure you created in the step above "Getting It In Game", overwriting old files as you go, then copy into: C:\Users\YourUsernameHere\Zomboid\mods as you did before, again overwriting if asked. Step 6) Zoning Your Map Spoiler A - Foraging and Loot Respawn Zones Find the .pzw file for your map mod (generally in the parent folder to your mods .lot files) and open it in a text editor (e.g. Notepad). Look for the line(s) that starts with "<bmp path= ...", after the last one, paste this chunk of code: Spoiler <objecttype name="TownZone"/> <objecttype name="Forest"/> <objecttype name="DeepForest"/> <objecttype name="Nav"/> <objecttype name="Vegitation"/> <objecttype name="TrailerPark"/> <objecttype name="Farm"/> <objectgroup name="TownZone" color="#aa0000" defaulttype="TownZone"/> <objectgroup name="Forest" color="#00aa00" defaulttype="Forest"/> <objectgroup name="Nav" color="#55aaff" defaulttype="Nav"/> <objectgroup name="DeepForest" color="#003500" defaulttype="DeepForest"/> <objectgroup name="Vegitation" color="#b3b300" defaulttype="Vegitation"/> <objectgroup name="TrailerPark" color="#f50000" defaulttype="TrailerPark"/> <objectgroup name="Farm" color="#55ff7f" defaulttype="Farm"/> Save the file and close it. It is possible that your pzw file will already contain this code, in which case it is not necessary to add it again. Open TileZed and then WorldEd and load your world, dbl click on the cell you want to add foraging to. Click the "create object" button at the top of the window. At the bottom of the window you will see 2 selection boxes ("Level: 0" and "Obj Grp: <none>") Click on "Obj Grp <none>" and you will see the list of foraging zones you can add to the world. Select the type you want, you can then draw a rectangle on the game world by clicking and holding left mouse button. You can add multiple rectangles of any type and size to each cell, allowing you to be as specific or general as you want. Once done, save the cell, close it and move on to the next. These zones are used for respawning loot and new zombies, the nav zone is used for zombie horde migration, basically marking the path of least resistance through a town/area. More specifically, only buildings that are within "TownZone", "TrailerPark" or "Farm" zones will be allowed to respawn loot. B - Vehicle Zones Adding vehicle zones is very similar to adding the forging zones. Simply add the following code to your map mods' PZW file the same way as you did for the foraging zones above. Again, if your pzw file already contains this code then there is no need to add it again. <objecttype name="ParkingStall"/> <objectgroup name="ParkingStall" color="#85929e" defaulttype="ParkingStall"/> List of vehicle zone names to use in WorldEd: bad good medium sport farm junkyard trafficjams trafficjamn trafficjame trafficjamw rtrafficjams rtrafficjamn rtrafficjame rtrafficjamw police ranger fire mccoy fossoil postal spiffo radio ambulance burnt The first group is the most common type of vehicle zones used. The second group are for traffic jams pointing in specific directions to immitate the flow of traffic. The ones prefixed with r will spawn less than the regular trafficjam zones. The third group are specific zones for the type of vehicles listed, they are still also spawn random cars but will also spawn the vehicle listed. The final one will add random burn out vehicles. Vehicle zones should be placed as a multiple of 4x3 tiles (4x3, 8x6, 28x3 etc) with 4x3 being a single vehicle, 4 being its side and 3 being its front/back. Once done, load your map mod up in WorldEd, open a cell and add your new vehicle zones as you would foraging zones. Whenever you add a zone you need to use the objects panel on the left of the WorldEd window to give the zone a name (use the names listed above) that will be visible in WorldEd as a tag over the zone, making it easier to keep track of what you have placed where, if these are left blank then the game will default back to grabbing random vehicles from the ParkingStall zone. Example: After you have added vehicle zones to all of your cells, save your map. If you are having trouble with your vehicle zones, you can always take a look at the vanilla objects.lua within the muldraugh folder of your zomboid install, once opened just search for "ParkingStall" to see examples of vehicle zones used in the vanilla vehicle branch. C - Water Zones As above, the first thing you want to do is add the needed code to your map mods' .pzw file, if already present there is no need to add the code snippets again. Look at the beginning of your pzw file and find where the "propertydef"' lines are and add the first chunk of code to the end of that block, same for the "template" and "objecttype" chunks, find their respective blocks and add to the end. Spoiler <propertydef name="WaterDirection" default="0.0"/> <propertydef name="WaterSpeed" default="0.0"/> <propertydef name="WaterGround" default="false"/> <propertydef name="WaterShore" default="true"/> <template name="WaterFlowN"> <property name="WaterDirection" value="0"/> <property name="WaterSpeed" value="1.0"/> </template> <template name="WaterFlowS"> <property name="WaterDirection" value="180"/> <property name="WaterSpeed" value="1.0"/> </template> <template name="WaterFlowE"> <property name="WaterDirection" value="90"/> <property name="WaterSpeed" value="1.0"/> </template> <template name="WaterFlowW"> <property name="WaterDirection" value="270"/> <property name="WaterSpeed" value="1.0"/> </template> <template name="WaterZone"> <property name="WaterGround" value="false"/> <property name="WaterShore" value="true"/> </template> <objecttype name="WaterFlow"/> <objecttype name="WaterZone"/> Now you will see 2 new zones in WorldEd in the same place your other zones reside, WaterFlow and WaterZone. WaterFlow zones are single tile-sized objects that you can place down on any body of water to make it flow in a given direction and at a given speed, any water tile connected to the tile you placed the zone on in a given cell is affected. You can then follow the flow downstream adding more WaterFlow zones to change its direction/speed to match the landscape/route the river/stream takes. Here's an example from the vanilla map: WaterDirection is in degrees with 0 being North and 90 being East etc. WaterSpeed goes from 0.0 to 1.6. The second new water zone is.... WaterZone. WaterZones allow you to play/remove with the blends that you will normally see where water meets land. This allows you to do things like have pools without the water in the pool creating a shore-like blend with the tiles next to it, which obviously for a pool, wouldn't make sense, here is an example from the vanilla world where a WaterZone has been used is this exact way, notice how the WaterGround and WaterShore properties are both set to false: It might be a little hard to tell from the picture but the WaterZone completely covers the pool and all tiles bordering it, allowing it to remove the shoreline blend from said tiles. You can play with the settings and placement of WaterZones to get different effects/looks depending on your needs. D - Zombie Zones Zombie Zones allow you to specify specific costumes for zombies that spawn within certain areas on your map (such as in and around buildings). As you did for the water zones etc first you need to add the following code to your map mods' .pzw file. Add the objecttype line at the end of the existing ones, same for the objectgroup line: Spoiler <objecttype name="ZombiesType"/> <objectgroup name="ZombiesType" color="#555500" defaulttype="ZombiesType"/> As before you will now have a new zone in WorldEd called ZombieType, you can select it and place zones as usual, the larger your zones the better chance of zombies spawning within them. These zones do not add "extra" zombies, they just affect zombies that spawn within them. Each ZombieType zone must be named, similarly to vehicle zones, the list of current ZombieType zone names is: Spoiler School Prison VariousFoodMarket Wedding Fossoil Offices Seahorse Dinner Restaurant Doctor Pharmacist FarmingStore Police ConstructionSite Gigamart Bank FancyHotel Spiffo CarRepair Factory Gas2Go ThunderGas McCoys TrailerPark CountryClub Athletic Spa PizzaWhirled Pony Jays Survivalist Boxing CoffeeShop Butcher Baseball StreetSports FireDept NursingHome Church Football Rocker PileOCrepe Bar Nightclub Army Above you can see an example of 2 Factory ZombieType zones and 1 TrailerPark ZombieType zone. The factory zones have been made to mainly only affect the zombies that spawn inside the buildings where as the trailer park zone has been made to cover the enitire park. E - Story Zones Story zones allow you to add small "scenes" to your map, such as a camping trip "gone wrong" as well as some others. As with the previous zones we first need to start off by adding the code snippets for these new zones to our maps .pzw file, once again add the objecttype line to the end of that section of code and the same with the objectgroup line, and if they already exist, they do not need to be added again: Spoiler <objecttype name="ZoneStory"/> <objectgroup name="ZoneStory" color="#ffffff" defaulttype="ZoneStory"/> You can now use the regular object tool to add Story Zones to your map. Best practice is to make the zone at least 10x10 tiles but you can also make them much larger to add a bit more randomization as to where they spawn in your zone. The zones themselves, like other zones do not guarantee a spawn of a story, only a chance. There are currently 3 different Story Zones used in vanilla, just like with vehicle zones and zombie type zones you will want to name each zone one of the following: Spoiler Lake Forest Beach As you can imagine, each one spawns vehicles/items/zombies you might expect to find in a "scene" from a zone of that type (eg. a bunch of tents, a campfire and a zombie eating some hiker/camper corpses). Above you can see an example of a Forest story zone and a Lake story zone. F - Loot Zones The new loot zones work alongside the new loot distribution system to allow us to take loot customization to a whole new level, 2 identical houses, but one with a loot zone over the top can produce wildly different loot spawns if you want it to. You do not need to add any loot zones to your map but they will offer wider loot variety and easier control of it. As with the previous sections, you will first need to add the code for these new zones to your map mods .pzw file: Spoiler <objecttype name="LootZone"/> <objectgroup name="LootZone" color="#ff00ff" defaulttype="LootZone"/> You can now add loot zones to the map the same way as any other zones. There are currently only a few zones used in the vanilla game (Rich, Poor, TrailerPark and Army), with more on the way, but you can easily create and use your own loot zones too. Here is a seperate guide about customizing loot for your map mod: Once all cells have had their zones added close any cells left open so you are back to the main world overview in WorldEd. Click on File and the Generate Lots>All Cells. If they aren't already then make sure your path to your lots directory and zombie spawn image are complete. Then for your tiles definitions folder you want to point that to the media folder inside your Project Zomboid installation folder (steam>common>... etc). Once done, click ok. Click File and then "Write spawn points to lua", then click on File and click "Write objects to lua". G - Map Zones Build 41.6 introduced the new in-game mapping system which allows your map to be procedurally drawn from a top down and an isometric view in game. All it requires is to tag your buildings in buildingEd with a type (commercial, industrial etc) and to add some simple zones over your roads/trails. There is a simple standalone guide on how to add these and get your map mod working with the new in game system here: Step 7) Uploading to steam workshop Spoiler Create a folder (anywhere for now, desktop is handy) with the name of your mod (e.g MyMapMod), place your mods preview picture (named preview.png) and a .txt file called "Workshop" which includes the following code: Spoiler version=1 title=Your Mod Name Here description=Your mod description here description=Second line of your mod description here (you can add more description= lines if you like) tags= visibility=public then save the file. Within the same folder as these 2 files create a new folder called "Contents", and inside the Contents folder add another folder called "mods". Inside this folder is where you want to copy and paste your mods main folder (the one you have been placing into c:\Users\Yourusernamehere\Zomboid\Mods when you test your mod in game). Once this is done cut/copy/paste the entire folder structure into your C":\Users\YourUserName\Zomboid\Workshop" folder and load up PZ. Click the "Workshop" button towards the bottom left and the click "create and update items", then select your mod (if it doesn't show dbl check you added it to the correct folder which will be shown at the top of the screen). Make sure the items details are correct and then press next, your mod will then be uploaded to steam workshop (wait for the upload confirmation)and should be viewable within the hour. You now have a map mod on steam workshop! Anytime you update your mod, simply copy/paste the updated files over the existing ones in your "C:\Users\YourUserName\Zomboid\Workshop" folder and follow the above step again from loading up Project Zomboid, anyone subscribers will have the update pop up in their downloads automatically. Tips Spoiler Map Image Creation: If you are using paint.net, I recommend the Selective Palette plugin. You can choose a palette of colors and all pixels in your image will be assigned to the closest color. Find it here: http://forums.getpaint.net/index.php?/topic/8043-curtis-plugin-pack-update-for-354/ - Ciber Ninja More Coming Soon FAQ's Spoiler Coming Soon Other Helpful Guides Spoiler Building Making - Current Room Definitions How To Add Custom Texture Packs And Tile Definitions Blackbeard06's Video Mapping Tutorial - How to create lootable maps for your map mod How to customize Loot Spawns Big thanks to Capt_Paradox, Blackbeard06, Suomiboi, Thuztor and the whole modding community ❤️

- 216 replies
-
- 19
-

-

-
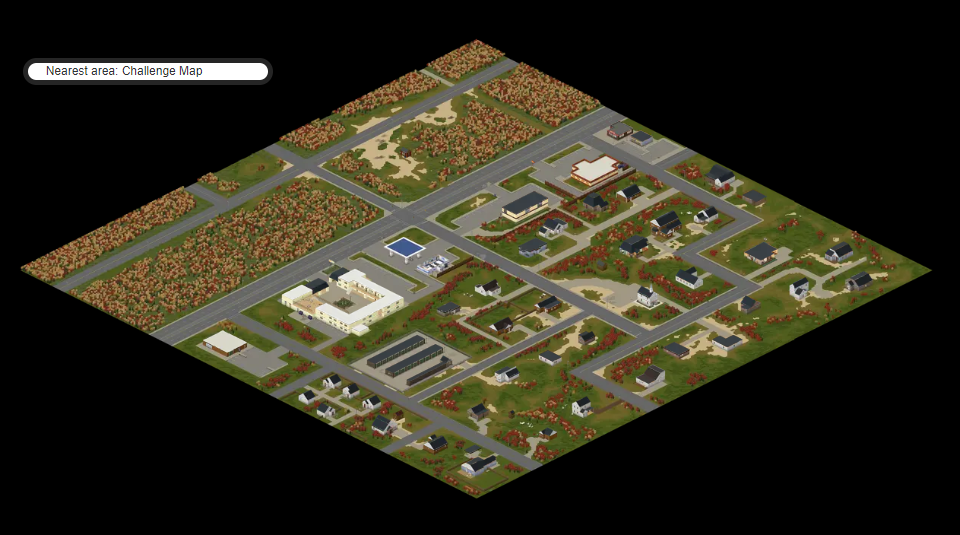
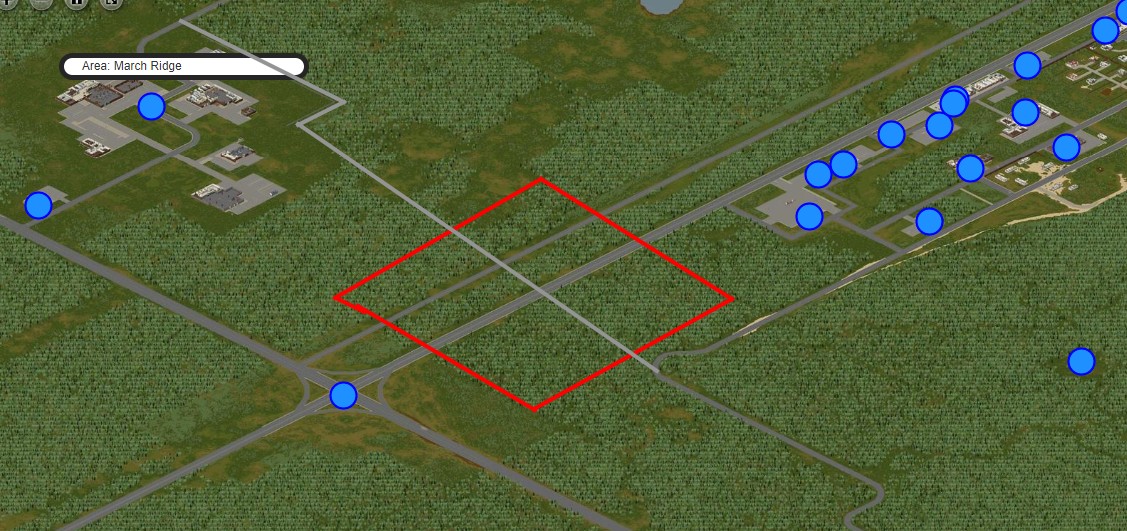
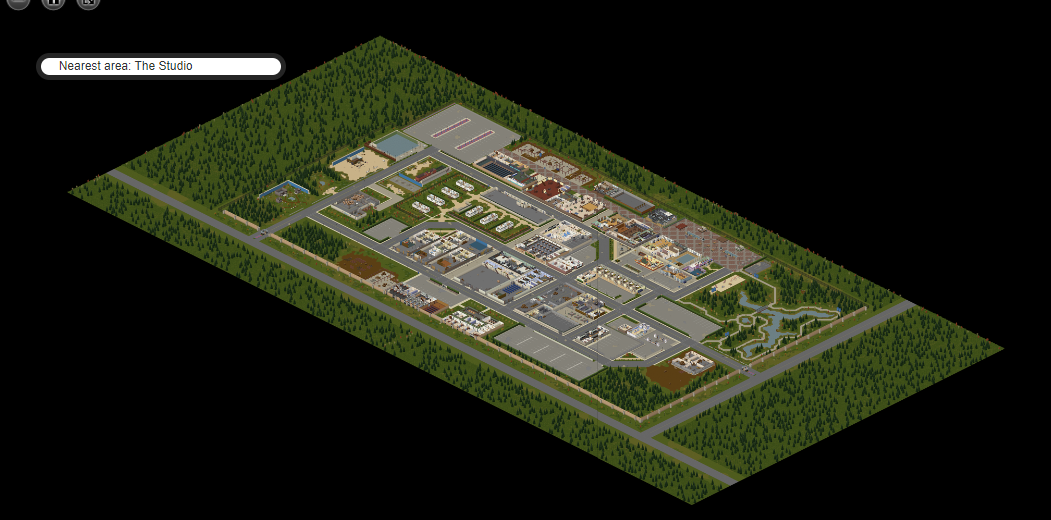
Can someone do a mod that place the following Challenge Maps in Knox Country?: Challenge Map #2 in South Muldraugh (acting as a "extension" of that map): The Studio (i know there is a mod already on Workshop that does that, but the positioning seems a little off for me) also near South Muldraugh:
-
I'm not quite sure how, but I managed to add a Vegetation slot to one of my buildings. It was an accident, but now I need to do the same on another building. I've tried many things but nothing works. Maybe someone has instructions?
-
First, create the following file structure (if you are adding the lootable map to your own map mod then create all folders within the media folder below in your map mods media folder instead): Spoiler MyLootableMapsMod >media >>lua >>>server >>>>Items >>>client >>>>ISUI >>>>>Maps >scripts >textures >>worldMap Next up create a .txt file in the scripts folder called something like "mylootablemap" (except make it more unique to avoid any possible compatability issues with other mods that might use the same names), it should include this code: Spoiler module Base { item MyLootableMap { DisplayCategory = Cartography, Type = Map, DisplayName = Your map name here, Icon = Map, Weight = 0.1, Map = MyLootableMap, WorldStaticModel = Map, } } The above code is adding a new item with the internal name "MyLootableMap" (so again make sure yours is something unique) into the vanilla pool of items, the above settings work for maps. The next file you need you will want to create in the "media\lua\server\Items" folder, call it something like MyLootableMapDistribution.lua but again make it's a unique name to avoid any possible mod imcompatability with other mods. It should contain the following code: Spoiler local function preDistributionMerge() table.insert(ProceduralDistributions.list.MagazineRackMaps.items, "MyLootableMap"); table.insert(ProceduralDistributions.list.MagazineRackMaps.items, 50); end Events.OnPreDistributionMerge.Add(preDistributionMerge); In the above code you can see that we are adding our new Item "MyLootableMap" into the "MagazineRackMaps" loot table inside of ProceduralDistributions.lua, this will affect any roomDef of any building that pulls from the MagazineRackMaps loot table. We are doing it this way as the definition we want to add to has the "procedural" tag in Distributions.lua and is therefore using the procedural loot tables. The number 50 is the "weight" of the item you are adding, higher number = more chance. To find the current room and container definitions, navigate to your "steamapps\common\ProjectZomboid\media\lua\server\Items" folder and open the Distributions.lua file. If the definition you want to add your item to is not procedural (does not have the "procedural = true" line) then you want to add this code instead of the above code: Spoiler local myMapdistributionTable = { all = { shelves = { rolls = 5, items = { "Magazine", 20, "Newspaper", 20, "Book", 20, "SheetPaper2", 20, "Notebook", 20, "BookTailoring1", 2, "BookTailoring2", 1, "BookTailoring3", 0.7, "BookTailoring4", 0.5, "BookTailoring5", 0.3, "BookCarpentry1", 2, "BookCarpentry2", 1, "BookCarpentry3", 0.7, "BookCarpentry4", 0.5, "BookCarpentry5", 0.3, "BookCooking1", 2, "BookCooking2", 1, "BookCooking3", 0.5, "BookCooking4", 0.3, "BookForaging1", 2, "BookForaging2", 1, "BookForaging3", 0.7, "BookForaging4", 0.5, "BookForaging5", 0.3, "BookFarming1", 2, "BookFarming2", 1, "BookFarming3", 0.7, "BookFarming4", 0.5, "BookFarming5", 0.3, "BookFishing1", 2, "BookFishing2", 1, "BookFishing3", 0.7, "BookFishing4", 0.5, "BookFishing5", 0.3, "BookTrapping1", 2, "BookTrapping2", 1, "BookTrapping3", 0.7, "BookTrapping4", 0.5, "BookTrapping5", 0.3, "BookFirstAid1", 2, "BookFirstAid2", 1, "BookFirstAid3", 0.7, "BookFirstAid4", 0.5, "BookFirstAid5", 0.3, "BookMetalWelding1", 2, "BookMetalWelding2", 1, "BookMetalWelding3", 0.7, "BookMetalWelding4", 0.5, "BookMetalWelding5", 0.3, "BookElectrician1", 2, "BookElectrician2", 1, "BookElectrician3", 0.7, "BookElectrician4", 0.5, "BookElectrician5", 0.3, "BookMechanic1", 2, "BookMechanic2", 1, "BookMechanic3", 0.7, "BookMechanic4", 0.5, "BookMechanic5", 0.3, "FishingMag1", 1, "FishingMag2", 1, "HuntingMag1", 1, "HuntingMag2", 1, "HuntingMag3", 1, "HerbalistMag", 1, "FarmingMag1", 1, "CookingMag1", 1, "CookingMag2", 1, "ElectronicsMag1", 1, "ElectronicsMag2", 1, "ElectronicsMag3", 1, "ElectronicsMag4", 1, "ElectronicsMag5", 1, "MechanicMag1", 1, "MechanicMag2", 1, "MechanicMag3", 1, "EngineerMagazine1", 1, "EngineerMagazine2", 1, "MetalworkMag1", 1, "MetalworkMag2", 1, "MetalworkMag3", 1, "MetalworkMag4", 1, "Journal", 2, "Radio.RadioBlack",2, "Radio.RadioRed",1, "MyLootableMap", 50, } }, } } table.insert(Distributions, 2, myMapdistributionTable); This would add your map to the existing "all>shelves" definitions, which would be every shelves container in the game world not inside a roomdef defined inside Distributions.lua, so for example your map would not spawn on shelves that are placed inside a "bookstore" room def as that room def already exists in Distributions.lua with a rule for shelves. You can also check this thread: for a more in-depth guide to working with the loot tables. Lastly, inside of your "media\lua\client\ISUI\Maps" folder create a new file called something like MyLootableMapDefinition.lua (make it unique to your mod instead of a generic name) and include the following code: Spoiler require "ISMapDefinitions" MapUtils = {} function MapUtils.initDirectoryMapData(mapUI, directory) local mapAPI = mapUI.javaObject:getAPIv1() local file = directory..'/worldmap-forest.xml' if fileExists(file) then mapAPI:addData(file) end file = directory..'/worldmap.xml' if fileExists(file) then mapAPI:addData(file) end -- This call indicates the end of XML data files for the directory. -- If map features exist for a particular cell in this directory, -- then no data added afterwards will be used for that same cell. mapAPI:endDirectoryData() mapAPI:addImages(directory) end function MapUtils.initDefaultMapData(mapUI) local mapAPI = mapUI.javaObject:getAPIv1() mapAPI:clearData() -- Add data from highest priority (mods) to lowest priority (vanilla) local dirs = getLotDirectories() for i=1,dirs:size() do MapUtils.initDirectoryMapData(mapUI, 'media/maps/'..dirs:get(i-1)) end end local MINZ = 0 local MAXZ = 24 local WATER_TEXTURE = false function MapUtils.initDefaultStyleV1(mapUI) local mapAPI = mapUI.javaObject:getAPIv1() local styleAPI = mapAPI:getStyleAPI() local r,g,b = 219/255, 215/255, 192/255 mapAPI:setBackgroundRGBA(r, g, b, 1.0) mapAPI:setUnvisitedRGBA(r * 0.915, g * 0.915, b * 0.915, 1.0) mapAPI:setUnvisitedGridRGBA(r * 0.777, g * 0.777, b * 0.777, 1.0) styleAPI:clear() local layer = styleAPI:newPolygonLayer("forest") layer:setMinZoom(13.5) layer:setFilter("natural", "forest") if true then layer:addFill(MINZ, 189, 197, 163, 0) layer:addFill(13.5, 189, 197, 163, 0) layer:addFill(14, 189, 197, 163, 255) layer:addFill(MAXZ, 189, 197, 163, 255) else layer:addFill(MINZ, 255, 255, 255, 255) layer:addFill(MAXZ, 255, 255, 255, 255) layer:addTexture(MINZ, "media/textures/worldMap/Grass.png") layer:addTexture(MAXZ, "media/textures/worldMap/Grass.png") layer:addScale(13.5, 4.0) layer:addScale(MAXZ, 4.0) end layer = styleAPI:newPolygonLayer("water") layer:setMinZoom(MINZ) layer:setFilter("water", "river") if not WATER_TEXTURE then layer:addFill(MINZ, 59, 141, 149, 255) layer:addFill(MAXZ, 59, 141, 149, 255) else layer:addFill(MINZ, 59, 141, 149, 255) layer:addFill(14.5, 59, 141, 149, 255) layer:addFill(14.5, 255, 255, 255, 255) layer:addTexture(MINZ, nil) layer:addTexture(14.5, nil) layer:addTexture(14.5, "media/textures/worldMap/Water.png") layer:addTexture(MAXZ, "media/textures/worldMap/Water.png") -- layer:addScale(MINZ, 4.0) -- layer:addScale(MAX, 4.0) end layer = styleAPI:newPolygonLayer("road-trail") layer:setMinZoom(12.0) layer:setFilter("highway", "trail") layer:addFill(12.25, 185, 122, 87, 0) layer:addFill(13, 185, 122, 87, 255) layer:addFill(MAXZ, 185, 122, 87, 255) layer = styleAPI:newPolygonLayer("road-tertiary") layer:setMinZoom(11.0) layer:setFilter("highway", "tertiary") layer:addFill(11.5, 171, 158, 143, 0) layer:addFill(13, 171, 158, 143, 255) layer:addFill(MAXZ, 171, 158, 143, 255) layer = styleAPI:newPolygonLayer("road-secondary") layer:setMinZoom(11.0) layer:setFilter("highway", "secondary") layer:addFill(MINZ, 134, 125, 113, 255) layer:addFill(MAXZ, 134, 125, 113, 255) layer = styleAPI:newPolygonLayer("road-primary") layer:setMinZoom(11.0) layer:setFilter("highway", "primary") layer:addFill(MINZ, 134, 125, 113, 255) layer:addFill(MAXZ, 134, 125, 113, 255) layer = styleAPI:newPolygonLayer("railway") layer:setMinZoom(14.0) layer:setFilter("railway", "*") layer:addFill(MINZ, 200, 191, 231, 255) layer:addFill(MAXZ, 200, 191, 231, 255) -- Default, same as building-Residential layer = styleAPI:newPolygonLayer("building") layer:setMinZoom(13.0) layer:setFilter("building", "yes") layer:addFill(13.0f, 210, 158, 105, 0) layer:addFill(13.5f, 210, 158, 105, 255) layer:addFill(MAXZ, 210, 158, 105, 255) layer = styleAPI:newPolygonLayer("building-Residential") layer:setMinZoom(13.0) layer:setFilter("building", "Residential") layer:addFill(13.0f, 210, 158, 105, 0) layer:addFill(13.5f, 210, 158, 105, 255) layer:addFill(MAXZ, 210, 158, 105, 255) layer = styleAPI:newPolygonLayer("building-CommunityServices") layer:setMinZoom(13.0) layer:setFilter("building", "CommunityServices") layer:addFill(13.0f, 139, 117, 235, 0) layer:addFill(13.5f, 139, 117, 235, 255) layer:addFill(MAXZ, 139, 117, 235, 255) layer = styleAPI:newPolygonLayer("building-Hospitality") layer:setMinZoom(13.0) layer:setFilter("building", "Hospitality") layer:addFill(13.0f, 127, 206, 225, 0) layer:addFill(13.5f, 127, 206, 225, 255) layer:addFill(MAXZ, 127, 206, 225, 255) layer = styleAPI:newPolygonLayer("building-Industrial") layer:setMinZoom(13.0) layer:setFilter("building", "Industrial") layer:addFill(13.0f, 56, 54, 53, 0) layer:addFill(13.5f, 56, 54, 53, 255) layer:addFill(MAXZ, 56, 54, 53, 255) layer = styleAPI:newPolygonLayer("building-Medical") layer:setMinZoom(13.0) layer:setFilter("building", "Medical") layer:addFill(13.0f, 229, 128, 151, 0) layer:addFill(13.5f, 229, 128, 151, 255) layer:addFill(MAXZ, 229, 128, 151, 255) layer = styleAPI:newPolygonLayer("building-RestaurantsAndEntertainment") layer:setMinZoom(13.0) layer:setFilter("building", "RestaurantsAndEntertainment") layer:addFill(13.0f, 245, 225, 60, 0) layer:addFill(13.5f, 245, 225, 60, 255) layer:addFill(MAXZ, 245, 225, 60, 255) layer = styleAPI:newPolygonLayer("building-RetailAndCommercial") layer:setMinZoom(13.0) layer:setFilter("building", "RetailAndCommercial") layer:addFill(13.0f, 184, 205, 84, 0) layer:addFill(13.5f, 184, 205, 84, 255) layer:addFill(MAXZ, 184, 205, 84, 255) end function MapUtils.overlayPaper(mapUI) local mapAPI = mapUI.javaObject:getAPIv1() local styleAPI = mapAPI:getStyleAPI() local layer = styleAPI:newTextureLayer("paper") layer:setMinZoom(0.00) local x1 = mapAPI:getMinXInSquares() local y1 = mapAPI:getMinYInSquares() local x2 = mapAPI:getMaxXInSquares() + 1 local y2 = mapAPI:getMaxYInSquares() + 1 layer:setBoundsInSquares(x1, y1, x2, y2) layer:setTile(true) layer:setUseWorldBounds(true) layer:addFill(14.00, 128, 128, 128, 0) layer:addFill(15.00, 128, 128, 128, 32) layer:addFill(15.00, 255, 255, 255, 32) layer:addTexture(0.00, "media/white.png") layer:addTexture(15.00, "media/white.png") layer:addTexture(15.00, "media/textures/worldMap/Paper.png") end function MapUtils.revealKnownArea(mapUI) local mapAPI = mapUI.javaObject:getAPIv1() local x1 = mapAPI:getMinXInSquares() local y1 = mapAPI:getMinYInSquares() local x2 = mapAPI:getMaxXInSquares() local y2 = mapAPI:getMaxYInSquares() WorldMapVisited.getInstance():setKnownInSquares(x1, y1, x2, y2) end ----- local function replaceWaterStyle(mapUI) if not WATER_TEXTURE then return end local mapAPI = mapUI.javaObject:getAPIv1() local styleAPI = mapAPI:getStyleAPI() local layer = styleAPI:getLayerByName("water") if not layer then return end layer:setMinZoom(MINZ) layer:setFilter("water", "river") layer:removeAllFill() layer:removeAllTexture() layer:addFill(MINZ, 59, 141, 149, 255) layer:addFill(MAXZ, 59, 141, 149, 255) end local function overlayPNG(mapUI, x, y, scale, layerName, tex, alpha) local texture = getTexture(tex) if not texture then return end local mapAPI = mapUI.javaObject:getAPIv1() local styleAPI = mapAPI:getStyleAPI() local layer = styleAPI:newTextureLayer(layerName) layer:setMinZoom(MINZ) layer:addFill(MINZ, 255, 255, 255, (alpha or 1.0) * 255) layer:addTexture(MINZ, tex) layer:setBoundsInSquares(x, y, x + texture:getWidth() * scale, y + texture:getHeight() * scale) end local function overlayPNG2(mapUI, x, y, scaleX, scaleY, tex) local mapAPI = mapUI.javaObject:getAPIv1() local styleAPI = mapAPI:getStyleAPI() local layer = styleAPI:newTextureLayer("lootMapPNG") layer:setMinZoom(MINZ) local texture = getTexture(tex) layer:addFill(MINZ, 255, 255, 255, 128) layer:addTexture(MINZ, tex) layer:setBoundsInSquares(x, y, x + texture:getWidth() * scaleX, y + texture:getHeight() * scaleY) end -- -- -- -- -- Now, after the last set of dashed lines you can add your lootable map definitions with the following code: Spoiler LootMaps.Init.MyLootableMap = function(mapUI) local mapAPI = mapUI.javaObject:getAPIv1() MapUtils.initDirectoryMapData(mapUI, 'media/maps/MyMapMod') -- 'media/maps/MyMapMod' - this should be where your maps worldmap.xml file is MapUtils.initDefaultStyleV1(mapUI) -- Specify the appearance of the map. replaceWaterStyle(mapUI) -- Use solid color for water instead of a texture. mapAPI:setBoundsInSquares(12900, 9900, 14399, 11399) -- (starting x, starting y, ending x, ending y) of the area you want to display and uncover, in World Co-ordinates. overlayPNG(mapUI, 14299, 9900, 0.666, "badge", "media/textures/worldMap/MyLootableMapBadge.png") -- Add your lootable maps banner PNG. overlayPNG(mapUI, 13000, 10000, 0.666, "legend", "media/textures/worldMap/Legend.png") -- Add the legend PNG. MapUtils.overlayPaper(mapUI) -- Draw a paper-like texture overtop the map. end Make sure that your "LootMaps.Init.MyLootableMap" on line 1 matches the name you specified on the "Maps = " line in your map item script you made earlier in this tutorial. The rest of the code is commented to describe what they do. The "textures\worldMap" folder that you created at the start should be used to store your maps name banner png if you have one and is referenced in the above code to make your lootable map look more official. As you can see, no external PNG's need to be created as the map is drawn from the data stored in the maps worldmap.xml file, which is what the "mapAPI:setBoundsInSquares" is using to draw a certain section of the overall world map. And that's it, copy your entire folder structure into your "C:\Users\YourUserNameHere\Zomboid\Mods" folder, load up the game, enable the mod (Your map mod if you made your lootable maps as part of a map mod) and start a new game, you now have your lootable map in game and waiting for you to find, and when you do it will uncover that area automatically on the main in game map. If you need a working example you can always subscribe to Bedford Falls on Steam and check it's workshop folder "steamapps\workshop\content\108600\522891356" . It's handy to verify your folder/file structure etc if you're having problems.
-
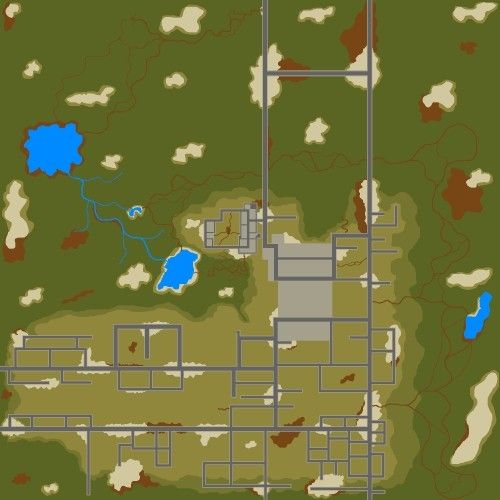
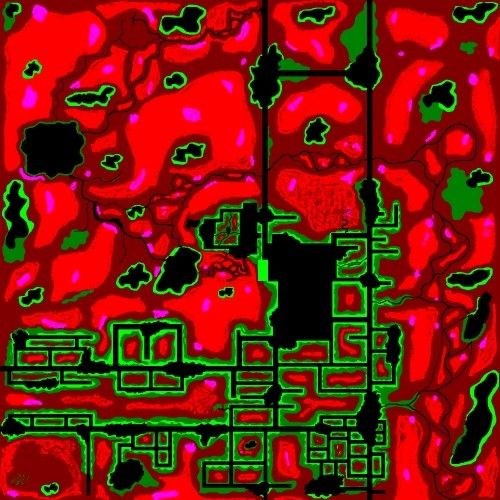
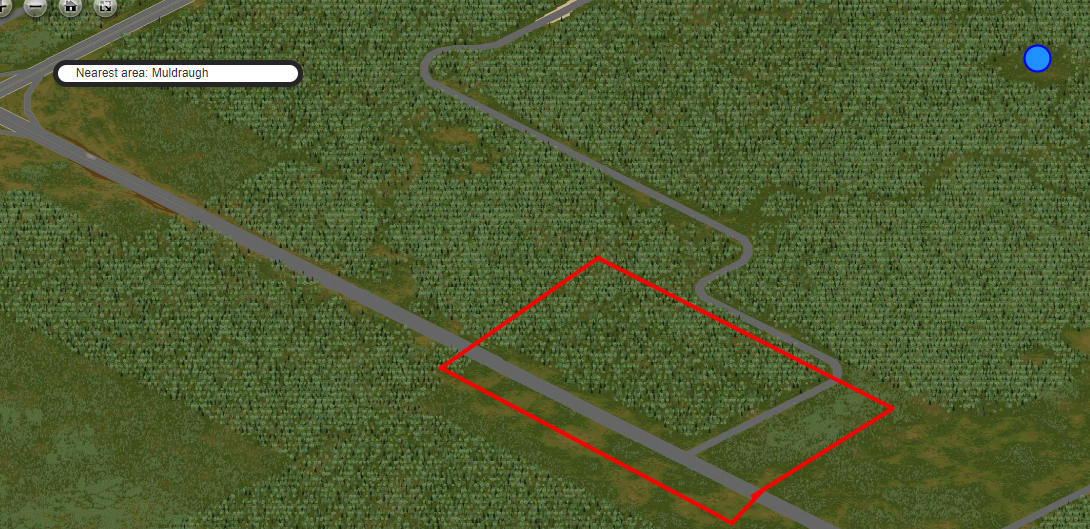
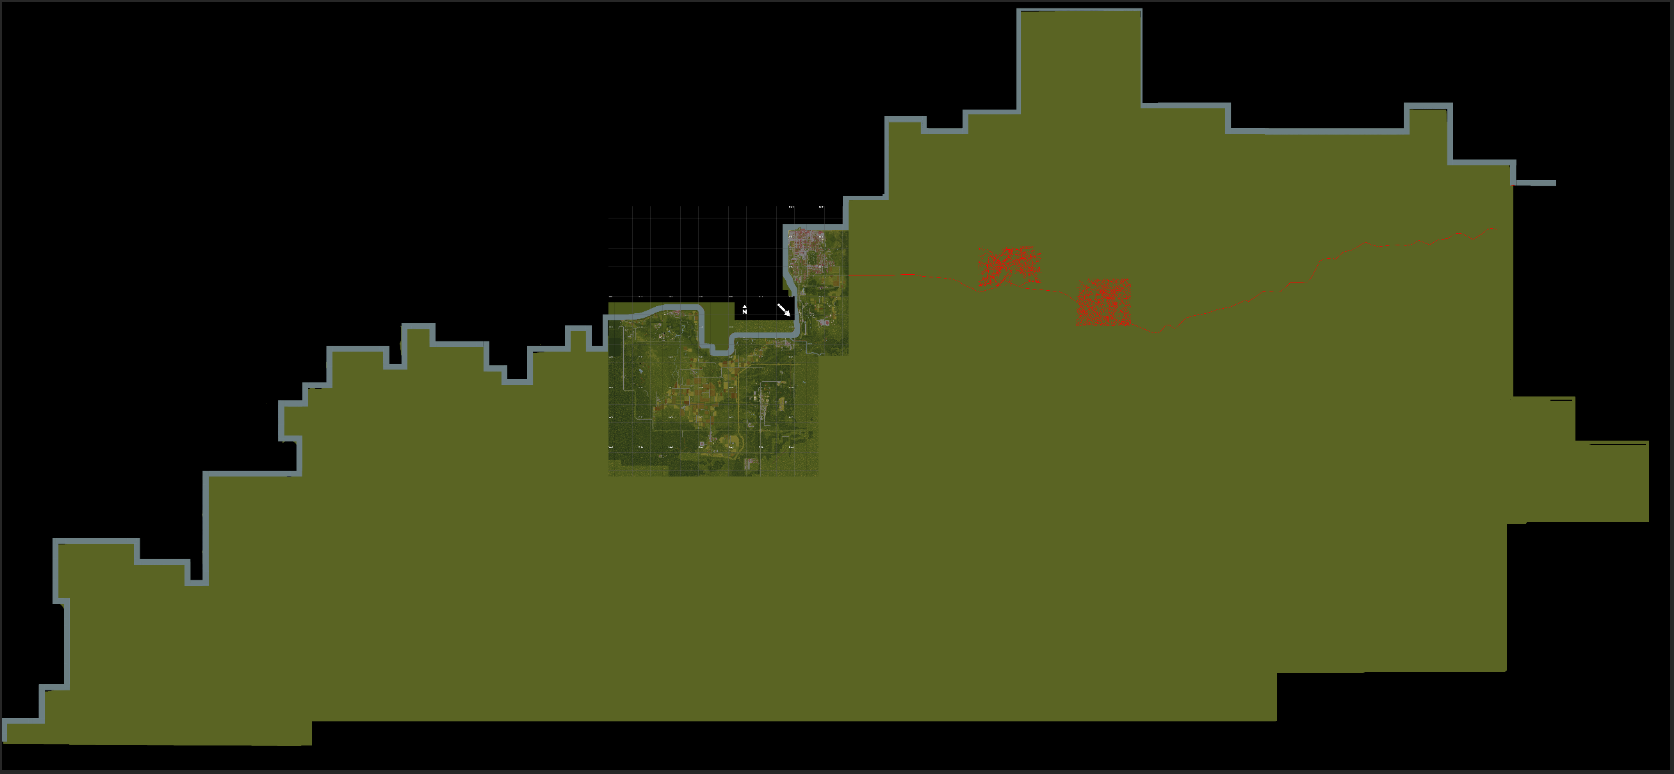
I did a fair amount of modding for TES3: Morrowind, for all you Zoomers out there it was the one before Skyrim and Oblivion, and though dated it continues to have one of the most active and capable modding communities out there. I am part of a still-active project called Tamriel Rebuilt that is systematically expanding the world cell by cell, blending it seamlessly into the original game. Morrowind had an awesome alien world to explore, but it only shipped with a small part of the province playable so there was a shared dream to bring the rest of the world to life. It's really amazing what the TR team has managed to do. It's as if the original developers of the game never quit because we get these incredible expansion packs about once or twice a year from that modding team. Anyway, I live in Louisville, KY so I really got a kick out of Zomboid when I started playing it. But naturally my wanderlust isn't satisfied with the tiny piece of the world we get to play with. The modding community for Zomboid is smaller than TES3 but I thought, what if I could use what I learned from TES3 to lay the groundwork for a similar Zomboid project? I could create a functional basemap, divide it into groups of cells or "claims", and then invite other modders to claim parts of the state for full implementation. It would be the modders' responsibility to blend their work into that of their neighbors for a seamless result. Years down the road who knows, we might be able to explore in ENTIRE state of Kentucky. The freaking castle in Versailles. The capital building in Frankfort. Red River Gorge. Hopkinsville with its alien/goblin folklore. And a slew of bizarre roadside attractions and sleepy small towns, too many to list here. Imagine that kind of world to play in on top of all the features the devs have planned for the final game. So this is something I've been working on quietly for a few weeks now. I have a large photoshop file divided into cells that are sized to match the game world. I pasted in the existing playable area. Then I painted in the rest of the Ohio River and filled in the rest of the state with grass. It's not perfect, but I think I'm getting somewhere. It won't be long before I have a full state map with major roads and cities painted onto the gridmap. Then I can slice them, export them as individual cells, and import into WorldZed. I've run into a few snags. First of all, there are hundreds and hundreds of cells. I need to find some way to automate the slicing/exporting/importing workflow to make it viable. There is also a 100x100 cell limit in WorldZed that might mean I have to work in large chunks. Finally, the top of the game world is at x=0 and I'm not sure yet if you can have cells with a negative x value. I would need to do that to be able to implement any zones to the north of the current area. Does anyone else think there is value in continuing this project? Better yet, does anybody want to help me get this off the ground? Very curious what others in the mapping community have to say.
-
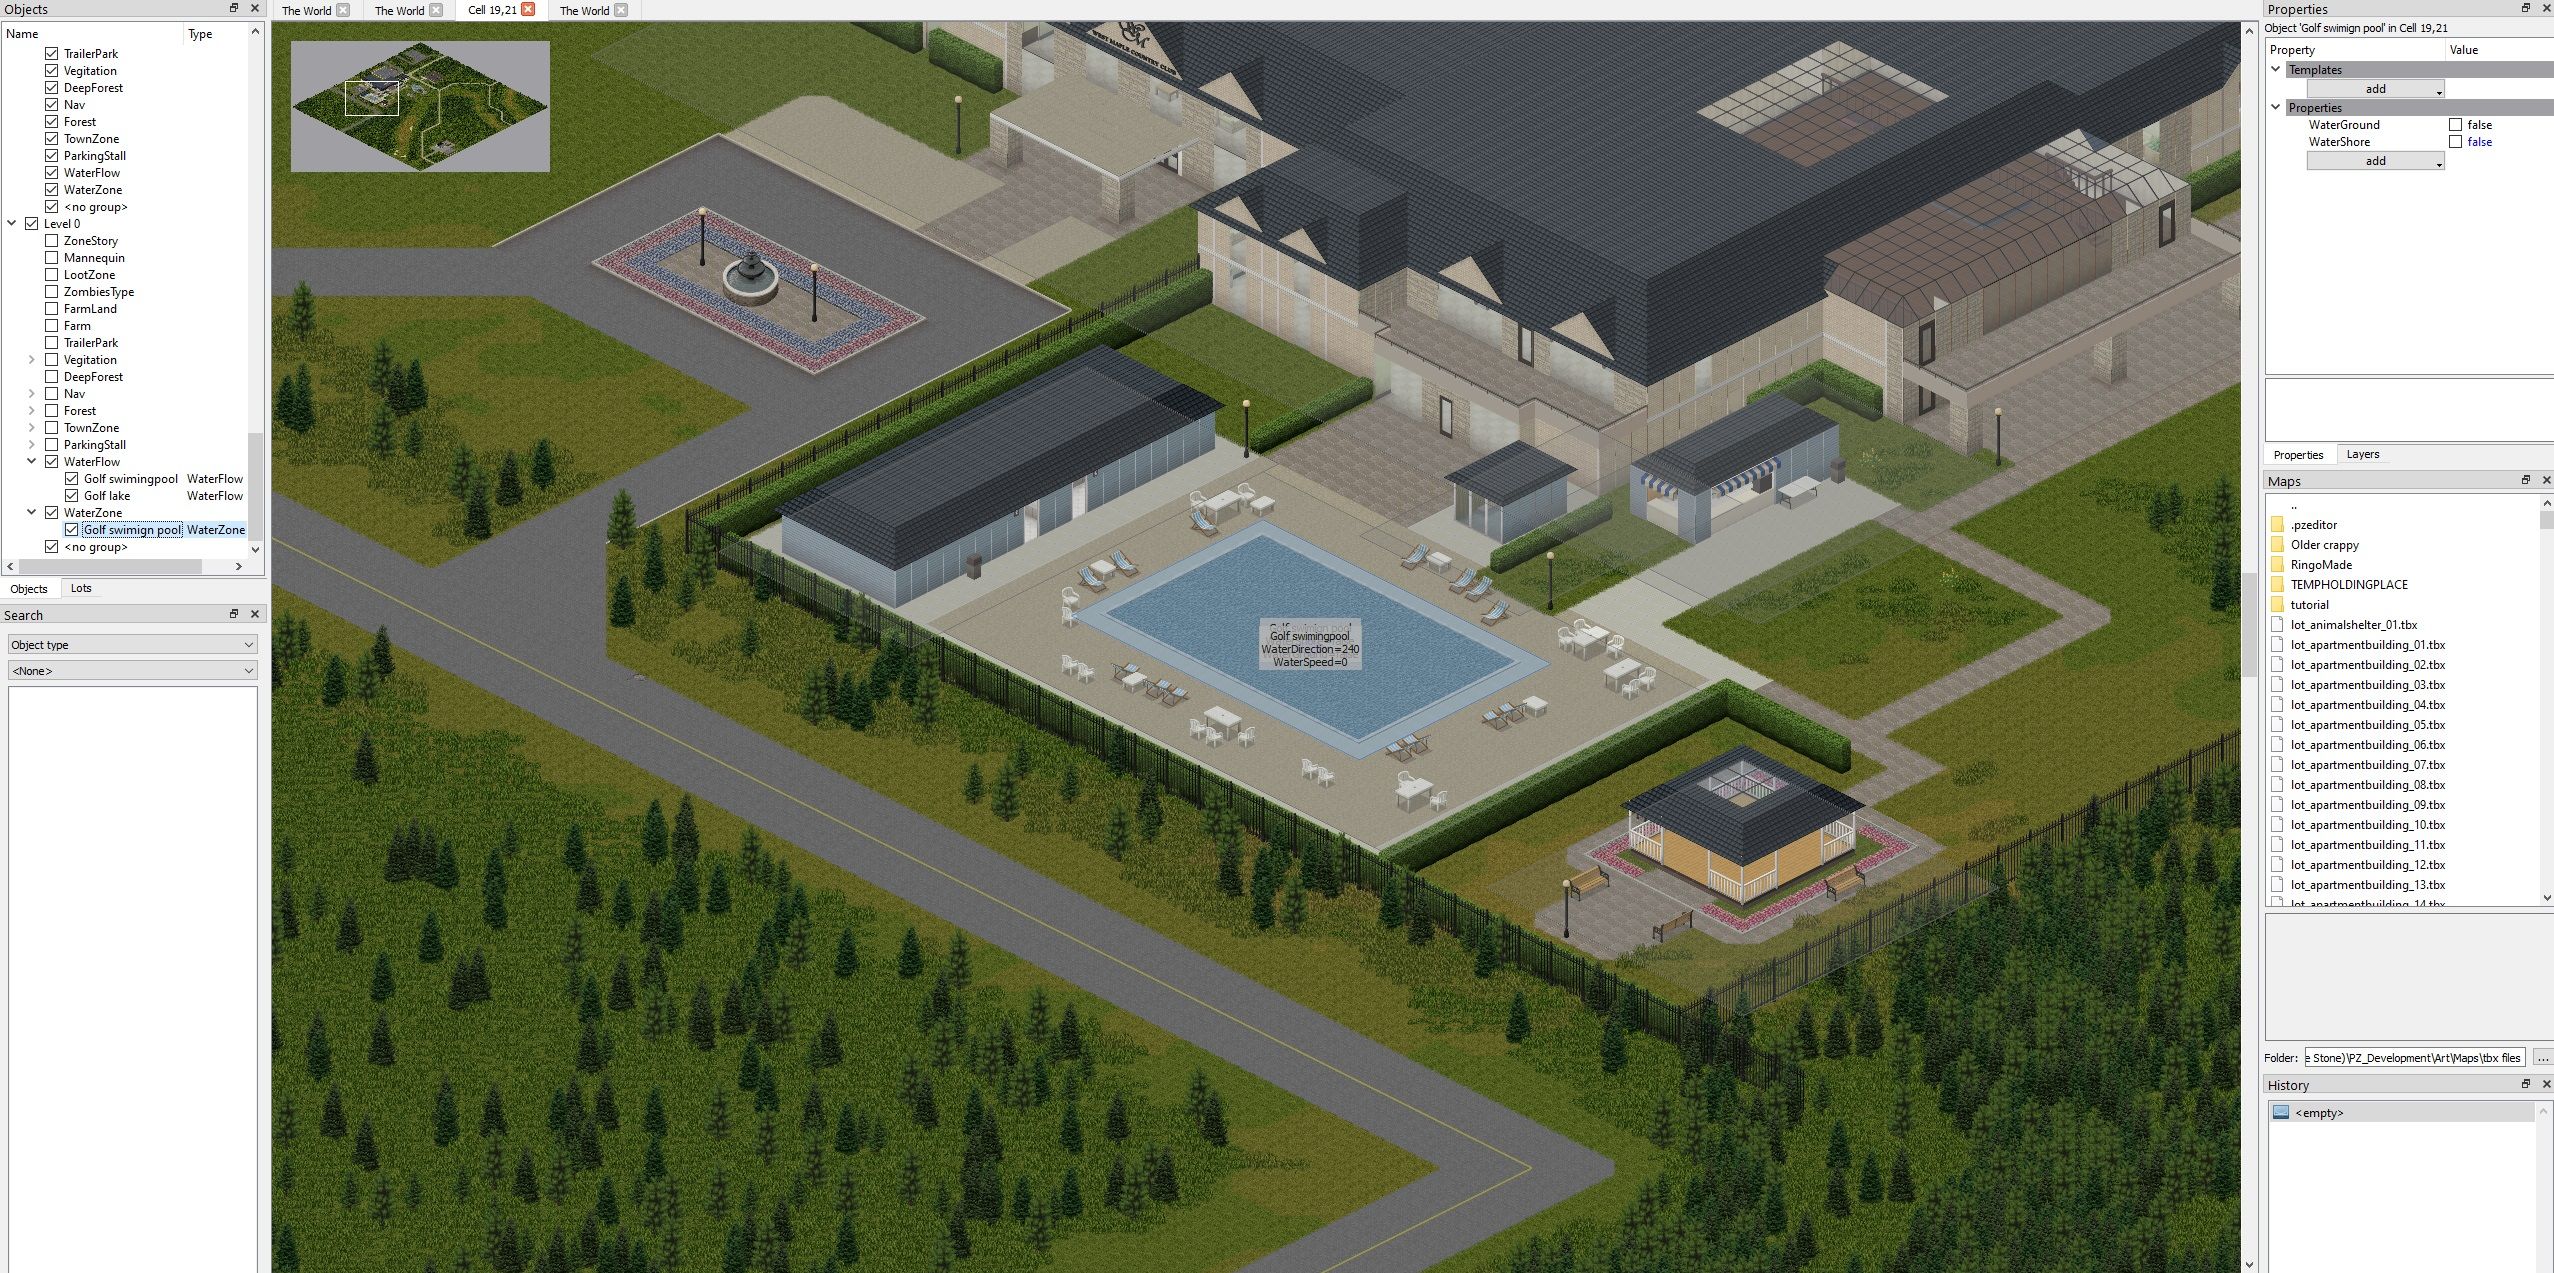
Ever since the map system has been implemented along with letting players mark down their map and write notes in it, many players have grown used to it, and have found their own creative ways of using it (me included), and certainly, lots of players have felt that there could have improvements to the feature. Of course, those are not needed, but they sure as hell would be welcomed. Changing Scale and Resolution of Markings Even though marking symbols and writing notes is already perfectly functional, being unable to change the scale of both icons and text can really be a nuisance when trying to keep a map clean and readable, hence why there are currently +150.000 players using the Map Symbol Size Slider mod, from capsgry. Not only that, but as soon as you zoom-in on the map, you'll realize how low-res those symbols are, which of course, would be even more noticeable if we could increase the size of them. It would be perfect if we could change the scale of symbols to our desire, and even better if they were of a higher resolution, thus losing less quality when scaled. There could have a setting in the game options so players can enable or disable those decals being compressed. Representing Physical Objects Zomboid can be one hell of an immersive game, even if we're not seeing through our characters eyes (at least, not literally), I'm sure that no player has ever managed to stay completely calm for the first time they witnessed their character panicking, probably while trying to barely escape of a horde while listening to their character's heartbeat speed up, get louder, while intense music players. The reduction of awareness from being tired, not being able to knock down a Zombie when exhausted, and the list keeps expanding. We always see our character doing specific actions, such as eating from the plate with their hands, forks or spoons, to grabbing a crowbar to unbarricade a window... but when we write down on our Journal? All we see is a GUI pop-up following Zomboid's layout in which we type text in, while the character stands still. Of course, there is absolutely no need for it, but I can only imagine how "into the game" I would feel if I could see an actual piece of paper, or ruled notebook page instead of just another GUI pop-up that I can perfectly see through, Down below you'll find a concept that I — who's very clearly not a designer — have made, that perfectly illustrates what I have in mind; As mentioned within the text, writing down on journals is a very common form of roleplaying, which only adds to the immersion. For example, any of DaFox's illustrations on "Lily's Journal", which usually shows a few illustrations followed by its inspiration being occurrences that the player lived through, and wrote down on its diary. Again, none of these could be considered a "must have" addition, but be honest, wouldn't they be a huge improvement to how immersed we can already get when playing? Hell, I would even suggest letting players draw on pieces of paper and maps, those could even reduce Boredness! Although, we all know what most players would end up drawing. Hopefully this suggestion can be taken into consideration, so we all can live as our characters before the unevitable.
-
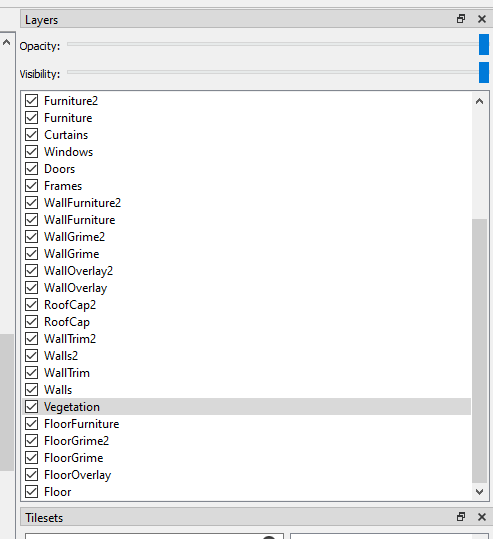
I have a ground layer and a foliage layer in my drawing tool (Currently Using Krita = https://krita.org/en/ = and OR Paint.Net = https://www.getpaint.net/download.html = ) and have been following various tutorials of how to export the images to WorldEd ( Tutorial Video Below) I get to the point where I am saving the file in Krita/Paint.Net and selecting .PNG files. However, files with multiple layers are defaulted to "Flatten" and is reduced to one layer, completely getting rid of either foliage or ground layer. I am inept at all this but very intrigued and want to learn. Any tips on what I can do to get passed this essential first step?
-
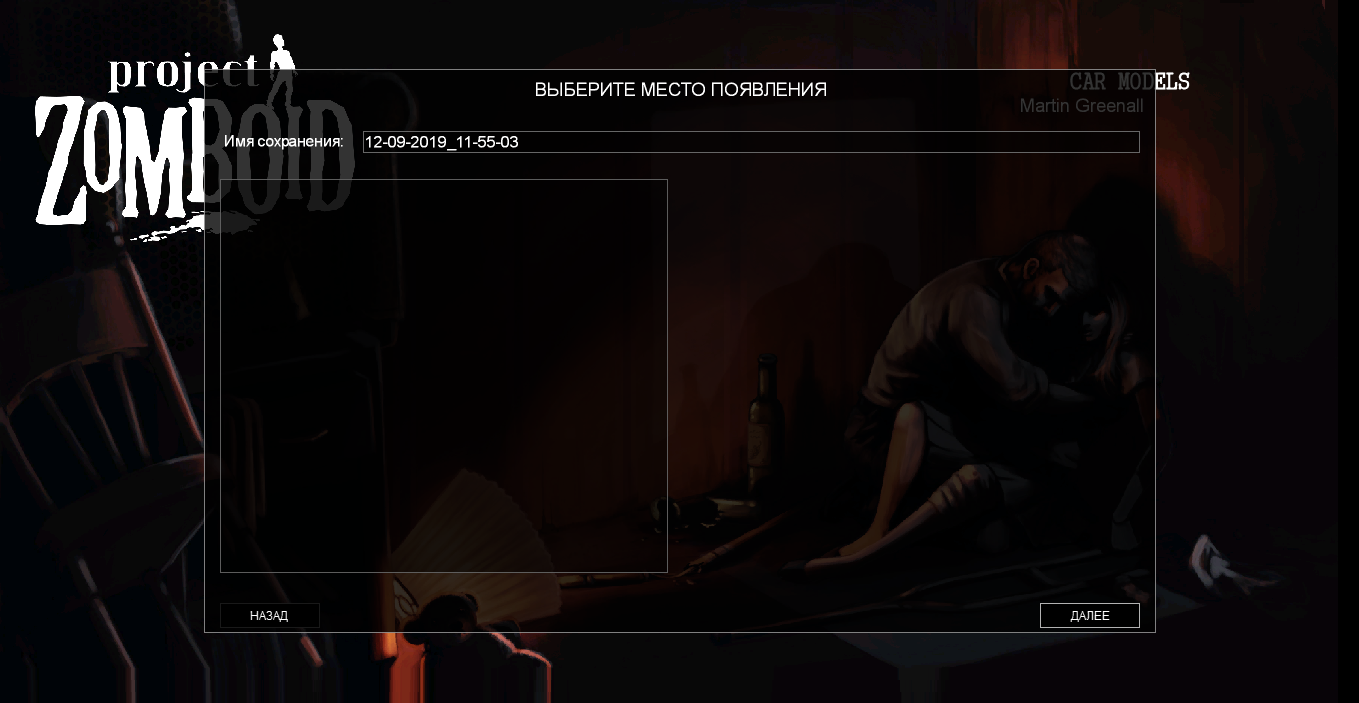
I made my map in WorldEd+TIleZed, did everything according to the guide from the official forum. I set the spawn points. But, when I select my location and click "Next" I get this error in the console: 1568270470051 STACK TRACE 1568270470051 ----------------------------------------- 1568270470051 function: clickNext - file: MapSpawnSelect.lua line # 169 1568270470052 function: onOptionMouseDown - file: MapSpawnSelect.lua line # 143 1568270470053 function: onMouseUp - file: ISButton.lua line # 55 at se.krka.kahlua.vm.KahluaThread.tableget(KahluaThread.java:1654) at se.krka.kahlua.vm.KahluaThread.luaMainloop(KahluaThread.java:499) at se.krka.kahlua.vm.KahluaThread.call(KahluaThread.java:167) at se.krka.kahlua.vm.KahluaThread.pcall(KahluaThread.java:1922) at se.krka.kahlua.vm.KahluaThread.pcall(KahluaThread.java:1747) at se.krka.kahlua.integration.LuaCaller.pcall(LuaCaller.java:77) at zombie.ui.UIElement.onMouseUp(UIElement.java:995) at zombie.ui.UIElement.onMouseUp(UIElement.java:957) at zombie.ui.UIElement.onMouseUp(UIElement.java:957) at zombie.ui.UIManager.update(UIManager.java:1159) at zombie.GameWindow.logic(GameWindow.java:630) at zombie.GameWindow.run(GameWindow.java:1315) at zombie.GameWindow.maina(GameWindow.java:1091) at zombie.gameStates.MainScreenState.main(MainScreenState.java:184) What could be the problem?
-
The first map is "Ghost Town" of survivals. It's situated here There you can find: 3 residential complexpolice stationhospitalsawmillelectric generatorbarcafegreenhouseplaces for shops7 towersand something else ) Initially, town was planned as a RP site for one interesting Russian server, the city has its own system and the economy. Some buildings are here purely role assignments. Some screenshots - https://vk.com/doc209736343_346146822(This old screenshots, before error correction. Now map looks a little better) Download link: https://www.dropbox.com/sh/mi4yncnflgij72m/AAB1-CVNCgQmXHQrBl7bZ1POa?dl=0 Second map is a lake with a bunker. There are:MotelBunkerLakeShipMini barLonely House Download link: https://www.dropbox.com/sh/dtr4i8kldde2pdu/AABc9P6p3Y_58gDSeH_2fqsXa?dl=0 And third map is a "JustForLulz map"There are:tanktanktanktanka lot of tanksand a little farmer's house Download link: https://www.dropbox.com/sh/wnvuamcc8s0eh1l/AAB_Rq8xuoWs4R83uDWwAlUWa?dl=0 Sorry for my eng ...and for bad screenshots. I did not know before, how to remove the extra lines in the mapper.
-
Hi, Friends and I are running a private server. We have a few mods on which work perfectly fine but when we tried to add modded maps the dialog box shows up for anyone that tries to join to download the modded map files / used cars mod but the actual maps or used cars are no where to be seen. We are however able to find a map item for one of the new places... Anyone know what's going on? Here is the ini nightlengthmodifier=1.0 PVP=true PauseEmpty=false GlobalChat=true Open=true ServerWelcomeMessage= <RGB:1,0,0> Welcome to Project Zomboid MP ! to chat locally press 't', to global chat press 'y' or add '/all' before chatting <LINE> Type '/help' to have a list of available commands <LINE> <RGB:1,1,1> LogLocalChat=false AutoCreateUserInWhiteList=false DisplayUserName=true SpawnPoint=0,0,0 SafetySystem=true ShowSafety=true SafetyToggleTimer=2 SafetyCooldownTimer=3 SpawnItems= DefaultPort=16261 ResetID=738400797 Mods=BedfordFalls;FORTREDSTONE;Otr;Hydrocraft;ToadTraits;Waistbags;RPGarbageDisposal;POS;LBMKnives;ORGMSilencer;HCORGM;ORGM;PumpPower2;FRUsedCars Map=Fort Redstone, KY;Bedford Falls, KY;South Muldraugh, KY;Otr;Muldraugh, KY DoLuaChecksum=true Public=false PublicName=My PZ Server PublicDescription= MaxPlayers=64 PingFrequency=10 PingLimit=400 HoursForLootRespawn=720 MaxItemsForLootRespawn=4 ConstructionPreventsLootRespawn=true DropOffWhiteListAfterDeath=false NoFire=false AnnounceDeath=true MinutesPerPage=1.0 SaveWorldEveryMinutes=90 PlayerSafehouse=true AdminSafehouse=false SafehouseAllowTrepass=true SafehouseAllowFire=true SafehouseAllowLoot=true SafehouseAllowRespawn=true SafehouseDaySurvivedToClaim=0 SafeHouseRemovalTime=200 AllowDestructionBySledgehammer=true KickFastPlayers=false ServerPlayerID=596264336 RCONPort=27015 RCONPassword= Password=6969 MaxAccountsPerUser=0 SleepAllowed=false SleepNeeded=false SteamPort1=8766 SteamPort2=8767 WorkshopItems=926737806;524301139;1516836158;522891356;1510950729;498441420;1299328280;1478038149;909647363;1164596597;859341915;640674707;1314062363;514618604;1188473572 SteamScoreboard=true SteamVAC=true UPnP=true UPnPLeaseTime=86400 UPnPZeroLeaseTimeFallback=true UPnPForce=true CoopServerLaunchTimeout=20 CoopMasterPingTimeout=60 VoiceEnable=true VoiceComplexity=5 VoicePeriod=20 VoiceSampleRate=24000 VoiceBuffering=8000 VoiceMinDistance=1.0 VoiceMaxDistance=50.0 Voice3D=true PhysicsDelay=500 SpeedLimit=50.0 server_browser_announced_ip= UseTCPForMapDownloads=false PlayerRespawnWithSelf=false PlayerRespawnWithOther=false FastForwardMultiplier=40.0 PlayerSaveOnDamage=true SaveTransactionID=false DisableSafehouseWhenPlayerConnected=false Faction=true FactionDaySurvivedToCreate=0 FactionPlayersRequiredForTag=1 AllowTradeUI=true HoursForWorldItemRemoval=0.0 WorldItemRemovalList=Base.Vest,Base.Shirt,Base.Blouse,Base.Skirt,Base.Shoes ItemRemovalListBlacklistToggle=false DisableRadioStaff=false DisableRadioAdmin=true DisableRadioGM=true DisableRadioOverseer=false Any help would be appreciated!
-
INGAME maps don't load for me, maybe this is due to my ram (2gb)? I open them, then there is a pause as the game/computer 'loads' the map and then they open like this. Once the first map opens and if failed, then they all fail and open instantly as shown in the screenshot.
-
Hello everyone! In short, two friends and I are playing in the coop mode, I wanted to know if for example the one who created the map or the world can pass it to another so they can continue playing when he is not there. Thanks
-
Please Up Date the Maps with there being no in game map i am relying on the PZ maps so i don't get lost so can you please update them thank you.
-
This is mainly for Single Player use as you can use the "mods=" for server setups. Also on Steam: http://steamcommunity.com/sharedfiles/filedetails/?id=944054233 First you want to subscribe to and/or download the maps that you want to combine. If you subscribe using Steam you will find the downloaded mods in your "Steam\steamapps\workshop\content\108600" folder, each mod with its own unique id number (for example Bedford Falls is 522891356). Now you want to create the following folder structure (on your desktop): Spoiler MyCombinedMaps media maps MyCombinedMaps Now, inside the first folder, alongside the media folder, you want to place a mod.info file and a poster.png file, you can create your own from scratch, but it's easier to copy them from one of the map mods (e.g, from the "steamapps\workshop\content\108600\522891356\mods\Bedford Falls" folder) and edit them to suit your needs. The mod.info should look like the following: Spoiler name=My Combined Maps id=MyCombinedMaps description=This adds multiple map mods together for use in Single Player poster=poster.png The poster.png file should be a 256x256 image, you can make your own using paint etc or simply use one from one of the map mods you downloaded. Now, for each map mod you would like to combine, navigate to its map data folder (e.g, "steamapps \workshop\content\108600\522891356\mods\Bedford Falls\media\maps\BedfordFalls") and copy across all of the ".lotheader", ".bin" and ".lotpack" files to your own map data folder ("MyCombinedMaps\media\maps \MyCombinedMaps"). Be careful when adding any maps that have cells that overlap, add the map you want be "on top" last. Once done, copy across the "map.info", "objects.lua", "spawnpoints.lua", "spawnregions.lua" and "thumb.png" from ONE of the map mods to the same folder as the files above. Rename the spawnpoints.lua file to something like bedfordspawns.lua or denverspawns.lua depending on the map. Now copy the rest of the spawnpoints.lua files from each map and rename them to something relevant too. Your map data foler should now have multiple "*spawns.lua" (one for each map) files alongside all the rest of the map files (".bin", ".lotheader", ".lotpack" etc). The next thing you need to do is add the objects.lua data from each other map to the one you copied into your map data folder. For each one, open using notepad and copy/paste everything after "objects= {" up to but not including the final "}" in the file, into the objects.lua already in your map data folder, after the final entry but before the final "}". Next, edit the map.info file to: Spoiler title=My Combined Maps lots=Muldraugh, KY description=Adds multiple map mods to the vanilla world The last file you need to edit is the spawnregions.lua file (some maps may not include one of these, but you can easily make your own too), you will need to add/edit entries to point to the "*spawns.lua" files you renamed, it should end up looking somehting like: Spoiler function SpawnRegions() return { { name = "Muldraugh, KY", file = "media/maps/Muldraugh, KY/spawnpoints.lua" }, { name = "West Point, KY", file = "media/maps/West Point, KY/spawnpoints.lua" }, { name = "Rosewood, KY", file = "media/maps/Rosewood, KY/spawnpoints.lua" }, { name = "Bedford Falls", file = "media/maps/MyCombinedMaps/bedfordspawns.lua" }, { name = "New Denver", file = "media/maps/MyCombinedMaps/denverspawns.lua" }, } end This will give you the option of spawning at any of the map mods (or vanilla games) spawn options after selecting your combined mod on the world select screen. All that is left to do now is copy your entire folder structure into your "C:\Users\YourUserName\Zomboid\mods" folder. Now you can load up the game, enable your mod, start a new game, select your combined mod and then spawn in a town of your choice. Some map mods will also come with additional folders inside of their "media" folder, alongside the maps folder, it's important to also copy these across to your combined mods "media" folder as they will be adding things such as lootable maps, additional items/recipes etc. Here's a working example that combines Bedford Falls and Fetzington into a single mod: http://www.filedropper.com/bedfetz_1 (Should only be used as an example as it will become outdated as soon as a new version of Bedford Falls or Fetzington are released).
-
Hello, I want insert maps like california or phoenix on my server, but people speak about NO LOOT generates by these maps, is it true? Can we do somethings for these maps for generate loot? Thanks for help and have a nice day!
-
Hello all, i want install drayton in my multiplayer server but i can not find the Mod ID of this map. Someone can help me please?
-
So at some point I would like to (whether or not I actually get to it is another question) create some mods both on the mapping side of things and on the new items / crafting side of things and had a questions on the mapping stuff. The first question related to overlapping of maps with other mods and even new maps the TIS might provide in the base game. From my understanding of the limited time I have spent in PZ (15-20 hours) and the overlaying feature of map.projectzomboid.com, it seems like that mods can both add new sections to the map (like New Denver) or add content to the existing map (like The Walking Dead Prison). How does PZ handle it if 2 maps occupy the same same in the game world? This can be a problem with multiple map mods if they both add content to the same location but also for maps added by TIS (I mean the latest build added a new map content to the existing map and what if The Walking Dead Prison map was made in the same location that TIS wanted to put Rosewood (or Roosewood, however it is spelt))? The other question related to the upcoming creative mode. Will this mode be able to completely or partially replace the existing tool set for creating maps / buildings? While I know just because it has been announced and we have seen preview videos of it, that does not determine that it is close for release however it seems like the tools that were shown in the preview videos would be a lot easier to use than what I have heard about creating maps / buildings in PZ and I would not want to spend time learning one tool set when another one is going to replace it. If creative mode would be able to completely replace the current set of tools for map making then I would just work on the items / crafting mod type stuff first.
-
 Sorry if this is a silly question, but how would one get mods like maps to work on the server? ORGM mod is working, however Immersive Overlays isn't. Do I need to FTP them to the server?
 -
Can we get a "Random" option on the Map selector and Spawn location selector as well? It's pretty simple to code and as a former single-player gentleman, I'd really love this kind of (simple) feature! EDIT: I'm not looking for a way to randomize better the specific spawning points, I'm looking for a way to cycle through your "map library" randomly, this way I can play randomly in west point, or muldraugh, or bedford falls or New Denver etc etc.
-
Foreword Yes, I appreciate this would be a lot of work but it struck me that I enjoyed PZ the most when I first started and how no idea where the warehouses and medical and gun stores are. If some sort of algorithm could be made for the placement of buildings then you could play a new map each time you play. Additionally, if this could be done in game then you could have it so a city could cover an area much bigger than that of Mul/WP with little or no effort on the developers themselves. I respect this probably beyond the reach of such a small project but in some regards, RNG is the way to go. Once you've created the tools for the maps to generate the rest of work is done by the client. Anyway, I don't expect this to come to fruition but I do still love offering up suggestions so before you shoot it down (community) as you invariably will, remember I'm just thinking up new ideas.
-
I couldn't find an appropriate section in maps for suggestions, so I'll post this here hoping the right person will read it. I have an idea for a challenge map sort of scenario. Instead of working within a town or city area, what about being the sole survivor on a cruise liner? Seems kinda quirky, but within a little different parameters, i think it would be worth a play-through. A few things would be key differences, there wouldn't be trees, but I'm sure that you could get more than enough planks from the hundreds of doors and furnishings on board...likewise saws wouldn't likely be on board a ship, but hammers certainly would. Nails could be find (not sure if accurate, but for sake of gameplay, why not?) Farming probably wouldn't happen either, same for trapping (maybe rats) or fishing (could probably mod proper equipment to fish, but i wouldn't want to stand around on the deck of an infested cruise liner watching a bobber). You would have to rely on raiding cabins and the kitchens. The game would likely be shorter...rather than months, you could probably survive for a couple weeks. Zombies would be fixed in number, and not respawn, but the much closer quarters would imply that chances of being caught and overrun would be greater. Since the number is fixed, you could conceivably kill all the zombies and 'win.' This may be controversial, but the whole map is a shot in left field, so there you go. Obviously this would involve a whole construct of new sprites, and is a huge order coming from someone who has no experience, knowledge, or time for the matter. But this is just an idea that I had that I wanted to share. This is obviously a talented community, and maybe the right person would come along.
- 3 replies
-
- 3
-
-
- map
- cruise ship
- (and 3 more)
-
Hello Community With the release of the Map editor yesterday, we can expect many different Maps from many different users in the near future/long term ! I thought a place to look at all created maps would be great so .... here it is ! No maps will get forgotten and it will be easier to search for new maps to play on as well as browse if the theme for a map you want to create is already in another one ! Every time a new map/thread for a new map gets released I will update this thread/post with the link, a small description and the name of the author ! I visit the forum several times a day , so I will probably notice new maps, but sending me a message with a link to the thread in case i didnt would be great too. I am excited for all the new maps ! Huraaay Indiestone , thank you once again for this awesome game and especially the map editor W.I.P - Maps (Work in Progress) Finished Maps
-
this is a request to please implement integrated maps as one plays ask this as i know it was looked at briefly but then i haven't heard much about it since the reason i bring this up is that i was introducing two new players to the game and the biggest hurdle was trying to get us all together also land marks for the new players when they die and re-spawn are proving very time consuming to learn and the whole situation would be made allot smoother if they at least had a map to go by as currently it proves difficult referring to even north and south as the map is not aligned to the screen as traditional maps would be (w) as north. its actual w and d key to go north (or the top of the screen) so guiding a new player takes quite a hurdle to explain not to mention frustration on there side iv resorted to pulling up a old modified map of muldraugh so they can print it for help and only playing in muldraugh as that is the map i have memorized the best
-
Hi! Being the huge fan of zombie survival games that I am I thoroughly enjoy playing PZ. So much so that I got my own server running (176.58.126.21:64300) and started looking into customizing it right away. I know that PZ has a rich API that is accessible through Lua and wrote a trivial mod following RoboMat's instructions to get a hang of the essentials. I also know you can add items to the game. With all that what I am wondering about is how that can be possibly fed into multiplayer at this point? Here are some concrete questions: Is it possible to use Mods at all in MP?If so is there a distinction between serverside and clientside mods?serverside: Mod only needs to be installed on server and its functionality is propagated to clients. Therefore clients could connect to such a server with a vanilla installation of PZclientside: To be able to play on a server that has a certain mod installed clients would need to install that mod prior to joiningIs it possible to supplement server behaviour using Lua scripts outside of a mod? Things like location-specific chance-based triggers for certain events?Thanks in advance!
-
Smartphones seem like something that, at first glance, would not be useful in a zombie apocalypse. There's no other survivors to call, and even if there was, they wouldn't work since there would be no one to man the phone reception, right? Well, that may be true for the calling purpose of the phone, or other style of phones, we're forgetting one of the main selling perks of a Smartphone - other tasks. Calendars, maps, mobile games, and other applications available at your fingertips; all useful things for your survivor. Smartphones would be a useful addition to add to Project Zomboid because Smartphones are useful for a survivor, allowing acess to an in-game map, the ability to see an extended calendar and open up new gameplay possibilities of setting up a schedule, mobile games to accommodate for boredom, and stress. "Wouldn't Smartphones simply be abused?" The idea I have in place to avoid this is rather simple - have Smartphones be fairly common along with a plug charge, but once the power goes out, so does the use of regular chargers. "But then Smartphones would only be useful for the first couple weeks. That's a bad idea." That's the turning point. There will be also be another, rare, type of charger out there. It is a solar charger. These will probably only be found in electronic stores or warehouses since they are not as mainstream. An example of a portable solar charger, in pink variant! "How would it work with the current inventory system?" At the moment, I picture a bar that represents how much batter is remaining for the pohone. When right-clicked, a drop-down of options such as 'View map', 'View calendar', 'View games', 'View other apps' with the option of having three top apps that would replace the first three options if you wish. "This still sounds a little powerful. Will there be different variants of Smartphones?" I picture three different types, a common one, a rare one, and an extremely rare one. Common ones would be cheaper variants of Smartphones that would carry less battery life, less apps, and overall of a lesser quality. Rare Smartphones would be better in those categories, but not as good as an extremely rare smartphone, which have the most premium apps, battery life, and build quality. I am sure Indie Stone could come up with more ideas on their own. I know this idea seems far-fetched, however overall, an addition of a Smartphone and its accessories would open up more gameplay opportunities, and help the survivor. What do you think of the idea? What are some suggestions/criticisms? Let's make this a good discussion.