Search the Community
Showing results for tags 'cars'.
-
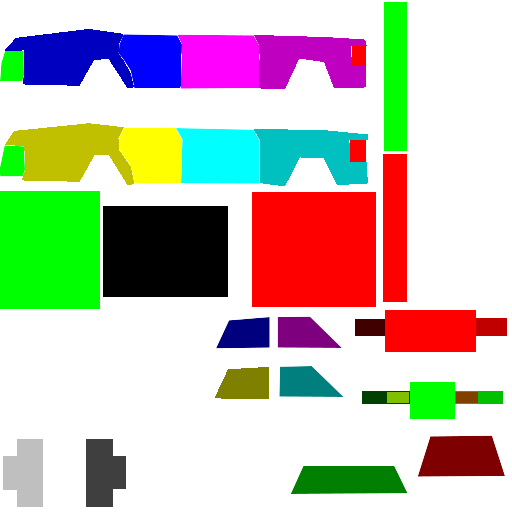
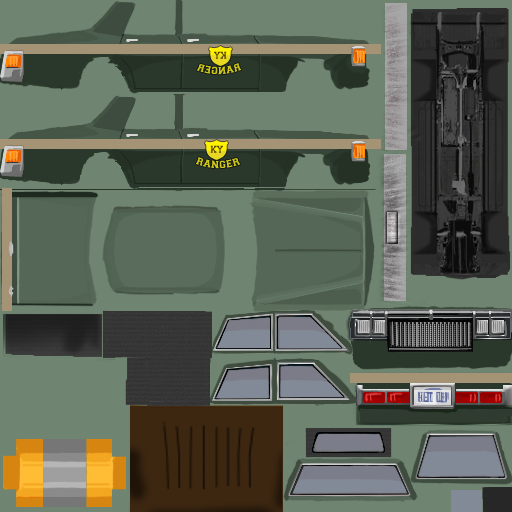
Hello and welcome to my tutorial. It covers full workflow of vehicle creation for PZ. If you are a complete beginner in 3D modelling, you'll have to watch/read additional tutorials, I won't cover every aspect of model creation and 'where this button is located'. I divide vehicle creation in these stages: 1) Modelling 2) Wheels texture and modelling 3) Texturing 4) Packing files in folders 5) Editing scripts and .lua 6) In-game editing and tests 7) Workshop publish STAGE 1 - MODELLING Today I am creating a 1960 Ford Falcon I prefer using blender as it is my everyday 3d modelling software. Now, find references for your vehicle and ideally it will be a blueprint/outline scheme, like this one: There are some tips in modelling for PZ: 1) Do not care too much about topology and good shading. There is no actual shading in game, only windows have reflections. 2) Avoid n-gons or triangulate them before export 3) DO NOT make edges to outline body panels/parts. All dividing of parts will be done with texture mask. You can do it in UVs if there will be a point for that. 4) Place spindiel imitations in wheel wells to hide rear part of wheel models 5) In the UVs parts of body have to be straight-oriented without any non-90 degrees rotation, so pixels in texture will lay parallel with polygon flow. 6) To avoid physics artifacts in game import model of one of vanilla game cars models to your scene and model in consistent scale. Or import mine, that is available in the end of topic. This is what I consider a well done model There is nothing special in UV unwrapping process, just remember to place the least amount of seams possible and keep island aligned. Here are the UVs of my model: I've unwrapped the model without applied mirror modifier, so now we will have to texture just one half of the car. I'll fix mirroring later. STAGE 2 - WHEELS There are many ways to make a wheel and texture it, but I'll show the most efficient one. Make the wheel's face with simple materials, but unwrap the 'road touching part' to flat surface, like this: Then place an orthographic camera facing the wheel, scale it to fit the whole wheel-dish. Place a ring with emission material to light the wheel. Switch your renderer to Cycles and go to camera view, now use a rendered shading mode to adjust materials and lights to your taste. Set rendering resolution to something like 120x120-175-175 for best results Check the 'transparent' box in film settings to have alpha backround in texture: Now increase the sample count to something like 512-1024 and hit render. You will end up with a result of a ready-to-go wheel texture: The example file with scene for rendering and the model of this wheel you can download here: *google drive .blend file* Now make a lowpoly model of the wheel to use this texture on. I prefer using 18-24 edge circles for wheels. The unwrapping will be later, but eventually you'll end up with this: This method takes 10-15 minutes when you get used to it and gives a stunning and clear result. STAGE 3 - TEXTURING NOTE: I use a pretty complicated way of texturing and adding light to model. All rules of using textures the default way are covered in "HOW TO CREATE NEW VEHICLE MODS" topic by RingoD123, one of PZ devs. You can access it here: *boop* I'll show you my way, using Substance Painter to apply lighting and fake chrome parts to model. But first comes the base color and details of the car, so let's dive into it. Create a texture with 0 alpha and resolution 256x256. You can go for 512x512, but personally I like pixelated look of lo-res texture. Here are the settings for initial image: To preview the texture you are painting with different car colors, use this node setup. But switch filtering mode from "Linear" to "Closest", I forgot to do it on screenshot. There are two types of texture details: somewhat transparent and absolutely opaque. Half-transparent parts will be affected by car color, so they are mostly shadow/highlight details. Headlights, fixtures and things like that have to be opaque and painted with 100% brush hardness. It is easier to keep 3d view just to see what are you doing and paint texture in image editing mode, right there: First, paint the outlines of doors and other opening parts. Here are some brush hardness values: 0.2 - Outline shadow 0.5 - Outline 1.0 - Fake chrome and rubber window sealing Some work in progress screenshots Now when you have windows frames, save the image you just painted and go to photoshop and mask out glass sections like that Well, time for Substance Painter. You can use photoshop gradients for windows and blender lighting for lighting of the body, but I'll use SP "Baked lighting" filter for that, and for chrome especially. I will briefly describe what I've done in SP: 1) Mask out windows, give them mirror metal material and add a filter to them 2) Mask out chrome parts, made them mirror metal and added the same filter with slightly different settings. 3) Apply the same filter to all body parts left. 4) Add a position gradient to the windows Now I have this result, it is not shaded model, just basecolor: Also export the AO map you baked in SP. You can download file with this scene to look through and get ideas using this link: *boop* Now paint additional details you want on the car and open Photoshop. This is your layers layout: Now save it as .psd for future color editing and as .png to see what the you've done. Plug .png direcly as BaseColor in shader settings. Set your shading setting like this: And check if everything looks ok. This is my result: And this is the vehicle's look with wheels that we made before Sweet, isn't it? Now, it is time to get rid of mirroring. You can make new UV, bake it and... get A LOT of offset artifacts resulting in jagged pixel edges. There is a lazy but effective method: 1) In the UV editor place cursor in the 0,0 coordinates. 2) Set Pivot to 2D cursor: 3) Scale all UV islands to 0.5 EXACTLY 4) Apply mirror modifier to your model. Now select FACES of any half of the model and move it in UVs on Y by value 0.5 EXACTLY or you'll eventually mess everything up. 5) In Photoshop expand canvas of your PSD file we made before 6) Duplicate everything and move to the upper left corner, like in UVs. You can merge color layer(s) to operate color on export more easily. Now you have half of the texture empty... You do not want to waste it, right? Then drop in the wheel texture here without scaling, and you won't need additional texture file for it! 7) Create a layer beneath all others and paint it black or grey to cover alpha-holes in the textures. 8 ) Now unwrap the wheel to this new texture and let it shine! We painted the car and fixed mirroring. DOWNLOAD THE .PSD FILE: *bloop* There are 3 more types of textures to make: 1) Rust 2) Damage (1 or 2 levels, I'm lazy, I prefer using single one) 3) ID Color Mask or just Mask It wasn't possible to make them right with mirroring. Everything about these textures are explained clearly in Ringo's guide, again: *boop* I'll just show results I ended up with. Now you have to use 512x512 clear images for these textures, do not forget it. RUST Painted it with jitter brush and 0.2 hardness. To see what I am doing used the same node setup, as for base texture. DAMAGE Painted gradients with black and white with 0.1 hardess with repetitive strokes. MASK Mask texture tells game where are separate parts of car: doors, windows, lights and others. Every part has it's own color in palette, you can find color table in Ringo's guide. Copy and paste color HEX to use it in blender brush or fill tools. I've missed some of the parts because they do not really matter. AEUGH Texturing is finished. Go to photoshop and make all color variations you want and save them as .png, name them Vehicles_[vehicle name]_ Vehicle name mustn't containt spaces These are color palettes of my car: Now you have to export your vehicle body and wheel models. Copy them to an empty scene and save as separate file. If you used blender default orientations (front, back, right, left, top), then rotate the car on Z axis by 180 degrees. Game rotates it for some reason, so you'll have to do it. Now position everything in scene like this and continue to export settings. Export body and wheel separately with these settings: STAGE 5 - Packing files in folders The folder hierarchy and naming the files you can find in Ringo's guide. The mod file and all of my project files you will be able to download in the end of this topic. make up an Id name for your car. It has to be short, but unique and do not contain spaces. For this car I use '60falcon'. _____________________________________________ workshop.txt properties of the mod for Steam Workshop _____________________________________________ mod.info properties of the mod for in-game mod menu _____________________________________________ models_X folder -> vehicles this folder contains 3d meshes of the vehicle - body and wheel _____________________________________________ textures -> vehicles easy to guess, all vehicle textures are placed here null.png - completely transparent image, used as placeholder later on _____________________________________________ scripts -> vehicles there shoud be a .txt file named with you vehicle's ID name. Open it up and follow these instructions: change invertX to 'TRUE' if vehicle appears to be mirrored by left and right in game. Do not care about scale, offset and other geometric parameters. Insert all your color variation textures as shown below: All vehicle driving parameters are self-explanatory. Remember to set seats count, I'm creating a car with 4 seats. If you want to make less seats or add new, delete passenger[Seat code] records or add new. Also remember Seat[position] records down below. Add or delete the templates, loaded from Game default files: _____________________________________________ LUA SCRIPTS lua -> server -> vehicles -> [car id name]dis.lua Vehicle trunk type distribution file. There is a file with all vehicle distribution types in game files, I'll put it in project folder in the end if the article. This is game files distibution types, select one of them in respect to the vehicle type you are creating. I'll use CarNormal type for Ford Falcon. This is what distribution lua file has to be: _____________________________________________ lua -> shared -> [car id name]SpawnList.lua This file describes spawn zones of your car in game world with certain chance. I've typed in all default zones of spawn, you just have to change the chance and set [Base.60falcon] to [Base.(your car id name)] _____________________________________________ lua -> shared -> Translate -> EN -> IG_UI_EN.txt This is the name of the car in UI - keys name, mechanics window name and such. STAGE 6 - In-game editing and tests Launch PZ and disable all mod exept the one you will be debugging. Now close the game and go to Steam. In application setting set startup parameter to -debug It enables many debug options in-game. Now launch the Game again and, if menu doesn't appear, you've done something wrong in lua scripts. Check them for probles, and I hope, you'll figure out what is wrong. Now start a new game in world with no zombies and big amount of cars. Leave the house and find any car vibing in the street. Right click, -> Vehicle -> Set Script -> [your car ID name]. Car will switch to yours. This is what I've got on first time in-game spawning: YEET, it is all coming along. But wheel positions are a bit off, and we have to place the entering areas of doors. Go to Right click on car -> [DEBUG] Vehicle -> Vehicle Editor. Chassis Place extents and physics shape to outline the car Areas These are access areas to different parts of the car. There is nothing to describe, really, just place them where you can explain it and continue to next section Right click in mechanics tab to enable cheat options for the car. Now right click in mechanics panel. Here you can get key for that car or repair it. Final result in different variations Make a suitable preview image for your mod and crop it in Photoshop to 256x256. Place it in mod folder as preview.png In game menu go WORKSHOP -> create or update mod -> Go to your profile workshop items and find the new mod. Add the description, more screenshots and set visibility to 'Public' ALL PROJECT FILES: *YEET* ZE END Congratulations if you followed my guide to this point. Comment any issues or mistakes I've made.
-
A "keep speed" solution for drivers You accelerate to a desired speed, release [W] key, then press [key bind] and car starts to maintain current speed until you press [W] or brake. Bonus: 👀 Fridge vans (heavy duty variant) Wood-powered car/gas tank (Video)
-
Hi guys, What do you think of a Mod which would allow modifications of cars like adding extra armour, putting metal sheets over windows, making bumpers, spikes or attaching guns ? Basically customising cars ! This would make the mechanics skill more attractive to have (leveling it up doesn't give much as of now) Additionally i thought the it would be a good idea to make the fuel consumption and speed dependent of overall weight of the vehicle. This would balance over armoured and armed cars ;) Do you know if such mod exist already? would someone be interested in making it?
-
i have a low end laptop , i lowerd graphics for the game not to crash on start ( this is how you died loading )

-
So imagine you have a home. You hear a horde nearby! You get to your home which is a trailer and you have everything you need on it! You get out of dodge while driving. It will have A way you can enter a building like a normal home. When you are inside you can press V and change seats to the driver seat and you can drive. If you leave you just get put next to the driver seat in the car. It will have a big gas tank and will be up to the devs how much gas it takes. Speed demon is good but bad. The car is slow but thats what you want from your mobile home. If you crash you might break a window so zombies can get in and eat you. It might remove barricades from said window. Sunday driver is not that great but it's useful as you want to take it nice and slow in your car. It will have a capacity of a good amount to make it a viable home. Heck maybe a perm one! Zombies will not attack the one door as to make it balanced so you can get out but the zombies only attack the windows. You may say this is op but think of it. If you are using it for its original purpose you got only one way in and one way out. You should have barricaded the 3-4 windows on the car so you wont die. Something like these. Designing interiors would be difficult but instead: So an RV that uses a new context menu similar to vehicle menu, with an oven and mini fridge that is powered only by the generator, a water tank(upgradable),1-2 inside storage slots, 2-4 vehicle bays, 4 seats: driver/passenger seat(upgradable), left/right side couch(not upgradable)glovebox/radio(upgradable to HAM radio), sleeping is safe, only entrance is from the middle of passenger side and passenger side door. Ideally it'll work with the radial menu in place already, and a secondary larger/alternate RV version would have a washer/dryer stack usable only with the generator as well Kudos to LastRequest for the idea but not walkable
-
 I had a fully loaded police truck when I saved and exited the game. It was parked and turned off about 20ft from my location. Loaded up a few hours later and the car was gone. This was parked by the rear exit to the movie theater by the mall. EDIT: Another odd effect. The backdoor to the movie theater is now locked and it was NOT when I last played. As far as I can see, the pile of dead zombies I was disposing out back are still there. So, car and contents vanished, door locked itself. The trunk was nearly full with a few tote bags, a school bag, and a hiking bag loaded mostly non perishable food, building supplies, tools and some guns and ammo.
 -
I've tried tor each out to people on the indiestone discord, I've done everything ever article i can find on here to try and fix it and have no idea what i can do to fix it. whenever i try to toggle the Vehicle Info or Car radial i just get lua errors Vehicle Info: function: onMechanic -- file: ISVechicleMenu.lua line # 395 function: onKeyPressed -- file: ISVehiclemenu.lua line # 969 Car Radial: function: showRadialMenu -- file: ISVehicleMenu.lua line # 54 function: onKeyStartPressed -- file: ISUIHandler.lua line # 56 I have no clue how to fix this, or read LUA, I've tried everything I could find about it, I don't know Lua code at all so yeah, maybe i'm an idiot but help would be appreciated Al mods are disabled, i thought maybe ORGM's settings might be conflicting so i disabled all mods i had, i checked my servers settings for vehicles as well, easy use isn't enabled, i have no idea why this isn't working
-
So I just got this game a couple weeks ago, I was playing around with settings to get better performance and now I don't know if its something ive done or a bug but car textures are missing. The shadows are on the ground and I can still get in the car and check the trunk but the actually textures aren't showing. Just wondering if anyone has any ideas? Loving the game so far!
-
Hello. I've been playing the latest IWBUMS build (as of 10/10/2018) version 40.25(Steam). I run windows 10 (version 1709), and a gtx 1060 6gb, ryzen 5 2600, 8gb ram. My screen resolution is 1440p (I think i'm running the game at 1080p though) The bug/s I've noticed is that for me the recent addition of shiny windows on cars doesn't work unless post processing is switched off in the video options. (I have also noticed that rain doesn't seem to "splash" when it hits the ground, but that might just be me not knowing what to look for.) I have updated my graphcis drivers, and so can't see any reason for it not to work (I have also validated my game files), so I am assuming this is a bug, and not intended behaviour. As far as I know, the only way to reproduce the bug is essentially to switch post processing on and off, and compare the windows before and after.
- 4 replies
-
- 2
-

-

-
- post processing
- shiny
- (and 1 more)
-
 Good evening. This is something I can't explain in pictures, because it's in motion. I can, however, describe it. I am also experiencing lag like I've never imagined, although I attribute that to the "Super Survivors" and my entry into a place I have not been before, which requires new Survivors to be generated. (Trying it without the "Super Survivors" enabled only caused monster lag when there were large numbers of zombies.) When I summon a horde of zombies to follow me in my car (so that I may either ignite them or run them over), the occasional event in which the horde gets so big that the zombies literally stop my car happens. This is normal, and usually, my car can't move more than a few pixels for some time until I break out. That is where the problem arises. Zombie hordes keep concentrating on one side of my car, and the game clips as my car is forced in the direction the zombies are pushing. I have no control over my car until it crashes into something. It's as if my car is on black glass! When I plough into a horde of zombies and they stop me, the usual pixel-by-pixel shoving begins, but once I break out of the horde, my car suddenly lunges at full speed, as if the horde was a chain that had been broken, in the direction it was going. I cannot control, break, or reverse course into the car unless and until it crashes in some way. It's as if my car is on black glass! I should mention, BTW, that it is in November, the temperature is approximately thirty two degrees Farenheit, and it is raining. This, coupled with lag, means my car crashes into everything and the game keeps lagging, so even when I am in control, I still crash into things. Even with all the Mods and the special Advanced Map, I never experienced any lag like this, and I've noticed a lot of change in vehicle mechanics and behavior since the IWBUMS V40.14 version. (Namely, the positive benefits are that I can run over zombies more efficiently and vehicles cause more damage to zombies.) Is this Working As Designed, or have I encountered a bug? Thank you for any assistance you may render. -TURTLESHROOM
 -
Update 11/3 Hey guy! This is now working on the stable branch! Hey dudes, I finally got the compilation of my cars completed, plus a few extra. I've got all the masks working, although the damage textures are kinda half-assed. The script files are fine tuned (for the most part). But yeah, hope ya guys enjoy! Link: https://steamcommunity.com/sharedfiles/filed etails/?id=1510950729 I owe a HUGE thanks to Fenris_Wolf of ORGM Rechambered for helping with, well, all the lua files, haha. I'm as good as code illiterate, so without him, this wouldn't have gone anywhere. Car list:
-
1) The first thing you want to do, as with most mods is to create your mods folder structure, use the image below as a reference, replacing MOD_NAME with the name of your mod: Don't worry about the files shown above, you will be creating them as you follow this guide, just make sure to remember, anytime you see "MOD_NAME" in this guide, replace that with the name you chose for your mod. 2) In your "..mods/MOD_NAME" folder, create your "mod.info" text file which contains the following code: Remember to replace all "MOD_NAME"'s with the actual name of your mod. 3) In the same folder, create/place your MOD_NAME.png , this will be the thumbnail used in game as the poster/picture for your mod. 4) Next up, in your "mods/MOD_NAME/media/lua/client" folder, create your MOD_NAME.lua file with the following code inside: This is the script that will load your model and scripts into the game, it also controls the spawn rate for the car in each type of zone as well as providing the vehicle mechanic overlay. Remember to replace all instances of "MOD_NAME" with the actual name you chose for your mod. 5) Next, in your "mods/MOD_NAME/media/scripts/vehicles" folder, create your MOD_NAME.txt file containing the following code: This script example contains all of the parameters to control the simulation of the vehicle, such as engine power, gear ratios, collision cube and much more. You will (hopefully) find it well commented to give you an idea of what each parameter does. You can look in the games "media\scripts\vehicles" folder for a vanilla vehicle script that more closely reflects the vehicle you are adding rather than starting with the example above, have a good look through them all to get a sense of the different templates you can use and the various changes that can be made to different components. 6) Now you need to (if you have not already) make the 3d model for your vehicle. We suggest using Blender, but as long as you're experienced in 3d modelling, any program that can export .ply files should work, just make sure your faces are triangulated, in Blender you can do this by selecting your model in Edit mode then pressing Ctrl + T. Then drag and drop the exported ply file onto the converter supplied below (unzip the below file, drag your .ply directly onto the .exe, do not double click the exe), it will output a new txt file with the same name as the .ply in the same directory. Copy the new .txt file into your "mods/MOD_NAME/media/models" folder as "Vehicles_MOD_NAME.txt This is the .ply to PZ convertor: PZ_PLYtoPZconverter.zip 7) Now it's time to create your vehicles texture files, these should all go into the "mods/MOD_NAME/media/textures/Vehicles" folder. First up is your "Vehicles_MOD_NAME_Shell.png" , this is the main texture image for your vehicle and needs to be 512x512 pixels, as do all of your textures, below is an example: Next there are 6 different overlay/detail png's to create, the first is for the vehicle lights ("Vehicles_MOD_NAME_Lights.png"): Then the vehicle rust ("Vehicles_MOD_NAME_Rust.png"): The next 2 image examples ("Vehicles_MOD_NAME_Shell_Damaged01.png" and "Vehicles_MOD_NAME_Shell_Damaged02.png") are to show light and heavy damage, respectively, on the vehicle's shell. They are used to represent dents in the bodywork: The next 2 image examples ("Vehicles_MOD_NAME_Overlays_Damaged01.png" and "Vehicles_MOD_NAME_Overlays_Damaged02.png") are very similar to the previous 2 except they are for showing damage on windows and lights as well as scratched on the body work: The last file we need is the vehicle colour mask ("Vehicles_MOD_NAME_Mask.png"), which should also be placed in your "mods/MOD_NAME/media/textures/Vehicles" folder. This tells the game which parts of your vehicle texture correspond to which part of your vehicle model and is needed to display damage, lowered windows and removed elements etc: Here the colour values to be used: Copy your complete mod folder structure into your C:\Users\YourUsernameHere\Zomboid\Mods folder, load the game, turn the mod on in the mod menu and start a new game, your new vehicle is now ready to be found and taken for a spin. Finally, here: ZAZ968M.zip - you can find an example vehicle mod using the above instructions. Notice the included example mod uses a slightly different process with its textures/overlays. The main texture is transparent while the detail has been shifted onto the vehicle_lights .png. This allows the game to automatically and procedurally generate different colours of your car when they are spawned in. Happy Modding!
-
Hey guys, with the ability to add cars in the new weather beta (thanks a lot, by the way!), I've been working on adding them all as new vehicles. Here's a screenshot of what I've got so far. I've got like ten thrown in there for now, not counting the different similar models (like cop cars or different lengths of pickup bed). I haven't done the masks yet, but got the random colors in, so that's pretty cool. Take it easy, dudes.
-
1) First create a folder structure for your mod, call the first folder something like "MyCarReskinMod". Inside that create a "media" folder, inside your media folder create 2 more folders, one called "textures" and one called "scripts". Inside the texture folder create a folder called "Vehicles" and inside the scripts folder create a folder called "vehicles". Your final folder structure should look like: MyCarReskinMod media textures Vehicles scripts vehicles Don't forget to place your mod.info and poster.png files inside your first folder alongside the media folder. 2) Copy, paste and rename the vehicles main texture that you want to edit/reskin from the ProjectZomboid/Media/Textures/Vehicles folder to your media/textures/vehicles folder. Use this texture along with the vehicles texture mask (also found in the same folder) as a template for your skin. The vehicle mask is listed in the code snippet below ("textureMask = ...") and dictates what part of your vehicle texture gets assigned to each part of the 3d vehicle. 3) Find and copy the original script of the vehicle you want to reskin from the ProjectZomboid/Media/Scripts/Vehicles folder and paste it into your media/scripts/vehicles folder. Below is what the start of your vehicle script should look like, in this example we are editing the taxi skin: Change the line "texture = Vehicles/Vehicle_CarTaxiShell" to "texture = Vehicles/"YourVehicleSkinPNGNameHere" and save. Add your entire mod folder structure into your users/zomboid/mods folder, enable the mod on the in game mods page and play, your edited vehicle skin should now be in game. You can download an example here: RingoCarSkinEdit.zip
-
So I was playing on multiplayer with my sister- just us, but the server tends to load chunks really slowly when we drive, and when we drive up next to the next one we often have to wait up to 30 seconds for it to load. Not sure if that's normal? We have about 3GB dedicated to the server (the computer has 12GB RAM total, current stable build, Windows 10). Well, after doing this for like, two irl days, we were driving back along a road we'd been on many times. We then saw that, just about every place we had stopped to load a chunk on our last time through that road, there was.. now another of the same truck. Items inside and condition were the same, and the engine was on with the key (also a copy, we had been in the car and running it on the road, afterall). We now have three to four extra trucks and are sort of confused. They still drive and I pulled the keys out and drove them around, though I didn't try taking items out of the glovebox, which is the only place that had items. So, definitely an odd bug. But I guess now we have a convoy..?
-
Players've learnt how to drive... It's time to make driving even harder! If you want to drive faster/slower or go backwards, you need to switch gear. Some of the vehicles (Like sportscars) have Automatic transmission so you don't need to switch gear (except for go backwards). This should make driving a bit harder and new people won't drive a car as fast as they found a key to the nearest car. Also this will add one more option to choose besides Capacity and Speed. P.s: If there's any mistakes in the text — sry. UPD: Uh, there's one thing that imo will make driving more realistic — Handbrake should be toggleable and make car unable to move while handbrake is used.
-
I was wondering if anyone could tell me where the vehicle tilesets are. I'm new to the game and would much rather build maps than actually play at this point. But going through Tilezed's tilesets, I don't see any for vehicles. Could someone please point me in the right direction? I'm working on roads to start with and having an in game car on my map for reference would be fantastic!
-
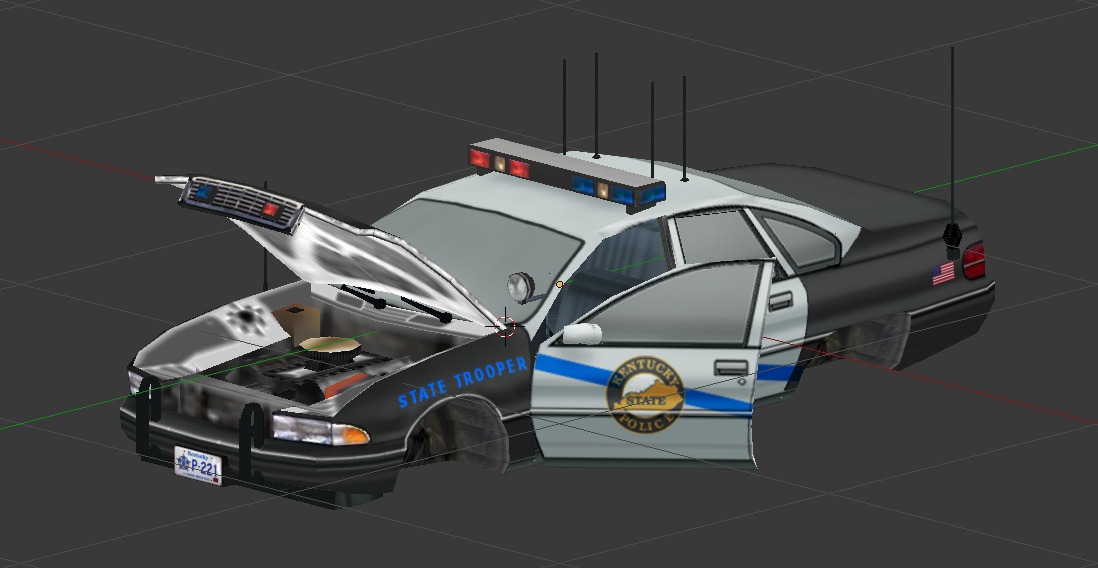
Hello guys! I have a problem that I could not solve on my own. We make a custom model of police car for Project Zomboid (Link). After we upload it to the Workshop, and we saw that the textures of light, damages and rust do not worked. In lua file the textures was writed to the model, but it still does not work. Anyone know, how fix that problem?
-
Hello there, I started a new game on Ver. 39.67.5, and just noticed in any car I cant see the icons for seats/trunk or anything on the inventory bar, therefore I'm unable to load items on cars. Im using some mods too, wich according to the creator have been updated to work on this new ver. of the game. Mods Im using in case any of these mods is causing the issue are: *Alice Pack *Bedford Falls *Better fuel mod v.1.0 by snake *Better item category labels *Cremation corpse disposal *custom tooltips mod Ver.2.7 *Easy access *Eerie country *immersive overlays *Legourmet evolution plus ver 0.7 vehicles edition *additional skill books vehicles edition *Milk mod *Molotov classic recipe *More zombie loot *Open cans with knife *Realistic weapon durabilities *Silencer *Simple lines *South muldraugh *West point strip center *Wring out wet towels
-
Good afternoon. Okay, so I've been playing the game for a few days and, much to my chagrin, I got bitten by a zombie. I deployed CTRL-ALT-DELETE and reloaded from the last auto-save. Fortunately, that was right be for I got nailed by a classic Bathroom Zombie, so I lost no progress. I looted that jackpot of a house and went down to my vehicle. It was gone. Now, I'm stuck too far away to get home AND I lost my preexisting loot in the car. The game saved correctly in the auto-save, and I've loaded the save files, which are all in order. -but my car is gone. The cars near the jackpot house? Oh no, they're there. Only MY car is gone. -and my car key isn't gone, either! What am I to do? Thank you for any assistance. -TURTLESHROOM P.S.: My version is V41.2 .
-
Hi, Sometimes when I drive slowly with a lot of zombies (20-30 zombies) behind/next to my car, my car is like capatulted and it goes from 5mph to 60mph in one second and I think it mostly happens with slow vehicles like vans. So yeah it's fun to have such a boost but when there are trees everywhere you get an instant crash and that's way less fun game's version : 39.67.5 but it does that since the beginning of vehicles I didn't see anyone reporting this bug, I'm playing with sprinter zombies so maybe it has something to do with that It's very easy to make this bug happens, just take a slow van, attract a lot of zombies and drive slowly next to them or even in circles
-
When my friend use the car and leave it with the key, and me take out the key, the key just disappear
- 5 replies
-
- 2
-

-
-
- im sad cause i lost my car
- bug
- (and 2 more)
-
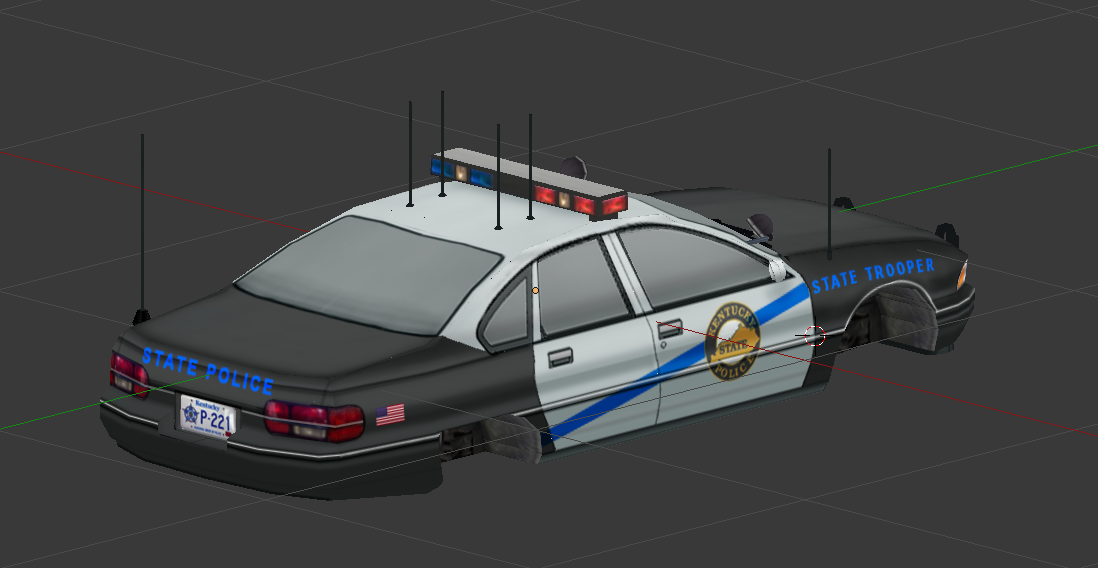
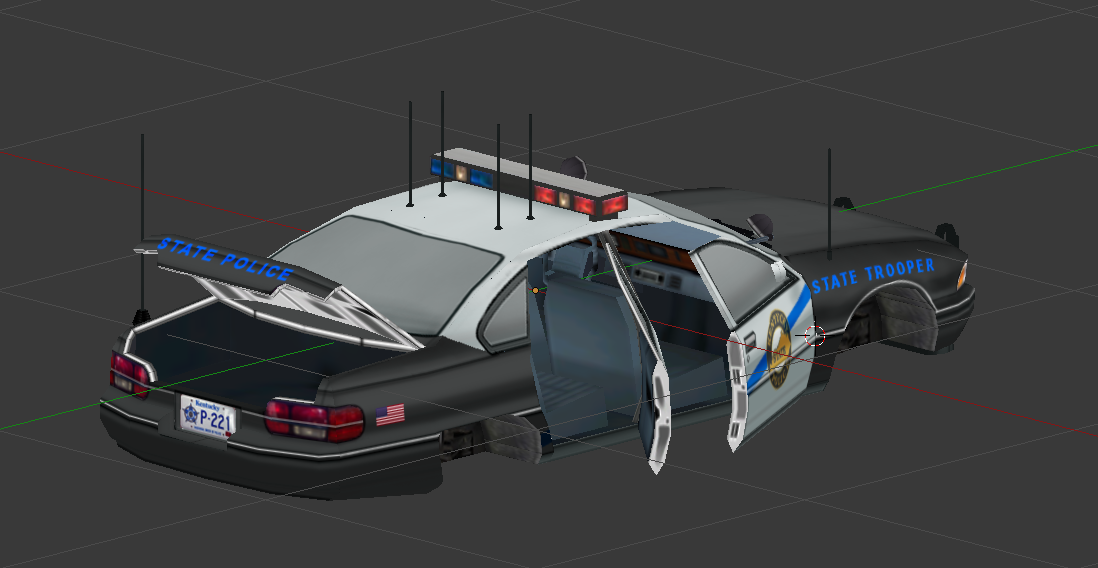
Enhanced Vehicles (WORK IN PROGRESS) Hello members! Today i want present you a our modification for Project Zomboid. We are decided to change default cars for more detailed and realistical. Our team make a new models and textures based on realistical vehicles of 90's. About progress, we will inform you at this topic. Thanks for you'r attention. Chevrolet Caprice 1992 1. First car in our modification - Police Cruiser and Park Ranger Sedan replaceble at model based on Chevrolet Caprice 1992. We are already complete a model and main textures.
-
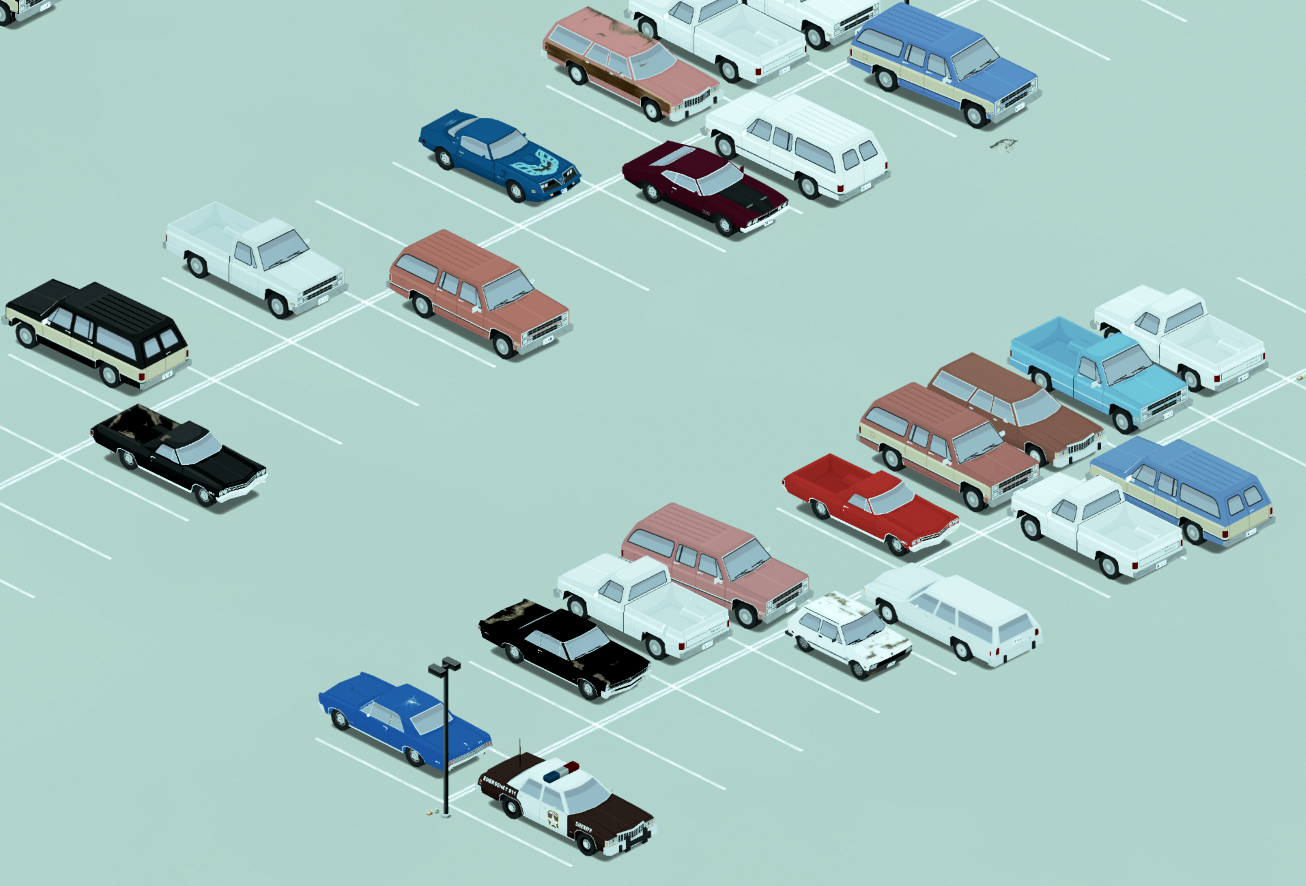
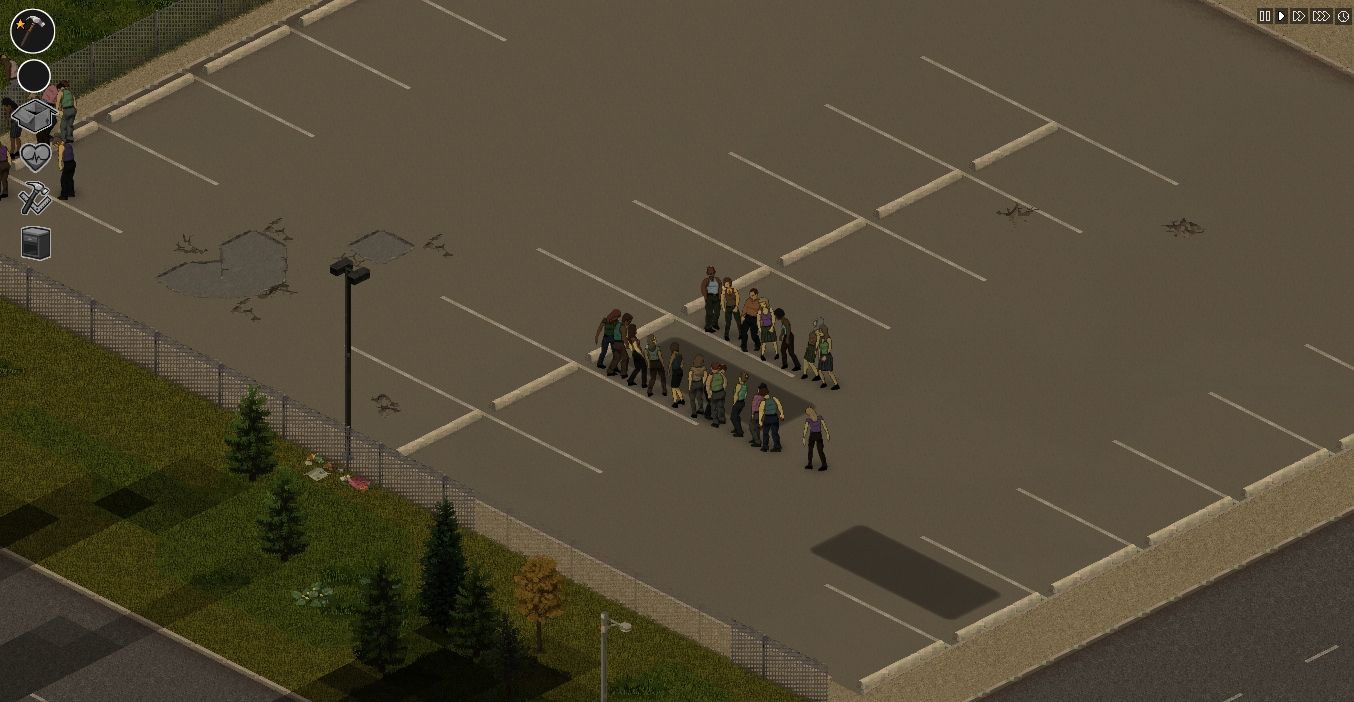
Hello, I am speaking for both the community and the Dev's, could you please add an Official Test Map for your latest updates ? For example a large parking lot with all vehicles having a place to spawn and such, different types of roads, terrain, etc. Zombies to roam a side of it, and a bunch more. Would love to see that kind of a test map. You could get a lot of information out of it and we could test all kinds of bugs and, fps decrease and other issues that pz needs fixed and as such I think it would be a good idea to be able to test the new features on a such said map. We could have trees to crash in or to chop, a mechanic shop filled with the parts you need to test out anything else and so on. That way it would be easier to test and see where problems arise. Below is a really poor example (really poor) but I think that everyone gets the idea. We can test houses, how the rendering will affect buildings and such and vehicles. We can have a dense area with a bunch of houses, a bunch of two story buildings and then just normal country road. Tight curves, intersections, etc. We could basically do a lot of stuff on it and it would be a fun way for everyone to test out new features before playing or if they are willing to make the game better and report anything unusual. This is just a suggestion but I hope it will come true. A cell or four at max would probably be enough for the car to accelerate, do leaps and anything like that. Please think it through and share your opinions with me and anyone else.
-
Hey guys, Is it just me or there's no longer cars in the vehicle beta server? I updated and it no longer works. Literally no cars showing up after the update. Anyone know what's going on and how to fix it? Thanks so much!

.jpeg.cce0db040050637d15f7773b6813d9ed.jpeg)