

turbotutone
-
Posts
212 -
Joined
-
Last visited
Posts posted by turbotutone
-
-
eya @MethodThree will look into writing a guide on modding the climate/weather once the last tweaks to the system are through (should be soon). There are some modding options build into it but could probably use some documentation.
In the meantime feel free to pm me any questions!")
-
Hi All!
Here an full overview of current temperature effect on player as a whole including recent weatherbuild changes/additions.
The player body tries to maintain an optimal temperature of about 37 Celsius. The average favorable surrounding air temperature for the body is set at 22 Celsius.
The more the air around the player drops below 22 degrees the stronger the cold strength will become, and if above 22 degrees the heat strength will increase.
To make sure the cold and heat don’t affect the body temperature body stats must be kept optimal and correct clothing worn.Cold.
To resist cold:- · Make sure to have a high clothing value (currently sweater, pants, shoes is optimal).
- · Hunger and tiredness affect body cold resistance negatively.
- · Sickness will lower your body resistance to cold.
- · Make sure you don’t get wet from rain, it will lower your body and clothing resistance to cold.
- · When outside, strong wind can lower the cold resistance but strong clothing will be able to counter this effect.
- · A good body fitness will have slight positive effect on cold resistance, bad fitness a small negative effect.
- · Drunkenness negatively affects the cold resistance, furthermore the more drunk you get you may not notice the first and possibly also not the second hypothermia Moodle giving you no early warnings to the negative impact.
- · When endurance lowers the body cold resistance increases a bit.
When the outside gets colder the indoors of buildings will be a bit warmer and even more so during day. For the upstairs levels however this effect is halved.
Car heaters, fireplaces and campfires that can be used to warm up have been altered a bit.
Campfires can now be build inside houses without spreading fire if the following is true:- · Tiles surrounding the campfire are not wood or carpet.
- · Tiles surrounding the campfire have no objects.
- · To be safe make sure there are no walls within a 2 tile radius of campfire.
When outside heat sources have their radius halved and the colder it gets the smaller their area with a favorable temperature becomes.
When severely undercooled note that car heaters and bbq’s and outside campfires help can staying warm with moderate cold, however when it’s really cold they’ll only warm up slowly. Heat sources inside buildings will be able to become much warmer and thus warm up at a higher rate.
Also note that with optimal clothing and body resistance you can successfully resist cold surrounding air temperatures down to about 0 Celsius. If the air around you drops below zero you will always start to lose temperature, albeit more slowly, so you must warm up from time to time. And since the night tends to become much colder sleeping near a fire is recommended as well as stacking up a good amount of logs to prepare for winter.
Heat.
To resist heat:- · Light or no clothing will help combatting heat.
- · Thirst negatively impacts heat resistance quite strongly.
- · Sickness will lower your body resistance to heat.
- · A good body fitness will have slight positive effect on heat resistance, bad fitness a small negative effect.
- · When endurance lowers the heat resistance lowers a bit as well.
- · When outside, wind can increase heat resistance a bit but this effect is cancelled out by strong clothing.
- · Wetness due to rain increases heat resistance for both body and clothing.
- · Drunkenness does not lower your heat resistance, but may cause the first 2 levels of hyperthermia to go unnoticed/ignored due to intoxication.
When the outside gets hotter, the ground floor levels remain a little colder and can be used to cool off a bit. Higher levels tend to get hotter and remain fairly warm during the night.
Insides of a car can get quite hot during the day as well (unless the cooler is on).When severely overheated drink water and stay inside on the ground floor with light or no clothing, or use a car air cooler to cool down more effectively.
Hypothermia and Hyperthermia
When level 3 is reached the body sporadically takes minor damage on random body parts.
When level 4 is reached the body receives constant and greater damage on body parts.
If the conditions are not improved you will slowly die.When level 3 or 4 of either is hit when asleep you will wake up from it.
Other noteworthy mentions.
Umbrellas now reduce the rate at which you get wet, and you’ll be able to get up to 50% wet.
-
Hey all,
A new weather version is out now
It contains a couple of fixes for some visual bugs and some fixes to the region system.
Also has some optimizations for the indoor masking of weather particles.Temperature should also be properly hooked and the way it affects the player + moodles has been changed somewhat albeit still a bit wip (likely needs some fine tuning). A new debug panel for this can be opened with SHIFT+BACKSPACE.
Gonna add some more info on this later on.- trombonaught, axeladalidez78, Kuren and 4 others
-
 5
5
-
 1
1
-
 1
1
-
Ey all, thanks for the feedback so far and giving the build a go!
Some interesting points for us to look into have already been raised, also might do a quick fix later on for some of the issues like the black lines in fog and the linux thing.
A few notes/responses on some of stuff mentioned:
Temperature
SpoilerIt seems temperature might need some testing to see if it feels alright for the seasons, also on the different sandbox settings. Tho as mentioned in the main post this can be subject to psuedorandomization.
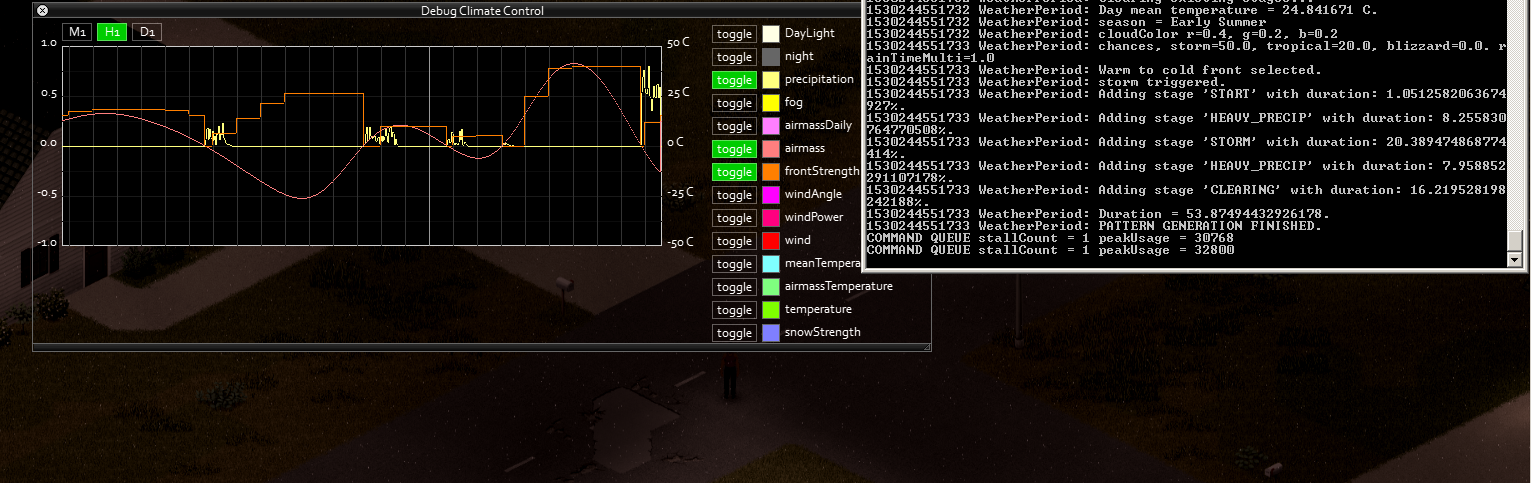
It might be handy to have some more info on this subject while testing so here a little more details:
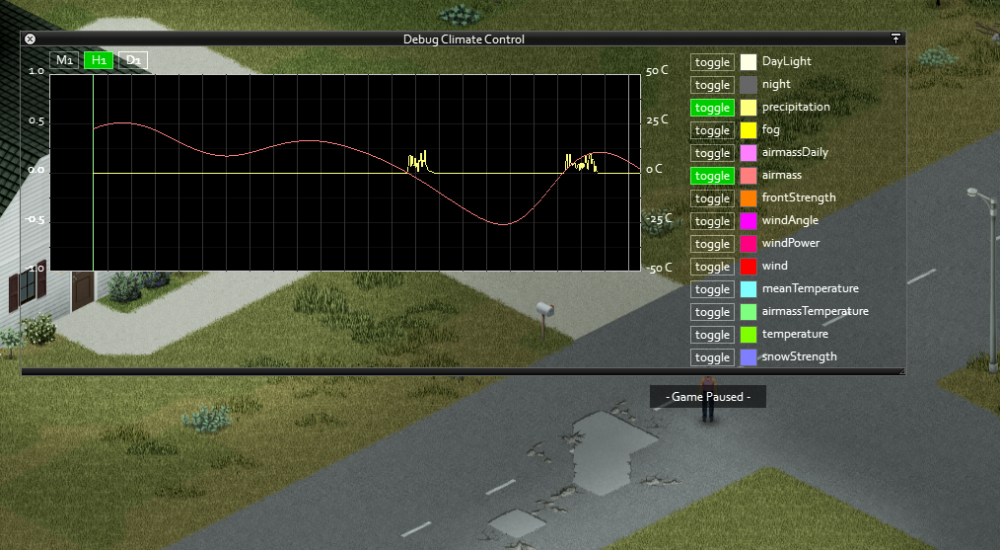
Temperature Mean
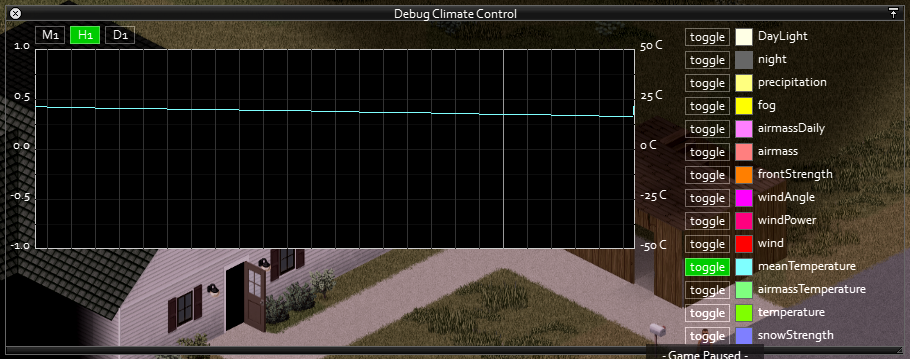
This value is derived from a summer and winter peak temperature value, those peak values can differ per year depending on the summer and winter strength. The mean gradually changes from high to low and serves as a basevalue for temperature.
Temperature
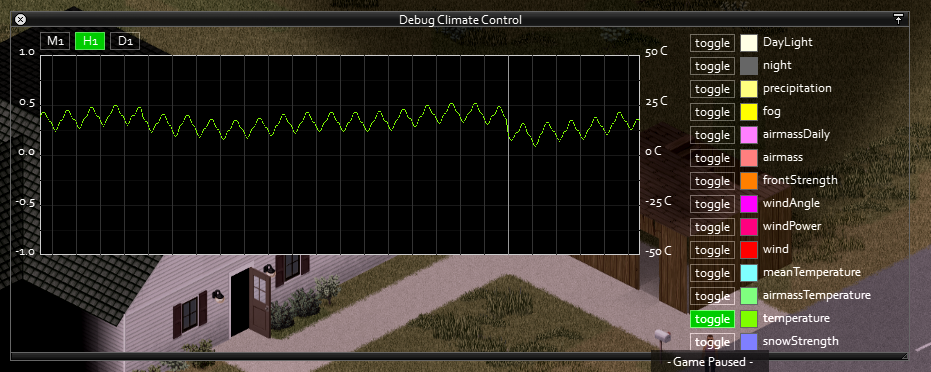
This is the actual temperate (also displayed in the smaller info panel) as you can see it goes up and down like a zigzag between day and night, it also has other influences as the pattern doesnt follow the mean exactly.
Temperature Airmass influence
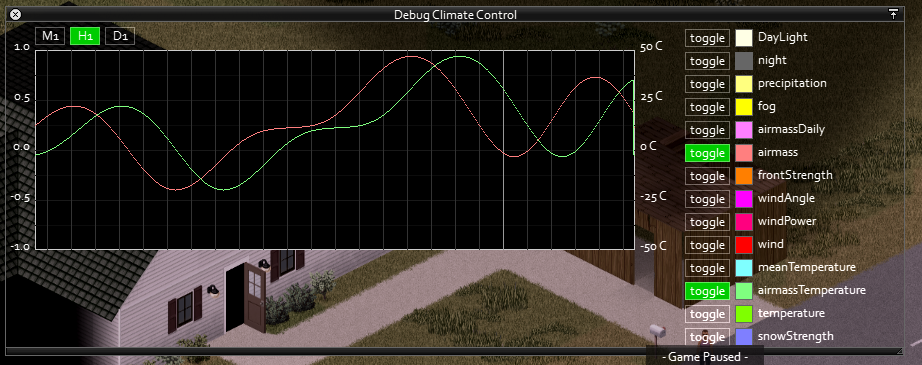
One of the influences is the airmass temperature. This is not a celcius value like the other two above, but a value between 1.0 and -1.0 instead. Depending on its strength it can push up or down the temperature with several degrees up to 8 or so.
The airmass temperature lags a little behind the airmass value itself, so drops and rises in temperature usually coincide with changes in fronts.
(when airmass value is above 0 = warm front, below = cold front)
If its summer and a very strong cold front is generated for example the temperature can be quite low relativly speaking (these fronts can take some days up to some weeks to change).Temperature Weather period influence

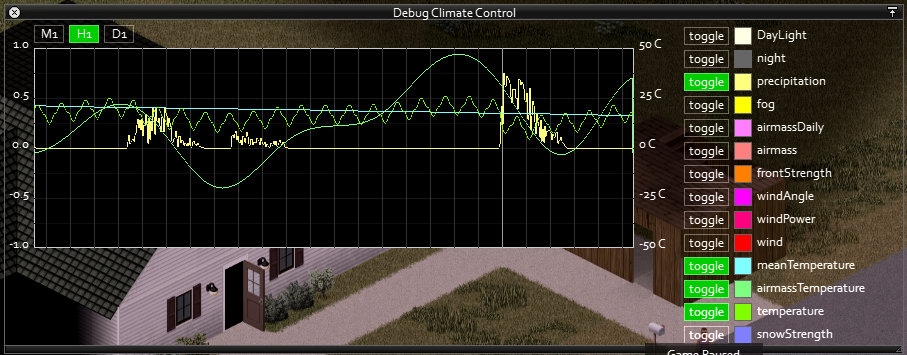
Lastly the weather periods that are generated when fronts change can influence temperature during their duration which can be a few hours up to a several days. This also depends on how strong the weather period is, in the picture above on the right side of the graph youll notice quite a strong weather period, when activating all values you can see that weather period was responsible for the sudden drop in the zigzagging Temperature value as well as the AirmassTemperature pulling the temperature up and down:
@MaxD12 On the building failing to mask fog:
Spoilerto make sure:
- does the building have sufficient walls? i notice no wall on the end of the stairs side altho that could be a visual occlusion by the game.
- does the building have sufficient roofing? all squares should have a roof tile, unless tiles with a stairs for those roofing can be ignored.
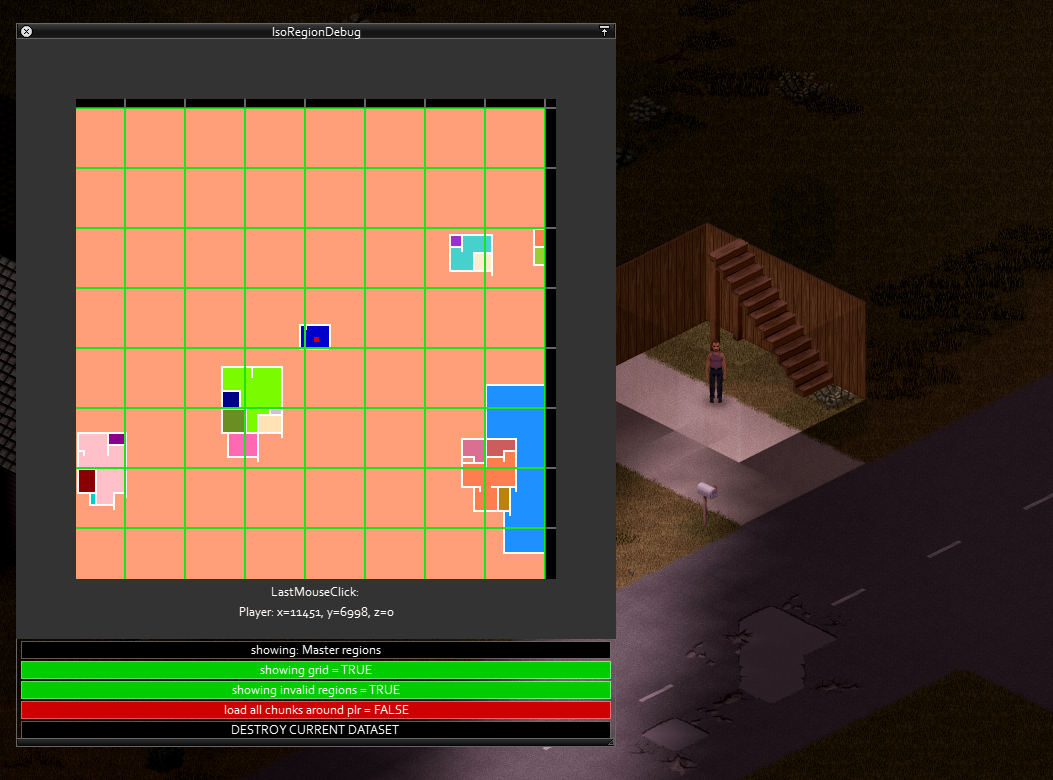
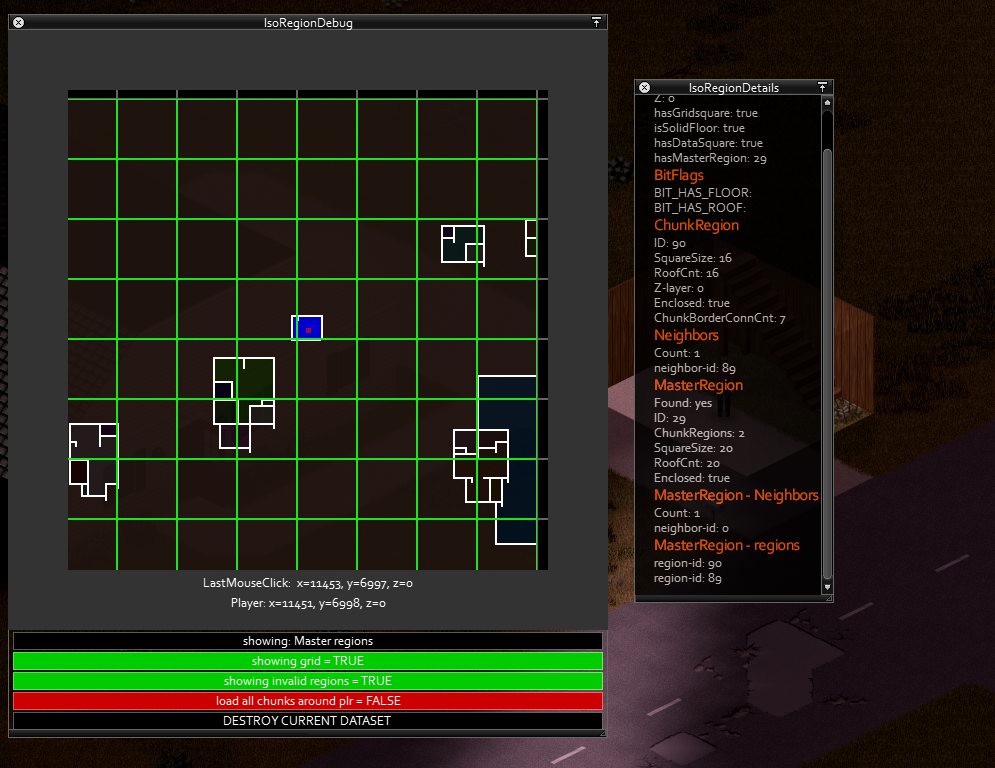
- if those are all good, could you perhaps check if the building gets properly recognized with the SHIFT-0 debugger?
To test with the debugger, it should have a rectangle with a diff color if correct:

if you click on the building rectangle that is yours, it should pop up some info:
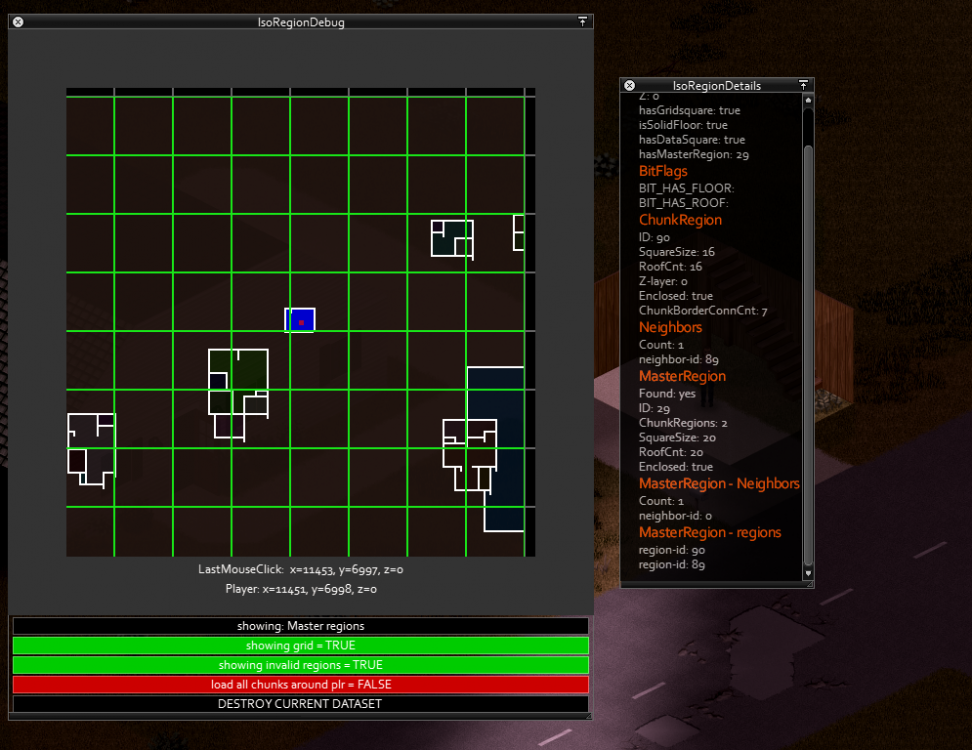
The "Master region" should display some info square count and roofs counted, which may have some indication on a possible error.
@MadDan2013 the transition is supposed to be gradual, please give a shout if the problem persists. a vid or some screenshots from moment to another would be handy if possible.
@Soul Filcher Filcher when taking control of weather via Fx panel by disabling the climate manager no sub effect (like snow on ground etc) will take place since the climate manager takes care of that. you only have direct control over the values on the panel.
@Eggtooth (and @trombonaught) agreed, in fact the system actually should do that already
 when the weather pattern is a blizzard and its intensity is on the high end it should throw in some fog.
The fog indeed doesnt play well with the dark of night, however atm normal fog that is generated by the system only appears in the early morning and gets burned away by the sun around midday'ish.Lastly, for those interested a little more info on weather patterns for testing:
SpoilerBest is to select the fastest time elapsing setting when creating a game, then use the FX panel to turn on god mode and fast forward untill weather shows up.
Like mentioned in the temperature section above the weather patterns generate when the front changes from cold to warm, H1 is the best view for monitoring this:
The weather period pattern generated depends on the strength of last front period as seen here: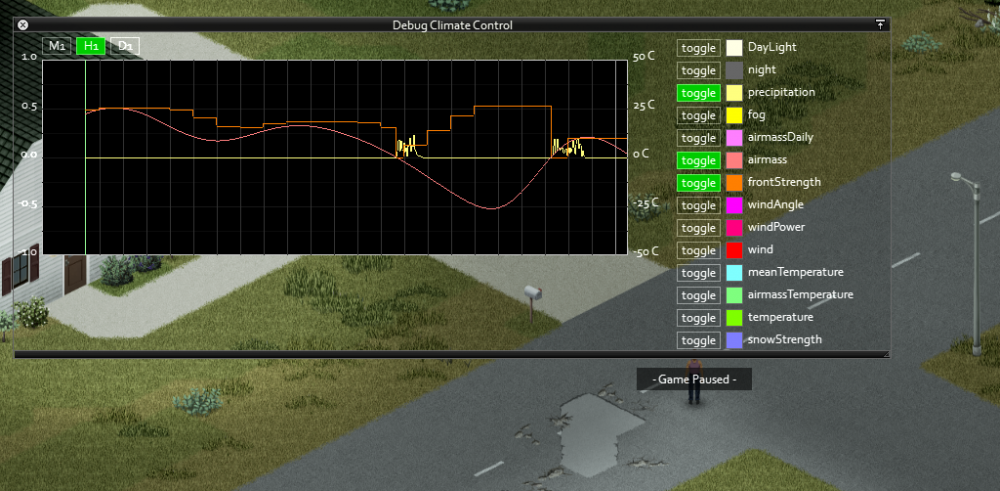
But also on wether the last front was warm or cold.If the last front was cold its usually less intense and pretty plain, lower wind power and cloud thickness, moderate rain and drizzle periods and such.
If the last front was warm, it gets more interesting depending on the frontstrength, allot more windpower, shifting winds, thick clouds and darkness, showers of rain and more rain in general, chance on thunder clouds or tropical storms.
When playing windowed with the console open you'll be able to see what patterns are generated once the front changes along with their duration in hours:
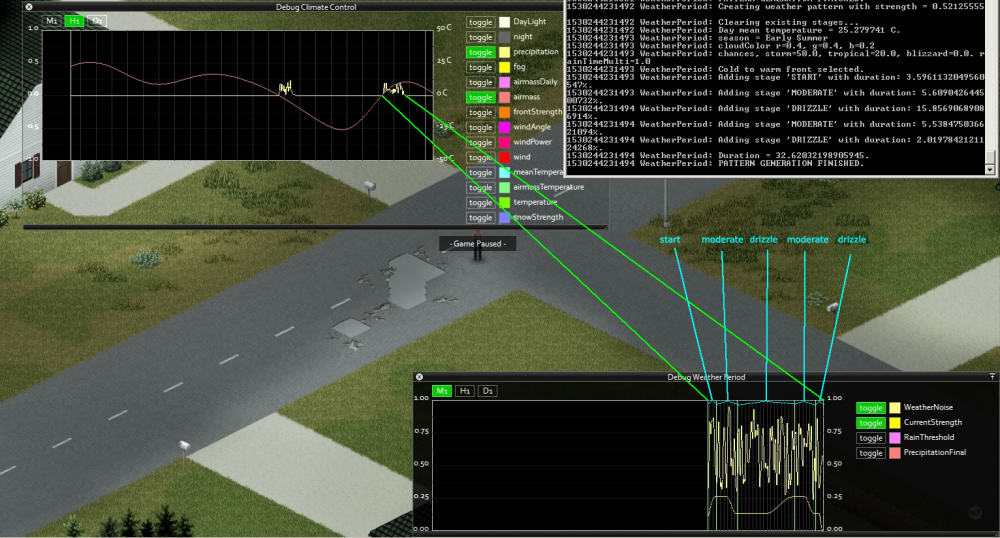
If you have the weather period debugger open (best to open before the weather period starts not to miss plotpoints) as well you can see the different periods seperated by a brighter line.
NOTE ive accidentally toggled weathernoise on in the weather period debug which is just a random noise, i was meant to toggle PrecipitationFinal instead wich resembles the precipitation in the main climate debug.Here another generation of a heavy weather period:
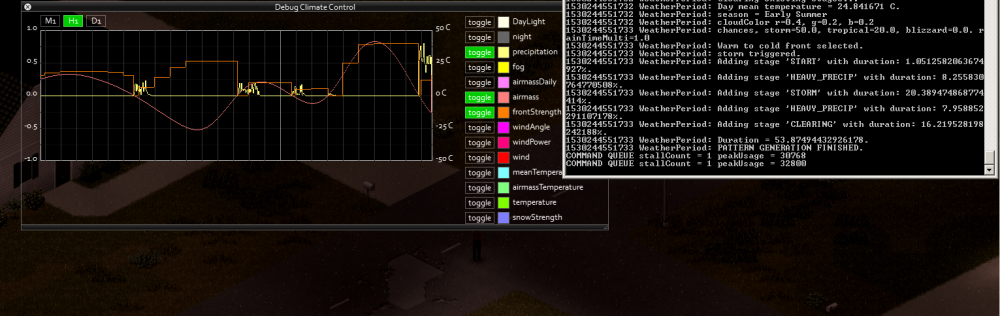
To the right the front strength had build up quite high and then the airmass started dropping, if the airmass had dropped but stayed above 0 the front strength would have gradually declined. but in this case it dropped steeply to below zero without giving the build up strength time to decrease causing quite a powerfull weather period to be unleashed..
-
Hi @DerMainulainen i wasnt able to reproduce the problem with the mods ive tried, could you perhaps PM me the mod you are using that gives the error?
-
On 19-2-2018 at 7:32 PM, Nebula said:
There are phases of the moon in the game, if so, how to get the value of the phase or the number of the lunar day?
Eya, for current builds the files in lua/server/Seasons/ should be of interest, its also stored in gametime moddata if im not mistaken.
Small note: some of the weather related stuff is being reworked tho, so in a near update the value(s) might need to be gotten in a different way.
-
eya @ddraigcymraeg it looks like something went wrong while reading one of the filenames, ive updated 1.2 links with some better verification...
you'd only need the 1.2 update files, if you could give it another go it should skip the files it cannot read properly and output those in the log.
if you could pm me the debuglog.txt from the mapmap dir after running the update would be great
regards,
turbo
- ddraigcymraeg and Batsphinx
-
2
-
My bad, i overlooked another bug.
Ive updated the 1.2 links with a rebuild package that works for RingoD.
If the program still fails for anyone let me know, the MapMap process should now finish gracefully instead of crashing and outputs a debuglog.txt in the "mapmap" dir of CartoZed.
Regards,
Turbo
- Rekkie, RingoD123 and ddraigcymraeg
-
3
-
-
-
Updated the OP with 1.2 version, which should fix the issue with no mods/no distribution. Many thanks to @GHawkins for helping out track the issue!
note: If you use the update package you might want to delete "config/options.txt", this will erase any stored directory setting causing the program to do a clean setup routine again once started.
-
-
@Void, @Crowborn and others having the issue of not seeing anything in the distribution tab, make sure youve got a updated IWBMS on steam like @russafiii mentioned and then it should be working properly. Ill update OP to include a little note concerning this.
@thiosk Indeed the distribution panel isnt well suited for bulk insertion operations like that atm.
Ideally id like to fix up the entire distibution panel a bit at some point in the near future so the points youve raised work better allong with some more drag and drop improvements.However when doing amounts 250 items this may still result in quite some dragging, depending on how they need to be distributed in the list lua might be a valid option as well.
Ive played around with creating a little helper script for that purpose and came up with the following which may be helpful to you:
DistributionInsertion
Spoiler-- Script can insert items of a certain module to a list of target distribution containers. -- SETTINGS --------------------------------------- -- change local variables accordingly and run script. local module = "myModule"; local spawnChance = 1.0; local dontAddIfItemExist = true; -- if set to true this will not add a item if the target container already contains that item. local targetContainers = { "aesthetic.counter", "bakery.counter", "all.shelves", "all.fridge", "grocery.crate", "Schoolbag", "Purse", }; -- SCRIPT ----------------------------------------- function string:split(sep) local sep, fields = sep or ":", {} local pattern = string.format("([^%s]+)", sep) self:gsub(pattern, function(c) fields[#fields+1] = c end) return fields end function run() -- collect the fullnames for items from the defined module local items = {}; for v in DataManager.Objects do if v.ObjectType.IsItem then if v.ParentModule~=nil and v.ParentModule.Name==module then table.insert(items, v.FullName); end end end -- now find the defined target containers for insertion local distRoot = DataManager.DistributionContainer; for _,s in ipairs(targetContainers) do local c = distRoot; for _,val in ipairs(string.split(s,".")) do local cache = c; if c.Children.Count>0 then for i=0,c.Children.Count-1 do if c.Children[i].Name==val then c = c.Children[i]; break; end end end if c==cache then c = nil; break; end end if c~=nil and c~=distRoot then --print("container found!"); if not c.IsItemContainer then print("container '"..s.."' is not a itemcontainer"); else -- interting the earlier collected items into this container for _,item in ipairs(items) do local canAdd = true; if dontAddIfItemExist then if c.Items.Count > 0 then for i=0,c.Items.Count-1 do if c.Items[i].IsMod==DataManager.IsModMode and c.Items[i].Item==item then canAdd = false; break; end end end end if canAdd then c.addItem(item,spawnChance,DataManager.IsModMode,true); end end end else print("could not find container: "..tostring(s)); end end print("Success!"); end
The top part has some settings you can modify, the way it works would be to have all the items that you wanna add in bulk to the distribution in a seperate module wich will act as a category.
You can set a default spawn chance and add target containers, the nested containers need to be seperated with dots as per example and be aware that the container names are case sensitive.
When running the script it will add all the items from the defined module to the targetcontainers, afterwards you can optionally use the right side item filter box to filter on the module name (see img) instead of item name incase you need to override some default spawn chances of some of the items.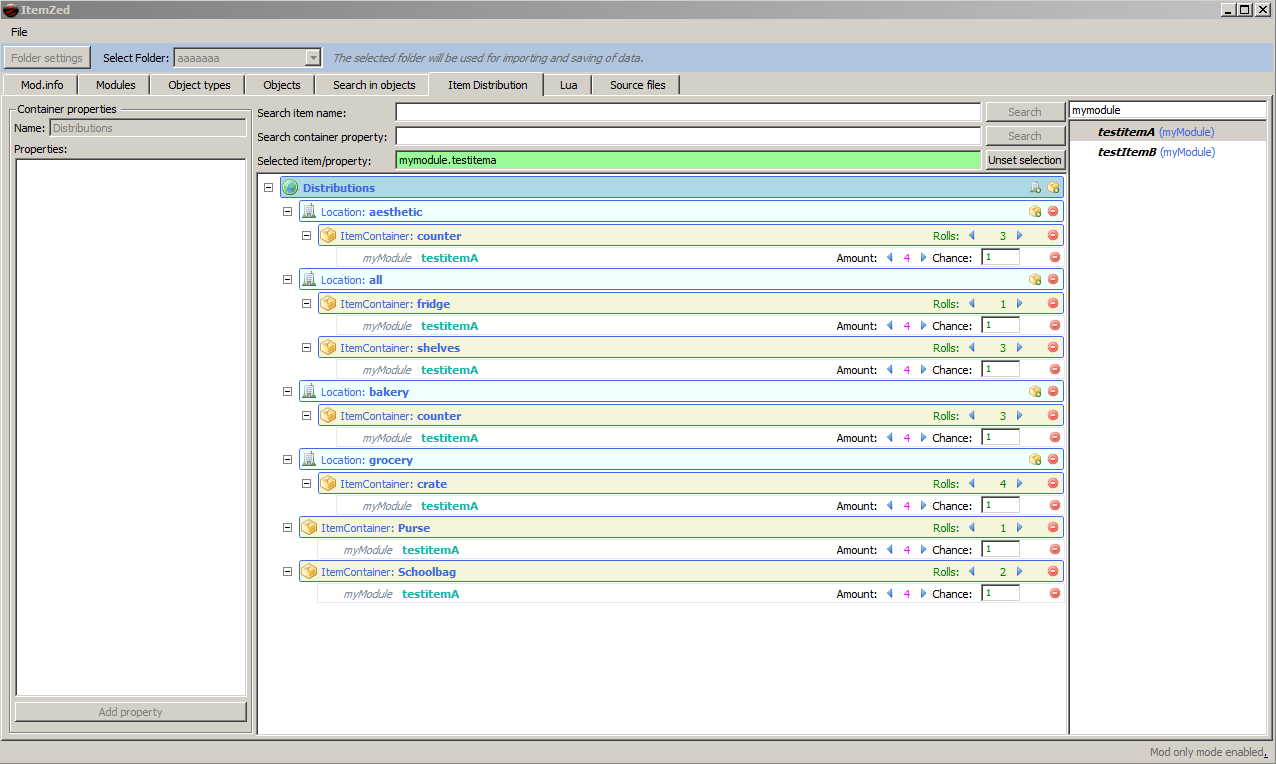
Additionally ive also created helper script to remove items from the distributions in bulk, it has somewhat similar settings in the top part:DeleteItemsFromDistribution
Spoiler-- Script to delete items from distribution. -- SETTINGS --------------------------------------- -- change local variables accordingly and run script. -- any items belonging to modules defined here will be removed. -- to disable modules set it to false, nil or a empty table. local modules = { "myModule" }; -- any items defined here (full name including module), will be removed. -- set to false, nil or empty table to disable. local items = { "myModule.testItemC", } -- optionally define spawnchances which the items must match, set spawnChances to false, nil or empty table to disregard spawnchance. local spawnChances = { 1.0, 2.5, } -- define target containers to remove items from -- NOTE: if set to false, nil or empty table then the specified items will be removed from ALL containers. local targetContainers = { "aesthetic.counter", "bakery.counter", "all.shelves", "all.fridge", "grocery.crate", "Schoolbag", "Purse", }; -- SCRIPT ----------------------------------------- function string:split(sep) local sep, fields = sep or ":", {} local pattern = string.format("([^%s]+)", sep) self:gsub(pattern, function(c) fields[#fields+1] = c end) return fields end function run() local doModules = modules~=nil and #modules>0; local doItems = items~=nil and #items>0; local doChances = spawnChances~=nil and #spawnChances>0; --local doTargets = targetContainers~=nil and #targetContainers>0; local finalItems = {}; if doItems then for k,v in ipairs(items) do addItem(finalItems, v); end end if doModules then for k,v in ipairs(modules) do addItemsFromModule(finalItems, v); end end if #finalItems>0 then local containers = getContainers(); for _,c in ipairs(containers) do if c.Items.Count>0 then for _,item in ipairs(finalItems) do for i = c.Items.Count-1,0,-1 do if c.Items[i].Item==item and c.Items[i].IsMod==DataManager.IsModMode then local canRemove = not doChances; if doChances then for _,chance in ipairs(spawnChances) do if chance==c.Items[i].Chance then canRemove=true; break; end end end if canRemove then c.Items.RemoveAt(i); end end end end end end print("Success!"); else print("Warning: no valid modules or items to remove."); end end local function getContainersWhiteList() local containers = {}; local distRoot = DataManager.DistributionContainer; for _,s in ipairs(targetContainers) do local c = distRoot; for _,val in ipairs(string.split(s,".")) do local cache = c; if c.Children.Count>0 then for i=0,c.Children.Count-1 do if c.Children[i].Name==val then c = c.Children[i]; break; end end end if c==cache then c = nil; break; end end if c~=nil and c~=distRoot and c.IsItemContainer then table.insert(containers, c); end end return containers; end local function getContainersRecurs(_cont, _list) if not _cont.IsItemContainer and _cont.Children~=nil and _cont.Children.Count>0 then for i=0, _cont.Children.Count-1 do getContainersRecurs(_cont.Children[i], _list); end elseif _cont.IsItemContainer then table.insert(_list, _cont); end return _list; end function getContainers() if targetContainers~=nil and #targetContainers>0 then return getContainersWhiteList(); else return getAllContainersRecurs(DataManager.DistributionContainer, {}); end end function addItemsFromModule(_itemList, _module) if _module==nil then return false; end if DataManager.Objects.Count > 0 then for i=0,DataManager.Objects.Count-1 do local obj = DataManager.Objects[i]; if obj.ObjectType.IsItem and obj.ParentModule~=nil and obj.ParentModule.Name==_module then addItem(_itemList, obj.FullName); end end end end function addItem(_itemList, _item) for k,v in ipairs(_itemList) do if v==_item then return; end end table.insert(_itemList, _item); end
Hope this is usefull, both scripts adjust to the mode youre running the program in (mod or dev), in mod mode the remove script for example will not touch and base game entries.Also, if there might be need for other similar scripts feel free to post a request in this thread!
Regards,
Turbo -
@thiosk great to hear!
As for the questions:
Stopping a base item from spawning cannot currently be done via ItemZed (yet), however the recent IWBMS should have lua functionallity already added for it. This would require a lua file to be added to your mod to get it working currently:
yourmoddir/media/lua/server/yourfilename.luawhen you have created the above file copy paste the following and edit/add accordingly.
local function preDistributionMerge()
	-- param1: a distribution root or subcontainer, Distributions[1] should always contain the entire basegame distribution set without mods.
	-- param2: Name of the item as it appears in the distributions list (fullname)
	-- param3: Optionally a chance number can be defined to remove only matching items with that chance, or set to nil to remove all matching items regardless of chance.
	-- param4: Do recursive or not, if true it will recursivly remove items from all subcontainers.
	RemoveItemFromDistribution(Distributions[1], "Base.Hammer", nil, true);
	RemoveItemFromDistribution(Distributions[1], "Base.Nails", nil, true);
	--etc

	-- instead of passing the entire Distributions table you can also pass a sub element:
	RemoveItemFromDistribution(Distributions[1].conveniencestore, "Base.Hammer", nil, true);
	-- in the above example the hammer will only be removed from containers in the conveniencestore location.
end

Events.OnPreDistributionMerge.Add(preDistributionMerge);
As for the category spawning, that would currently not be possible (unless you add some custom lua that does it to the mod). But i may look into it for a future update of ItemZed if something like that would be feasible to add to the program/gameside.
@Crowborn in case you might have missed it, ive dropped you a pm concerning the issue.
-
great to hear
as for the distribution problem, could you perhaps attach a screenshot of that?
-
Eya @Crowborn,
Not being able to edit existing base game items when modding is correct behaviour for the program, you can however override an existing item in your mod.
To do this, in add new object (bottom left) check 'copy' and select for example a apple from the list, give your copy item exactly the same name as the original apple and press 'add'.
This copy can be edited and should overwrite the basegame apple once you load the mod ingame.
As for adding sprites, you got 2 options:
Single file sprites which go into the "media/textures/" folder in your mod dir,
or texturepacks which go into "media/texturepacks/" more info on creating texturepacks can be found here.
The default icons are in a pack file, however you can use the Lua tab to export them.
To do so, go the Lua tab and paste the following script:
-- outputs to: ..\output\user\html\img\


function run()
	for v in DataManager.Objects do
		if v.IsMod==false and v.ObjectType.Name=="item" then
			if v.HasKey("Icon") then
				local icon = v.GetFirstKey("Icon").Value;
				-- see if icon exists, else try prefixing Item_
				if not DataManager.HasImage(icon) then
					icon = "Item_"..icon;
				end
				if DataManager.HasImage(icon) then
					addIconToExportList(icon); --global function to add icons to export list.
				end
			end
		end
	end

	-- global function, this exports all icons added to the export list to html/img/ in the output dir:
	exportIcons();
end
Give the script a name and hit 'Save & Run', this should export all used icons for basegame items to 'output/user/html/img/'
One thing to keep in mind about exported icons tho, when it exports it cuts away unused whitespace so their original size was 32x32px but some outputted images will be a tad bit smaller then that due to this cutting of whitespace.
-
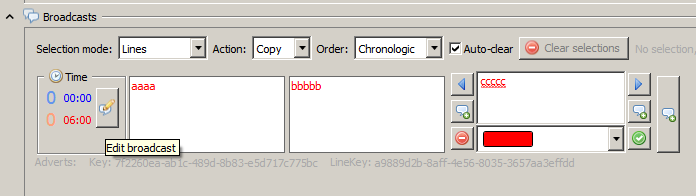
np! and yea those blue and orange timestamps mark the begining and end of a timeslot, a timeslot being the the timeframe in which a broadcast is allowed to start.
The big number are the days indeed, relative to the day the script gets queued.
As for not being able to change it, could you clarify a bit what youre trying to do? perhaps i can add a few steps here to help achieve it
-
Also, loading custom made radio files should work with the current IWBMS and beyond. To add them a mod can be used which should have "media/radio/" directory where all the files (xml and final translation txt files) should go.
Optionally you can use this simple mod package and edit the mod.info accordingly.
- CzarUltra and ProjectSky
-
2
-
On 2/20/2017 at 6:14 PM, CzarUltra said:
I have a couple suggestions from screwing around with it for a couple of days.
I think being able to collapse the voices/channels toolbar would come in handy. And then maybe a keyboard shortcut to create a new line of dialogue, like CTRL+ENTER. Ability to change the voice of a selection of lines would also come in handy (for scenarios where you're changing multiple voices to one, or several lines within the same voice that should be different). I'm thinking a keyboard shortcut like CTRL+Scrollwheel while you're entering text for a line that would allow you to scroll through the different color voices for that line would speed things up as well. Also a way to split/merge broadcasts could be useful.
I'm no programmer, I have no idea how hard it would be to implement any of those things. But, it's pretty intuitive thus far. Although, I'm not sure how long I can make a broadcast before the next day starts.Eya, should already be able to change a selection of lines to another voice (theres some more info on making selections in the documentation in bottom of main post) with a selection active, changing one of the selected lines voices will apply to the entire selection.
To change a color of a section of text within a line try
[col=255,255,255]some text[/](these cannot be nested). I think this should be enabled currently for radio lines as well, if it doesnt work let me know.
additionally theres also
[img=xxxx]which can add display any icon, or the shorthand
[img=music]for music the notes, and
[fnt=fontnamehere]some text[/]which can display text in a different font loaded by the game.
23 hours ago, CzarUltra said:Sorry for the double post but I'm working on a mod and was curious about something.
I'm transcribing the script for an entire movie -- if it's too long, will it cut out if it plays over the first day? Do I need to split it into multiple broadcasts and set it so they play in succession?
Also, I've noticed on the broadcasts the blue and orange numbers -- in the normal files it appears those have been edited, but I can't seem to find a way to do it.Timing the broadcasts is a bit tricky, the game can run in various time scales where an hour ingame could be 2.5 minutes or less in real time or it can run where a ingame hour is an actual real time hour. The lines however have to appear at the same pace for good readability. So when setting up broadcasts for a certain timeslot youll have to make sure that amount of lines fit somewhat in whatever the lenght of the timeslot is. Which comes to the second question about the blue and orange numbers, those represent the game time timeslot and they are calculated automatically based on the duration of the broadcast.
You should be able to edit the duration via this button:
Then change the duration and it'll update the colored times:
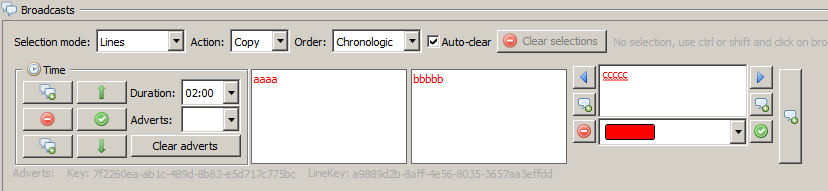
resulting in a updated time slot:
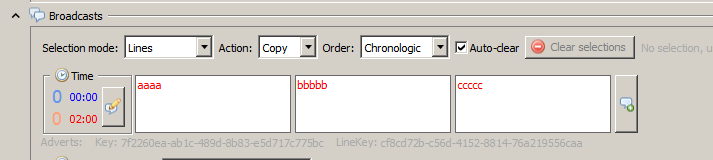
When setting the duration of a broadcast to 2 hours as in the image above, on the fastest time setting it would be about 1.2 real minutes so the amount of lines within the broadcast should more or less be able to be processed within that time frame. If you use the entire day (23:30) as duration you'll have 15 minutes on the fastest time setting.
The system will always try to finish the currently playing broadcast once its triggered, once finished it will be free to put a new broadcast on queue. If a certain broadcast takes extremely long to play then it might happen on fast time modes that it overlaps some follow up short duraction timeslots which wont get a chance to be aired as consequence.
Hope that clarified a bit, let me know if stuffs still unclear tho,
Turbo
-
Updated the main post with a new ItemZed version 1.1b and a instructions manual (thanks to @Batsphinx and @Rathlord for making it a smoother read!)
Also thanks to those testing and posting suggestions! a good bunch have been put in the update.
@Rathlord
The distributions work for the new version 1.1b, the project zomboid's current IWBMS has the game side code updated as well to make the ItemZed distribution files work.@makkenhoff sorry for getting back at your question a bit late i see you already gotten it working, a tip for future: it may be handy to copy an existing apple and then add stuff like the alcohol to it. For copying existing items you need to untick "show only modded objects" in the filter, then the copy section in the add item groupbox (bottom left) also shows existing game items in the dropdown box.
Currently that dropdown box and the objects list both apply the filter settings so it may not have been apparent right away.As for your suggestion about the mod.info, the new version allows you to create a mod from scratch aswell as editing mod.info file of a loaded mod
I havent added another way of copy pasting sections of objects contents yet, but ill likely put that in a future update allong with @Butter Bot suggestion of being able to view multiple objects at once in-program, as those suggestions would be very handy indeed.
- dnk3912, makkenhoff and Rathlord
-
3
-
-
On 1/24/2017 at 5:35 PM, makkenhoff said:
One minor thing, on start up, it doesn't take into consideration where your start menu is located. (IE: If it is situated at the top, it will place the title bar "under" the start menu. Makes working within the window impossible.
In the new version there is a file "config/window.txt" in the program root that allows you to change its start up position/window size. That should help with the issue, let me know it doesnt work for some reason
-
ItemZed
Scripts & Distribution editor.Welcome to ItemZed!
ItemZed is a development and modding tool that is used to edit the contents of script modules (foodstuff items, weapons, recipes etc) and the distribution table that dictates where different in-game items can be found and looted on the map. Additionally, it loads texturepacks containing icons so you can change how things appear in-game.
On top of the manual editing of data, there are options for the batch refactoring of large numbers of items and in-game objects.
We have also added lua integration that allows the entire data set to be programmatically modified, and output to any sort of format – meaning that changes and new items can quickly and easily become part of user mods, and a part of the main game. They can also be used to created handy tables in html and wiki format.
QuoteCool stuff you could do with ItemZed, for example in terms of axes and dead mice:
· Want axes to be more powerful? Modify the axe item!
· Want to be able to make axes out of spoons and dead mice? Modify the axe recipe!
· Want to create a whole new item called a ‘Zombie-doom Dead Mouse Axe’? Create a new item or copy and modify the normal axe!
· Want to increase the numbers of dead mice found in cupboards, for said axe? Edit the dead mouse map distribution table! Add spoons!
· Want to create an entire set of weaponry, forged from the bodies of small animals? Create a whole mod, and programmatically manipulate lua script data to make your life easier!
· Want to create a wiki specifically about dead mice in PZ? ItemZed can help with that too! Weirdo!
Videos
Downloads
Most recent version:
ItemZed 1.3 (FULL) | ItemZed 1.3 (UPDATE)
Old versions:
ItemZed 1.2 (FULL) | ItemZed 1.2 (UPDATE)
ItemZed Version 1.1b download.
(if you have 1.0 installed, put this one in a seperate directory, dont update the 1.0 version)
Changelog
Spoiler1.3
FIXED file loading, should now ommit invalid txt files from scripts dir.
CHANGED most settings are stored in registery now instead of files.
CHANGED various outputs (logs, backups, temp&userdata etc) now defaults to "userorhomedir/.ItemZed/"
note: window.txt to force window size and position now generates in .ItemZed directory as well.
CHANGED some names in file menu to be more clearer.
ADDED some hot buttons on the select folder bar for open/close/save
CHANGED backups are now turned off by default, they can be turned on by going to folder settings and checking the backup tickbox at bottom.1.1b
FIXED several small bugs.
FIXED UI improvement suggestions made in thread.
CHANGED distribution file format to work with the game.
CHANGED program now loads from the root directories of both the game and mods, instead of the media folders prior.
CHANGED when running in mod-mode the dev options are obfuscated.
ADDED support for custom texture packs and single image textures.
ADDED several mouse-over tooltips.
ADDED create mod from scratch.
ADDED mod.info reading/editing, this means a mod's texturepacks are also automatically found.
ADDED Auto-detect option for game folder and mods.
ADDED Several new options for lua exporting, including html and outputting of icons to images.
ADDED lua simple wiki generator for mods script.ItemZed instructions
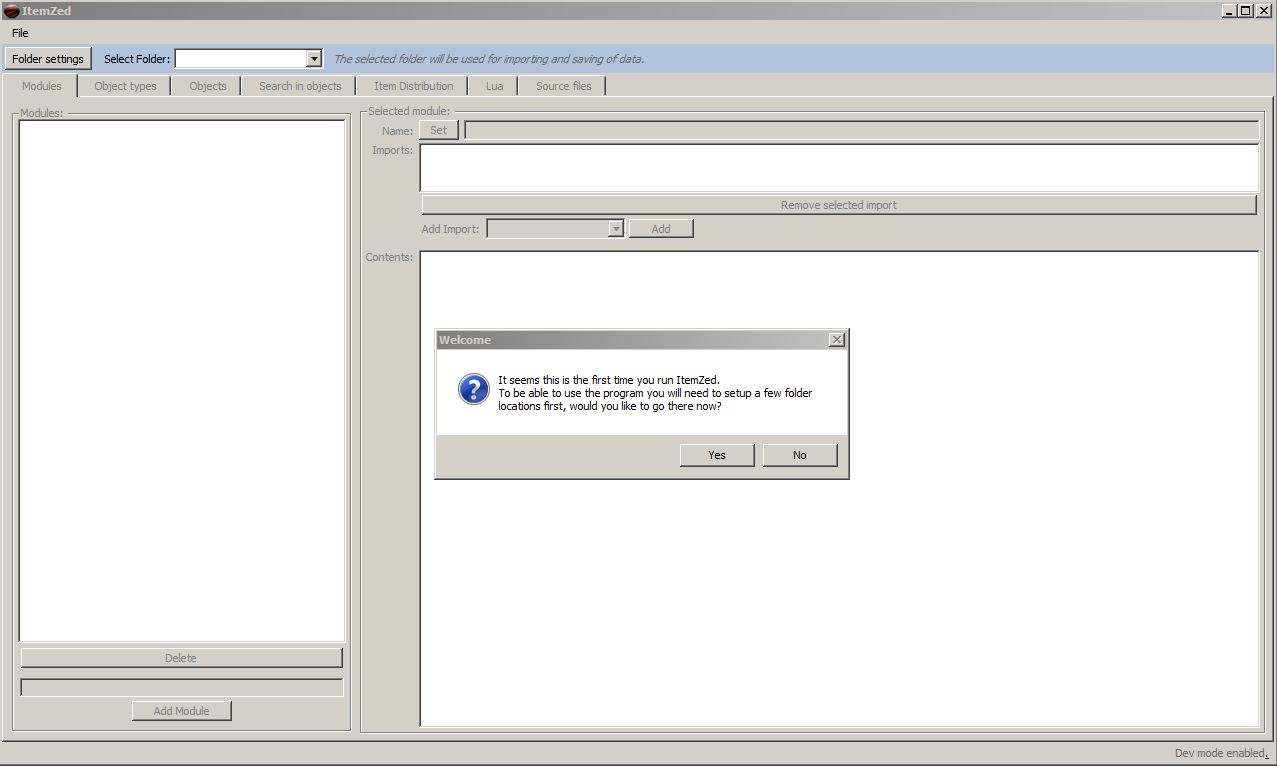
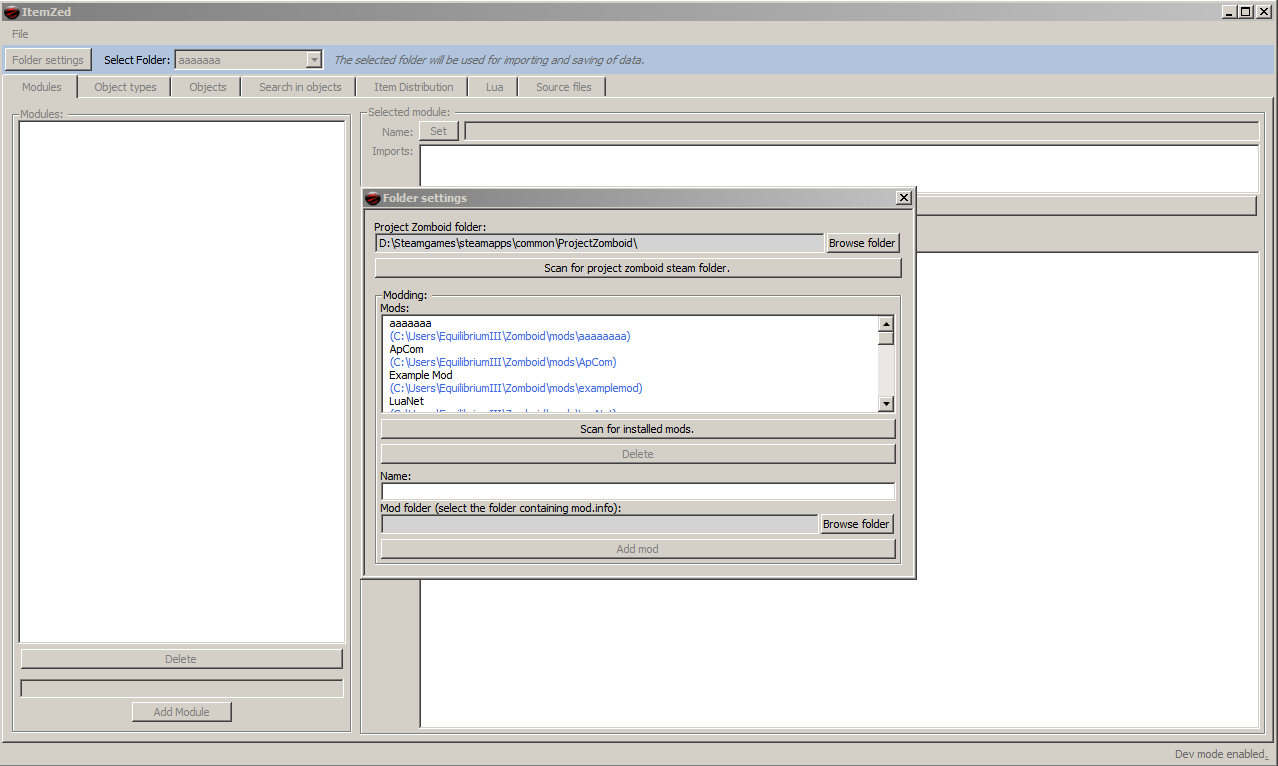
Spoiler1 How to begin
SpoilerUppon first boot the program will ask to setup folders.

When you confirm it will open the folder settings where it will prompt you for an automatic detection of folders.
If all went well then you are good to go and you can close the panel.
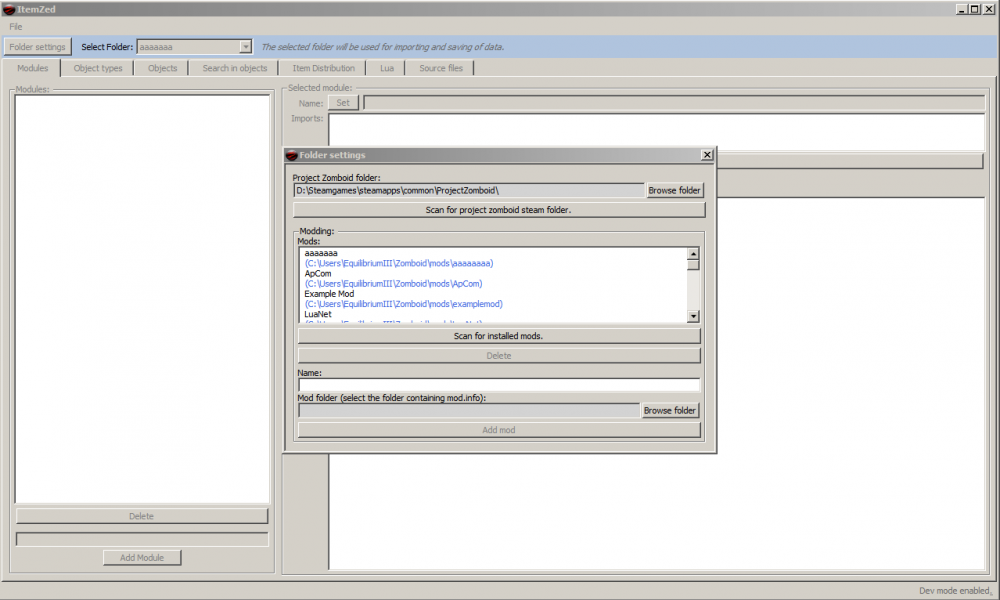
If the program cannot set (some) folders automatically or if you want to point to mods not located in the usual directory for example, you can add them manually.
Once the above is set up you can select a mod in this tool bar and use ‘File->Import’ to start editing.

Or you can use ‘File->Create new mod’ to start a mod from scratch, this will open the following popup.
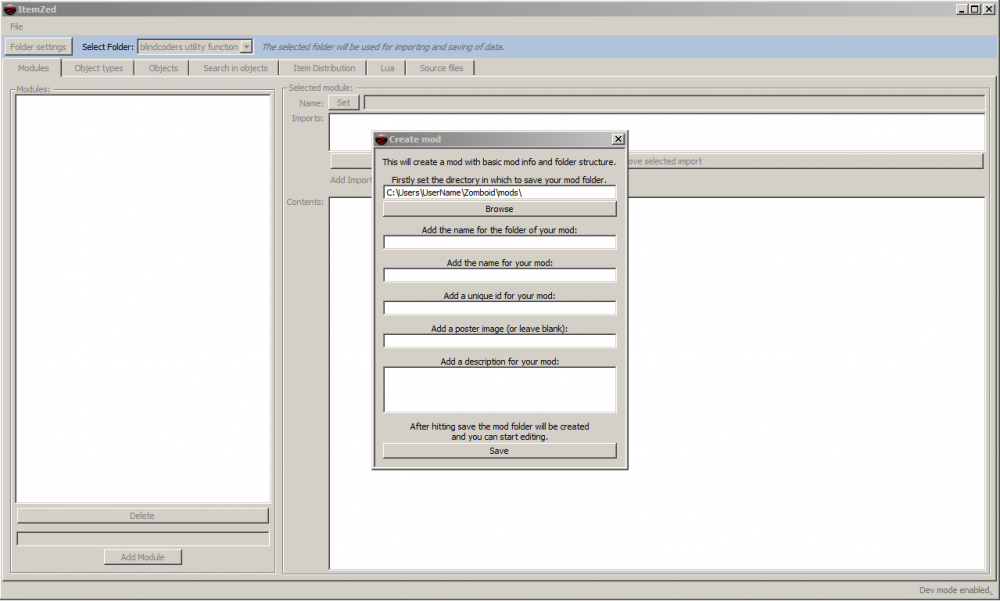
Once the initial values are filled in you can save and start editing the new mod, any additional mod.info values such as texturepacks and tiledefinitions can be edited in the mod.info panel after the new mod has been created.
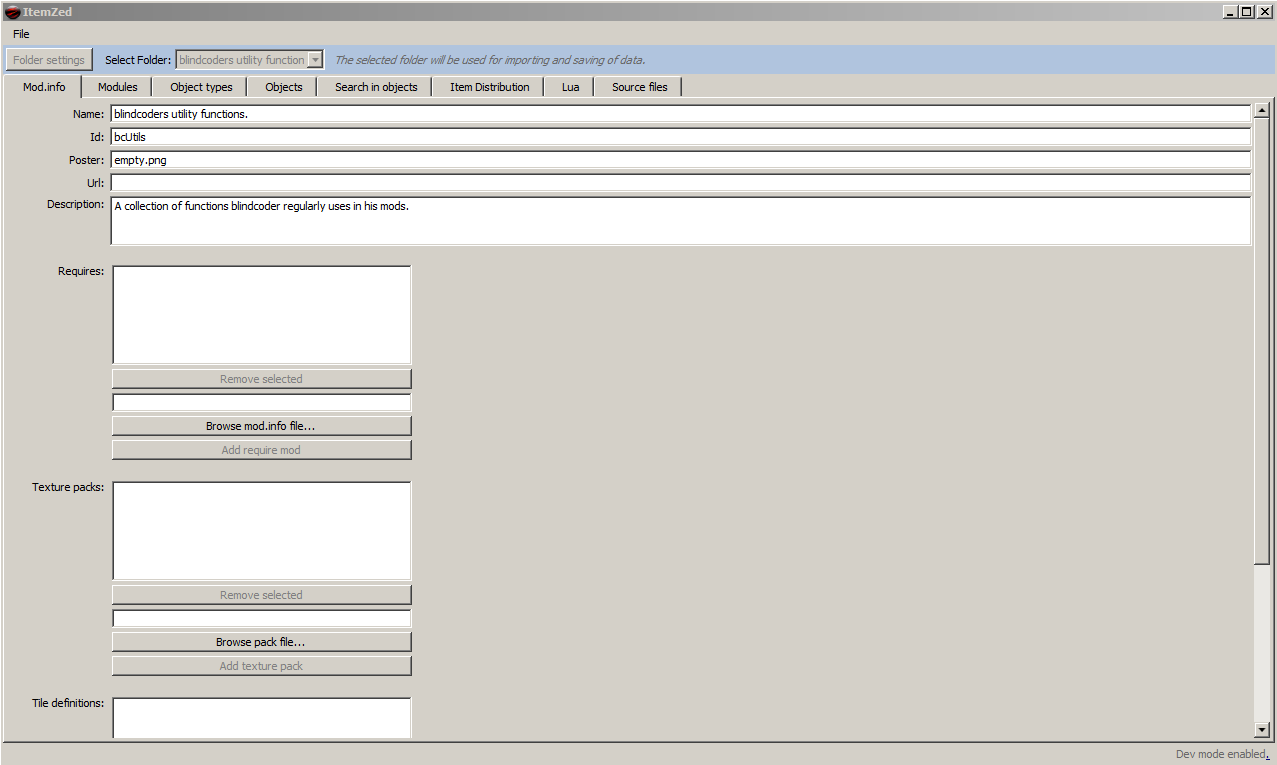
2. A brief tour of ItemZed Panels
Spoiler2.0 Mod.Info
Spoiler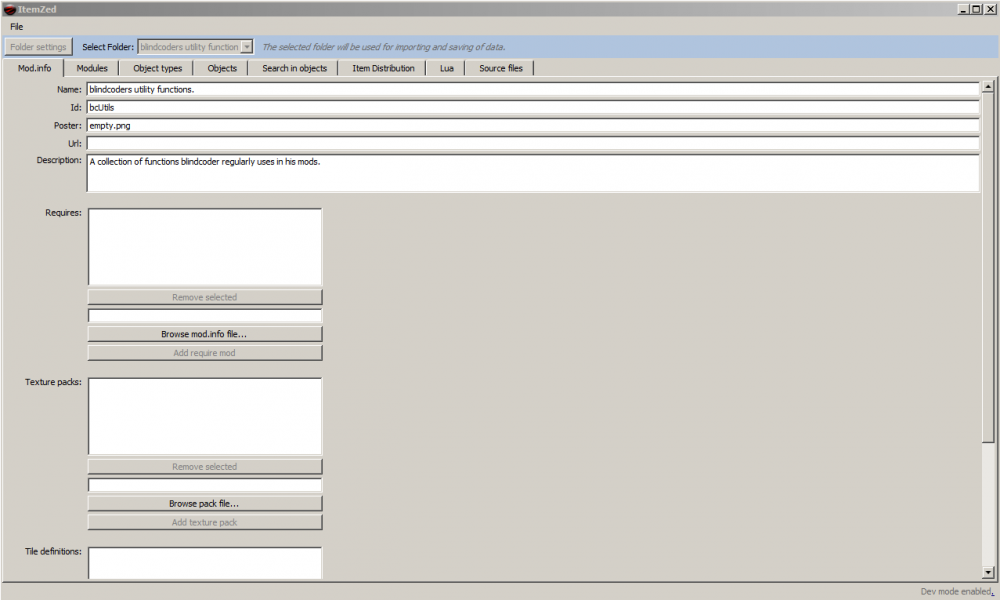
Allows you to edit the mod.info file. When adding texturepacks, save and reimport the mod for the program to load its textures.
2.1 Modules.
Spoiler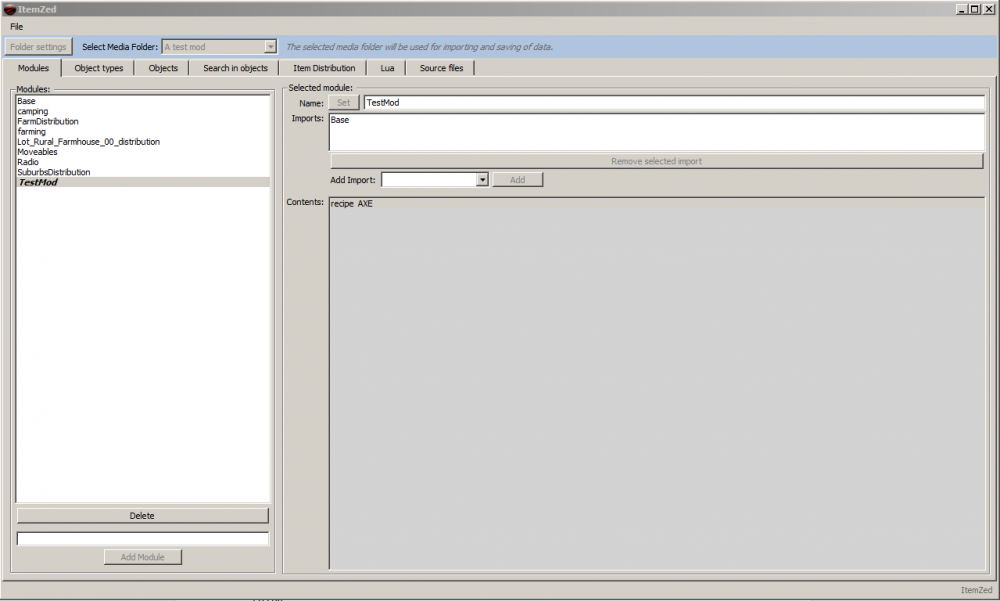
You can optionally add your own modules here, they will be displayed in bold/italic. Only modded modules can be edited.
2.2 Object Types.
Spoiler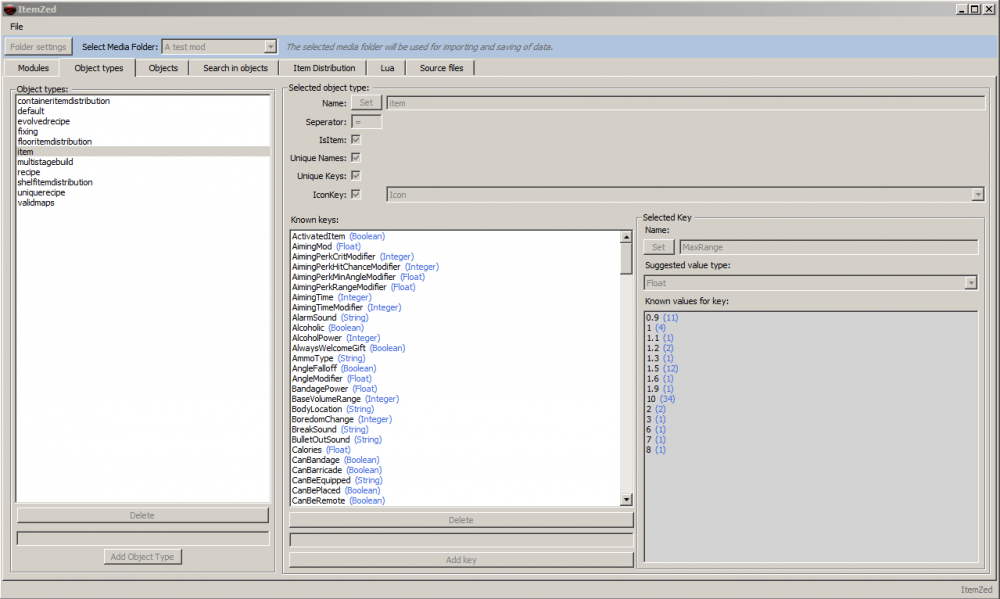
This panel is used to define the different object types - items, recipes etc. When loading a mod media folder this panel is Read Only, but can be used for reference.
2.3 Objects.
Spoiler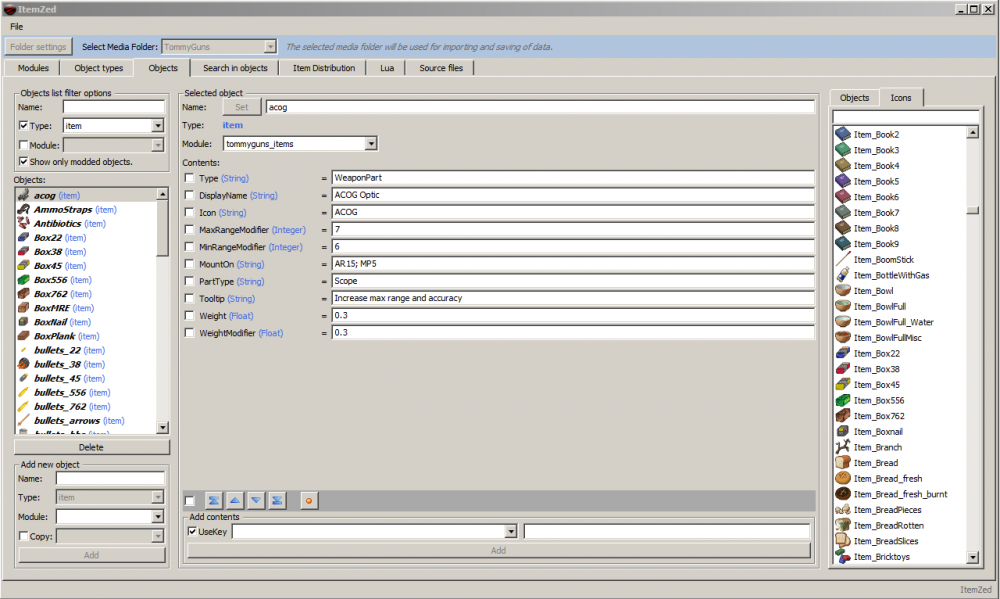
In the Objects Panel all the script module elements (items, recipes etc) can be created/edited/viewed.
On the left you see all loaded objects, which can also be filtered for ease of use. Below this you can add/copy objects, which is also sorted through the aforementioned filter.
Note: when loading a mod the “Show only modded objects” filter is enabled by default.
New objects require unique names, and this can be checked by looking up the object type settings, unless of course you intend to ‘overwrite’ something in the base game.
The middle of the panel shows the currently selected object. The contents of an object appear as they do in the game’s base file scripts, just in easy to use input boxes.
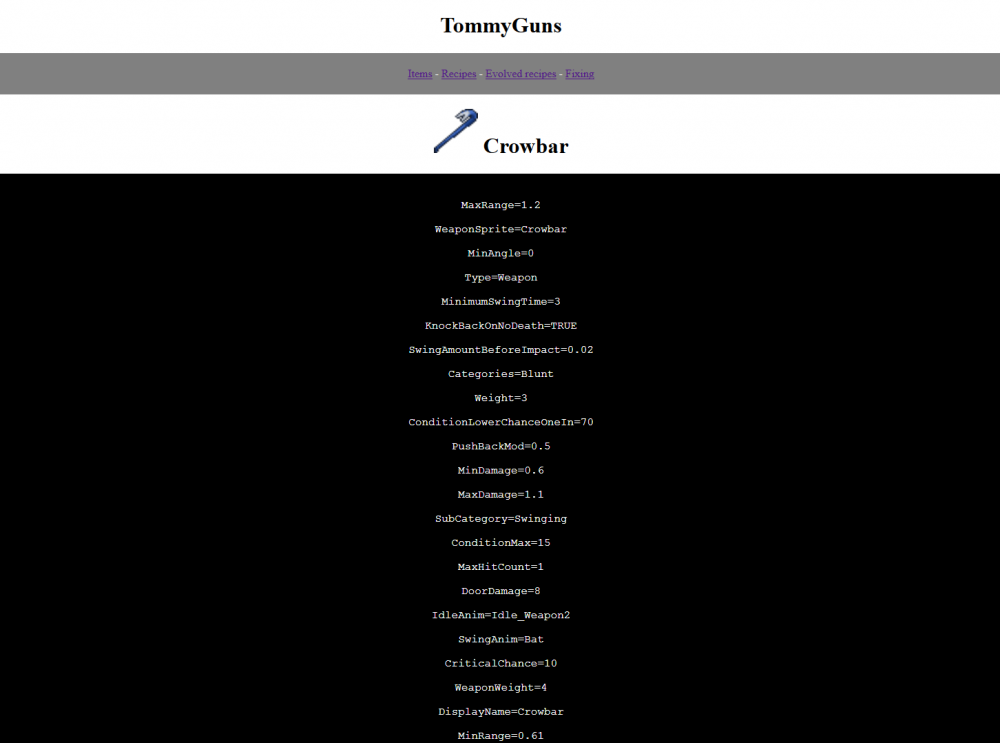
For example the apple in script: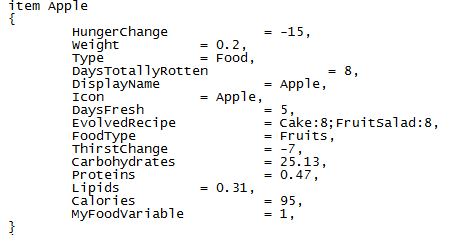
And the apple item again in the ItemZed editor:
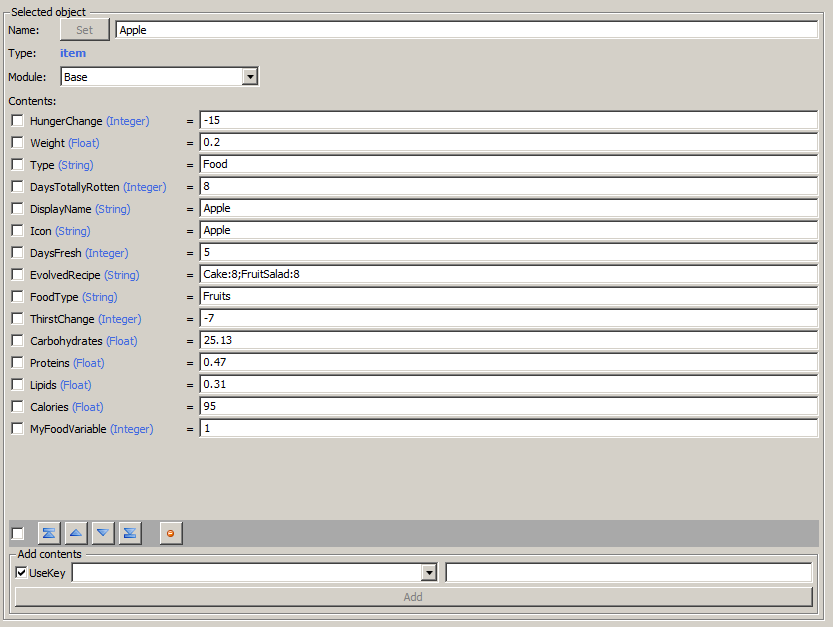
The program has a simple way of parsing the contents, if an object type has a key/value separator defined it will detect those key value pairs and manage the keys for that object type.
Any lines that don’t have the key value separator will be regarded as a “value only” line.A good example to illustrate are the recipes, so here’s a recipe in script:
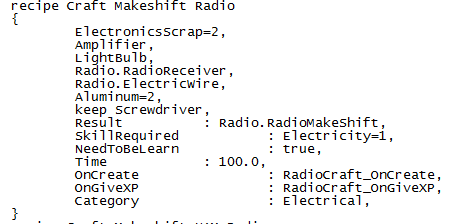
And again in the ItemZed editor:
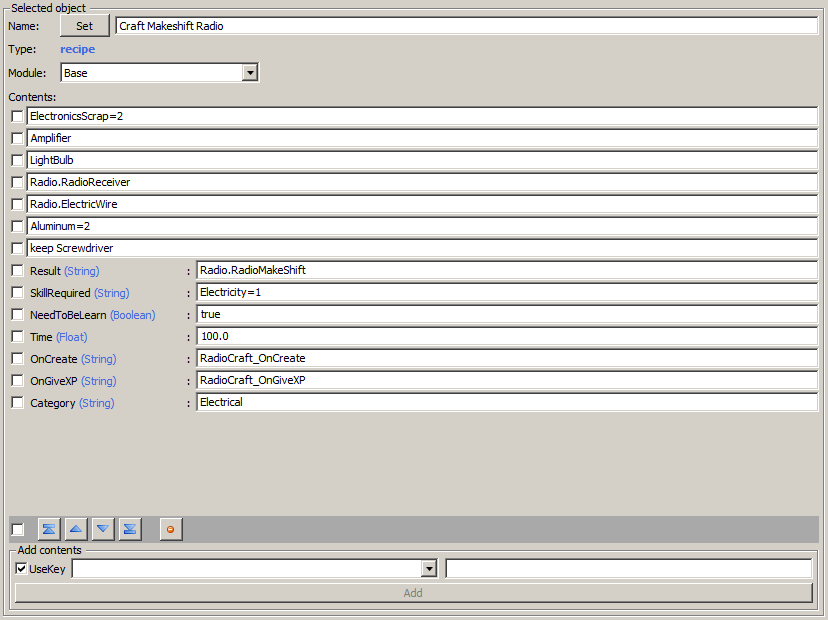
The separator for recipe key values is a colon, as such ElectronicsScrap=2 is treated as a value only line. So any formatting (the ‘=’ and stuff like ‘keep’) other than the key value separator for this object type is not recognized by the program, this is so the program can remain flexible if stuff changes or new types of objects are added in future.
You can select lines using the checkboxes on the left, and the buttons in the dark grey bar to move/delete.
Adding new Key Value pairs can be done below, and if you want to add a single value line then uncheck ‘AddKey’.
Lastly, to the right you’ll see a tab with an Items list and Icons list, from which you can drag and drop items and icons.
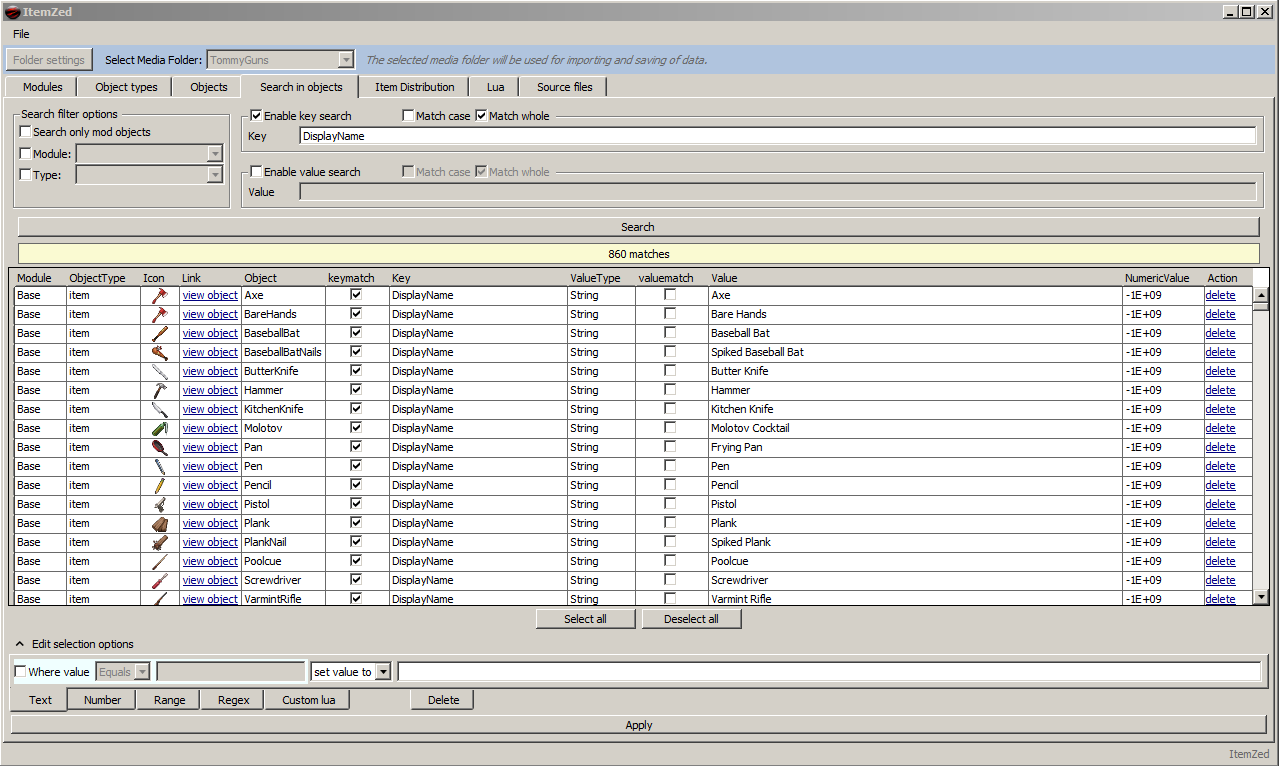
2.4 Objects Search Panel
Spoiler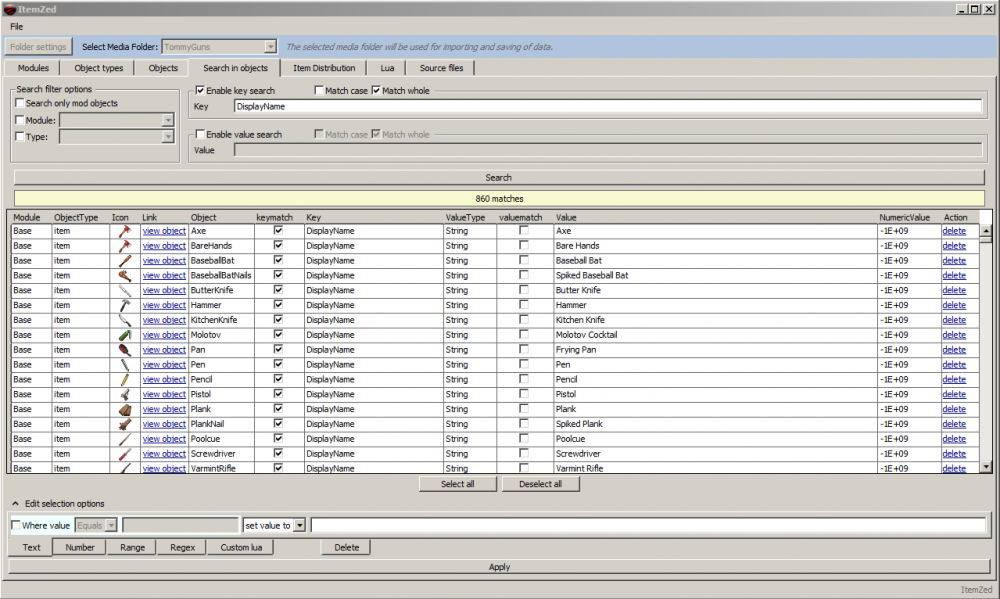
The Objects Search Panel lets you sift through the contents of PZ script objects, also with a handy filter. You can search for two parameters: Keys and Values.
When you enable Key search if will look for relevant results – say the display name of the item you’ve searched for. ‘Axe’ or ‘dead mouse’.
TIP: Searching for ‘*’ will find all keys and values. If you want to get a list of all possible lines, including key/value pairs and single value lines, then disable key search and enable value search with ‘*’ as search value.
Search results
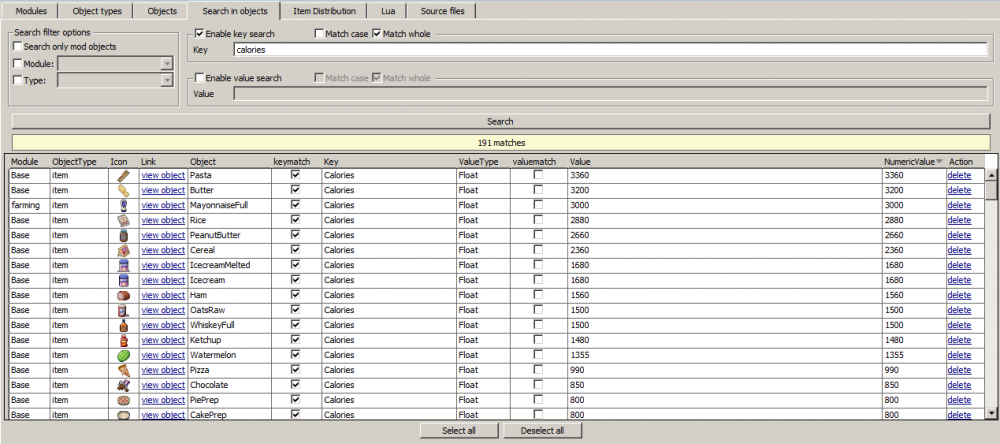
You can sort the results on most columns by clicking the header. When sorting on the value column will always sort values based on their text value (internally all values are text). If a value is a valid numeric value it can be sorted by this too.
Links here allow you to view specific object panels, and to delete lines.
All columns are Read Only except for the Value column: you can edit Values in-list directly through a double click.
Selections can be made by using the buttons below or by using CTRL, SHIFT or CTRL+SHIFT and clicking.
Edit selection options
A number of options can be used here to make changes to a selection of search results, again this only applies to the value column values.
If you are running in mod mode, any of these options will ignore results in the selection that are base game.
Text

This can make simple text based changes, the line can be read as a statement to execute on each value. TIP: For more complex replacement statements use regex.
Number

This will apply operations on numeric values.
TIP: If a result has a key then the key will be checked for having the correct number type. If a result has no key then the value will be evaluated to see if it matches the number type. So if you have a Key ‘DisplayName’ which is a string, and an associated value ‘123’ it will be ignored on grounds of the key being defined as string.
Range

Using range you can convert a range of numbers to a new one.
Regex

This applies regex on the selected results, see link.
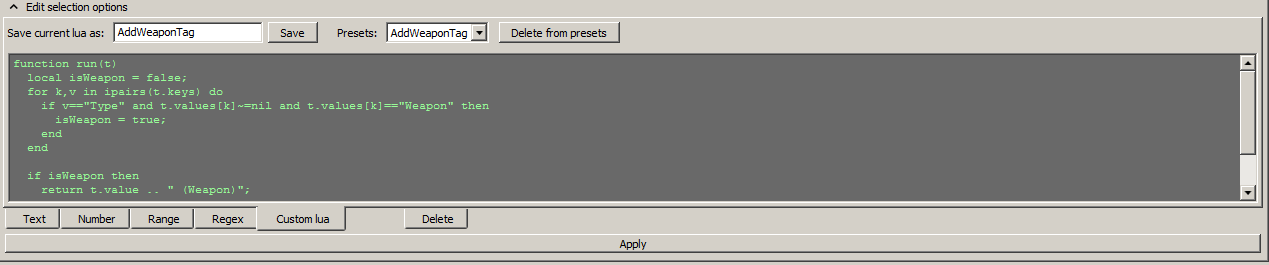
ItemZed Expert Function: Custom lua
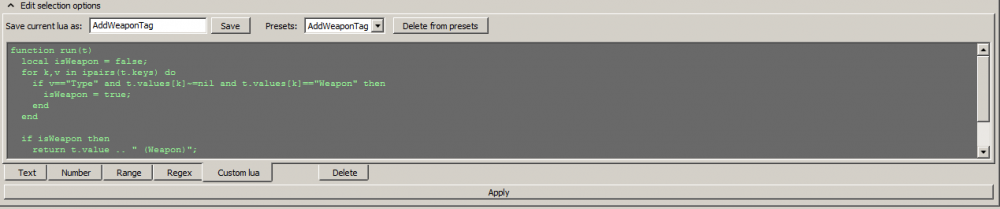
The custom lua option can be used if ever you need to make changes to a selection of values which isn’t covered by the other options. The custom lua allows you to write a custom function to be performed on each search result and optionally return a new value for that result.
How it works:
When you click ‘apply’ then the entire lua script is loaded (you can use upvalues and your own globals).
Each script needs to have at least a global function
function run(t)ItemZed will then run through each search result (it will ignore non-modded results if in mod mode) and call the run function and pass the searchresult as a lua table. You can then parse the result in any way you like, and use return values of the function to modify the search result’s value.
Return values:
· When you return a string it will change the search result value to that string.
· When you return nil or a non-string value, the search result value will remain unchanged.
· Optionally you can return a second boolean parameter, if set to true the content line will be removed.
Optionally you can also define a global function:
function init(t)If a function init is defined, the program will first pass all search results through init and only after all search results have been passed through init once will it proceed to calling the run function on them.
This can be used if for example you want to make a custom range converter you may want to save the highest and lowest value of a set into a upvalue or global variable before performing the final conversion operation in run.
Search Result table
The search result table passed to both init and run contains the following keys with string values:
t["value"] = the value
t["key"] = the key or nil
t["valueType"] = the value type or nil
t["object"] = the object’s name
t["objectType"] = name of the object type
t["module"] = name of the module
And it contains the following keys with table values:
t["keys"] = keys
t["keyTypes"] = key types
t["values"] = values
The latter tables contain all the keys and values of the associated object as indexed tables with string values. For example the first line of an object contents is DisplayName = ObjectName then the first index of these tables would be:
t["keys"][1] == “DisplayName”
t["keyTypes"][1] == “String”
t["values"][1] == “ObjectName”
Note: Values in the ‘keys’ and ‘keyTypes’ table can be nil if a content line has no key, the ‘values’ table on the other hand should always have a string value for each index.
This could be used for example to change the WeaponDamage value for a large selection of weapons and applying a modifier based on the CriticalChance of the weapon if defined.
The CriticalChance key can be looked up in the ‘keys’ table, and if found the associated value can be retrieved from ‘values’ using the found key index.
Delete

Simply deletes the selected entries.
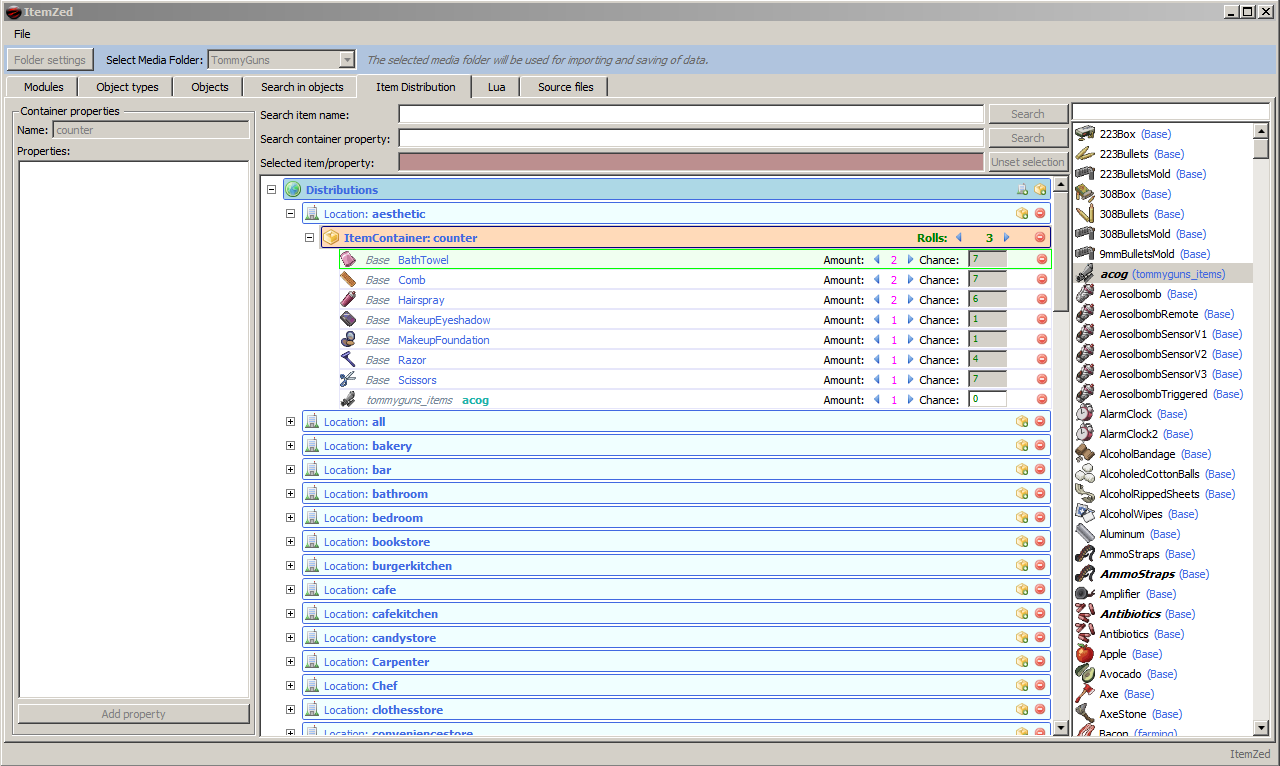
2.5 Item Distribution.
Spoiler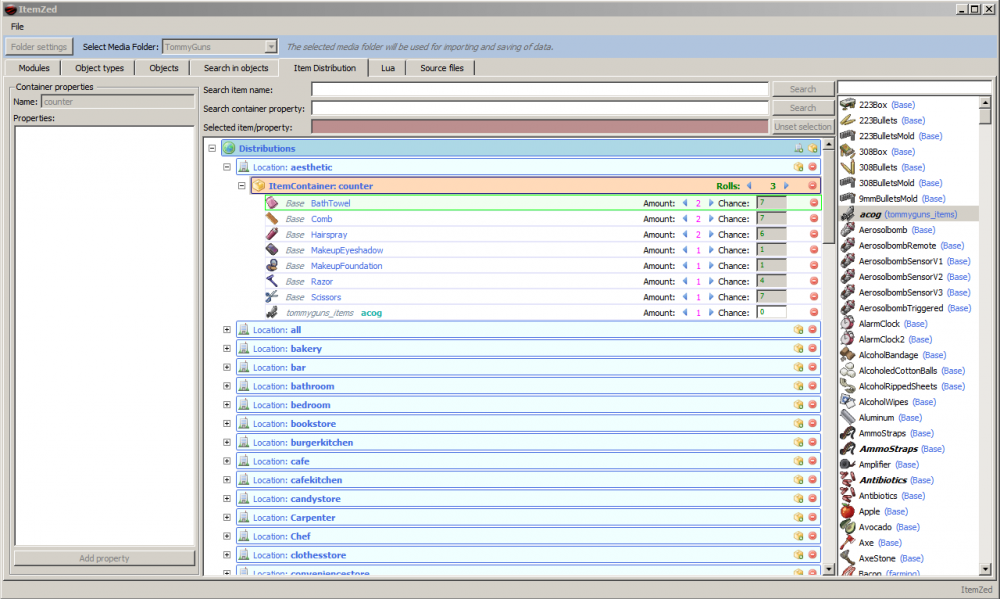
ItemZed can be used to maintain the distribution of your mod’s items throughout PZ maps, but you can ignore this if you’d rather do it the traditional way.
To use it you can simply add your items to the containers (adding distribution items is not limited to modded items, you can also add extra spawns for base game items). TIP: Modded items are shown in a different colour and are editable.
To add Items simply drag them from the list on the right into your chosen container on the distribution list, then set your preferred spawn chance.
Right clicking an item in the list on the right will show all containers that currently contain it.
Note: Your distribution items are saved in a separate distribution table which gets merged with the game’s distribution table when the game loads the world. The distribution table is saved in “\lua\server\Items\” in your mod media folder. The filename should be “Distributions_youruniquenamehere.lua”, if you don’t have such a file the program will generate a filename looking like this “Distributions_ff9a7ccd.lua”. You can rename this file, making sure the mod is not currently loaded in the program, then change the random part to something more user-friendly.
2.6 Lua Panel
SpoilerSee section 3 “Lua”
2.7 Source File Panel
Spoiler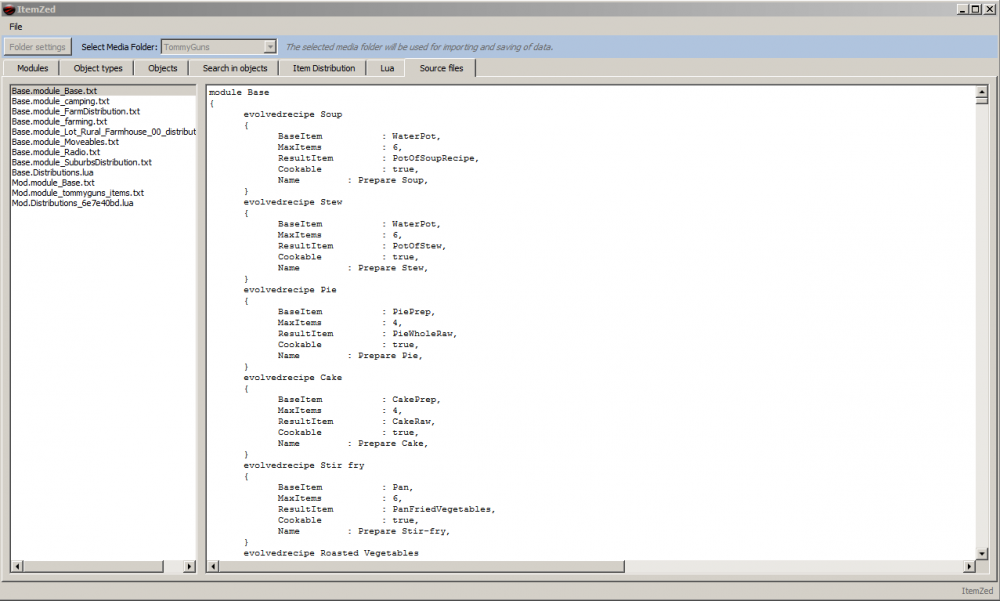
This is a read only panel showing the files that have been loaded, so you can browse their contents.
TIP: If you run the program the first time on an existing mod it will show files with the old filenaming structure as it displays the source files in their state prior to an import. Once you save and reimport this will be updated.
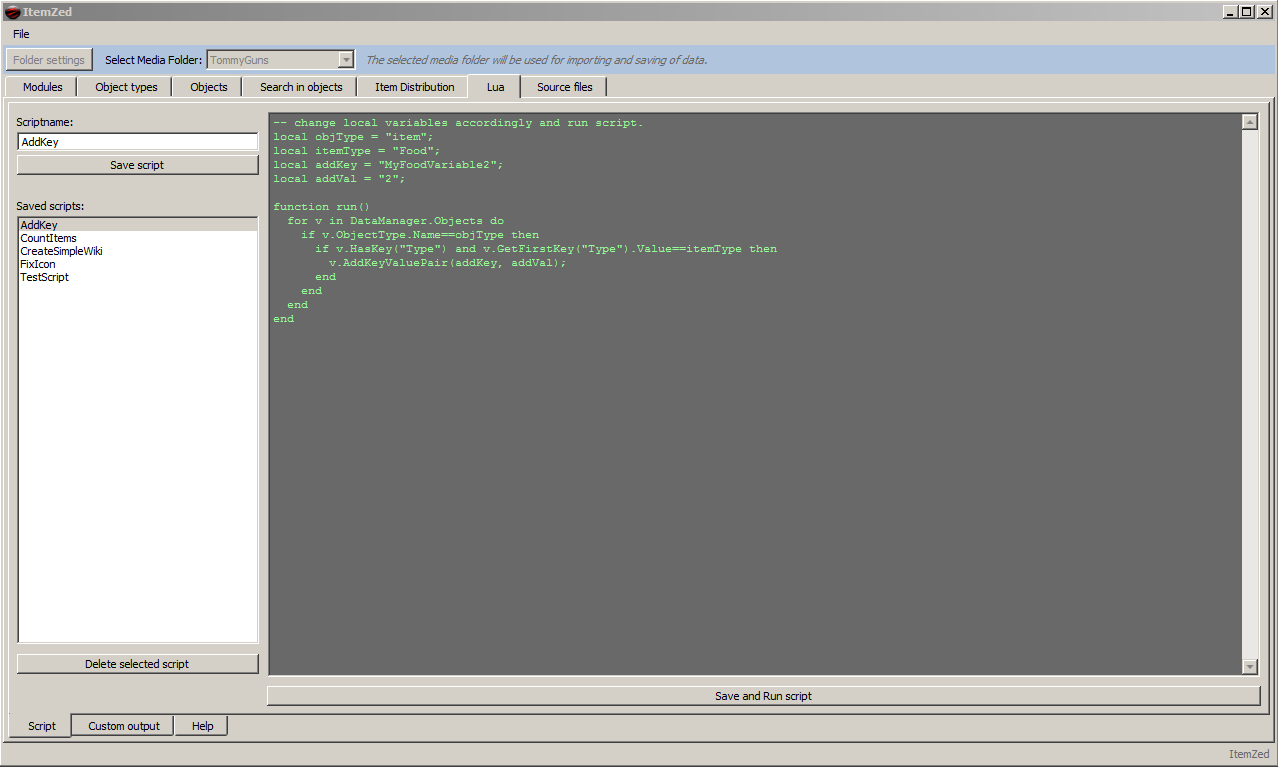
3 Lua
Spoiler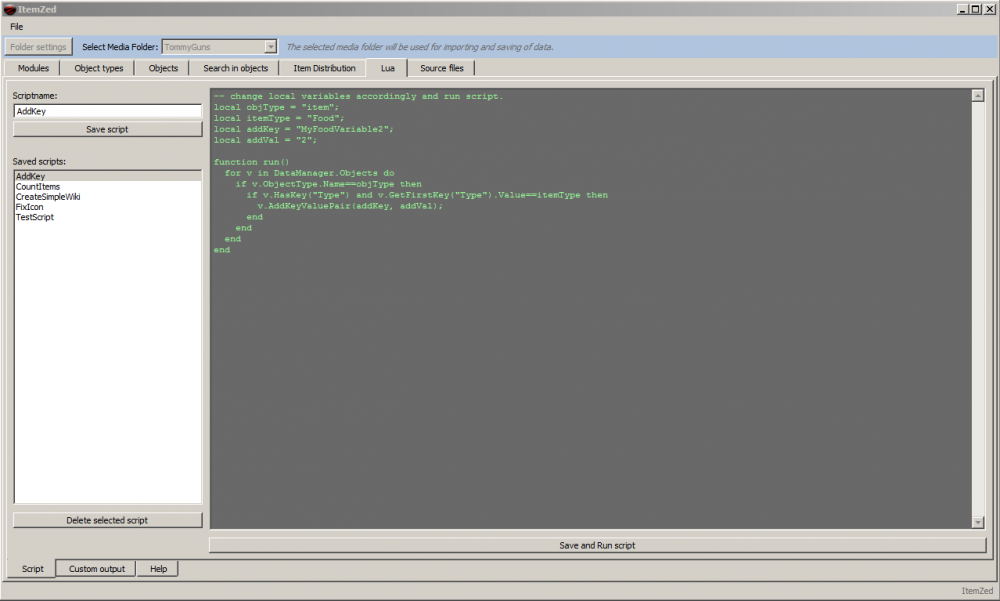
The lua panel offers a way to manipulate the data via traditional lua scripting instead of using the UI. This can be used for many things, whether it’s refactoring or adding new data elements. It can also be used to output data and icons (from a pack) or generate html.
When running a lua script a console window will pop up that you can also print an output to. (It should also be noted that before running a lua script ItemZed will save the data, make a backup and then reimport the data in a clean DataManager object, just before the new DataManager is passed to the UI it will try and run the lua script.)
To write a valid script all that’s required is that said script has a function run(). This is the entry point. The run function will be called without parameters, and any return values of the function will be ignored.
You can use the following globals in the ItemZed lua environment:
print(msg)
Prints the msg string to the console window.addIconToExportList(name)
Adds an icon name to an export list that can flushed at some point.exportIcons()
This flushes all the icons in the exportlist as separate files stored in “output/user/html/img/iconame.png”getFileWriter(filename)
When the filename is a string without a path or extension, this returns a filewriter object.
Filewriters can be set to save as html or txt. See lua documentation for more info.getGUID()
This returns a randomly generated guid string.DataManager
This global variable holds the instance of the DataManager. (Please see the Help tab in Editor for documentation on exposed classes and functions.)Some example scripts.
The following script probably makes more sense to use as dev then modder, but it serves well as an example. So, suppose you want to add a new key to only items of the type food:
local objType = "item";
local itemType = "Food";
local addKey = "MyFoodVariable";
local addVal = "2";
function run()
  for v in DataManager.Objects do
    if v.ObjectType.Name==objType then
      if v.HasKey("Type") and v.GetFirstKey("Type").Value==itemType then
        v.AddKeyValuePair(addKey, addVal);
      end
    end
  end
end
This script searches for any items with the Food item type and then adds a new key value pair to all it finds. It defaults the value to 2, and the search panel could be used afterwards to search for all added “MyFoodVariable” keys to adjust values accordingly. Alternatively you could write a more complex script that sets the value of MyFoodVariable based on other values of the item.
Here’s another example that utilizes the file writer to write some statistics about your mod:
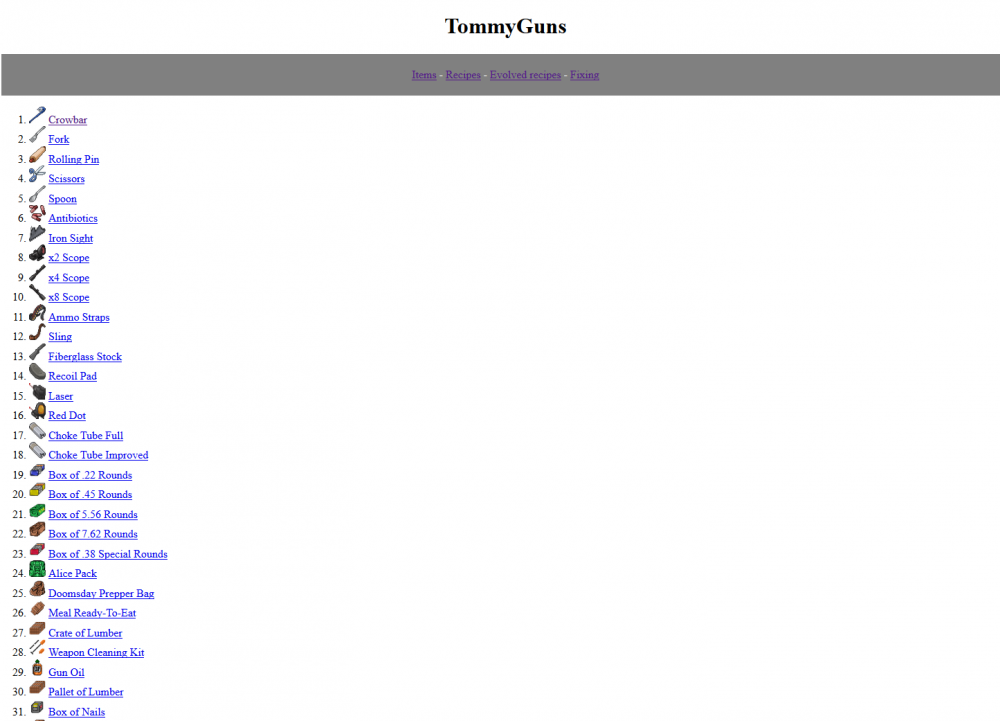
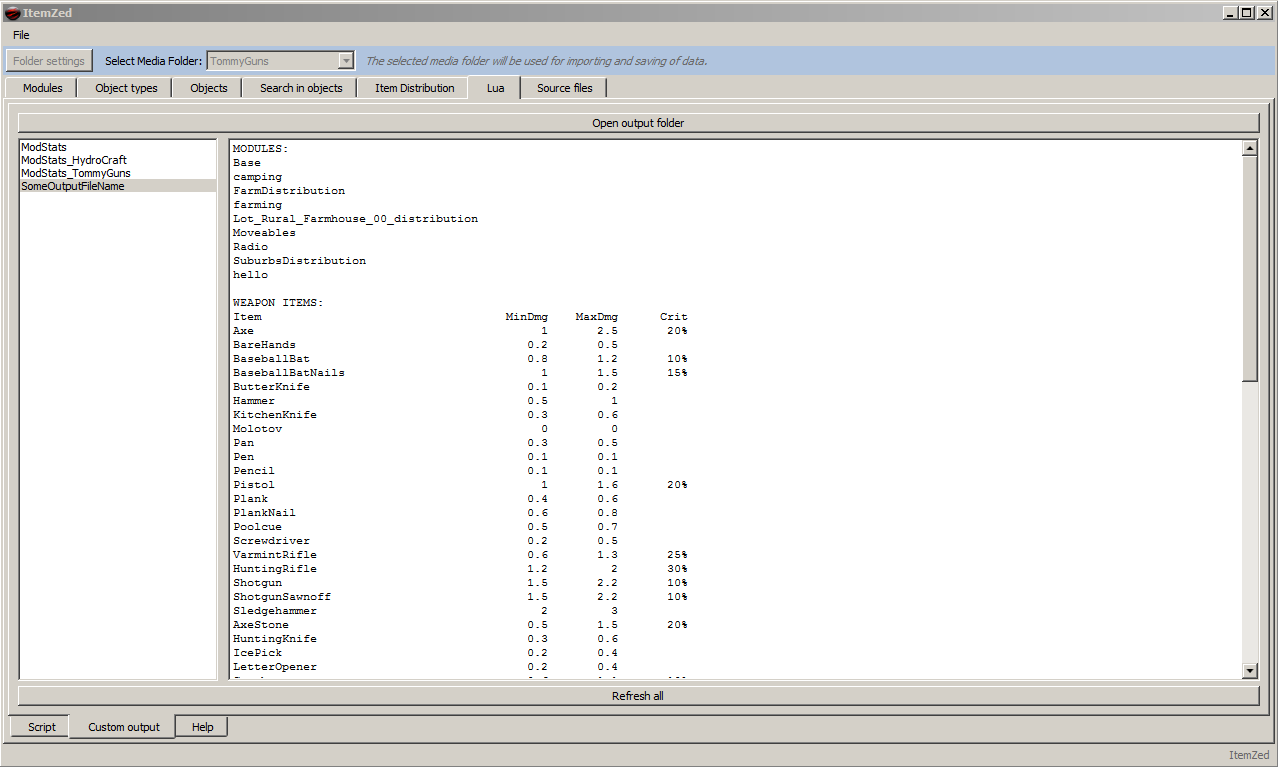
-- counts stuff in a mod.
local modName = "YourModName";

function run()
  local w = getFileWriter("ModStats_"..modName);

  w.WriteLine("Stats for mod: " .. modName);
  w.WriteLine("");

  local count = {};
  local types = {};
  for v in DataManager.Objects do
    if v.IsMod then
      if count[v.ObjectType.Name] then
	  count[v.ObjectType.Name] = count[v.ObjectType.Name]+1;
      else
        count[v.ObjectType.Name] = 1;
      end

      if v.ObjectType.Name=="item" then
        if v.HasKey("Type") then
          local t = v.GetFirstKey("Type").Value;
          if types[t] then
	      types[t].count = types[t].count+1;
            table.insert(types[t].items, v.GetFirstKey("DisplayName").Value);
          else
            types[t] = { count = 1, items = { v.GetFirstKey("DisplayName").Value } };
      	    end
        end
      end
    end
  end

  w.WriteLine("Global count.");
  for k,v in pairs(count) do
  	w.WriteLine(tostring(k)..": "..tostring(v));
  end

  w.WriteLine("");

  w.WriteLine("Item types.");
  for k,v in pairs(types) do
  	w.WriteLine(tostring(k)..": "..tostring(v.count));
	for _,itm in pairs(v.items) do
		w.WriteLine("  "..tostring(itm));
	end
  end
end
This will output the file writer contents to a file ModStats_modname.txt. Any text file output can viewed in the editor’s Custom output tab, so here’s an example of the above script running through the TommyGuns mod:

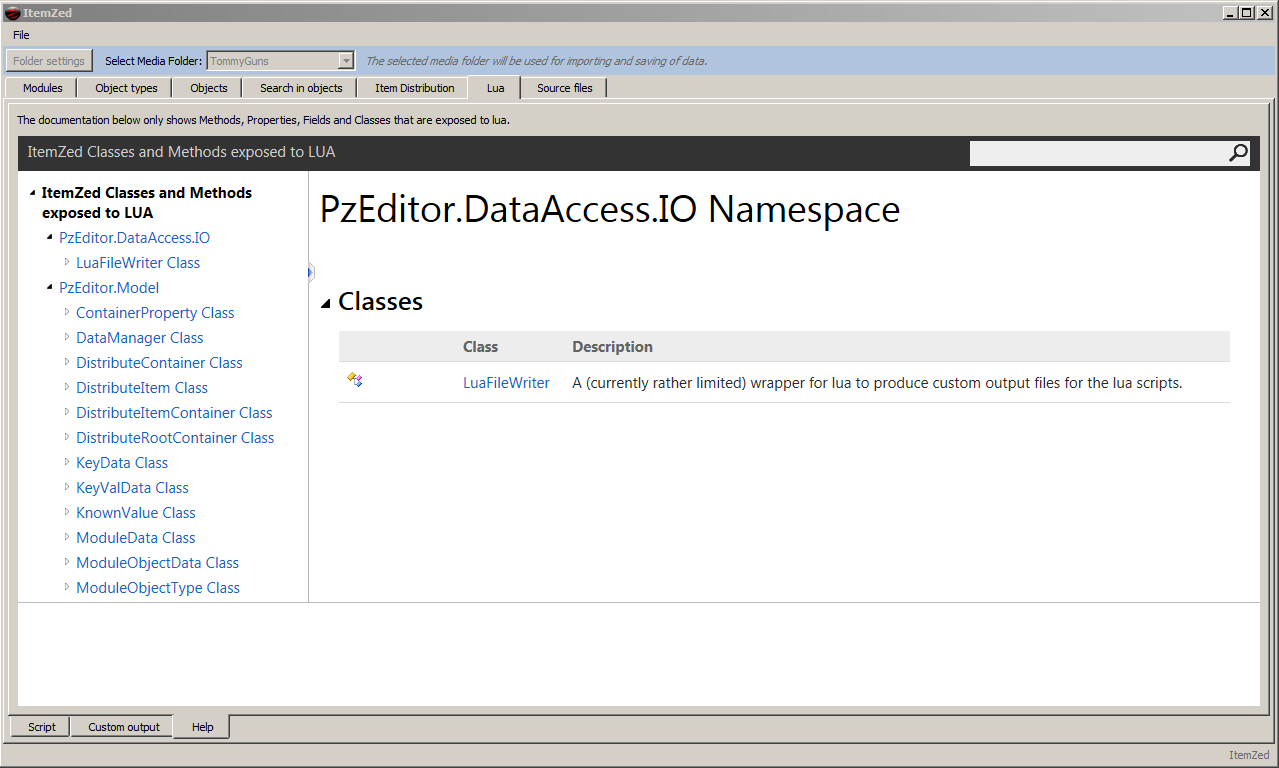
There’s also a Help tab in the lua panel, which shows some documentation on exposed classes and functions. It should hopefully help with writing lua scripts.

4. Importing & Saving
SpoilerAfter that whistle-stop tour, I guess you’ll be wanting to know how to import existing work/data. Well, with a correctly set mod folder in the blue bar, you can import the data via: Menu->Import.
When selecting Import, the program will automatically start reading folders/files inside the mod folder and display a progress report. If the process fails then you should be informed of any errors.
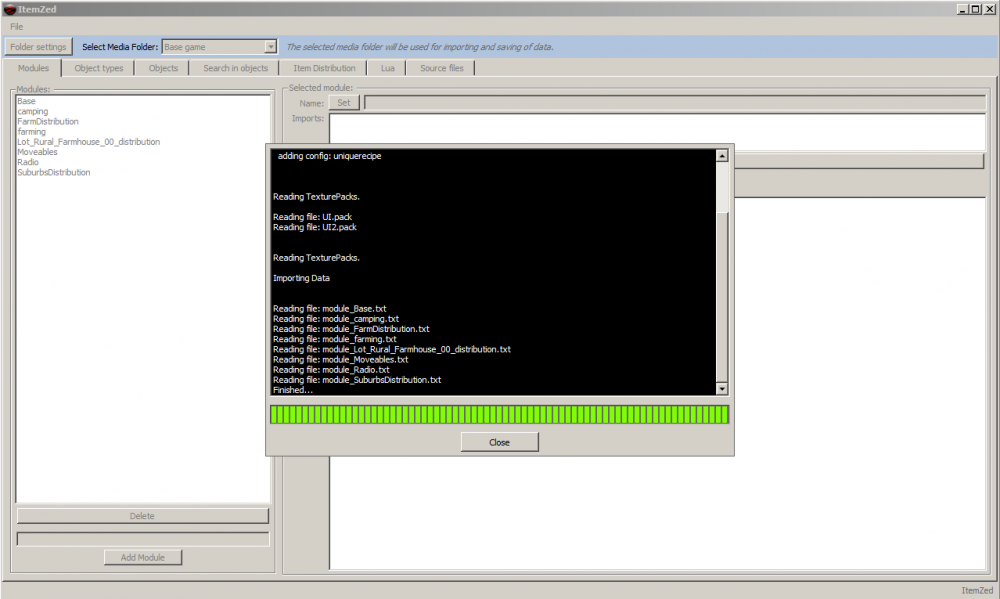
During the import process the following will happen:
- · The config.txt file is parsed.
- · The mod.info and directories are read and verified.
- · Any whitelisted texturepacks and single textures are loaded.
- · The “scripts/” sub folder is searched for text files which should contain scripts which are then parsed.
- · The Distributions.lua file, if present, in “lua/server/Items/” is parsed.
When parsing the image, scripts and distribution data – they are stored internally in various class objects and collected together in a DataManager object. The data can be edited via the UI or you can write a lua script that manipulates said DataManager object and its contents directly (see lua section).
When you are importing a mod, the program will first load the data from the Project Zomboid media folder, then it will load data from the mod media folder, and finally merge all data in the DataManager.
Elements belonging to your own mod will be tagged internally, and the UI will subsequently only allow you to make changes to mod elements that impact on it.
TIP: After importing all operations are stored in memory, so if you import and don’t save then nothing will be changed in your files.
Data can be saved at any time, and at the same time converted back to the original formats.
When you save, all text files in the root of your “scripts/” are deleted before the newly saved files are copied in – so make sure there’s only script text files in that folder. This is because ItemZed restructures and renames existing script files, as shown below with the ‘old’ script structure to the left and the ‘new’ to the right.
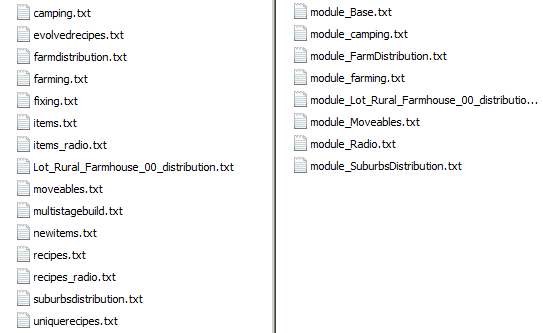
Internally, files still have the same formatting as before - but each module is now saved separately. (This was done so the program doesn’t need to remember which file different data belongs to.
5 Lua wiki/html generation.
SpoilerThrough lua you can export icons and also output .html files instead of .txt. This can be used to export partial html for a wiki, or generate an entire custom wiki for you mod.
In fact, ItemZed now includes a “CreateSimpleWiki” script:
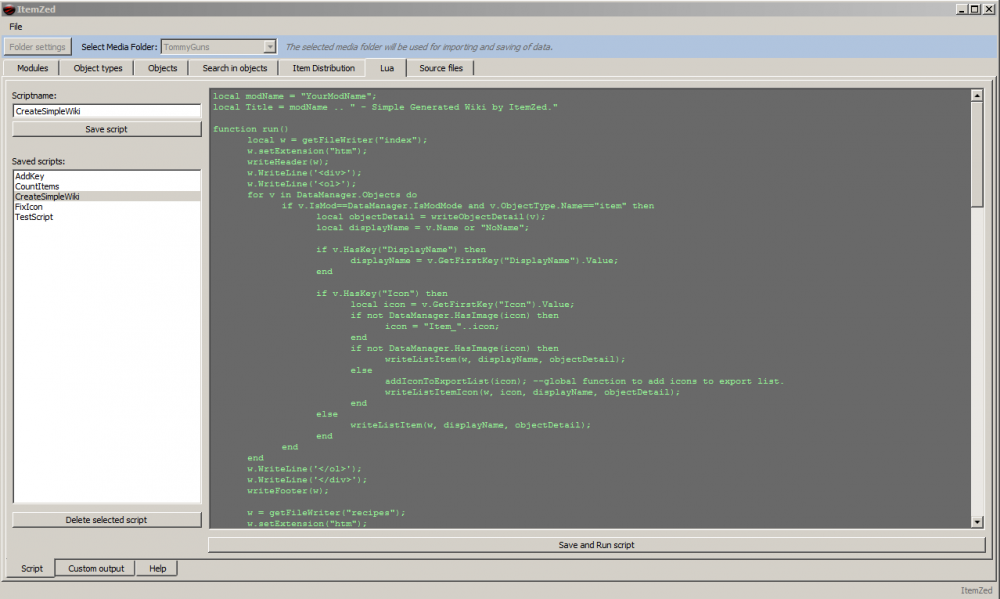
When running this script a simple wiki will be exported to “/output/user/html/” in the program root.
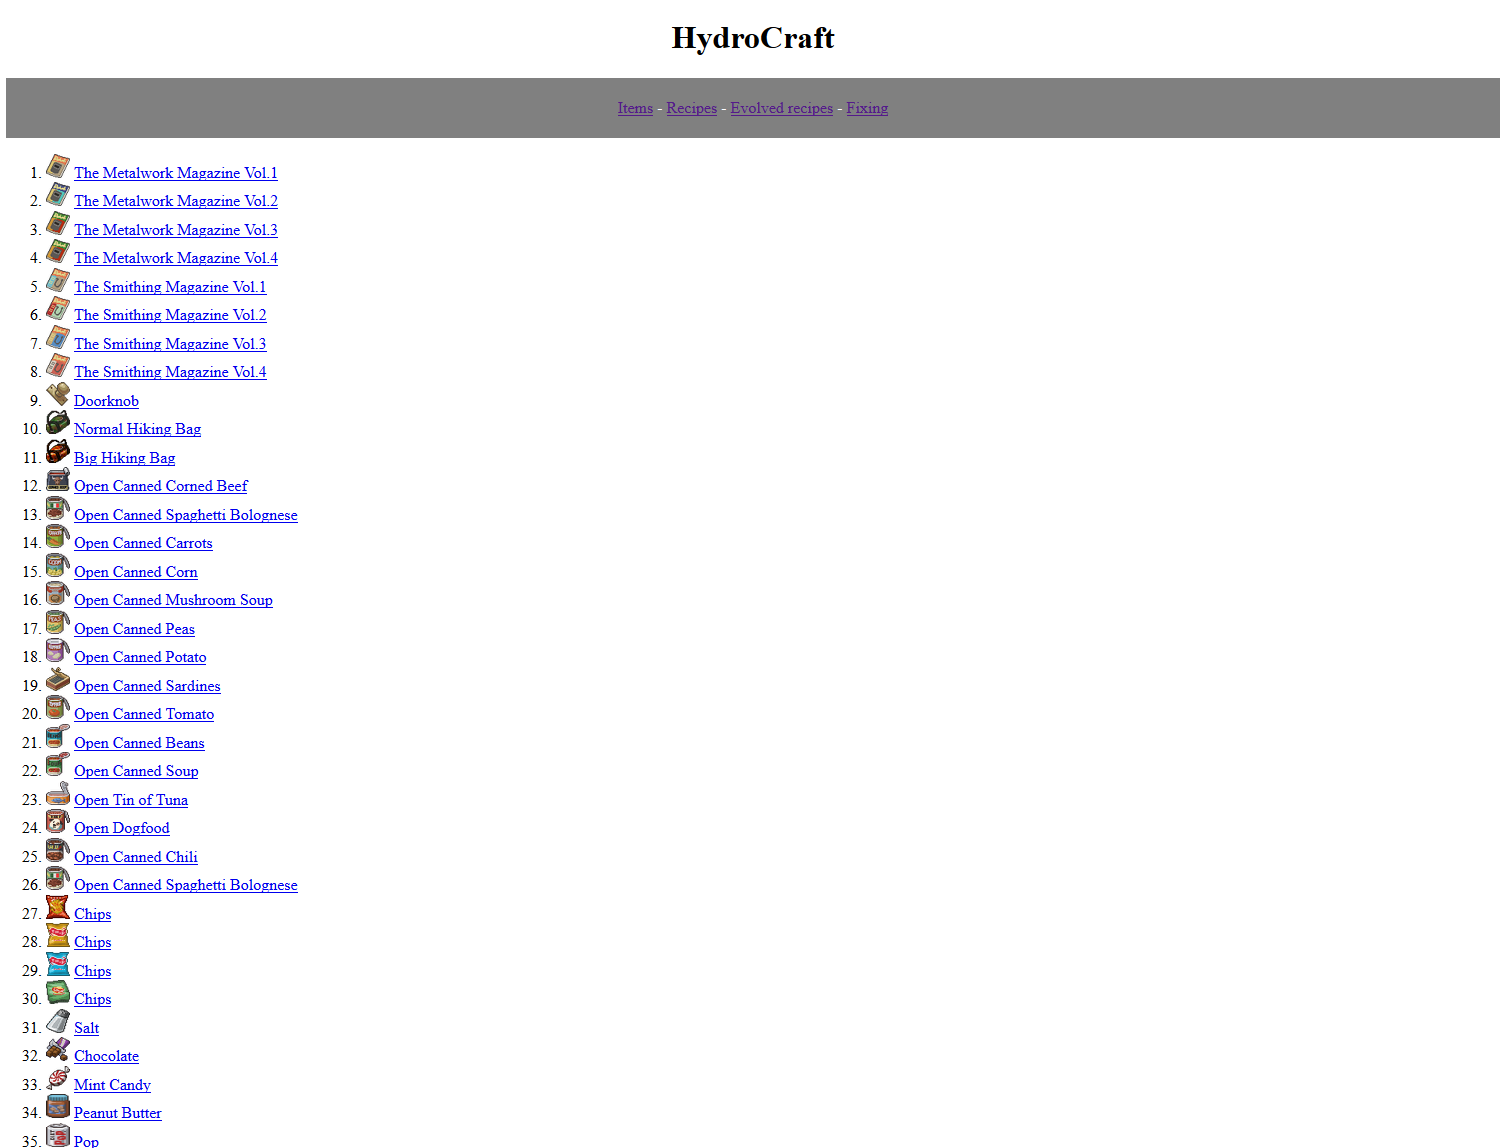
The output html looks something like this:

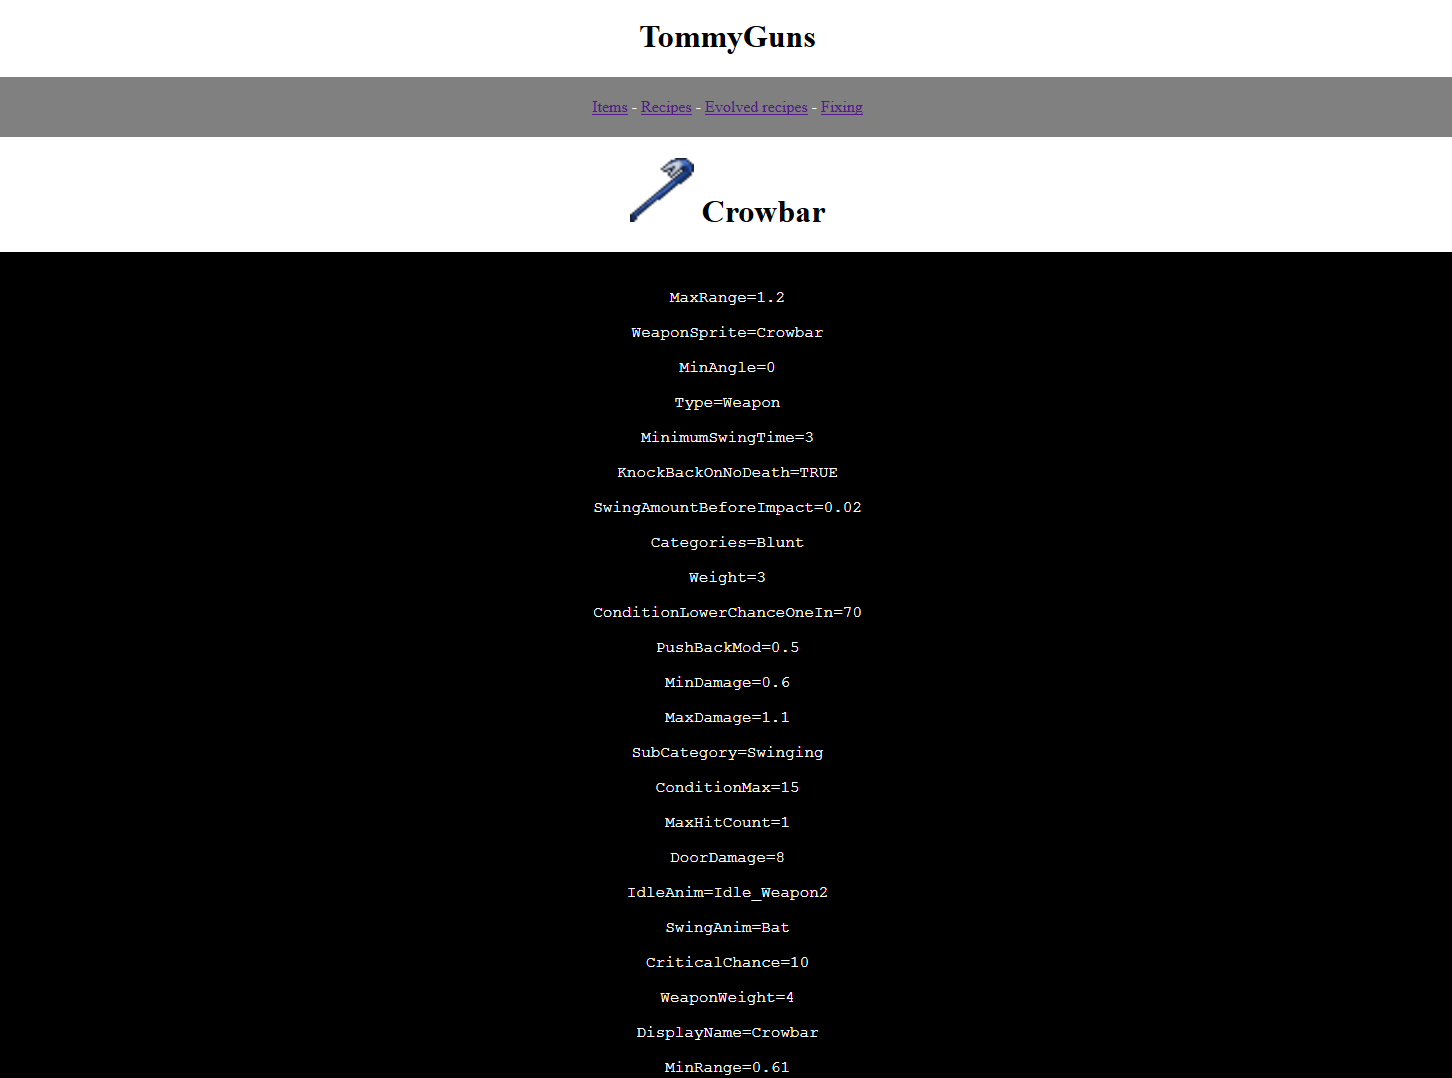
When clicking on an item link it shows a simple detail page with a raw printout of the item contents:
The script is very bare but functional for a simple minimalistic wiki and could be further developed to create a better looking html page.
Other Important Information:
SpoilerWhere files and configuration files live
ItemZed has the following configuration files stored in the “config/” folder.
window.txt
//Uncomment the lines below and change their values accordingly to modify window startup position/resolution.
//position:0,0
//size:1920,1080
Can be edited to change window start up behavior.
options.txt
This file stores media folder settings in key value pairs per line separated by a comma. This file is automatically maintained by the program and usually won’t require any user editing.
config.txt
This file can store different types of configuration options. The “ObjectType” blocks contain information about how to read various elements in the script files. These can also be edited in the program itself.
The two configuration option blocks that are of interest to note are “TexturePacks” and “SingleTextureDimension”.
TexturePacks
TexturePacks
{
	ui
	ui2
}
If your mod uses texture packs you can add their names to the whitelist without the .pack extension. Each entry must be on a new line and contain no extra characters like commas.
The white list won’t cause errors if pack files don’t exist, it simply checks if found pack files match the whitelist and if so loads them.NOTE: A recent update now finds a mod’s texture packs automatically.
SingleTextureDimension
SingleTextureDimension
{
	64
}
This single value option controls the size of single image textures to be loaded from the textures folder.
Any image with both the width and height smaller or equal to this value will be attempted to load. You can set this value to -1 to ignore all single image textures.Automatic backups
ItemZed will make automatic backups during some operations. This is baked in currently, a future update will have ability to change backup settings or disable it altogether.
Automatics backups will be made:
· Before files are imported.
· After each successful save.
· When running a lua script in the lua tab before a script is ran.
The backup folder can be accessed easily via menu->backups folder. The files are archived with a year-month-day-time stamp and a tag of the operation that triggered the backup (IMPORT,SAVE,RUNLUA).
Currently there’s no limit on the backup saves, a future version will have a option to set how many backups to remember maximally (perhaps also a restore option).
-
thanks @Kim Jong Un! gonna look into those.
- EUDOXIO, Magic Mark and Kuren
-
3


ItemZed (updated 1.1b)
in Tutorials & Resources
Posted
Eya, added version 1.3, which should fix the problem with errors during import.
Full list of changes:
FIXED file loading, should now ommit invalid txt files from scripts dir.
CHANGED most settings are stored in registery now instead of files.
CHANGED various outputs (logs, backups, temp&userdata etc) now defaults to "userorhomedir/.ItemZed/"
window.txt to force window size and position now generates in .ItemZed directory as well.
CHANGED some names in file menu to be more clearer.
ADDED some hot buttons on the select folder bar for open/close/save
CHANGED backups are now turned off by default, they can be turned on by going to folder settings and checking the backup tickbox at bottom.