nheve
-
Posts
8 -
Joined
-
Last visited
Everything posted by nheve
-
Hello. Found this just by accident. While disassembling previously created Wooden Cross (through the pick up/disassemble mode in hud on left), this error appears in console: STACK TRACE ----------------------------------------- function: start -- file: ISMoveablesAction.lua line # 51 ERROR: General , 1627087904428> ExceptionLogger.logException> Exception thrown java.lang.RuntimeException: Object tried to call nil in start at KahluaUtil.fail line:82. ERROR: General , 1627087904429> DebugLogStream.printException> Stack trace: java.lang.RuntimeException: Object tried to call nil in start at se.krka.kahlua.vm.KahluaUtil.fail(KahluaUtil.java:82) at se.krka.kahlua.vm.KahluaThread.luaMainloop(KahluaThread.java:973) at se.krka.kahlua.vm.KahluaThread.call(KahluaThread.java:163) at se.krka.kahlua.vm.KahluaThread.pcall(KahluaThread.java:1980) at se.krka.kahlua.vm.KahluaThread.pcall(KahluaThread.java:1782) at se.krka.kahlua.integration.LuaCaller.pcall(LuaCaller.java:85) at zombie.characters.CharacterTimedActions.LuaTimedActionNew.start(LuaTimedActionNew.java:90) at zombie.characters.CharacterTimedActions.BaseAction.waitToStart(BaseAction.java:94) at zombie.characters.CharacterTimedActions.LuaTimedActionNew.waitToStart(LuaTimedActionNew.java:62) at zombie.characters.IsoGameCharacter.updateInternal(IsoGameCharacter.java:9606) at zombie.util.lambda.Invokers$Params1$CallbackStackItem.run(Invokers.java:37) at zombie.core.profiling.AbstractPerformanceProfileProbe.invokeAndMeasure(AbstractPerformanceProfileProbe.java:71) at zombie.core.profiling.AbstractPerformanceProfileProbe.lambda$invokeAndMeasure$0(AbstractPerformanceProfileProbe.java:83) at zombie.util.lambda.Stacks$Params3$CallbackStackItem.invoke(Stacks.java:230) at zombie.util.lambda.Stacks$GenericStack.invokeAndRelease(Stacks.java:26) at zombie.util.Lambda.capture(Lambda.java:130) at zombie.core.profiling.AbstractPerformanceProfileProbe.invokeAndMeasure(AbstractPerformanceProfileProbe.java:81) at zombie.characters.IsoGameCharacter.update(IsoGameCharacter.java:9355) at zombie.characters.IsoPlayer.updateInternal1(IsoPlayer.java:1864) at zombie.util.lambda.Invokers$Params1$CallbackStackItem.run(Invokers.java:37) at zombie.core.profiling.AbstractPerformanceProfileProbe.invokeAndMeasure(AbstractPerformanceProfileProbe.java:71) at zombie.core.profiling.AbstractPerformanceProfileProbe.lambda$invokeAndMeasure$0(AbstractPerformanceProfileProbe.java:83) at zombie.util.lambda.Stacks$Params3$CallbackStackItem.invoke(Stacks.java:230) at zombie.util.lambda.Stacks$GenericStack.invokeAndRelease(Stacks.java:26) at zombie.util.Lambda.capture(Lambda.java:130) at zombie.core.profiling.AbstractPerformanceProfileProbe.invokeAndMeasure(AbstractPerformanceProfileProbe.java:81) at zombie.characters.IsoPlayer.update(IsoPlayer.java:1850) at zombie.MovingObjectUpdateSchedulerUpdateBucket.update(MovingObjectUpdateSchedulerUpdateBucket.java:69) at zombie.MovingObjectUpdateScheduler.update(MovingObjectUpdateScheduler.java:132) at zombie.iso.IsoCell.ProcessObjects(IsoCell.java:2862) at zombie.iso.IsoCell.updateInternal(IsoCell.java:5626) at zombie.util.lambda.Invokers$Params1$CallbackStackItem.run(Invokers.java:37) at zombie.core.profiling.AbstractPerformanceProfileProbe.invokeAndMeasure(AbstractPerformanceProfileProbe.java:71) at zombie.core.profiling.AbstractPerformanceProfileProbe.lambda$invokeAndMeasure$0(AbstractPerformanceProfileProbe.java:83) at zombie.util.lambda.Stacks$Params3$CallbackStackItem.invoke(Stacks.java:230) at zombie.util.lambda.Stacks$GenericStack.invokeAndRelease(Stacks.java:26) at zombie.util.Lambda.capture(Lambda.java:130) at zombie.core.profiling.AbstractPerformanceProfileProbe.invokeAndMeasure(AbstractPerformanceProfileProbe.java:81) at zombie.iso.IsoCell.update(IsoCell.java:5572) at zombie.iso.IsoWorld.updateInternal(IsoWorld.java:3169) at zombie.util.lambda.Invokers$Params1$CallbackStackItem.run(Invokers.java:37) at zombie.core.profiling.AbstractPerformanceProfileProbe.invokeAndMeasure(AbstractPerformanceProfileProbe.java:71) at zombie.core.profiling.AbstractPerformanceProfileProbe.lambda$invokeAndMeasure$0(AbstractPerformanceProfileProbe.java:83) at zombie.util.lambda.Stacks$Params3$CallbackStackItem.invoke(Stacks.java:230) at zombie.util.lambda.Stacks$GenericStack.invokeAndRelease(Stacks.java:26) at zombie.util.Lambda.capture(Lambda.java:130) at zombie.core.profiling.AbstractPerformanceProfileProbe.invokeAndMeasure(AbstractPerformanceProfileProbe.java:81) at zombie.iso.IsoWorld.update(IsoWorld.java:3107) at zombie.gameStates.IngameState.updateInternal(IngameState.java:1612) at zombie.gameStates.IngameState.update(IngameState.java:1319) at zombie.gameStates.GameStateMachine.update(GameStateMachine.java:101) at zombie.GameWindow.logic(GameWindow.java:281) at zombie.core.profiling.AbstractPerformanceProfileProbe.invokeAndMeasure(AbstractPerformanceProfileProbe.java:71) at zombie.GameWindow.frameStep(GameWindow.java:722) at zombie.GameWindow.run_ez(GameWindow.java:624) at zombie.GameWindow.mainThread(GameWindow.java:467) at java.base/java.lang.Thread.run(Unknown Source) LOG : General , 1627087904435> ----------------------------------------- STACK TRACE ----------------------------------------- function: start -- file: ISMoveablesAction.lua line # 51 It isnt game breaking - it just gives one red error on the right bottom and then game continues to work properly (and Wooden Cross is disassembled properly). Very random error, so ive thought it is worth mentioning.
-

Build 41.52 - "CrateFarming" missing in procedural list
nheve replied to nheve's topic in Bug Reports
Missing procedural distribution was restored with the new hotfix, and this topic can be locked. Thanks for the fix! -
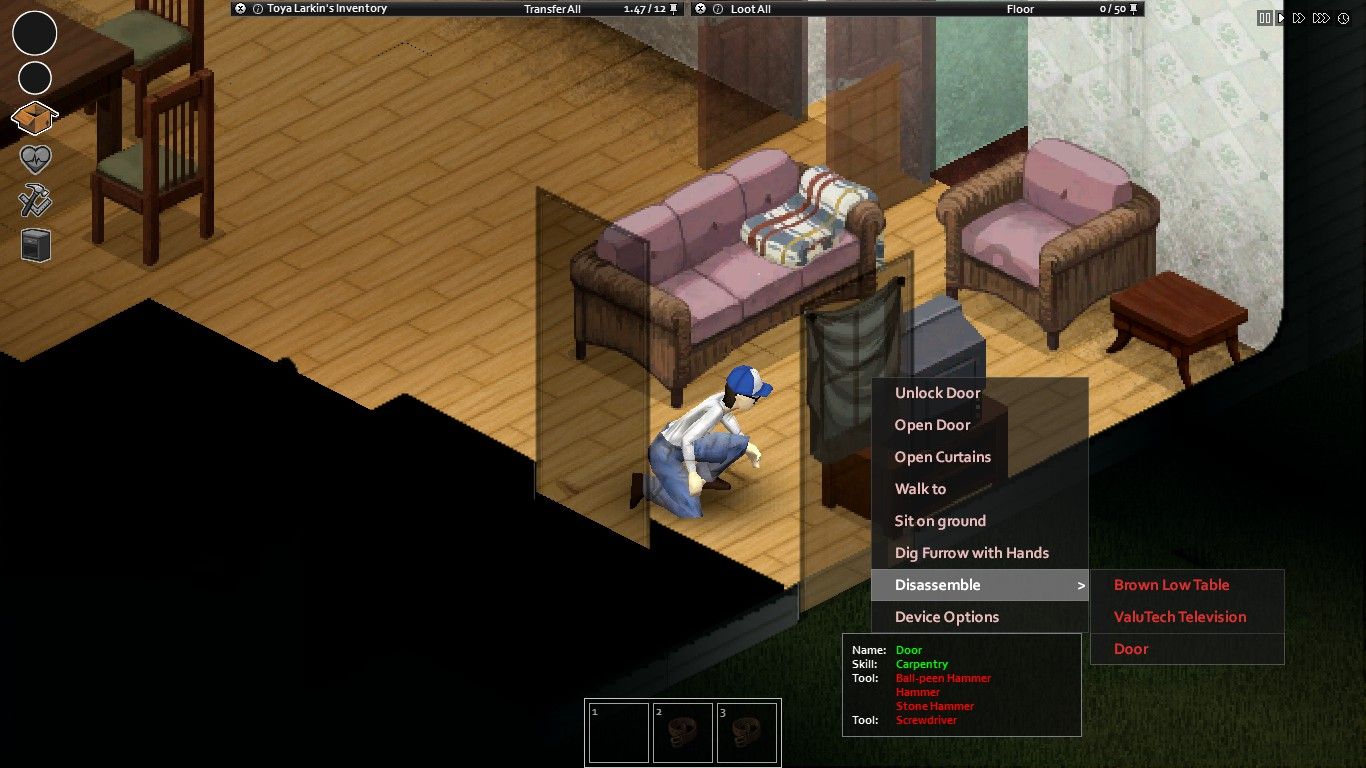
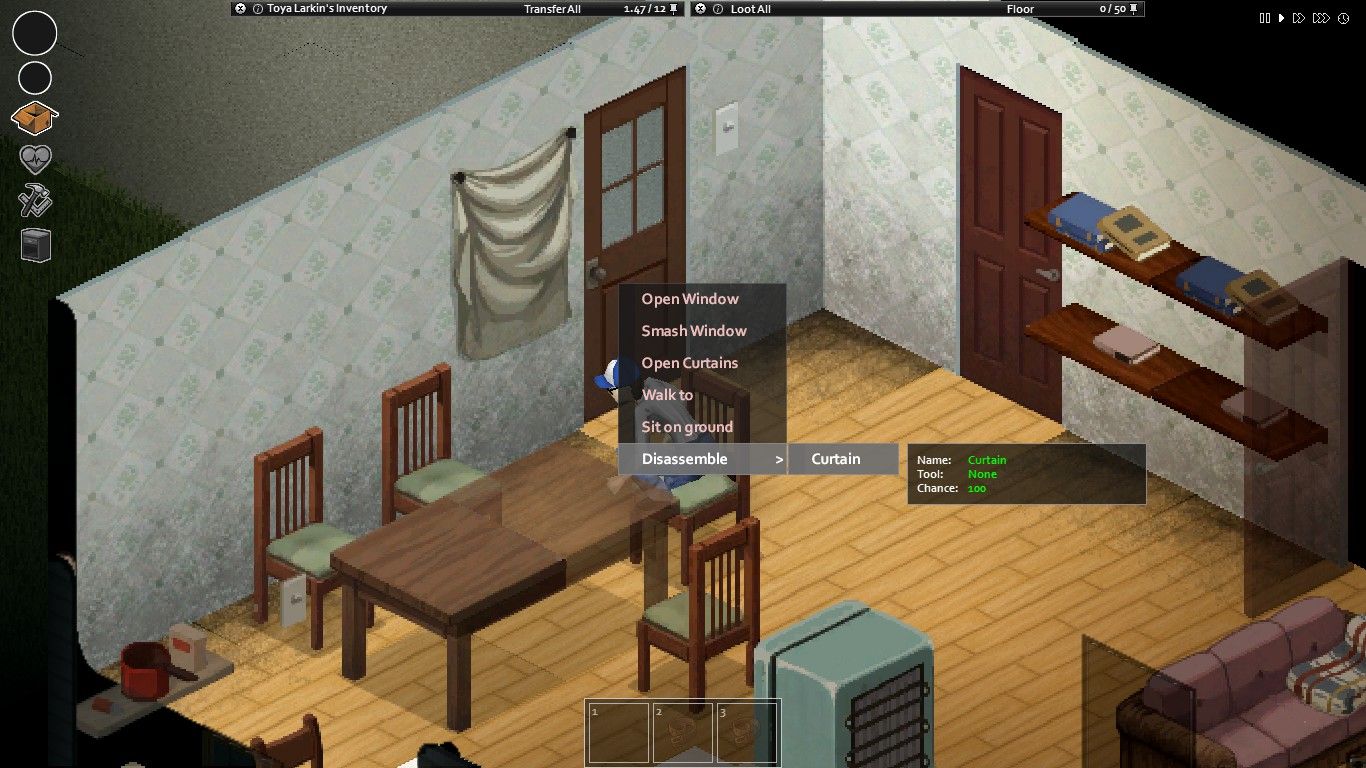
Hello. Ive noticed that in the newest update something is still a bit weird in how the Sheets behaves, and how our character can interact with them. Yes, as the update notes said - you can now disassemble the curtains to get Ripped Sheets material (though shouldnt it be more than just 1? or maybe just whole Sheets item, as in previous builds). The problem is, that when you try to disassemble the Sheet (not the Curtain) from your door - you cant do that. But when you try to disassemble Sheet from window - it works properly. Seems like the doors are just missing this behavior? Also, another weird behavior of Sheet is that you cant pick them up (both from window and doors), with pick up option - like you can now pick up the other Curtains. So basically, when you placed your Sheet on the door or window - its stuck there without possibility to disassemble it or move it. Heres some screens in case: Please look up into it, developers, whenever it will be possible for you. Thank you for the great work with new updates, and still working on the game. It generally feels like the critique, that you sometimes receive, isnt really deserved. And its sad to see that sometimes people dont want to acknowledge, how much the game changed (for the better) over the years - and how much work was needed to achieve this effect. Lets respect each other, and how the opening text ingame says - 'dont get mad, get involved. let us know on our forums...'. Thanks, and wish you all nice day.

-
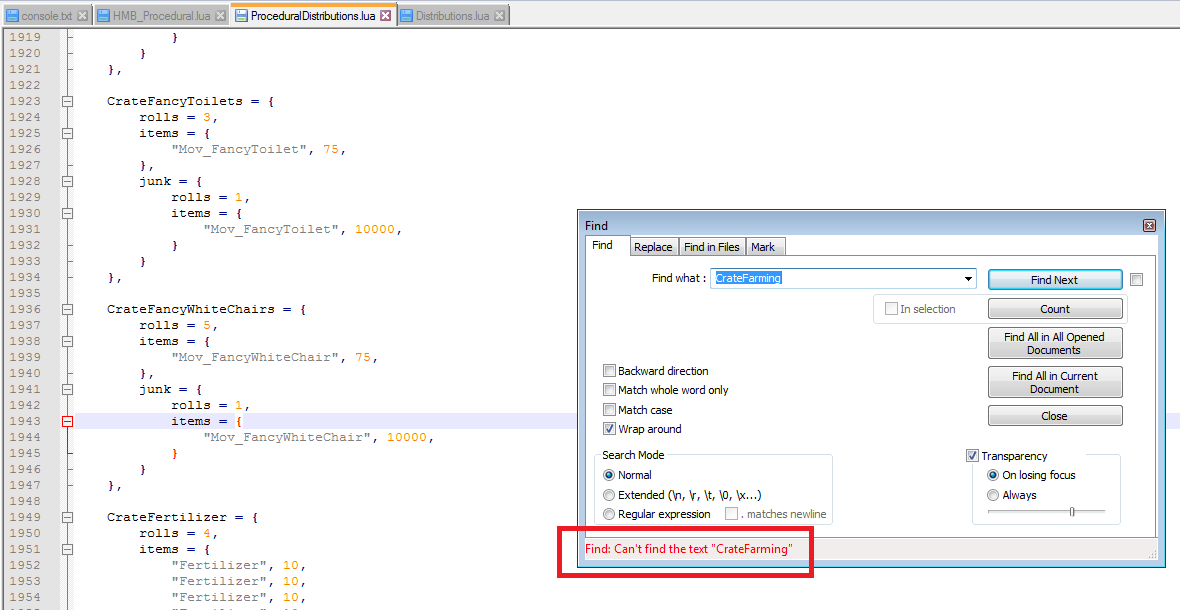
Hello. Ive been updating my mod to newest build, and ive noticed one error appearing in it. It seems like the "CrateFarming" section disappeared from the "ProceduralDistributions.lua" file. Its okay and understandable if its been made intentional - but in the "Distributions.lua" file some loot tables are still referring to the missing CrateFarming procedural table - so the error in game appears. Heres additional screens showing the issue: Console output: Procedural list file in my mod, with the line from console pointing to the "CrateFarming": Vanilla ProceduralDistributions.lua file - CrateFarming cant be found.
-
Cedric is right - you can pick up curtain, but you cant pick up the sheet back, that you've put on your window. Its like the game doesnt see it, when using pick up mode. Also ive noticed that it isnt possible to place curtains on the door - and it happens with both long and short curtains. You can only place sheets on doors - but then its the same like with windows, you cant pick your sheets back. Hope it could be fixed, thanks! Besides of that - great work with the update!
-
Thats great, it solves everything. Thanks a lot for the solution Nebula!
-
Hello. Do anyone know how to add tag, for example "Build 41", onto the Steam Workshop mod page? Adding tags to line 'tags' in Workshop.txt file doesnt seems to be working. Would be great if someone could share the solution. The answer isnt visible anywhere, and it could be very helpful for modders in labeling specific mod, either for Build 40 or Build 41 on steam. Thanks.
-
Hey Veyron. If not sure if you are aware of this feature, but when you will open your windows while being in car - you will be able to use right click to look further ahead, like it is working on foot. But still when you will try to look further while being in car - the car will stop immediately. So you still cant do both driving and looking further simultaneously. Maybe someone would be able to make some mod which would allow to do that? Would be cool, if it is possible. Also make sure to check further zoom values in the game settings. I think by default few of them are unchecked.
-
Blender template for creating custom Project Zomboid Tiles Hello. Recently been experimenting with creating custom tiles for Project Zomboid, and tried to create some model for it in the Blender software. So ive decided to prepare and share some instructions/template for people who would want to create their models/furniture in blender - but they are still a bit confused how to start with it, to fit with the default PZ dimensions. Heres project file for Blender (currently 2.92.0 version), which contains a basic workspace for creating Project Zomboid tilesets in 3D environment. Download: https://drive.google.com/drive/folders/1B_wVyOKwibm3PxI6-ZQsP_hgV0U3OQGi?usp=sharing Camera angle is set up to fit properly the isometric view of tiles used in PZ (you can see camera view by pressing Numpad0 key). Also theres included additional ‘helper grid’ (just an image reference) to keep track of proper size for the model (this grid is only visible in the camera view). Ive included also an example of bookshelves modeled by me - with base texture, normal map and specular map - also with two lights to create shadows and give an additional effect of accent to the final render. These maps are optional, but they helps in adding more depth to your model. You can also change or remove (or add more) the lights, but its generally good to have at least one light in scene. Important note - to fit into general style of tiles ingame, remember to set up lighting affecting your models in a similar style as it is visible on original tiles. To help you with understanding the lighting style of tiles in PZ, ive prepared some quick helper images below: In blender project, ive also enabled Ambient Oclussion option in the scene properties, as well with Bloom effect for making the render looks more soft and smooth for the eye. These options can be adjusted and disabled as well. The process of creating a model can be a bit complicated and overwhelming at beginning, so before using this template - make sure to look up the basics of modeling, creating uv map and texturing in blender. Personally i would recommend learning from the “Blender Guru” channel (made by Andrew Price). He’s got very good tutorials especially for beginners, with a calm pace of narration through it, while explaining each step in details. General steps for creating your model are as below: 1) Start modeling the shape of your object/furniture. There are many different methods how to do it, and its good to look up for tutorials and find the method best fitting for yourself. Example: Here 2) When you will have a finished model, you need to unwrap your mesh to UV Map. By default it is made by selecting all faces of your mesh in edit mode (with A key, or manually) - and then pressing U key, and choosing one of the options to unwrap it into UV map. Theres few ways to do that as well - if your model isnt very complicated and detailed, i think simple and practical way is just to use Smart UV Project option, and then setting some small value for the Island Margin (so you can edit easily each face of the mesh in UV map later). Heres another video which may explain you more about unwraping the mesh (and also marking seams, which allows you to manually project your mesh in parts): Link 3) Once you have your model and UV map prepared, you need to find or create some textures. Please keep in mind that not everyone is okay with using their textures by someone else - but you should be able to find some nice, free textures for non-commercial projects (or commercial if its needed). Texture ive used in the template, i found on this site: https://freestocktextures.com/texture/ The authors of these photos give you license to use the textures for free in both commercial and non-commercial way - also with possibility to modify the texture as you would want to (which i did, making the texture a lot darker). 4) With prepared texture, you need to create new material for you model, and apply the texture to it. You can do it by going to the node view (in Shading tab), and adding Image Texture Node, choosing your texture in it, and finally linking it to the Output Node. Once you have your texture linked, you can go to the UV Editing tab on the top, where you will be able to see two viewports - uv mesh editor on the left, and 3d view on the right. Hover your mouse cursor on the view on right side, make sure to change mode to Edit mode, and then press Z key, and choose Rendered view, to see your render (with applied texture) in the real time (thanks to new Eevee render engine in blender). Now you can select different faces of your mesh in this viewport, and with each select you will see in the left viewport a highlighted face projected from our mesh. Use this UV Editor to adjust your uv map (change shape or scale), to make sure texture appears properly on your model. 5) All necessary steps are completed. You can also add the normal map and specular map to give your model more depth. This can be done as well with the nodes in the Shading tab. You can look up the basic example in the template, in the same node view. Making normal maps and specular maps can be done in a few ways as well. But for this tutorial - you can find online free tools which would help you generate those maps, based on the base texture. Theres also a way to generate normal maps in Krita (as well like in Gimp or Photoshop), by using proper filter. 6) Remember to add some light to your scene, its nice to have at least a subtle one. You can also change the overall world lighting in the World properties/Surface. How to use a template Simply open the project in blender, and start by hiding the bookshelves model (make it visible when you will need a reference, you can remove it later). Do it, by hiding not just model, but the individual collections (which are like layers in the graphics software) - like ive prepared in the project, as seen below: Notice also that theres four different collections of bookshelves models - two for the different sides in front view, and two for the different sides in back view. Also each of them is placed in the slightly different position - it is intentional to make the same light effect on them, but with light covering them accordingly from proper side (and fitting to the original PZ lighting style), in the final render (so you need to render and save them separately - just check current collection, and uncheck the rest). The lighting setup ive prepared in the project isnt perfect and ideal, but should work properly with your models, and for the most important - it should fit the original style. Dont be afraid to experiment with setting different lighting - and changing its shape, power, or even colors. Theres helper grid of original isometric tiles from project zomboid, which appears only in the Ortographic view in the camera (access camera view by Numpad0 key). You can use it when you are done with final model, to align the model/furniture as it would appear in the TileZed editor - to make sure, for example, if it fits on the one or more isometric tiles. The angles for the camera in blender, to work with the isometric view of PZ, are set up as below: Orthographic Scale is set to 10. To fit the original tiles size it should be on 20, but we are using 10, because (in my opinion) as you will see later - it will help us create better, clean effect (instead of blurry) in the final render and exporting to tileset. When you are happy with look of your model, render it and save as image (separately for all front and back sides). Also useful tip: To prepare back view of your model - simply duplicate your model, select it, and then just press S (scale) key, and then X (x axis), and finally write -1 and press Enter key to accept. This will rotate the object in the opposite direction, exposing its back properly to the camera view (remember to place it in the proper position, having in mind the style of covering lighting). Also one more useful tip: To change a model to appear in different sides (front or back), in the eyes of your camera, as in the template project - you can select your model, duplicate it, and then press R (rotate) key, then press Z key (z axis), write number 90, then press minus (“-”) key (to make value as negative 90), and finally press enter to accept it. This will rotate your model accordingly in 90°. You can repeat the same process, but without using minus, to rotate model in opposite direction. Now we will add our rendered images to the tileset. To do that, find the image of one of the tilesets for Project Zomboid, which are available here: For this tutorial we will use “furniture_shelving_01” tileset image. Open it in your favorite graphics editor/software (in my case Krita). Then in the next tab open one of the rendered images. Change the scale of the whole image of your rendered model (should be in 1920x1080 resolution), by dividing original value by 2 - and choosing Scaling method as: Nearest Neighbour (or as Closest, or Pixel Perfect, in different software). Now you should have your image in 960x540 resolution. Select and copy your rescaled image, and go back to the “furniture_shelving_01” tileset, and paste your image there on new layer. After this, try to line up layer of your new tile on top of the original one (in this case bookshelves), having the original one below your new one , and then select and delete the original tile from the first layer, leaving only your tile in the place. This way you should achieve effect as below: As you can see, we got our new tile in a crispy (as Popeyes Chicken) look, instead of anti-aliased or too blurry - if we would set our previous value already as 20 in render settings in blender. This way the new tile got more pixel-like look, and (at least in my personal view) more fitting to the original PZ style. Thats all for this tutorial. Thank you for reading this - hope it could help someone. Good luck and have fun with creating your own tiles - nheve