We’ve had a few people contact us for specifics on the process we’re using to translate the 3D source models for Zomboid into 2D sprites. So I thought it’d be a good thing to go into here.
The Goal
The result we’re striving for is all the advantages of being 3D (ease of creating animations in all directions, simplicity in terms of adding new costumes, hair, accessories, props, etc) without the look straying too far from our original hand-drawn sprite look.
The Process
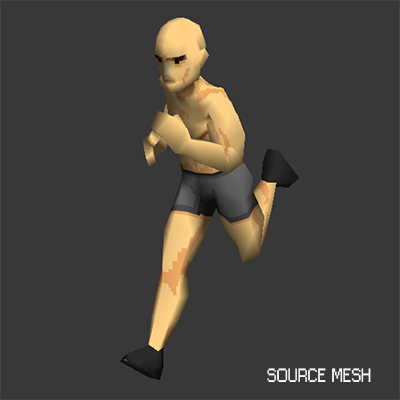
The models are built and animated in 3D, and were we just to render the frames directly, they’d look something like this:
…which is not particularly great. Even shrunk down to the size it would appear in-game, it would obviously be a 3D model and stick out like a sore-thumb. So what we have, then, is a two-stage process.
Firstly, we render the model to a render target that’s twice the size that it would need to be in-game. We apply a shader which applies some basic lighting (using hard edge, cartoon-style lighting) and uses Point sampling to preserve the crispness of the source texture.
We then render the contents of our double-sized render target to a game-resolution quad and apply a second shader process. During this stage, we allow anti-aliasing (we’re basically doing super-sampling here, since our source is twice the resolution of the destination) and then in the shader we clean up the image data.
The cleanup involves several layers of quantizing.
First, we ‘snap’ the colour value to the closest available colour in the source palette (the palette is passed in as a parameter to the shader, and is calculated once per model processed).
Next, we quantize the intensity (the length of the colour vector) to one of 5 possible values (0.0, 0.25, 0.5, 0.75, 1.0)
Then we quantize the pixel alpha to one of 3 possible values (0.0, 0.5, 1.0)
Finally, the colour is re-constituted from those parts, and spat out of the shader.
It’s a little difficult to show a fair comparison between the first version of this system and the current system, because a few things have changed with the source (an obvious example being that hair is now a separate overlay rather than being drawn onto the texture), but this should give a reasonable idea:
While there’s definitely a ‘personal preference’ aspect to which you prefer (and the new system is still work-in-progress at this stage), the new sprites are considerably cleaner, and much more closely match the original sprites.
There’s still work to be done in terms of finding that ideal sweet-spot for the lighting which will help add definition needed particularly on the side-on frame.
But one of the tremendous advantages of the new system is the speed that we’re able to convert the 3D data to sprites. Almost all the work of the process is now done on the graphics card, which means you can spit out all the frames for all the animations in all directions for one model in a matter of seconds. Beforehand, the process would be something we would leave running overnight.


Looks good. Keep up the good work i really want to see this game go somewhere. It has a ton of potential.